Which white balance settings should I use?
That’s a question that baffles photographers who are just starting out with digital photography.
You have a few options in setting the WB on your camera:
- Shoot in auto white balance (AWB), trusting your camera nails it.
- Set your camera to one of the preset WB settings, such as Daylight, Cloudy or Incandescent. And then hope your camera’s preset is close to the correct WB.
- Do custom white balance readings and save it as you encounter and work in new situations. These custom white balance readings can be done with all kinds of white balance cards and discs.
These all work … usually. However, what we need to understand is that quite often, there is no ‘correct’ white balance setting. What we are after is a pleasant white balance.
There is another option – shoot in the RAW format. Then most of the stress dissipates about getting the WB correct while taking the photos.
Now, it can be said that it is easier to achieve a pleasant WB when we have a correct WB, and work it from there.
This discussion here doesn’t take into account the need for some photographers, such as commercial photographers and product photographers, to have very precise control over the color balance of the lights they are using. For our discussion here, we’re considering general photography and on-location photography and such.
My approach is a fairly simplistic one. I mostly use the preset WB settings on my camera, guessing the approximate WB of the scenario I am shooting in. Then in post-processing of the RAW file, I look at the image on a calibrated display, and adjust it to my liking. Now, it does count to my advantage that we have a fairly wide latitude as to what our eye and brain accept as a good color balance.
About the need to shoot in RAW
Some photographers might need the speed and efficiency of an out-of-camera JPG – for example, event photographers who need to print images on location. For the vast majority of photography, we have a real need for the latitude that a RAW file offers. Here’s the thing – there is simply no photographer on this Earth that is good enough to be able to set correct Exposure, Contrast, Saturation and White Balance for every possible scenario we’ll encounter on location. Some settings such as Black Point, Local Contrast and such, aren’t even settings we can change in-camera. All of this implies that we will very likely have to do some kind of post-processing of our files for better image quality. And then we might as well just shoot in RAW and allow ourselves greater flexibility.
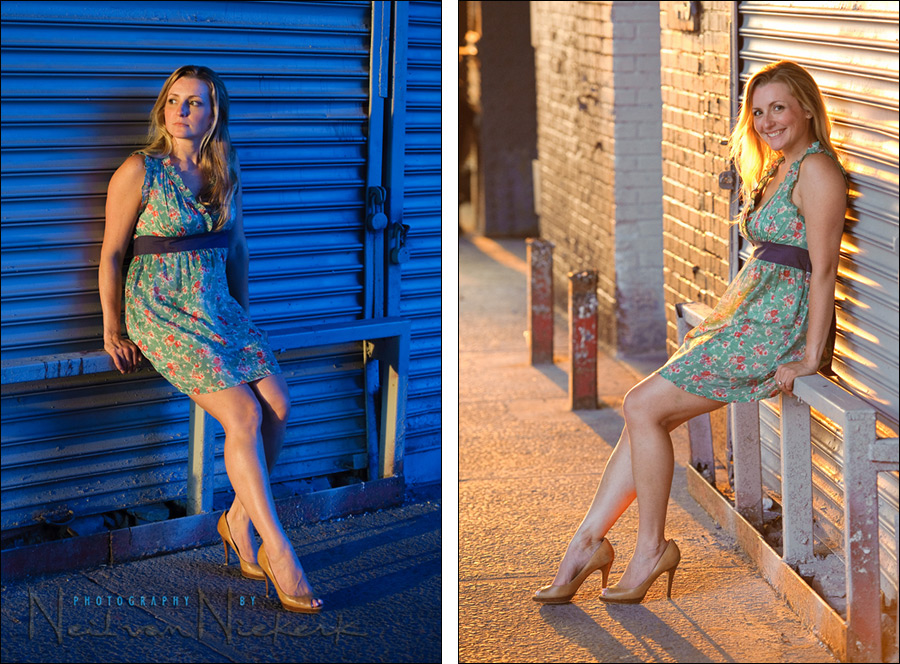
Enough of the lecture about RAW; let’s go back to the two images at the top:
I photographed Kristy and Tom for their engagement photo session. In setting up this shot, I had her sit on this metal barrier. The light was the golden glow from the setting sun in the early evening. So part of the scene is lit by a very warm colored light, and part of the scene is in shade. I only used the available light; no flash or additional lighting. How did I set my WB for these two photos? I didn’t. I just kept it to Daylight WB, and adjusted it to taste in post-processing of the RAW file.
In the first image, Kristy was looking towards the light, and hence her body is basking in that golden light … which I then reduced to a more normal looking warm light in post-production. The shaded areas behind her now go to that very cold looking blue color.
For the second image, the way her body is facing me, she is mostly shaded. In correcting that side of her body to a pleasant WB, the rest of the scene is now jacked to very warm tones.
So, for this scenario, which is the correct white balance? I’d say that neither is ‘correct’ in the sense that there has to be a correct WB. Alternately, I could answer that the correct WB is the one that appeals to me for my subject, in each specific image . In other words, correct white balance is a pleasant white balance, adjusted to taste. (As an aside, the first image was adjusted to 2700K, and the second to 5200K, in ACR / Lightroom.)
My shooting workflow
1) My cameras are set to the closest appropriate WB setting, whether Daylight, Cloudy, etc.
2) I shoot in RAW.
3) With a RAW work-flow, it is no effort afterward to change the WB setting on multiple images.
4) A calibrated monitor gives me a neutral reference point.
There – it is as simple as that.
I try to get it as close as possible, but without stressing it.
Then I finesse it in post-processing.
There is no single white balance setting that will cover every situation
To anyone who is searching for a magical short-cut .. a single white balance setting that will give great results no matter what lighting conditions prevail .. please read that again.
Specific white balance settings are often recommended on the internet forums- and these may work very well under some lighting conditions but there simply isn’t a cure-all. Anyone who slavishly use a specific WB setting for every situation, will soon enough run into the limitations of not adjusting your camera’s white balance setting to match the lighting conditions.
Sticking to only one white balance setting is self-defeating.
The different white balance settings are there for a reason – lighting conditions change.
Even though the WB can be changed at will if you shoot in the RAW format, it usually makes for an easier post-processing workflow to get the WB correct (or close enough), during the actual time of taking the photograph.
Getting it right in camera … or at least as close as possible
Even though it is easy enough to correct WB in a good RAW workflow, it is still faster if I have a fairly consistent WB with sequences of images. It makes for a faster workflow if I have an idea if a group of images need adjustment. Therefore I still try to get a pleasant White Balance, but without stressing if I can’t accurately nail it during the shoot.
Auto white balance (Auto WB)
I don’t often use Auto White Balance – it isn’t always consistent. Auto White Balance can only ‘guess’ at what is put in front of it. An example: If you were to photograph an autumn scene with a lot of reds & orange & yellows, then the auto white balance will try and reduce the warm tones to some kind of average balance .. and you will lose all the lovely autumn tones. Also, with overcast light, Auto WB tends towards too blue, and tungsten is usually rendered too warm.
Even though I shoot in RAW, and changing the WB for any image is a simple matter, shooting with Auto WB does make my raw work-flow a touch slower. The reason for this is that the speed of a solid raw work-flow depends on editing multiple images at the same time. If you use Auto WB, then the WB between similar images could appear different – and this would make it less easy to see which images need to be edited together.
If you keep to a consistent white balance, then it is a much simpler task to correct for a series of photographs by the same amount, since any WB error would then be consistent.
Therefore, I still like to use the Preset WB options:
Preset white balance settings
Incandescent
The Incandescent WB immediately gives good results, but since Incandescent / Tungsten light varies a lot in actual Kelvin settings, I often get better results by changing to 2800 Kelvin (or thereabouts.) I try a test shot or two to check on my LCD which White Balance setting looks the best.
Fluorescent
This WB setting is a very good compromise. However, it won’t give the best results with every venue that uses fluorescent lights, since fluorescent lights give widely differing color casts. You’d do well to check your LCD to see if you need to adjust the Fluorescent setting slightly warmer or colder.
Also take note that if you use a shutter speed higher than around 1/60th, you’re likely to get different color casts with repeated shots. This is due to the rate at which fluorescent lights flicker.
Daylight / Sunlight
This gives good neutral tones under most sunlit conditions. If you do need the photographs to look warmer on your Nikon D-SLR, fine-tune this WB by dialing in -1 or -2. (Daylight-2 is the same as the default Flash WB, according to the D100 manual.) If you need your photos to appear warmer with your Canon D-SLR, dial in more Amber with the WB shift option.
Flash
This setting gives a really good WB when I use my Speedlights in a direct way. However, I most often use my flash in a bounce position and then the light picks up different color casts, depending on the surface I bounced the flash off. Since walls and ceilings are most often a warm tone, using Flash WB makes the image far too warm.
However, when I use my Quantum or other studio strobes, there is a slight red cast if the WB was set to Flash. I then use the WB setting, (and further fine-tune the WB in my raw processing.) The reason is that these strobes are already color balanced to give a flash output closer to daylight.
Cloudy
When I do use Cloudy WB, I use Cloudy-1 on my Nikon D-SLRs as my default, since I like the extra bit of warmth when shooting under overcast conditions. With my Canon D-SLRs, I dial in more Amber, usually +1 Amber.
Kelvin settings
As mentioned previously, since since Incandescent / Tungsten light varies a lot in actual color temperature, I often get better results by changing to 2800 Kelvin (or thereabouts.)
White Balance Presets
Preset White Balance gives the photographer the opportunity to set proper white balance under difficult lighting conditions .. such as where there is a mix of different light sources like fluorescent together with tungsten.
Setting the Preset WB is a simple enough task. Check your manual for specifics.
However, I don’t use the Preset WB function. The reason for this is that since I most often use bounce flash, I frequently get a color cast. For me, it is simpler correcting this in my raw work flow, than driving myself crazy on a shoot trying to continually get a correct WB at the time.
Related articles
- Using interesting available light & white balance options
- RAW vs JPG – the final discussion
- So I shot in RAW format, now what?
- Exposure metering
Hi Mr. Neil,
In my first days of shooting with my Nikon D90, I’ve been introduced to the option of choosing Kelvin settings for the WB. Ever since, I’ve been using this kind of setting. I couldn’t help but to wonder though, if this a good (or even better) way of tweaking the white balance, or am I missing something that WB presets could only give?
Thank you for sharing your thoughts! :)
I do use the Kelvin settings at times, and usually when I gel my flash for Tungsten.
Using the Kelvin settings exclusively could work, but you still end up playing a guessing game anyway, unless you use a color temperature meter. So you’d most likely end up tweaking the files anyway.
Thant must have been a great sunset.
The second photo is wonderful as usual however I keep looking at the first.
The fact that you got such a contrast with all natural light is amazing.
Usually, a flash with a warming gel is what I usually need to get that golden/blue contrast, but to do it will all ambient, just wow. Great eye Neil.
Aways enjoy your blog.
Great shots there, but there’s something that’s puzzling me about the first one… what source is casting the shadow directly behind her? Was there a reflecting building on the other side or something?
Thanks!
She is sitting close to the wall and that is causing the shading you see. The light that is bouncing in from all directions are partially blocked.
Hi Neil,
Great Shots! I wonder about the second one. She seems to be backlit – how did you get that light on her legs and face? Is that really natural light? It looks like fill to me.
It’s all purely the existing light. No flash; not even a reflector.
Hi Neil,
I like both photographs. What type of gel modifier would you use in order to match the flash color temperature with an outdoor scene in shade illuminated with blue sky? This summer I have faced this situation where I know that in order to photograph a subject in shade illuminated by a blue sky, I should use a color temperature around 8000 ?K. But I if need to use flash either to fill some shadows or as the main light source, I know that the flash color temperature does not match the ambient color temperate. Have you experimented with this types of conditions?
Thank you very much.
Nicolas
Nicolas .. I haven’t ever gelled the flash colder to match the available light. I would just use flash as it is. I wonder if the difference between gelling for 8000K (which is very cold), and not gelling, would make a significant difference in comparison.
“…there is simply no photographer on this Earth that is good enough to be able to set correct Exposure, Contrast, Saturation and White Balance…”
For this reason, I’ve been waiting for an excuse to put my hands on one of these:
https://www.datacolor.com/photography-design/product-overview/spydercube/
I don’t know what software you’re using, but in Aperture, my particular tool of choice, I can use an eye dropper to pick up WB from the middling grey off the cube, and ‘highlight hot’n’cold areas’ to have some default settings to ‘stamp’ onto other images with similar conditions.
For these modeling sessions where you’re using similar conditions with different poses, adding one more shot of the cube into a group of photos could really cut down on time spent eyeballing settings like these. It wouldn’t really work for conditions seen in wedding photography, but I could see where it would help: If you’re going on site before hand and only using cube photos as starting points for similar conditions (as I try to do), then there’s minutes more shaved off of post evaluation times.
What do you think of that little gem?
Dan .. it definitely makes sense to include a calibration chart or device in an initial shot. It would make post-processing easier. That certainly looks very nifty.
In a shoot like this though, I like to keep the tempo and energy going, so I wonder if stopping every so often to take a test shot of a chart or device won’t break the flow of the shoot.
I have the X-Rite color checker chart (passport), that I recently bought.
Neil,
Thanks for your response. I would like to experiment if making the flash colder to match the ambient light will make a difference.
Nicolas
I’m with you Neil – hate to break the flow of a shoot by introducing too many gadgets! If you get the exposure basically right and a good sharp focus, then you can do what ever you like in post-processing with the RAW files. You could end up ‘developing’ any number of pleasing images from just the one shot. Some people prefer their skin tones to appear warm, others do not – RAW processing & Photoshop give you the tools to please everyone’s tastes. Stacking differently processed layers in Photoshop and brushing back via layer masks gives you great control over background & foreground exposure and tone. It’s all part of the ‘art’ in today’s photography and great fun, if you have time to play!
Neil-
I’m new to flash. I was wondering if it was necessary to have the flash turned off to meter for the ambient light and then turn it on or if you just leave the speed light turned on all the time.
Thanks
Jonathan, I normally switch off the camera to meter for the ambient light when I use the camera’s built-in meter.
I bought this product which is useful in balancing the WB in post-production.
It comes in a portable wallet size, which I’ve been keeping in my camera holster or pants pocket.
As long as the lighting is consistent during your shoot and the WhiBal device exhibits no glare, you get a decent representation of middle-gray. You can do the calibration photo anytime, even after the session is done. This might be more difficult for sunrise or sunset shooting since the lighting will change over a shorter period of time.
If you shoot RAW, getting WB right in camera is a non-issue; adjusting it in LR/Aperture/whatever is absolutely, 100% the same as using a camera preset.
On my cameras, WB is set to “Auto”, and it never moves. I simply don’t see the point of setting it to anything else, when I’m going to edit the RAWs anyway.
Mike, it is easier for me to judge accurate exposure on the back of my camera if the WB is approximately correct. If it is wildly off, it becomes more difficult to see at a quick glance if exposure is good.
Also, for a faster workflow when working with a high volume of photos (eg, weddings), then it is easier if I don’t have to touch the WB at all.
I agree, Neil. Anything I can do to reduce the amount of PP work I need to do is welcome.
That said, I find that AWB generally gets me in the ballpark (I shoot Canon, and the only time AWB gets fooled is by tungsten…though to be honest, I don’t shoot that much under strictly tungsten illumination), so that the adjustments to WB in post are generally just made “to taste”, as you describe above, rather than correcting a massive WB problem. In the same vein, if you have many shots taken in the same light, you can generally just set a single WB setting and then copy that over to many files without issue.
Different strokes for different folks. I suppose the real take home message here is “Shoot RAW”, so you can at least have this discussion at all.
“Mike, it is easier for me to judge accurate exposure on the back of my camera if the WB is approximately correct. If it is wildly off, it becomes more difficult to see at a quick glance if exposure is good.”
Neil, I know this may be an article in itself, but how do YOU judge the exposure at a glance? Are you checking the histograms, and if so, what are you looking for in particular?
Regards,
Rick
It is difficult to make an accurate assessment of exposure by looking at the back of the camera in bright light. So for me it is most often just a quick check that I’m on the right track with my exposure.
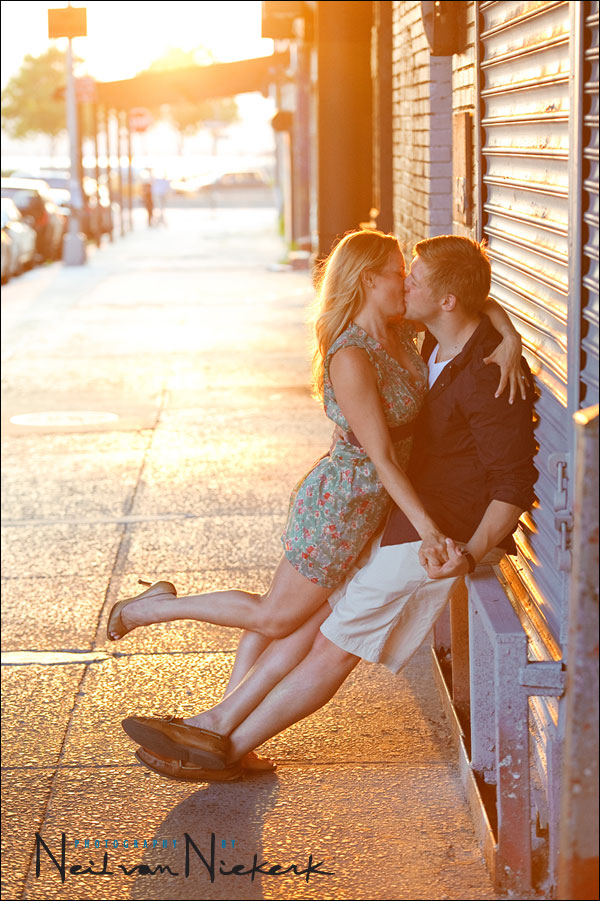
The histogram has to be used with more careful consideration, in my opinion. In a photo like the backlit image, the histogram would be meaningless because of the blown highlights in the background.
I do check the blinking highlights on the relevant part of my subject. If I get anything but the highlights around my subject, ie, the rim-lighting, blowing out with the blinking highlights, then I know I need to double check my exposure.
It’s usually a combination of exposure metering techniques.
Would you consider her hair “blown out” on the second image?
Mat, her hair is blown out there, but it doesn’t bother me. I would’ve preferred it to be just rim lighting, but I can live with it like it is there. I’m more concerned about good light on her face. Also, your clients are very very unlikely to ever notice this … just Photographers do, In that sense, this image, for me, is successful despite what might be seen as technically a problem.
Neil,
Thank you for the comment regarding fluorescent lighting and using a shutter speed of 1/60 or slower. I do weddings in churches where there is fluorescent in the seated section, tungsten floods over the stage and natural light fron the windows.
Yes, I shoot RAW but because I use a shutter speed of around 1/100, the colors are all over the place. I’ll take 3 or 4 bursts of the same scene and all 4 are different. Your advice will be used this Saturday, and as usual, i’m sure your advice will be stellar. Thank you for this tremendous resource.
James Toal, CT
Neil – do you ever use an Expo Disc for white balance? If so, how. If not, why?
Thanks,
Rob
Hi there Rob.
Using an Expo Disk or a Color Checker chart, or any other reference tool for WB, would make a lot of sense under a static scenario, such as studio photography. But in most of my work, I am moving around a lot, and bouncing flash behind me or to the side of me.
In doing this, the light picks up all kinds of different color .. which sounds like an Expo Disc would actually be an ideal solution to the WB problem. However, as I move around, the flash light is bouncing off different areas all the time – different parts of the walls and ceiling, and of different objects. Therefore the WB changes often.
So on location, instead of driving myself nuts taking custom WB readings, I just adjust the WB afterward as part of my general raw work-flow. Much simpler, imho.
Neil, thanks for your knowledge sharing here. It improves my photo knowledge a lot. it is better than reading from photography books. I like to learn from experienced photographer who can give you proved practical photography techniques.
I would like to share my experience of white balance adjustment setting. If you use Canon 5D mark 2 camera, you can use live view function, push WB button to select K mode and change K parameter until you get the color you want. The camera will show you the color of live view picture on your LCD while you are changing K parameter.
For Canon shooters.
The flash WB setting on Canon is a bit different that what appears to be for Nikon, is balanced for studio flash units (~6000K) rather than speedlites (5400K). Therefore it produces warmer tones when used with the latter.
For direct flash, daylight WB setting on Canon bodies will produce a neutral WB results.
Neil you mention that when you use your speedlites bouncing off walls you don’t use the Flash WB setting and adjust later in post processing. In this situation what WB setting would you dial into your camera?
James, Auto WB has been improved quite a bit since Neil had posted this originally. RAW workflow also. I only change WB to a pre-defined setting (or custom balance) for conditions that warrant gel use or studio shots (which lately I haven’t done too many…)
Just my two cents…
James .. it depends on whether I have my flash gelled or not. Then I would have 3700K or there-abouts dialed in.
For indoor flash photography, where I bounce my flash and don’t use a gel, I usually work with either Daylight or Cloudy WB … whatever gives me the best look on the camera’s preview.
Ultimately, since you’re shooting in RAW, this decision has no real consequence.
Ok. If you are shooting in incandescent light with a bounce flash. What kelvin number should I use ?
My usual default gel when shooting in an Incandescently lit environment, I gel my flash with a 1/2 CTS gel.
Therefore my WB is usually set to around 2370K … but I do finesse the WB as part of my usual workflow.
Here is more about using flash with incandescent light.