Image size & Resolution – 72dpi or 300dpi
I live 20 miles at 65mph outside New York. Yes, that sentence is pure nonsense. I live 20 miles outside of New York. That’s it. The complete description of the distance. Now that 20 miles of course could mean either 30 minutes or 3 hours of driving, depending on traffic through the Lincoln tunnel. But I digress.
I could have described my distance from my house to New York as 20 miles, or disregarding traffic, as 18 minutes at 65mph. But it is nonsensical to describe my distance from New York as 20 miles at 65 mph. The 65mph becomes a superfluous bit of data when stated like that.
So why the strange title for this posting? Because as a digital photographer I see the same kind of nonsense perpetrated on a daily basis when image size is described in terms of absolute pixel dimensions (600 x 400 pixels) and a specific dpi such as 72dpi or 300 dpi also demanded. It is unnecessary, or worse, confusing.
The math is actually very simple – don’t be daunted
I am sure everyone has seen image size requested as 600 x 400 pixels at 72 dpi. Or 300 dpi. When an image is described as 600×400 pixels, then the dpi (or ppi) value is of no consequence. It means nothing. It has become the superfluous 65mph description. Since the actual image size is already described in very specific terms, (600 x 400 pixels), there is nothing else to add. That’s the size – the pixel dimension – 600 pixels by 400 pixels. We’re done. No dpi or ppi value needed.
Where the dpi (or ppi) value comes in, is in describing how large the image will be printed. But before we get there … people use dpi (dots per inch) when they mean to say ppi (pixels per inch). Dots per inch (dpi) is mostly a legacy term to describe how printers resolve detail. How many dots per inch it can print. It is largely meaningless to us as digital photographers. ppi however, will describe how large the image will be printed at the current ppi setting. But the terms ppi and dpi are often used to mean the same thing. So it has to be read in context.
There are numerous articles about this on the internet, and a quick search will bring them up. Here’s a start.. And even more. There are so many articles on the subject that this posting hardly seems necessary, but it grates me when so many digital photographers clearly don’t understand something as basic as image size and resolution.
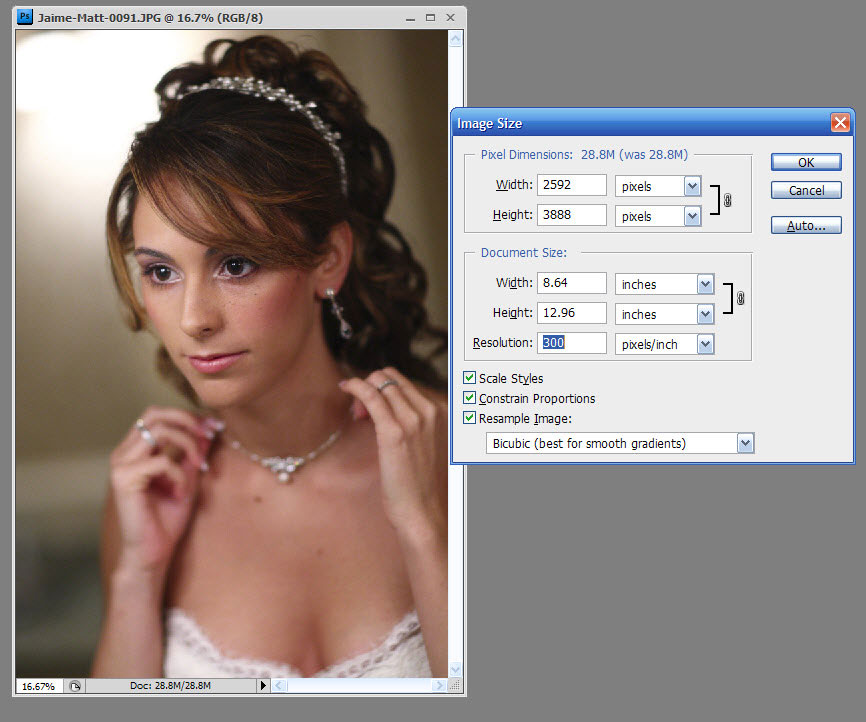
Let’s look at an actual image opened up in Photoshop, with the Image >> Size dialog box open:
.
Looking just at the dialog box, the pixel dimension of this particular image is 2592 x 3888 pixels straight from the camera. If we do some quick math, 3888 / 2592 = 1.5 and this means that the aspect ratio of this image is 3:2 which is the usual aspect ratio for 35mm film cameras and most D-SLRs. This ratio of 3:2 also means that the image can be printed as 6×4 without cropping any part of it. You will have to resize it, but not crop it. But 8×10 or 5×7 which are different aspect ratios, will need cropping.
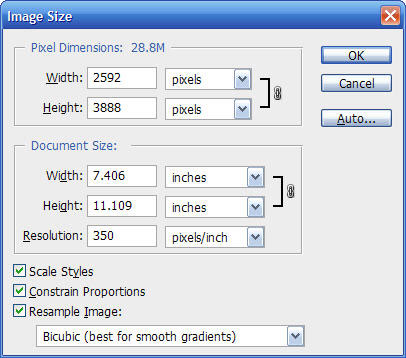
Still looking at the same dialog box as it opens to the default – if I wanted to use 350 pixels per inch, and I have 3888 pixels on the longest side, then simple math with a calculator tells us we can get an image 3888 / 350 = 11.109 inches wide. And there it is … the dialog box already did the math for us. We have an image that will print as 11 x 7.4 inches at 350 pixels per inch, if we don’t resize the image from the camera’s resolution.
The camera in this case was the Canon 1D mk3, and the specs say it is a 10 megapixel camera. If we look at the resolution, 2592 by 3888 and pull out the calculator again, we get 2592 x 3888 = 10,077,696 … and that is a touch over 10 megapixels – the resolution of our camera. Without resizing the file in Photoshop, that’s the pixel dimensions that the image will open up with. How large the image will print, as it is, depends on how many pixels per inch we want to use.
To change the size the image will print to, without changing the pixel dimensions, we can uncheck the ‘Resample Image’ button. That keeps the pixel dimension of the image static.
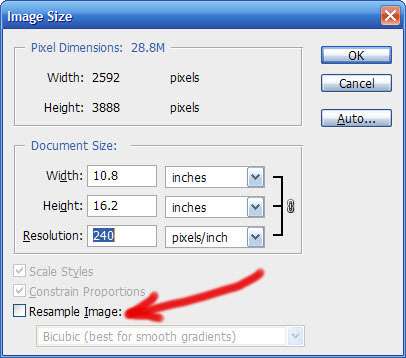
Doing so will allow us to change the size the image will be printed to (measured in inches) without affecting the basic resolution of the image as it came from the camera.
The next two screengrabs are where the ppi value was changed, and the pixel dimensions are then changed accordingly by Photoshop via resampling the image data. ie, the image is made larger or smaller.
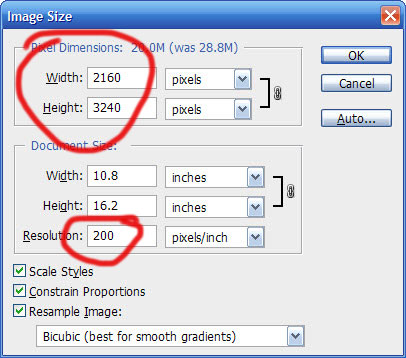
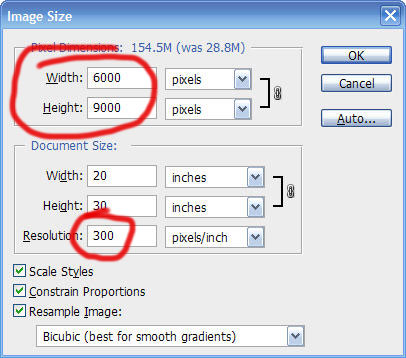
The numerical values in this screengrab should be easy to understand. If I want an image that is 20×30 inches, and I want / need the resolution to be 300 ppi, then the basic math tells us that we’d need 20×300 = 6000 pixels along the one side to have an image that size. Basic math and basic geometry with the aspect ratio.
In this instance, the ppi value makes sense … a certain ppi at a required size (in inches).
Describing the print size in this way makes sense. It is equivalent to traveling for 18 minutes at 65 mph. It is a description that contains useful info.
But when the image is described in pixel dimensions (eg 6000 x 9000 pixels), then the ppi doesn’t matter at all. The image size is described completely by just the pixel dimensions. (ie, I live 20 miles from New York.)
Related articles on Digital Imaging
- Which image resolution should you use – 72 dpi or 300 dpi?
- Photoshop tips – avoiding moiré when resizing
- RAW vs JPG – the final discussion
- Which white balance settings should I use?
- Full-frame vs Crop-sensor comparison : Depth-of-field & perspective
Amen! One thing I dont understand is the PPI box that Lightroom has when exporting images. What does it do? Is it just attaching a PPI valuie to the Metadata?
Here is another link describing how dpi (and ppi) does not apply if the image is for screen display only.
https://www.scantips.com/no72dpi.html.
This link is important because people who work with print images get the wrong idea when trying to put those mages on the web. For example, scanning a photograph into the computer and then telling someone to set that image at a certain dpi, which is meaningless for screen display.
You are right in almost every respect. Where you are wrong is when it comes to software that uses the embedded pixel resolution to determine how big to display an image. Such software will display an image embedded with 72 dpi very differently than the same image that has an embedded resolution of 300 dpi. Microsoft Office is a perfect example of where this comes to play. Try importing multiple copies of the same image with different embedded resolutions into MS Word or MS Powerpoint and see what happens.
This is indirectly the answer to Andrew Krakker’s question about the Lightroom export dialog. It asks for the resolution because every image has the resolution embedded into the metadata. For most software programs it really doesn’t matter what that resolution is, but for some software it does.
Sean .. thanks for the info. I wasn’t aware of that. :)
Thanks Neil! I often point people to your blog when they ask questions like this on forums and this is just another in a long line of extremely well written, informative pieces from you. Keep up the good work!
Great post… which reminds me of something I’ve been thinking for the last couple of days…
I’m planning on sending some of my 12MP pictures to an online printing service… they accept anything from 100ppi, being 300ppi their recommended resolution. I’d like to test some 20″x16″ printing which means my original pictures will have to be cropped (from 4288×2848 to 3560×2848) giving me an efective 178ppi resolution on the 20″x16″ paper.
Now, I’m wondering… do you think 178ppi is enough for a casual observer not to notice the lack of resolution?… and also, should I just crop the image and send it with 178ppi or should I crop and resample the image up to 6000×4800 so the resolution becomes 300ppi?… I was just thinking that maybe CS3 resampling is something I could trust (or not?)
Anyway thanks for the reply and keep up the good work!
Alberto
wonder
Wow Neil! It looks like you’ve been reading that “Advanced Calculus for Genuises” book again! Thank you for this post, but it still leaves me with one question. What do you save your images as when you convert from RAW? I use Canons DPP (as do you) and I usually put ppi at 300 and change the size to 6″x9″. Sometimes I have to compromise between resolution and file size. Is this any different than choosing 100 ppi @ 18″x27″? Thanks
I have always taken my files to a printing service lab and requested a 12×18, which is the size I usually enlarge to.
I shoot with my 4 megapixels D2H but many times, the file comes from the D70S that has 6 megapixels. Both files, when enlarged, have looked great. I leave resampling the image to the service lab.
When “resample image” is not checked the photographer can add the size he wishes to print, like my 18 inches in the widest dimension of the print. Photoshop will add the height and the ppi. The ppi could be much less than the usual 300 and still, if not under 100, the print will be fine simply because, by not checking resampling, the quality of the original has not changed.
If something I have learned from this method (taught by Scott Kelby) is that we do not need high ppi images to have an excellent print.
Nice clear explanation Neil – thanks!
Alberto – the boys from Luminous Landscape have a video on printing which discusses exactly your question. They suggest that if your native resolution is between 180 ppi and 480 ppi you should send the native pixels (ie not resampled) to the printer. However in your case for the size you want your ppi drops (slightly) below 180ppi.
Their opinion is that in that case you can easily upsample to 200% with CS3 provided that the image you use is good to begin with (ie tack sharp and well exposed) and properly sharpened.
There is lots of detail in the LL video but Jeff Schewe also wrote an article about this in Digital Photo Pro magazine – The art of up-res. See
In your case I’d do a simple experiment. Create the cropped 20″ image with native pixel resolution of 178ppi. Then create another copy where you resample to the required 300ppi. Then after you have upsampled, you need to resize to the desired 20″ (untick resampling).
Finally create one last image with the left or right halves of both test images and send that off to your online printing service. You then have one 20″ test where you can see the effect of both settings side by side.
Heck I may just do this myself on my new Epson printer – sounds like fun for a rainy day! Let us know what worked for you!
Cheers,
Ed
Thanks for your input guys… Ed, I’ll take a look at that LL video you suggested… and I think I’ll try that test image too. I’ll let you know how it goes. Regards, Alberto
I agree. I,ve written a similar article. I still write t down the pixels and ppi because people expect it. I once forgot to change a setting in Lightroom and an exported photo was 72 pip – still at full pixel dimensions though. I had a user email me asking ” I thought your downloads were high resolution?”
I like to think of the pixel dimensions as the actual size and the ppi as an export setting guideline.
Yeah, that is super low resolution! I would be mad too.
Stephanie … you need to carefully re-read this article, but without your preconceived ideas of what is correct / incorrect.
Thank you. Will be sending this to my confused friends.
I think what a lot of ppl are trying to say when requiring a certain dimension and PPI is that they want a certain size so they don’t have to crop (either a minimum width or a certain aspect ratio) and they don’t want a huge file that the server can’t process quickly. Requiring 72PPI is one way of ensuring file size, even though it may be an odd way to say it.
PPI means nothing about file size. 3 PPI versus 300 PPI on a 3000 pixel document doesn’t change it’s resolution or it’s file size. It’s still 3000 pixels. In fact, two copies of the same document at the SAME PPI could have different file sizes, as that is based quality and compression setting of the format saved. And of different documents of he same pixel size, image content weighs in to file size, too, IF it’s a compressed format.
Further, stating a PPI value doesn’t even come close to relating to proportion or aspect ratio. PPI is a linear measure. Aspect Ratio needs two dimensions, X and Y, Horizontal and Vertical, to be complete. You simply can’t have a ratio with only one value.
While they may be trying to convey file size or aspect ratio, they’re going about it wrong. A webmaster need only say “I want a 600×400 pixel image that’s less than 150KB.” and avoid the derived, ambiguous, inaccurate, and inappropriate terminology.
I’m sorry, but are you trolling? A 3 PPI would be so blurred, you could not make it out at all!
Stephanie … Again, you need to carefully re-read this article, but without your preconceived ideas of what is correct / incorrect.
Nathan – PPI does not affect file size at all.
Of course it does!
Stephanie … try it : save the same file as 72dpi and as 300dpi, and have a look. Neither the file size in kB, nor the file size in pixel dimensions change.
I completely agree with your Title and the meaning behind it. Last week, my Advanced Photoshop instructor gave us a size call-out for our final project. It was to be a certain size, at 72 pip. Of course, he made a typo, but I’m used to seeing dpi, no ppi, so it threw up a red flag. I know that pip stands for picture in picture with video in Photoshop, so I assumed he was confused. (It has happened before, with instructors that really don’t know what they are talking about, they just read it in a book, and they are reciting what they’ve read. So, with a little perseverance and replies via email, my instructor realized it was a typo and fixed it, but not before dragging me through the proverbial mud by saying it was an obvious mistake). So, thank you, this is very informative.
THANK YOU for this article. I’m sharing the link around.
I have been trying for YEARS – since well before HDTV – to profess to the masses I encounter the fallacy of DPI/PPI for display work in an essay I wrote called “The ABC’s of DPI for TV”. It was aimed at folks that kept saying the “magic number” for all images destined for broadcast should be 72 DPI. I kept trying to get people to realize that a TV signal on their 13″ kitchen TV was the same number of dots as my 8′ wide projector screen, but obviously NOT the same number of inches, so stop measuring displayed images in inches! Even many web designers and some graphic designers are caught up in this ‘myth-understanding’ of PPI, and tell their clients incomplete or incorrect specs and requirements.
One commenter above correctly points out that some software will often interpret embedded PPI ratings and display images differently, but hopefully that’s only where the software is intended for creating printed output. One would expect InDesign or Word to pay attention to inches. But it still requires a fundamental understanding of what PPI is to be able to rise above the confusion and realize what it is for.
Thanks for the reminder to use my high school geometry and algebra concepts. I’m a fine artist so I come to the DPI/PPI question from a scanning-printing perspective I’m using paint.net, though I’ve used GIMP and Photoshop in the past. As I understand you, the actual pixels shrink for a smaller image size; anything smaller than your original print size is meaningless. Essentially you take a print at 300 ppi from the camera/scanner, final print size set to 8″ x 10″ (2400 x 3000 PPI). Then save a copy at the smallest size for the web, 72 PPI,