tutorial: Balancing flash with available light / ambient exposure
Many of the questions I get on the Tangents blog relate to balancing flash with available light, and I want to pull it all together into a single article.
The questions often revolve around metering for the ambient light, and how to balance flash with the ambient light. Tied in with this, is how to make the decision about which camera settings are the best. It’s a juggling act, balancing all the factors quickly enough … and still being able to deliver solid photos.
The answer to the questions about how to balance flash and ambient light, is often along the lines of “it depends”. It really depends on:
– the scenario you have, and
– what you want to achieve.
Now that all sounds quite vague, and doesn’t help if you don’t even quite know where to start. But, let’s look at one specific image, and analyze what our options are, and see if we can make sense of it all …
A great starting point
As I mentioned in the recent article on effective on-location portraits,
my starting point most often is a combination of:
- finding an interesting or neutral background,
- positioning my subject in relation to the surroundings, so that it all looks visually pleasing.
How do you know if it is visually pleasing? Well, that’s open to interpretation, and it is what makes every photographer unique. However, a good guideline in terms of composition, is to eliminate anything that is distracting or doesn’t add to the final image. Look at the edges of your frame. What you include is just as important as to what you exclude. Most often, it’s the better decision to simplify the composition. Eliminate clutter.
.
Exposure metering
When I work on location with a model or a couple, I take care to position them so that they are in even light. It’s just easier if there are no hard shadows across their face, or strong dappled light, for example. It’s just easier to work with. If you’re more adventurous and have a specific vision that you’re chasing … and you need (or can work with) strong uneven lighting … then great. But a simpler approach where we control the light that falls on our subject, is easier to work with. With our options simplified, it becomes easier to balance flash and ambient light.
With our subject now positioned in front of an interesting / complementary / neutral background … and our subject not that unevenly lit … we start with the background.
How do we expose for the background?
We could work with handheld meters, and meter the light in the background. But this would be impossible with a background like we have here – dappled sunlit leaves. Much easier, is to use your camera’s built-in meter. Now you have to decide how you want your background to appear. Do you want it over-exposed to an extent? Maybe we want a summery airy feel to it. Or we’re looking for a high-key effect. Or we want to over-expose by such an extent that we lose detail in a distracting background. The choice really is yours.
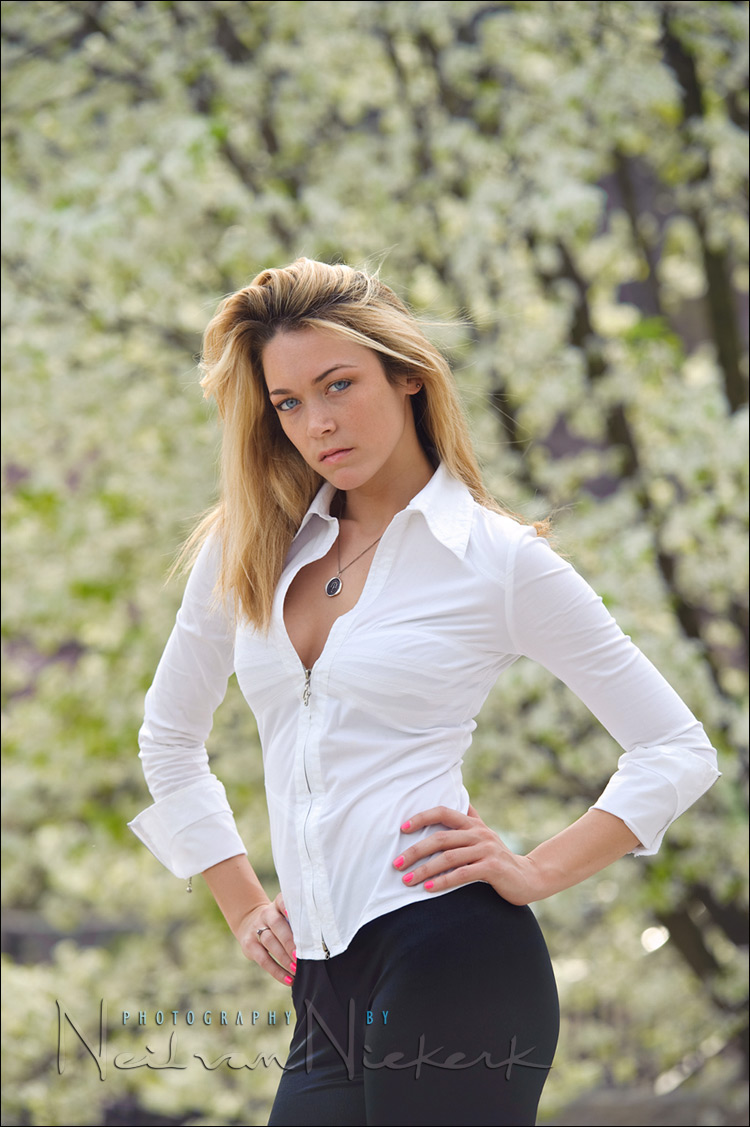
In the example above, I looked through the viewfinder, and let the meter show over-exposure by +0.7 stops. I could’ve chosen a zero reading, or I could’ve blown out my background even more. Or under-exposed it. In this case, I liked the background to be slightly brighter than a zero reading would’ve given.
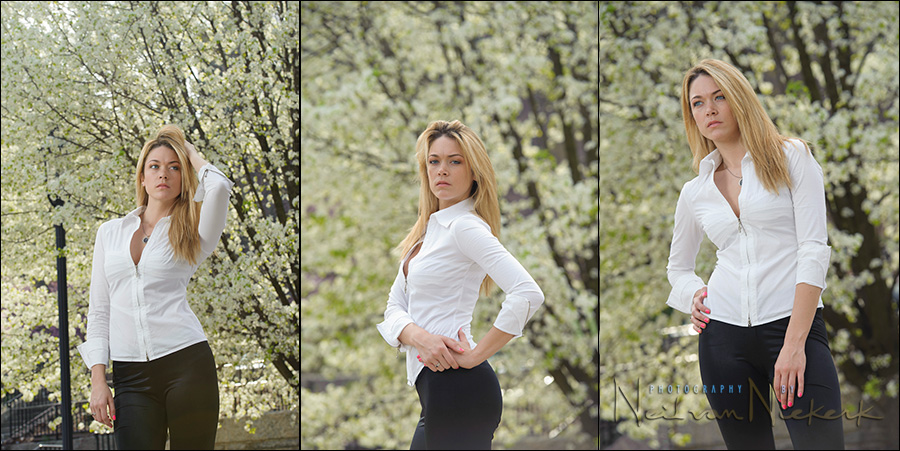
The image above was one that I took during a personal workshop. As a comparison, here is another photograph, taken by Natalie.
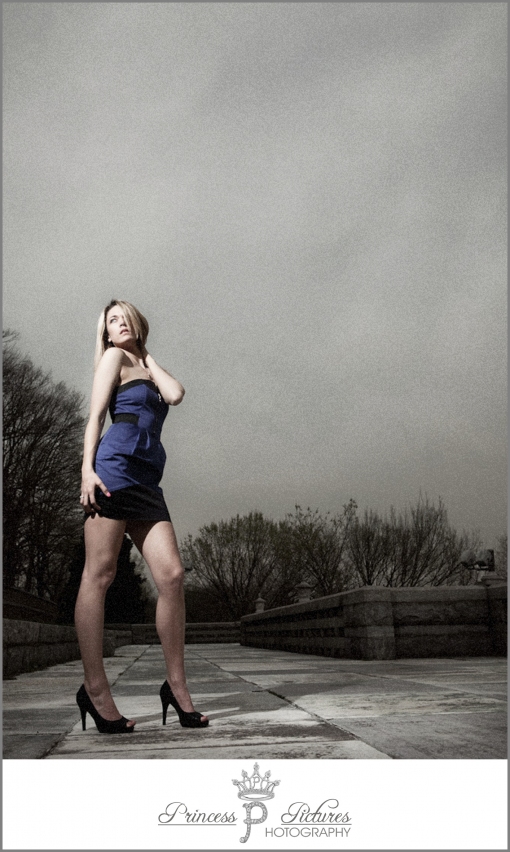
Here we based our ambient exposure on what we wanted to do with the sky. We wanted a slightly ominous looking sky by under-exposing it, and then using flash to pop the model brighter with correct exposure from our flash.
So the choice of how you expose for the background, really depends on what you want to do.
There is a limit though, you can not choose settings which will over-expose your subject. (That should be an obvious limit.) Broadly speaking, you have two scenarios here:
– You need to expose correctly for your subject (and then use fill-flash), or
– under-expose the ambient light for your subject to a certain extent, and then use flash to give correct exposure for your subject.
What we need to do with our flash exposure
1. If we just need fill-flash,
in other words, we already have correct ambient exposure for our SUBJECT, regardless of our background – then we need to have our flash around 2 stops under. Or 3 stops. Somewhere there.
If we had decided to use manual flash, then we’d meter for our manual flash to give us exposure 2 or 3 stops (or somewhere there), under what we have set our cameras to for our background. For example, if we had settled on f4 @ 100 ISO (as in the example at the top), then we’d set our flash so that our flash meter tells us we need an aperture of f2 (or f2-ish) for correct exposure. In other words, at f4 (as in this example), our manual flash would then be under-exposed.
Now, if we use TTL flash, then our flash exposure compensation would be in the region of -2 or -3 EV. We have to keep a few things in mind with TTL flash though. The tonality / reflectivity of our subject / scene will affect exposure. Also keep in mind that most cameras tend to under-expose TTL flash when there is heavy back-lighting. So what you’d think would need 0EV, might need +1.3 EV. Or in this case, you might want flash exposure 2 stops under “normal”, but you might get even less flash than that because of strong back-lighting. Then -1EV might give you the same as -2EV might have in a different situation.
2. If we need flash as a main source of light:
Another approach to using flash with ambient light, is to intentionally under-expose your subject by a stop or so. Then we use flash to give us correct exposure. Just as important, we use flash to give us great light which is directional.
Here are two articles that describe the decision process:
• Camera & flash settings: what do you want to achieve?
• Various scenarios: balancing flash with ambient light
So if we had decided to under-expose for our subject, and use flash to bring up exposure on your subject in relation to the exposure of your background … then your flash becomes a dominant source of light.
With manual flash, the simplest would be to use a flash meter to help you figure out correct flash exposure.
With TTL flash, you’d have your FEC in the region of 0EV. Against a brighter background, you might be using +1.0 EV .. or perhaps higher. Perhaps +1.3 EV. We will have to check our camera’s preview to see. (ie, you are basing your exposure settings on how you want your background to appear.) Where TTL flash might be fast and easy to work with, it might not be as predictable as manual flash. We will have to check our camera’s preview to confirm correct exposure, and possibly adjust our FEC. And of course, rely on the latitude of the RAW file to take up some of the slack. .
Camera settings and photo gear (or equivalents) used in this photo session
- 1/250th @ f4 @ 100 ISO
- Nikon D3
- Nikon 70-200mm f2.8 AF-S VR II /equivalent Canon EF 70-200mm f/2.8L IS II
- Nikon SB-910 Speedlight controlled by PocketWizard FlexTT5 Transceiver & AC3 Controller
or alternately, the Canon 600EX-RT Speedlite controlled by Canon ST-E3 Transmitter - Lastolite EZYBOX 24″ × 24″ softbox
Summary
Going back to the original image again:
We ended up only needing a touch of fill-flash on our model, Tia. In how we positioned her, we had open light on her face, and only needed just the lightest kiss of flash to open up any shadows on her face.
The choice of maximum flash sync speed here should be an obvious one. Since I was using PocketWizard Plus II units, I couldn’t go over maximum flash sync speed. And for various reasons, max flash sync speed is a sweet spot when working with flash in bright light. In short, max sync speed gives us the most efficiency from our flash, by giving us our widest possible aperture, without going into high-speed sync mode. This will also explain why a scenario like we have here, is the exact opposite of a situation where we would drag our shutter. Dragging the shutter just doesn’t come into play in this situation – we’re working in bright light.
In this instance we used manual flash in a softbox. Exposure for our flash was well under ambient exposure, because it needed to just be fill-flash. The off-camera speedlight was set to manual, and was in a softbox.
There we have this particular end result. But we could’ve decided on another approach in how we exposed for our background, and what we’d need our flash to do then. Our choices are wide open.
Related articles
- Exposure metering for available light
- Exposure metering for TTL flash and ambient light
- Manual flash vs TTL flash
- Flash exposure compensation (FEC)
- Maximum flash sync speed
- Various scenarios: Balancing flash with ambient light (model: Catherine)
- Flash photography tutorial: Balancing flash & ambient exposure (model: Anelisa)
- Metering for off-camera manual flash and ambient light
- Choosing our settings to balance manual flash and ambient light
Hi Neil, Thank you for the inspiration! Do you have any guidance on choosing the appropriate F-stop while shooting outdoors in bright daylight? I would like to underexpose the sky a little bit @ 1/250s and the maximum aperture I could get is F8 at ISO 100. The image is fine to my liking but the flash recycling time is killing me. With TTL, probably the flash use the full power and slow me down. Opening up the aperture may overexpose the background (the sky) as well. Hope can hear your thought on this.
Lanz … that’s just how you have to juggle your exposure settings.
To further under-expose the sky, you need a smaller aperture. There’s no other way around it. And then the decision is once again based on what YOU want to achieve.
A certain flash exposure will use the same amount of power (and will need the same recycling time), regardless of whether you use TTL or manual flash. So the actual flash exposure mode won’t affect how much juice the flashgun uses.
Neil,
Could you use the old Metz CT60 flash with a medium Photoflex Q39 (24″ x 32″)to get a similar result like the SB-900. Thanks Gregory
Greg .. absolutely. Nothing to stop you.
Neil,
I can’t thank you enough for my tutoring session. I’ve said it before, but your flash workshop should be a MANDATORY workshop for everyone. You truly love what you do and went above and beyond to ensure that I understood everything you taught me. I know your workshops fill quickly just like your WPPI master class. Everyone interested should sign up now at: https://neilvn.com/tangents/photography-workshops/
Natalie .. thank you! It was a treat meeting you as well and working with you. :)
Neil,
Your explanation of this topic just keeps getting better and better – which probably means these principles are finally sinking in for me. As many times as this topic has been either directly covered or touched on in prior posts, it’s amazing how sometimes seeing concepts discussed in a slightly different order or with a new, even subtle, comment from the teacher can make things click for the reader. Thanks for recognizing the need to revisit and drill us on this key technique.
Glenn … good to hear. I was beginning to wonder if we hadn’t already completely mined the shutter-speed / aperture / ISO .. but if these kind of articles help, then I’ll add some more over time.
Hi Neil,
Thanks for putting together one of the better documents on mixing natural light and flash. I think this is a subject that is difficult to put down in words, and you’ve done an excellent job. Now, if I only had $$$’s for a flash :)
Ciao, Danté
Glenn K. commented above that “seeing concepts discussed in a slightly different order or with a new, even subtle, comment from the teacher can make things click for the reader.”
Would you consider doing a video demonstration Neil? I think everyone here would benefit greatly SEEING this live!
Natalie .. here they are.
In flat lighting I read it is nice to under expose the background (the ambient light) and then over expose the flash. So how is this done PRACTICALLY on the camera and flash?
Is it….
Step 1. (on camera)
Put the camera mode on “P” mode, point the camera towards the scene you want to shoot. Lets say you get a reading of “F5.6 & 1/250” so to under expose it by one stop you change to “Manual” and then set the camera to “F8 & 1/250” or “F5.6 & 1/500”. As max sync speed is 1/250 we can only go for first option. However, they do say in manual mode only shutter changes the ambient light…..nevertheless……how do we set the flash?
Step 2. (on flash)
Put the flash on “M” – how do I know what flash settings I need for something like “F5.6 & 1/250”? but then it says we should OVER expose the flash by 1 step so really our flash should be set for “F.5.6 & 1/125”? But again, how do I set this in the flash?
Cheers
Magnus
Magnus … the first thing we need to consider here, is that we are not over-exposing the flash in that scenario.
If we under-expose the ambient light by a stop, we are then correctly exposing for our flash.
Over-exposure would be over-exposure.
Looking at your step 1.
I wouldn’t even bother with P mode.
You may as well start in Manual mode. There’s less translation of settings to be done then.
Pick your ISO. And in bright light, you need to be at maximum sync speed … unless you specifically need a wide aperture, and can work with the reduced range.
So now you just need to find your aperture.
This is exactly the method as described in this article – what are my settings?
We then set the flash according to the considerations as described in this current article.
Regarding your step 2:
I’m still not sure where you get the idea we need to over-expose the flash.
The main problem in your description there, is the idea that changing the shutter speed will change the flash exposure. This is simply not true. Shutter speed largely has NO effect on flash exposure. (While we remain at or below maximum flash sync speed.)
And as to how we set our flash, we go right back to the top. :)
This tutorial is outstanding! Thank you.
Nicolas
I’ve had some issues with TTL. In similar to above, I chose my setting for the bg. Had FEV0, took a pic. It looked too bright, so changed FEV-1. Looked too dark, etc a few more iterations and then I’m back at FEV0, this time it’s too dark! I’m not sure what’s going on, but it seems the TTL isn’t doing the same thing every time.
Using D90+SB900, subject under roof shade 3m in front and to the side, bg is bright grass/trees etc.
Didn’t change composition at all, just chimping and chimping but felt so much like guesswork. I had expected to be chimping until I got the right FEV, then be able to take many pics from that location w/o further adjustment.
Val .. my guess would be that your flash has trouble recycling. If you’re working in bright light, you most likely are working at smaller apertures (or have gone in to High Speed Sync mode.) So your flash could very well be dumping close to full power.
Even when your flash tells you it is charged, (ie, the red light comes on), it might not be fully recharged. That charge light comes on while the flash is still charging, but approaching full charge. The flash charges in an asymptotic way as it approaches full charge. Therefore it is quite possible to fire your flash before it has enough charge to give you proper exposure where you need (close to) full charge.
Therefore the best way to make sure your flash is properly charged (and you have a shorter recycle time), is to use a battery pack with your flash.
Hi Neil,another outstanding post with plenty of information for beginners [like me].This one should be put alongside “Top 20 flash fhotography tips” as a “sticky” one.I’ve one question about FEC: if I understood correctly reading your book,FEC affects exposure,but does it affect the strobe’s power output,too?.
Thank you very much,
Gorka.
P.S.: I need a workshop in Spain ;-)
Hi there Gorka .. when you add flash exposure compensation, you are in effect telling your flash you need more output than the camera and flash calculated for you. So yes, it will affect the speedlight’s power.
Neil… you say that first you choose your ISO. I am getting confused a bit. Isn’t aperture more important for portraits? To get DOF effect right? Atleast ISO shouldn’t be thing to look with new cameras where ISO is good up to 3200 or atleast 1600.
In that case, A mode should be apropriate for finding right exposure for bacground?
You mention 250 sync speed for outside. What If you exposure for background inside the building? Than IMO things are different?
And yes, we need workshops in Slovenia too ;)
Saso .. with this photograph, I was definitely controlling my aperture.
In deciding on using my lowest ISO, I get my widest aperture.
In fact, I started at 200 ISO (which is the base ISO for the Nikon D3), but that gave me f5.6 which was too much depth-of-field. I then pulled it down to 100 ISO which is considered to be out of the normal range of ISO settings for the D3. This then gave me f4 … which gave me less depth of field.
In deciding on using maximum flash sync speed, I am assured of using the widest possible aperture … while working in bright light, and using non-high-speed-sync flash.
So even in controlling my ISO and shutter speed first here, I am still very much chasing a wide aperture.
About the choice of maximum flash sync speed … yes, I would definitely consider a slower shutter speed when I work indoors.
Two exceptions ..
1. when I am photographing my subject against a much brighter background, such as a window,then I most often use maximum flash sync speed again.
2. when photographing a wedding reception, and I have to deal with the videographer’s light causing subject movement to be very noticeable.
There will be other occasions as well where it would make sense to use a high shutter speed indoors. We have to adapt to situations as we find them, without falling into a strict pattern of how we think things should work every time.
Thank you Neil!
Hi Neil,
Did the use of ISO 100 affect your workflow?
Jack
Hi there Jack! Nope, changing the ISO lower than the base ISO didn’t affect my workflow at all. I edited the image as usual.
Hi Neil. Still using what you taught on a regular basis. Glad I was able to attend while you were still touring the US. I wanted to clarify about gelling the flash, especially in the outdoor case of fill flash. When in full shade, one would want to use a CTB to get the flash closer to the ambient. Similarly, if you have late-day orange light, CTO will be your friend. Now, if you have your model back-lit by the sun (as a hair light), do you tend to use CTB to balance to the shady side of the face, or CTO to match the color hitting the hair (in the case of late-afternoon/sunset light)? I figure that when you underexpose for the backlit sunset case, you’d want CTO to get the front of the face matching the hair light but then you don’t have the problem of much ambient blue (shade light) in the face. What have you found to work out best? Or do you not worry and let AWB and LR deal with it?
Thanks again for all you do!
Andrew, I don’t use CTB gels, and definitely not for this.
CTB gels take a warm-coloured light source (around 3200 Kelvin), and changes it to daylight white balance of around 5600K. I’m sure you could use fractions of the full CTB gel to make your flash even colder in colour temperature .. but I wonder if this is often a concern for us during a normal shoot on an overcast day or deep shade.
I just use CTS and 1/2 CTS gels. (Close enough to CTO and 1/2 CTO for this discussion.) And these I use to warm the speedlight to Tungsten light’s WB, or close to.
I do at times use a 1/2 CTS gel to make my flash warmer when I shoot in late afternoon, and need my flash to match the warmer tones of the ambient light.
Hi Neil,
Thanks for the great information that you have put out in blog to help us understand how to use flash properly. I have to visit the blog everyday and just getting more and more information from it.
I got one question about over expose the back ground. I did an experiment on my kid outdoor portrait the past weekend. First I meter against the back ground (some trees) and over expose it by 1 stop and then I set the nikon BL TTL flash to -3. But my subject still over expose. What did I do wrong? Is 1 stop too much?
Thanks for the help.
Jason.
Hi there Jason …
I suspect one of two things happened here:
1. Are you sure that your foreground / subject wasn’t already over-exposed without the flash?
You can’t just expose for your background, if your subject / foreground is brighter than your background.
2. Sometimes people will meter without the flash, with a high shutter speed set. Higher than max sync speed.
Then when they switch their flash on, the flash forces max sync speed as the highest shutter speed possible, the ambient exposure is too much.
Hello Neil, your blog is very useful, I hope your efforts are repaid.
I want to ask you what is the less worse to use an on-camera speedlite outside (without boucing walls) both for fill-flash and for flash as main source of light. I mean if you are not a pro and therefore you have any assistant. Are diffusers of any help? Are there good or less than good solutions?
Thank you in advance
Enrico … I would really try to not have hard direct on-camera flash as the main source of light.
Therefore I will:
1. direct my subject and place them so that there is even light on them,
2. and then I can use straight-head fill-flash, and it wouldn’t be noticeable.
If I’m shooting in hard sunlight,
I will still try to direct my subject so that they are turned away from the harsh light.
However, sometimes I am forced to use hard direct on-camera flash as my main source of light.
I hope this helps.
Neil
A quick question re: metering for ambient light. Do you do this with the subject in the frame, and if so, do you use spot metering. OR
Do you meter without the subject, take a shot, chimp etc, and once happy, place the subject back in the frame.
I read varying opinions for this question.
The down side is that you cant quickly see the difference between the background and foreground exposure, when only the background is used.
When metering for the background, you meter the background only.
When metering for the subject, you meter the subject only.
Then you will clearly know the difference in exposure.
Greetings Neil
A general question regarding fill flash and flash as a main source when used outdoors and in some cases indoors).
.
In many of your articles you indicate to exp for the ambient light (AL) and then flash for the subject for correct exposure. Now I wont go into the usual questions about setting (ISO, f-stop, shutter, MSS or HSS) etc, however in general terms for flash as a predominant source, the AL is exp for personal taste or what you want to achieve (which may be over or under exp).
.
However for fill flash, my understanding is that you meter for the subject “with little regard for the background”, and the FEC is dialled way down to only lift the shadows etc.
.
So how do you decide what to do with the background, in terms of persoanl taste, fill flash (p100 Plate 14.1 and p34 plate 5.28) or flash as a predominant source (p61 plate 9.17).
.
I think you explanation about this will probably revolve around the source, direction and type of ambient light (flat/even, bright sun, uneven etc), but I will wait and see just to be sure.
.
Regards
Angelo (Australia).
Hi there Angelo ..
You’re quite correct. Much of the decision-making is based on what YOU want to achieve. It really is up to personal taste to a large extent.
>> However for fill flash, my understanding is that you meter for the subject “with little regard for the background”, and the FEC is dialled way down to only lift the shadows etc.
That’s correct. In this case you’re exposing correctly for your subject based on the ambient light, and your flash merely helps with the contrast, and lifting the shadows a little bit.
The image you refer to with regards to fill flash (p.100 plate 14.1) is this one:
With this photo, I wasn’t concerned about the background exposure, and I allowed it to blow out. Framing within the stone archway does help contain the white areas in the background. In the end, I exposed correctly for them, and just used direct fill-flash to help improve the contrast of the couple / my subject.
If the background was somehow important, I could’ve exposed correctly for the background (or approximately correctly), and then used flash (preferably off-camera) in exposing correctly for them.
But just using a touch of fill-flash was easier in this case.
Neil
Again, thanks for the easy to follow reply to my question. There are several other Q’s which I forgot to ask about fill flash. As I mentioned above,
.
“For fill flash, my understanding is that you meter for the subject “with little regard for the background”, and the FEC is dialled way down to only lift the shadows etc”
.
I would assume that you metered correctly for the most relevant tone (skin or white shirt), via the histogram method and then puffed in a small amount of TTL flash of -2, to lift shadows.
.
However, on page 23, you state “Remember, this exposure method only works if we’re using ambient light or manual flash in a fixed position”.
.
Im lost as the above pix indicates -2FEC which means you used TTL ???.
.
Cheers
Angelo
Hi there Angelo ..
With the photo at the top, we used manual flash, So there wouldn’t have been a -2EV setting.
In the text explanation, I said, “Now, if we use TTL flash, then our flash exposure compensation would be in the region of -2 or -3 EV” .. meaning IF we had used TTL. But we didn’t. We used manual flash. I tried to make it a broader explanation, showing how the thought process might work for manual flash, and how we’d go about it if we had chosen to use TTL flash.
Back to my comment about the histogram .. yes, it works for manual flash and available light, since those are constant light sources. TTL flash isn’t. It varies as you change your composition.
I hope this makes more sense now.
Hi Neil
1. Sorry, Im still lost if the histogram method works for TTL flash when exposing for the subject (most relevant tone).
2. I can see what you mean in your explanation in that “if we use TTL”, (which you didnt) then the FEC would be -2 or -3. Therefore, I do understand that manual and not TTL flash was used in the very top pix.
3. However, in plate 14-1 p100, under the fill flash section, you mention how flash “sweetens the scene”. Further to this, on p32 you use the histogram method with TTL flash.
4. Another area which im lost in is deciding when to use flash as fill or as predominant light. By this I mean flat / even light where you purposely under exp the AL, and then when the light is even or pleasant on the subject.
Hope this makes sense
Cheers
Angelo.. ;-)
Neil
Thanx for the reply. I suppose I should be more accurate in my question. By this I mean exp for the ambient light when outdoors and flash is used in ttl mode as light fill only to “sweeten the shot”, as opposed to it being a predominant light source such as under exp the background by 1-2 stops when working in flat even light. This was discussed in another tangent “balancing flash and ambient light, where do we even start”.
.
So in one question, this method of histogram exp can or cannot be used for fill only “to sweeten the shot”, however one must ride the FEC to ensure correct flash exp.
Hi Neil
Perhaps my explanation is being lost somewhere so I will use an example.
.
I have a bride in a white dress against a neutral/complementary background and only need fill flash to “sweeten the shot”. I wish to use TTL flash.
.
You mention above “44.Angelo .. when you use TTL flash as fill flash, and dial the compensation down to -2 EV or -3EV, then you have already established your ambient exposure prior to this. Therefore the histogram method already came into play as a way to determine exposure for your ambient light”.
.
The way you answered, or at least what im thinking, then the histogram method works ?? I first need to establish ambient exp on the subject ( this is what I forgot to mention), and expose corretly for this only.
.
I take my ambient reading off the most relevant part of the scene which is the dress (flash off). I meter for this and place the dress on the histogram where it should be. Fire off a test shot etc etc.
.
Once I have “determined exposure for your ambient light”, then I can use flash dialled down for fill.
.
Third time lucky perhaps.
.
This is what I tried to explain in the first two takes. I understand that “the histogram method of exposure metering has nothing to do with dialing down FEC as you decide to just use a touch of fill flash.
.
If Im still lost, then shoot me.
Cheers
Angelo
Neil
Finally. I suspected that you wanted me to delve deeper into my thought process for this question, and inturn, your answer reflected what was questioned.
.
Yes, “There is a process here”, which I see in your teachings. For me its not important to know the settings which is often asked. However, when I get the shot I often question if my technique which is what ive learnt from you, is correct or did I just fluke it.
.
Us Aussies still wnat to see you downunder, soon.
Cheers
Angelo
*”Us Aussies still wnat to see you downunder, soon.
*Cheers
*Angelo”
yes i agree with Angelo, im new to your site Neil and ill admit im hooked, you have a quality to the way you teach here and i would also love to see you down under, Adelaide – South Australia.
Regards
Anthony.
Thanks Neil
Your Website is a great source of Info on Speedlites, Flash, and balancing Flash with Ambient Light, a Topic I have become kinda keen on lately,
So When are you coming to Ireland, Any Idea yet if you ‘ll be down South in Counties Cork and Kerry, I’ll show you the Landscape Spots and you might show me how to use my 580EX ii with my 5D !!!
keep up the great Work, John OShaughnessy
Hi Neil, as a photographer myself – and really only at the beginning of my career I am thankful for photographers such as yourself, you give the rest of us an enormous amount of advice, and inspiration…. thank you.
Thanks for this article, I have learned more from this than I have from any other source I ever encountered.
I’m a beginning photographer and in my studio things are excellent, however, outdoors the images while generally acceptable, sometimes seem to lack punch. I meter every light in the studio and I will be starting shooting outside soon, I did one session outside in the snow (first time using a light meter outside) and I was very pleased with the results. However, in previous outdoor sessions the photo quality varied considerably.
Here is a scenario and what I think I should do.
I will be shooting the subject who is in shade in the doorframe of an old building with flaked paint. Lets say that my light meter has her at ISO 100, F5.6, at 125 I want to add some fill so I set my flash manually to give me a reading of F4.
Would that be correct? Also I use an X-rite color checker for white balance, but if I didn’t would I still use the shade WB in my camera?
Neil – After following you for the past year I can only recall one article in which you used a reflector. Do you EVER use them with on location portraits?
Neil, Thanks for this great aticle. It has been a great to me in understanding this whole concept of relationship between ambient light and flash. My eldest daughter is expecting her first child and I’ve offered to take as many photos as I can of her and her husband this week-end. So now and then, I’ll be spending all my spare time practicing what I’m learning here. Here’s hoping. Thanks again
Ted A
I wish i had TTL off camera but I only have manual. With manual, it’s very difficult evaluating fill flash on the small LCD back of camera. Using OCF manual is good when you want to under expose your subject slightly to see the difference on the LCD.
Since i have TTL on camera, it’s a little bit easier when i am dialing FEC because I know that it’s pretty close even if I am not sure about what i see on the small LCD screen.
In the end, i would like to use OCF manual mostly (because it’s harder :-) and I believe that using it automatically covers “fill” as well as having more dimension to the subject.
Neil, I’ve been studying David Hobby’s blog for a couple of years & I still can’t get my head around balancing ambient & flash. Do I meter ambient w/Nikon matrix (interior & exterior), underexposed 1 – 2 stops and trial & error find right flash intensity? Shooting M is new to me & I’m not clear on how to determine camera settings. Please help me to turn that switch on…& thank you
Gary, have a specific look at this article, Various scenarios in balancing flash with ambient light.
In that article we look at a range of possible scenarios, including what we do when the ambient light is good and we only need a touch of fill-flash … all the way to where the flash needs to be the dominant light source.
Now, in the example you mention, it sounds like you want (or need) the ambient to be one or two stops under.
Now, if you are using direct / bare off-camera flash, it is fairly easy to get to correct flash exposure for the settings you have.
Work through these two tutorials and see if it makes sense. The material is inter-connected.
– Tutorial on the controls for manual flash exposure.
– using the guide number of your flash.
See if it all comes together for you now?
Keep in mind that with a softbox, you’ll probably be better off using a light-meter, or using the histogram, rather than the Guide Number.
Finally, here is another Tutorial on Balancing flash with ambient exposure.
Let me know if the pieces of the puzzle are falling in place for you.