Flagging the speedlite for directional light
Bouncing your flash of various surfaces will give you a larger light source, and hence, softer light. But in bouncing it at a sideways angle compared to where your subject is, will give you directional light from my on-camera flash.
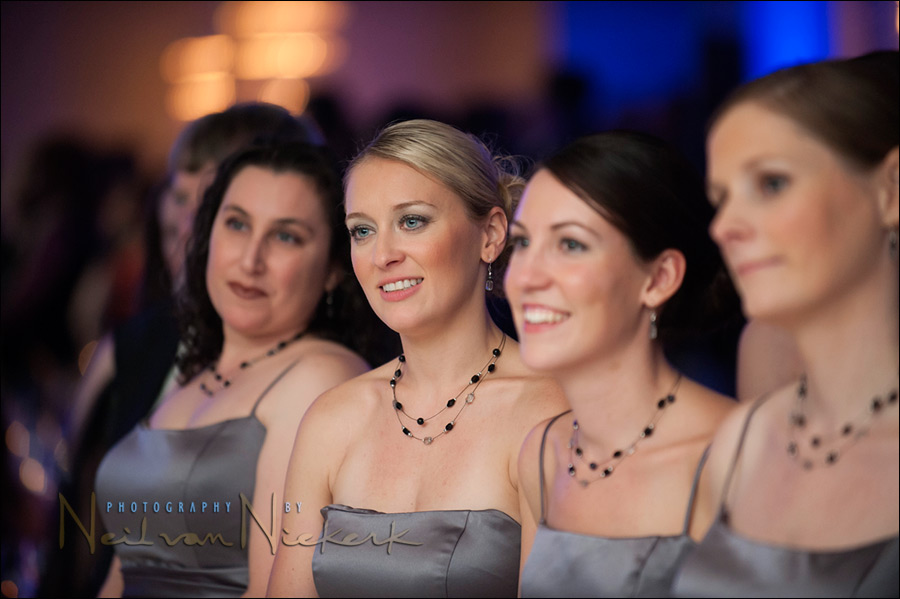
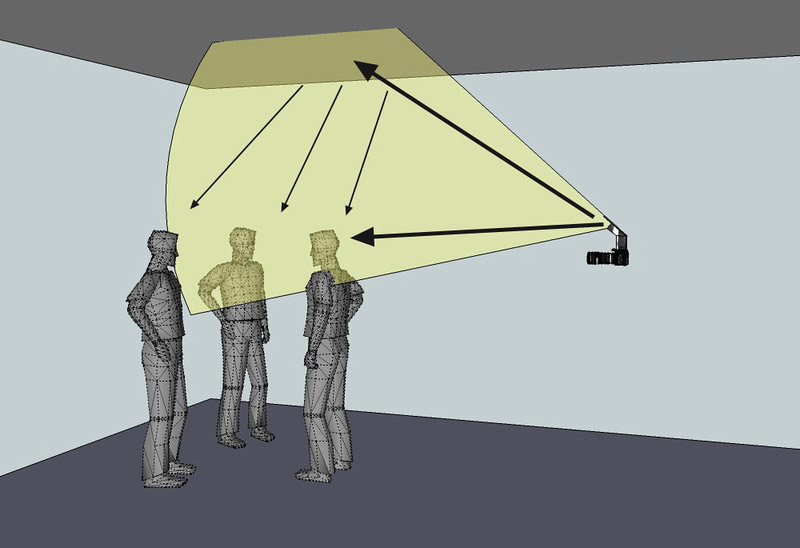
Even better, if you have a scenario as in the photo at the top, where there is a row of people, you can get nearly an equal amount of light on them. Since you can bounce your flash off a surface equidistant to them, they will all be lit about the same amount. This means less dodging and burning in post-processing. A good example is this photo at the top from a wedding where the bridesmaids were watching the bride and groom’s first dance.
So the important thing to notice here is that everyone there is evenly lit, whether closer to the camera, or further away. This is achieved by NOT bouncing the flash off the ceiling towards my subject … but rather to flag my flash so that there is no direct flash falling on my subject. And then I bounce my flash off some point equidistant to everyone. Then the light has the same distance to travel to everyone … and everyone will be evenly illuminated by the flash. NO need for the local correction brush in ACR / Lightroom. It’s all done in camera!
This technique is also very useful when photographing corporate events. You will inevitably have someone closer to the camera – possibly with his back to you. The way then to get everyone equally well exposed, is to bounce off a wall or the ceiling to the side of everyone … in such a way that there is equal amount of light on everyone.
We are trying to move away from the idea of bouncing flash directly towards the group using a bounce card or that infamous piece of tupperware. Doing so would mean the people in the frame would be unevenly exposed – for example, the person closest to you might be over-exposed compared to the other people in the frame. But bouncing your flash in a way to create an equidistant light-source, will mean you will have even exposure on your subjects.
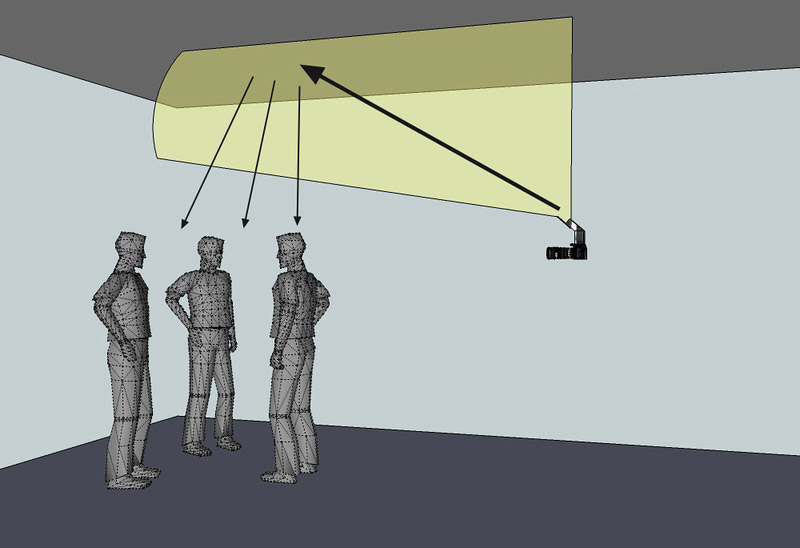
In contrast to that, here is what happens when you flag your flash, bouncing your flash ONLY off a surface parallel to everyone in the frame …
A regular reader of the Tangents website, Alex Perry, works as an event photographer in Washington DC … and he just posted an insightful article about this technique on his blog. With his kind permission, I’m including the illustrative diagrams here. But check out his blog post to see his description of how he uses this at events.
Hopefully these diagrams will help in making the concept more clear. Thank you for this excellent contribution, Alex!
On-camera flash modifier – the black foamie thing

The BFT is held in position by two hair bands (Amazon), and the BFT is usually placed on the under-side of the flash-head.
The linked articles will give clearer instruction, especially the video clip on using the black foamie thing.
Related articles
- Tutorial: bounce flash photography
- Throw away the tupperware on your flash
- Flash photography: how far can you bounce your flash?
Superb diagrams Neil. They make it all so easy to understand. Many times seeing things such as diagrams helps me to grasp issues rather than just imagining how they would be. This is particularly important with light and lighting.
Many thanks for this.
PS….the fact that you are on Twitter is great. As soon as your Tweet hits I’m clicking the link and reading your great articles.
CSI style on neil´s blog.
perfect and great.
thanks a lot for your site :-)
olympus
Your image of the bridesmaids watching the first dance begs the following question: If you are facing the line of bridesmaids, and they are looking at the couple to your left, you must have bounced the light to illuminate their faces off your left shoulder. But where in the world would a nice bright wall be located for this to work? Obviously, the dancing is happening to your left, you can’t bounce it off the newly married couple. And surely there is another line of people next to them as well, so there must be nowhere to bounce? Yes here you have bounced it somewhere?
David .. it’s magic.
I bounced the light off the ceiling .. but not directly overhead from them. I bounced it off the ceiling at a stop equi-distant to them, away from me, to my left.
You have to keep in mind, this is not the most efficient use of flash. I am wasting the major part of my flash’s power by throwing it ‘away’ from my subject. But the light that returns, is sweet indeed.
The most efficient use of flash here would be direct flash. But that’s ugly. I want the light to be pretty. And this is it. In my opinion, this is about as far as you can take on-camera flash in making it not look like on-camera flash.
This kind of technique with the black foamie thing is the closest that I imagine it is possible to make on-camera flash look like off-camera flash.
Hello Neil,
I had actually the same question like David Eisenberg: “When the bridesmaids are looking toward the dancing couple, how you bounced then the flash? I would assume that the dancefloor is not the smallest place and so the next “available” wall would be quite far away, beside the fact that there is a couple dancing….”
I have this kind of question actually very often when I read your articles and I’m not the only one…But today with the help of Alex Perry’s diagram I understood everything. I know that everything you do for us is more less voluntary and I’m thankful for that. But can I suggest that maybe from time to time you could perhaps provide us, the readers of your blog, with a more visual explanation – as Alex Perry did today. It makes things so much more easy. Especially because one of your core subjects is what direction you bounce the flash of.
Regards
Andreas
I would also like to hear the answer to David E’s question. Very intersting
Bouncing off the ceiling works well even on higher than usual ceilings as long as they are white-ish. I usually bump up the ISO a little to compensate.
I’m now thinking… what if one uses the Honl speed snoot as a flag? Its inside is silver so potentially it will help with the bounce by reflecting to the ceiling (or wall) the light that would otherwise be absorbed by the flag.
I’m going to try it at my first opportunity.
Cheers!
Bogdan
I’ve tried a similar method to using a honl snoot and the issue is that it spreads the light out so much that it won’t go to exactly where you wany it and the light quality will be different than intended.
Sometimes I zoom my flash when bouncing both to get more effective power and also to produce a smaller light source on the ceiling. Consider more than a simple bounce. Consider your flash as the light origin and the wall/ceiling as the source and you can begin to shape that source area based on the light you want to produce. I’ve even used a full snoot when bouncing when I want to produce a harder off camera light source. That eats a lot more power but it works.
Neil, what I loved most about this post is your image’s subject matter. It’s such a simple idea to shoot the wedding party as they watch the first dance, but as a budding wedding tog its something I hadn’t considered doing. I’d love to read a post from you about the types of images you create at a typical wedding that, like this, may not seem so obvious to someone with less experience covering weddings.
Neil, Scott brings up something I’ve been wanting to ask. Flash head zoom. I didn’t see it mentioned in the book, but do you leave it at the widest zoom setting or vary it?
The snoot as a flag is also something I’m interested in. I need to quickly change from bouncing to left to right in vertical. It takes too long to move the flag around, but with a flag around the entire flash head, snoot, would solve that. Thoughts?
Thanks,
David
Scott, I do keep my flash-head zoomed to maximum.
I think a full snoot will eat up far too much light. While the idea itself might have merit, I don’t think it is entirely practical.
Another great article Neil! I’ve got a wedding coming up so I will try this method out.
Thanks for sharing :)
Mark.
Neil, seeing that diagram reminds me of a question I wanted to ask. If you bounce off the ceiling rather than an adjacent wall there is a risk that you will get panda-eyes as the eyebrows cast shadows over the eyes. A convenient wall is not always available and then I get in a quandry: do I bounce off the ceiling and flag and risk panda-eyes, or do I use a bounce card and risk over-exposure of close subjects. I far prefer the results of flag and bounce off a wall rather than bounce card except when it comes to a bounce off a ceiling.
How do you minimise panda-eyes when using a flag and ceiling bounce?
Mark .. I bounced off the ceiling here, yet don’t get raccoon / panda eyes with my subjects. Read my reply in comment #4. It’s all there. : )
Neil, the diagrams are very effective, would it be possible for them to be added when you are dong future posts to show how you bounce the light?
PS Just got you book, cant stop reading it, Brilliant! well done
John
John … I would like to, but I also need to spend time on things that actually pay the bills.
Another great post and example…
Thanks as usual
Dave T
Neil, when you say that you keep your flash-head zoomed to maximum, do you mean 200mm on the SB900, when you use the Black Foamy Thing ?
Stefan .. you’re going to have to connect the dots yourself on this one. : )
Very useful post, and useful complement to the book (which I just finished this afternoon.) Guess I’ll go have to find some black foam now.
Dear Neil vN,
I fully understand this posting in your excellent blog.
However, there are just a few issues that I don’t get.
Your excellent technique seems to presuppose that there will always be something to bounce the flash off of, right?
Well, what does one do if, as happened to me on Valentine’s Day (I was shooting as a guest and the shots were my wedding present),(1) you don’t have with you a high powered flash (the flash was GN36 at full 85mm zoom) (2) you don’t have a camera with super duper high ISO ability ( a la Nikon D700 et al ) and (3) wedding is held in a sports hall with super high ceilings?
Luckily for me, the lighting was VERY bright and I used an extremely fast lens (and no flash) but next time I might not be so lucky (the lighting might be poor and I may not have a super fast lens). So what to do?
And what if there is no ceiling? Or the ceiling is not white and you can’t bounce off of walls because folks are in the way?
Then of course there is the PJ issue. PJs tend to shoot JPEG, so how are they gonna cope if they can’t get a white surface to shoot off of?
I don’t mean to sound negative or come across as a naysayer, I am genuinely interested in how to overcome such problems.
Your advice will be appreciated.
Thanks in advance.
I get this question frequently on my site … and my answer is invariably the same. You have to adapt your technique and approach. If there is nothing to bounce flash off, then use off-camera lighting. Or bounce flash into a reflector. Something. Or sometimes, we have to accept that there is no other option but to use a measure of direct flash with a clear plastic light modifier.
While much of the material on this site deals with bounce flash, there are many examples of where I used additional lighting of some kind. It’s all there, showing that a flexible approach is necessary.
As for PJ’s refusing to shoot RAW … they have issues that they need to deal with if they want to insist on shooting JPG.
Neil,
Superb site! Just ordered your book, and this AM picked up the black foam for my flash.
Question: It seems to me that your excellent technique will push the ISO setting to the max, in many situations. (I have a Canon 50D, and 580EXII, and have found that I can shoot at ISOs of 1600 and 3200, but ONLY if I use Noiseware Professional, which is a separate plug-in for Photoshop) I haven’t as yet found any posts on your site that discuss the various noise-reduction techniques that I think would be an integral part of your approach. Am I wrong??
Jack
A big part of it is simply using a more modern camera. The 50D is a little long in the tooth, to say the least (seven years was a LONG time ago in digital photography). On more recent cameras, particularly full-frame models, ISO 1600 is pretty clean, and ISO 3200 and even ISO 6400 are “just another setting”. There are even a couple of cameras out there, including the new Samsung crop-sensor NX1, that will produce pictures at ISO 6400 that will be as clean as or cleaner than your 50D at ISO 800 — the state of the art is absolutely mind-blowing today. You no longer need heroic noise reduction strategies unless you’re addicted to viewing everything at 100% on your screen. But yes, with a 50D (or a D80/D90) you would need to pair the technique with noise reduction appropriate for the output size (not so much for an album or the web, quite a bit for a large print).
In response to the last post (Jack’s), I think Neil’s latest post (the new Nikon lens) illustrates Canon’s approach to noise in higher ISO’s…they don’t really have one (haven’t seen any pix of the new 7D, with 12500 ISO, but imagine it can’t be that great?). I too am a Canon user (5D and 580EXII) and can’t really justify shooting anything higher than 1250 ISO without flash; the noise is just too great. With flash, I’ll go as high as 1600 but 3200 sucks, especially with black tonalities (like tuxedos).
How is Noiseware Pro? I’ve used Nik Dfine2 software and it does the job, but it seems to blur the image in order to do so.
Thanks Neil!
Great Stuff, I can’t wait to put it to use.
Neil
I need to say you captured the moment, the four brides maids are in wedding heaven
Dream land Nice shot!
I have been using your tech. now for months with great results I need work on the spontinuity timing. ( it takes me a moment to think thur the shot and follow thur)
But very pleased.
I use the sb800 and d200 still, and find on a shot like this I need to push my flash up to 2.5 and 3 sometimes is this normally the case?
All and all getting the shot like this is what its about. Great feeling in this one.
John
John .. try going to TTL instead of TTL BL mode then, and see how this influences the amount of FEC you need to dial in.
Very cool website! I am so glad I found you. It must’ve been one of the fliers I picked up at WPPI.
I noticed my SB900 makes a funny sound when I attach a black foamy thing. It maybe the fact that the filter detection window is covered. I will try cutting a piece out when my SB900 comes back from Nikon. Has anyone else experienced this using the BFT with the SB900
Neil,
In this example with the bridesmaids you bounce flash of the ceiling but in a direction away from the bridesmaids, right? But when you direct your flash away from your subject like this, I don’t get how there is still enough flashlight hitting the bridesmaids. You bounced to your left, so I should think the light also travels to the left??? (Except of course when bouncing to a wall, then I do understand of course the light is bouncing back.)
Neil, I am going to give this a try. Very interesting!
Thankyou.
That black foam stuff is available at Michaels craft stores for around $1/sheet. Also available in white, and a bunch of other colors.
Great technique. I’ve been using it for some time at weddings, including a BFT (of sorts). I actually learned it from the primary shooter that I work for most times, and she learned it from Jerry Ghionis. More often than not I’m shooting both the flash and the camera in full manual and then just keep an eye on my working distance and use the inverse square law to calculate when I need to bump up my flash power or ISO to compensate the exposure. I manage to get some really great results with it.
One tip that I found very useful to keep in mind is to aim the flash in the direction that my (primary) subject is looking. Using your bridesmaids example, the flash should be aimed to camera left and far enough forward so that the light has to bounce back toward the ladies and creates short light on them. Bouncing to camera right would have resulted in broad lighting them, not to mention a lot more falloff from front to back.
Good stuff Neil, as always.
Are their basic rules meaning if a wall is colored what option do you have then?
If the ceiling is to high? Don’t bounce of a wall if the wall is x feet away? Worse case scenarios. LOL.
Check out these links. They will answer all your questions. You have some homework to do!
I can’t give “worst case scenarios”. How well you can bounce your flash is also tied in with how wide you can take your aperture, and how high you’re willing to take your ISO. So this will vary on a case-by-case basis.
Great stuff thanks Neil.