|
December 22, 2009
This question repeatedly comes up as response to the various articles here on my favorite light modifier – the black foamie thing.
For anyone new to this, here are the two main articles on how I use a piece of black foam to flag my on-camera speedlight:
- the black foamie thing,
- my choice of flash modifiers
The question invariably comes up:
why a piece of black foam and not a white card or a piece of white foam?
I have replied to this in the various articles here, using this image below .. but I think the reply tends to be overlooked as the articles are pushed deeper. So with that, I thought I’d resurrect my reply to this one specific reply to that question.
Looking at this image, which also appears in my book on flash photography:

I wanted to place my light source (ie, the area where I am bouncing off), at some point to the right of me, and above me, but also a little to the front of the bride. This way her arm and back to me, are under-lit compared to her face (which we see here as a reflection in the mirror.) Instead of a plastic light modifier or something similar, I used a black piece of foam to flag the light from my speedlight.
An open card with white on the one side might have thrown too much light into the room again, flattening the lighting. I don’t want that. I want directional light. I want that interplay between light and shade. I want contrast.
And in an opposite way of reasoning, a snoot might be too specific, since I do need a fairly large area to bounce effectively.
I like this piece of black foam. I can roll it a little bit with my left hand, and turn it into a snoot if I want to. I can also roll it back and open it up. Ultimately, this piece of black foam is simple, yet flexible. And this is what I use if I need to bounce my speedlight with a fair amount of control over the flash’s light.
Then there are also two other perennial questions:
- if there are no bounce-able surfaces, then you have to make other plans. You either have to use different light modifiers, or use direct flash, or ideally, off-camera lighting. You will obviously not be able to use a piece of black foam to flag yourself and your speedlight out of all kinds of impossible scenarios. You have to be adaptable in how you use light.
- yes, I do use other flash modifiers at times. But indoors, (and even outdoors), where I have surfaces I can bounce my flash off, this piece of black foam gives me the control I need. And the results are there in the images that I show on this site, as well as my work as a wedding photographer in New Jersey.
As a summary, I want to emphasize this point again – there is no quick fix. I am staunchly against the idea of a cure-all approach to lighting and flash photography. Specifically, the idea that a single piece of plastic attached to your flash will give you the best results all the time – that idea will hold you back.
You have to constantly adapt your technique by considering your subject, the scenario you’re in .. and the results you’d finally like to achieve.


If you find these articles interesting and of value, then you can help by using
these affiliate links to order equipment & other goodies. Thank you!
Stay informed of new articles via the monthly newsletter.
Also join us on the Tangents forum for further discussions.

Comments (21)
December 13, 2009
Rear curtain flash sync
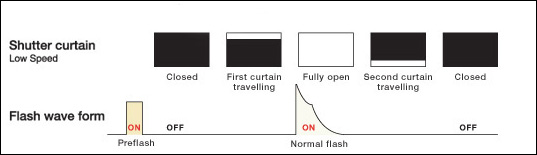
With flash photography, suggestions are often given that you should use rear-curtain sync. Most often for the wrong reasons. So here is when NOT to use rear-curtain sync flash … whenever you don’t need it. Sounds confusing? Well, let me explain …
Rear-curtain / second curtain sync
Your camera’s shutter consists of two curtains that open, and allows the light to hit the sensor or film. This is true for all focal plane shutter film cameras, (as opposed to those with leaf shutters), and true for all digital cameras that have a mechanical shutter, (as opposed to an electronic shutter.)
To allow light to hit the sensor (or film), the first shutter opens, and then some short time duration later, the second curtain closes. Now, in using slower shutter speeds than max sync speed, most D-SLRS and speedlights allow you two points at which you can sync your flash.
You can either have your flash fire right at the point when the first shutter has opened, (first curtain sync), or juuust before the second curtain (rear curtain) closes.
This gives two different effects when your subject is moving laterally across your frame. The way the ambient blur records in relation to the flash-frozen moving subjects, looks different for those two ways of syncing your flash. If you’re photographing people (or any subject) in low light, and you use flash .. while that subject is moving, then rear curtain sync will most likely give you the best effect. (More about that in a follow-up article later on.)
However, when your subject is static, there really is no difference in how your photograph will appear .. except when you’re using TTL flash, and you’re photographing people looking at the camera.
To explain why, let’s look at this diagram:

(more…)
Comments (16)
October 27, 2009

[ click on the photo for a larger image ]
using off-camera flash on location
It was a busy weekend again, with a wedding and a portrait session on Sunday. From the photo session on Sunday, here’s my favorite image of the day. I just love the way the background appears in this photograph. The bokeh of this lens is just wonderful.
camera settings: 1/250th @ f4 @ 400 ISO
The camera used was the Nikon D3, (B&H), and the lens was the 70-200mm f2.8 VR , (B&H).
A telephoto zoom like this, or the Canon 70-200mm f2.8 IS, (B&H), is essential for this kind of portrait work.
That image is typical of the separation you can create between your subject and the background, by zooming tighter. Here I was zoomed to 170mm .. for no real reason than I liked the perspective at this point. I had a comfortable working distance in that he could listen and see any instructions I gave him on how to pose … yet the perspective is nice and tight.
Lighting is exactly as described on this previous post on off-camera lighting, where I used the Q-flash’s wireless TTL system. The Q-flash was held to my left, and at about 45 degrees to the boy, and diffused with a softbox.
My choice of settings was for the background exposure, and I was at maximum sync speed for a very specific reason. In using TTL flash, I was able to control my background exposure from my camera, by changing my aperture and ISO as needed .. while remaining at a high enough shutter speed.
And that’s it.


If you find these articles interesting and of value, then you can help by using
these affiliate links to order equipment & other goodies. Thank you!
Stay informed of new articles via the monthly newsletter.
Also join us on the Tangents forum for further discussions.

Comments (33)
October 18, 2009
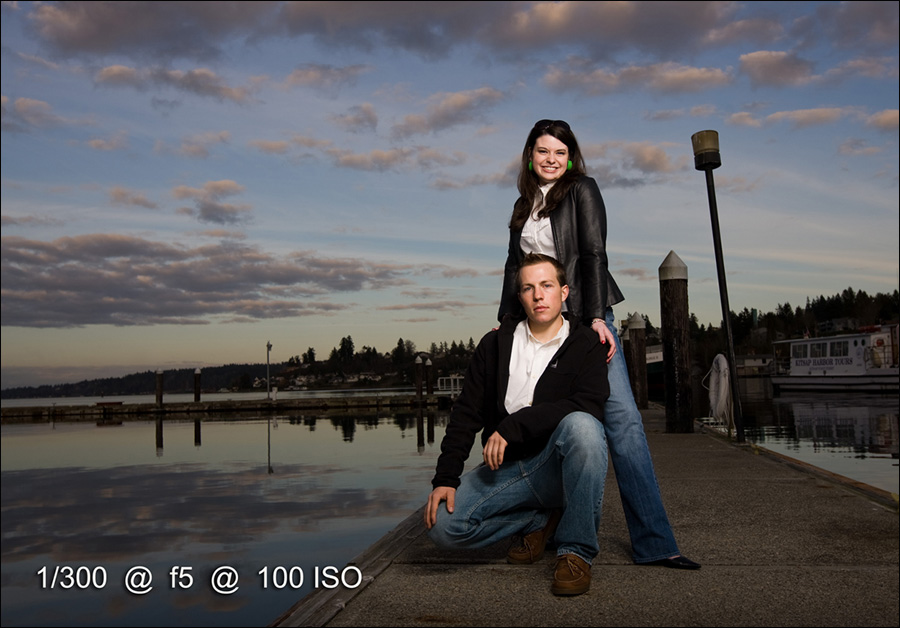
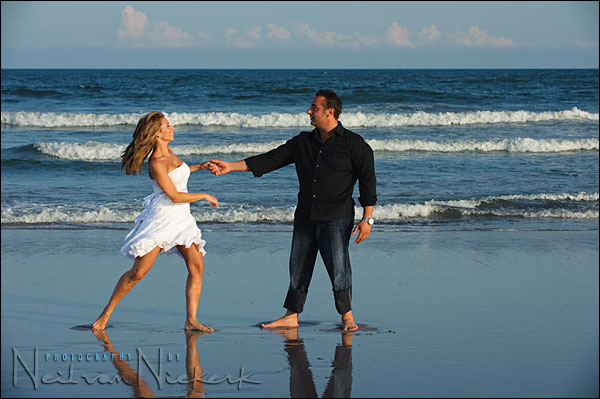
There are a few reasons why I love off-camera lighting, and I want to show some images from a recent photo session with one of my couples, Jill & Mike, as an example.
The main reason for me, is that you can have perfect lighting on your subject’s face with much more freedom than if you just relied on the available light. I am usually quite particular about the backgrounds to my photos, where it is in my control. The backgrounds need to be complementary, or add something to the image. I have a preference for an out-of-focus background. The defocused backgrounds create separation that helps my subjects pop out.
When I only use available light with a photo session, I am reliant on finding both a good background, AND great light on my subjects’ features. However, when using supplementary lighting, (such as flash with a softbox), the pressure is off. I pretty much just have to find a nice background, add my subject, and then use off-camera lighting to light them properly. Dead easy.
Here’s a straight-forward portrait of the couple against a background which I knew would work – the sun-soaked leaves in the back would create a golden glow behind them.

(more…)
Comments (42)
October 7, 2009

The previous article on the topic showed a more static set-up in how I light the formal portraits of the bride and groom and families on their wedding day. But I try and get as many on-location portraits of the bride beforehand to bring in some variety to the portraits. It is also a very good idea to get as much done as early on as you can on the day .. just in case the time-line gets compressed and things don’t quite follow the original plan. Then you’ll be much happier for having some solid portraits in your pocket. So it definitely is a good idea to shoot some formal portraits when you can just after the bride has finished her preparation.
In this example, I had the bride in the hotel’s foyer, but I specifically had the bride stand in a place where the overhead tungsten spotlights didn’t fall directly on her, but there was obviously enough spill light to give a strong color cast. So she was relatively in ‘shade’ compared to the brighter background. This was done on purpose, so I could use flash to light her properly. In this case, on-camera flash in TTL mode. And to make sure I don’t get an ugly color cast in adding “blue” flash to the warmer tones of the tungsten+daylight mix .. I gelled my flash with 1/2 CTS gel and had my white balance set to 3700K. More about that on this previous post on using flash in a tungsten environment.
I bounced my flash to camera left, and used the Black Foamie Thing to shield any direct flash that would’ve fallen on the bride. I specifically want indirect flash. The moment that your subject can see any part of your flash tube, there is direct flash … and that would spoil the effect that I am after here … soft indirect light that is still directional.
(more…)
Comments (18)
August 26, 2009

A question that came in regarding material covered in the book on flash photography techniques ..
Sven Pohle asked:
I am reading through your book (second time already) and have a question about metering plus adding the flash. I do meter for a white tone in my image and add +1.7 or 2 (I’m on Nikon) to my exposure. Now without flash my image is exposed correctly. But if I add the flash then the white starts to blow out as it does add flash light to it. So this is there i am confused. Would you rather go and meter for the background to get that right and then just add the flash to bring the subject up ?
I’d like to answer this here, since I am sure this is a widespread question or point of confusion …
First, to anyone who is confused by the question – part of the metering techniques explained in the book, revolves around using your camera’s built-in meter. We use it to calculate ambient exposure by metering off the brightest relevant tone of your subject if they are wearing white. And in order to do so, we have to adjust our metering so that it places white correctly on the histogram. In other words, we have to correct for our camera’s tendency to expose for everything as a medium toned grey, by pushing up our exposure by around +1.7 stops.
Back to the question about adding flash to available light ..
(more…)
Comments (16)
March 27, 2008

What are your settings? - a question that I am often asked about various images.
And quite often, the answer is surprising – it doesn’t really matter.
Sometimes the specific settings are of importance, but usually much less so than the method of getting to correct exposure of the ambient light and the flash.
This is the photographic equivalent of teaching someone to fish, versus just slapping a fish down on a dinner plate. Just telling my settings will reveal very little about the how. And yet, the how is far more important than just a listing of seemingly random figures.
Let’s look at this recent image from one of my workshops on flash photography – especially since it is exactly the kind of thing which I teach during the course of the day.
(more…)
Comments (31)
« Newer Posts
|
|