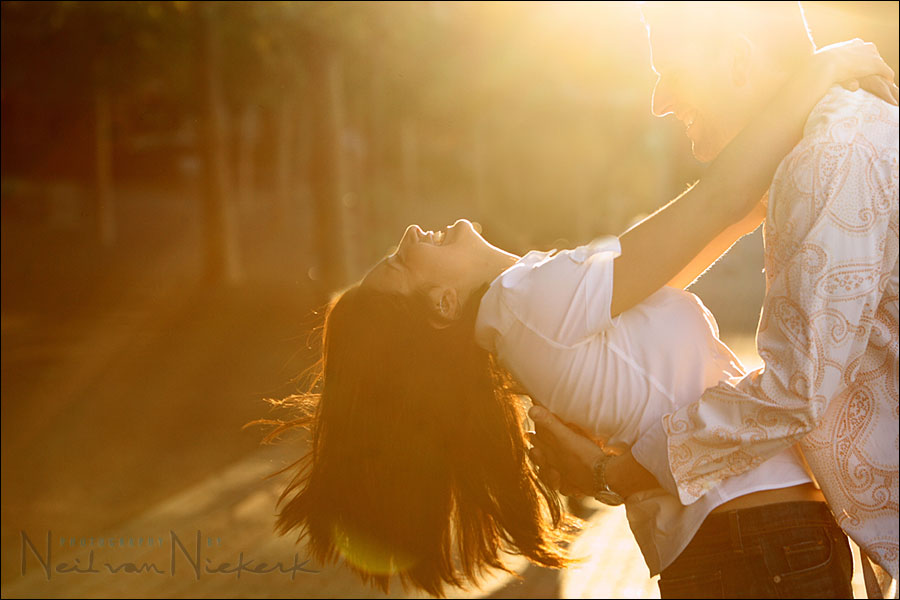
Using lens flare for that golden glow effect
I’ve had some questions about images that I have posted which show a lot of lens flare, and specifically the image above. And the question also arose what kind of Photoshop actions or effects I used on that image. The answer is simple .. none. While that image isn’t quite “straight out of the camera”, it is (nearly) “straight out of the raw converter”.
Something I find myself doing quite often on days when I photograph in the sun, is to seek out the sun purposely in the frame of my camera .. and allow the sunlight to flare as a burst of light streaking across the image. I find that if I can place it carefully, it adds a cinematic feel to the images – and for me, also a sense of lightness and sometimes even a touch of the dramatic.

Here is what the original image looked like, straight out of the camera.
Interesting perhaps, but definitely not quite there yet. It needs a little work. But just a little.
Adjusting this type of image in post-production, you really need the latitude that the RAW file offers. (I also know now that there will be the wise owls who will save this image to hard disc and edit it and then triumphantly email it to me to somehow prove they can match the results with a JPG image. But really, you can’t. No, seriously, you can’t.)
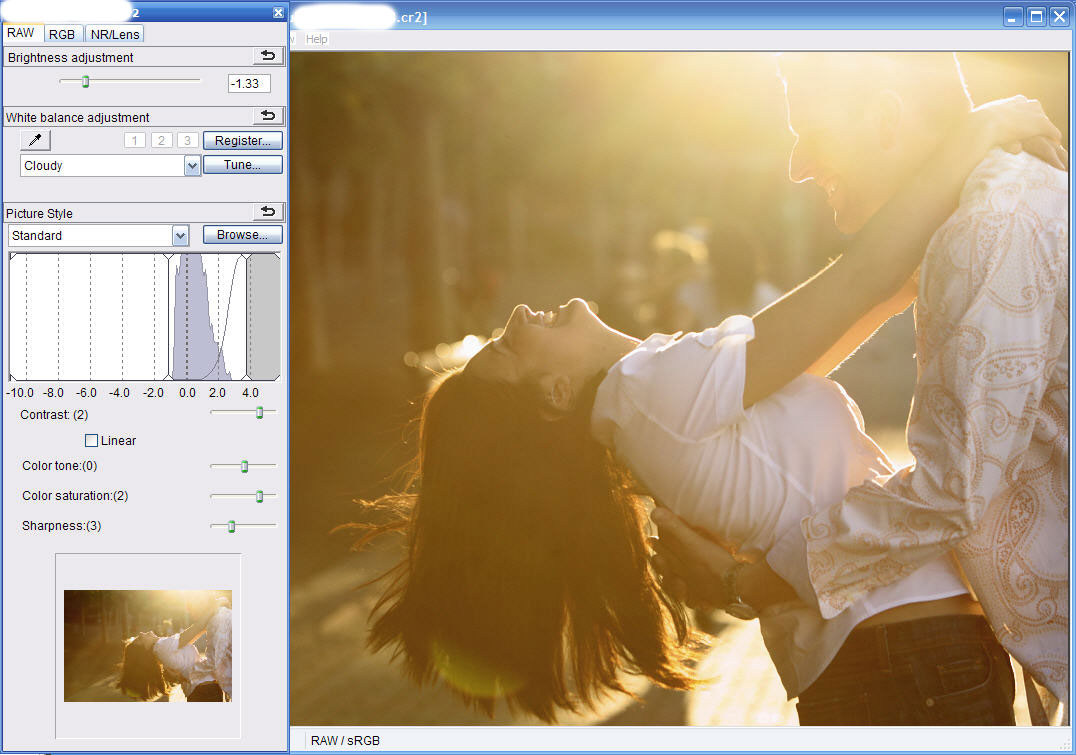
Here are the controls in DPP that I changed to bring the above image into something which looked much better.
Firstly, I pulled the exposure down a lot. -1.3 EV in this instance.
Then I changed the Black Point. For DPP it is that slider in the histogram that I moved up to the place on the histogram that I wanted to appear as black.
Other things I changed were the WB, the Contrast and the Saturation. The WB was changed to Cloudy to give an even warmer glow to the image. Similarly the Contrast and Saturation were bumped up to give the image a lot more punch. (Images with flare will most often have low contrast.)
The only part of the image that I specifically needed Photoshop for, was to edit down someone passing by in the background which I found distracting.
For the most part however, I try not to edit images in Photoshop at all for my raw workflow. It is just more efficient to do all your adjustments and edits, in whatever program you use for your raw workflow, without having to edit individual images in Photoshop.
And that is how I moved from the original image, to the final image – pretty much just a few simple edits in a raw editor program. No flash. No photoshop actions or tricks. Oh, and I didn’t use a filter on my lens in this sequence of images. A filter would’ve just reduced the contrast even further.
That is it – a simple accessible technique to create an image with some punch.
Related articles
- Using lens flare for effect
- Should you use a filter on your lens?
- Technique – using lens flare for effect
Hi Neil,
I got one question regarding this technique. What do you expose for when shooting these types of photos. Every time I try this technique, the sun is either completely blown out, or the main focus is too dark. It’s a great technique, and I would really like to learn how to do this correctly.
Thanks
– Mike S.
Hmmm, you use DPP instead of ACR? Interesting, I would have expected that Bridge w/ACR would give you a faster workflow. I use Bridge to flag pictures, etc. and it integrates with ACR. While DPP seems to offer nicer NR and Sharpening than ACR, I find the combination of Bridge/ACR too appealing. It’s also unfortunate that DPP will not save a CR2 RAW file with an associated XMP sidecar, which means ACR won’t see your changes in DPP. Such a shame…
Hey Neil,
I’m a devout DPP user and started the Flickr DPP group. Great to see other Canon shooters using it too. Lately I’ve been also using Lightroom 2 (on VISTA). Been trying to find away to streamline the use of both apps since I find value in some of Lightroom 2’s tweaks. But for the most part I do EVERYTHING in DPP.
Great post!
Harry
Any thoughts on how to manage the massive file sizes associated with RAW? From all I’ve read, it sounds like a great way to shoot, but how does one deal with having one’s memory card fill up so fast, even the 2 GB card I have, not to mention the storage space required. I got a one terabyte external drive, but I get the feeling even that would fill up pretty quickly with files this size. Thanks for the insights!
My suggestion would be to spot meter the face of the lady to ensure the couple don’t become silhouettes. The sun’s going to burn out regardless but moving the black points is going to claw back some of the tones from the couple.
I’m a Nikon shooter and almost exclusively use NX2 to batch process my files. It’s very slow but the rendered files are better than those from Lightroom. I also use Lightroom but only as a library now.
Me thinks i may want to revisit using raw more often.
I use 8GB CF cards in my camera. I get about 379 RAW images out of that. I think that when shooting RAW, a large memory card is necessary to get through a good part of the shoot session. For SD cards, I think the camera has to support SDHC to allow one to use SD cards greater than 2 GB.
As for processing without DPP (I’m a Nikno user), I use Adobe Lightroom. All the controls Neil mentions he used in DPP are in Lightroom. For me, the main problem with Nikon Capture NX2 is that I have a harder time understanding how the controls work. If you’ve used an Adobe product before, you can figure out Lightroom. In addition, books and other documentation on Capture NX and NX 2 is severely lacking. Nikon needs to step up in this regard to obtain better NX/NX2 adoption.
Wow, now that was amazingly simple..I didn’t think it would be, but it was…I’ll really need to figure out how to shoot in RAW now..can you tell I’m a DSLR Novice!!?? LoL
Hi Neil,
Glad to see that i’m not the only one who prefers DPP.
Out of interest, do you save pre-sets that you use for your basic workflow with DPP, or is it pretty much what-ever each image needs. And do you use the NR/LENS tabs much.
Regards.
Steve.
Steve … I don’t use presets for the bulk of my editing. I do edit in groups of images though. Since I shoot in manual exposure mode, with one of the preset WB settings, it is easy to go through groups … and do global adjustments first. Then I might fine-tune a few images here and there.
I do set my noise reduction to level 2, for both chrominance noise and luminance noise, as my default. I do this globally to ALL the images, before I start editing.
I haven’t used the Lens tab yet. The vignetting that you can achieve with it, is too subtle an effect. When I do want vignetting to an image, I will do it in ACR.
Here is an example of a wedding where I did exactly that ..
I made some of the images B&W with a warm tint, and added a vignette. All done in ACR with Bridge.
Neil, sorry for back-reading (as I often do with your site). I love sunset/sunrise flare shots a lot, one problem I always have is locking focus, since there’s very little contrast in the viewfinder and AF sensor when shooting towards the sun, do you lock focus without the sun in frame (such as moving your camera angle/location) then recompose or is it really a pro-cam AF advantage over a consumer cam?
I don’t mind focus-recomposing on adult posed-shots but with moving kids and such, I don’t have the luxury of doing so, how do you do it accurately? Thanks and can’t wait for your book to finally ship :D :D
Dave
Dave … in the image above I used my hand to block the flare from the front element. So part of the scene would be obscured while I focus, and then I remove my hand when I have focus locked. It’s tough though. Most (all?) cameras will tend to hunt under these circumstances.
Hi Neil,
First of all, thanks for sharing your experience.
As I am a newbie regarding photography and more for using flash, I have some more questions. I tried many times to do some portraits in front of sun, trying to get the flare effect, and no trial has succeeded. My question is : is the background important to get the right effect? Should it be dark? If not, I am sure that I miss something. (for information, I am using a sony A100 + 50mm f1.4 + Sigma EF-530 DG Super)
Benoit .. try to get the sun in the actual image, or at least for sun to fall directly onto the front of the lens. Maybe your lens is just very flare-resistant.
Would even just a UV filter reduce this effect Neil?
Adam .. nope, a filter worsens the effect and gives even less contrast.
Great article, useful tips.
I could add that when dealing with flare, setting a wide aperture (f/2.8, f/3.5 etc) can sometimes create an unpleasant wash-out effect. You should reduce the aperture size to f/22 or lower if you can. The sun will now look like a star!