Flash Photography Techniques
Natural looking flash ~ Flash & Ambient light ~ Dragging the shutter
![]()
Adding flash to ambient light
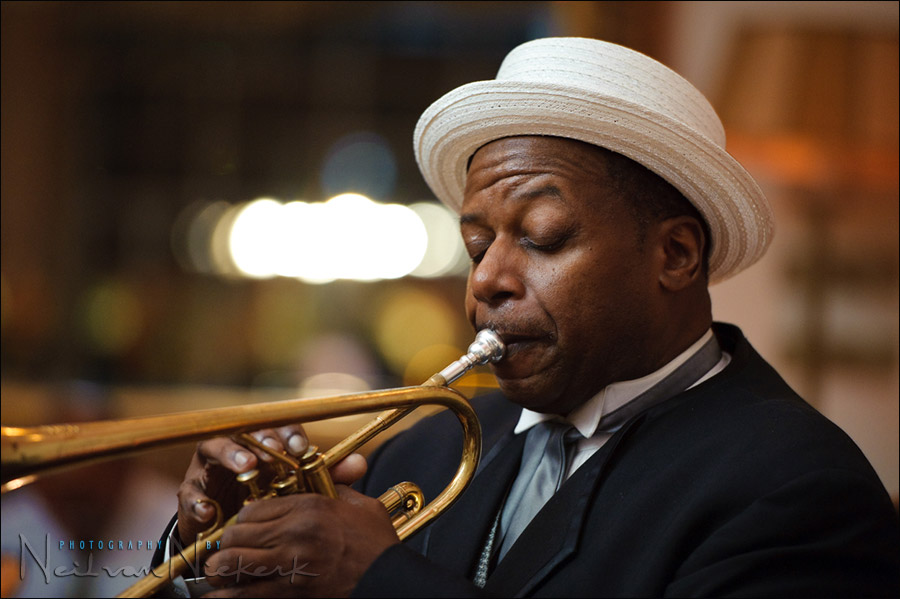
The expressive trumpet player in the band at a wedding – a simple portrait of this musician, sweetened with some bounce flash. The light on his face, is mostly flagged on-camera bounce flash. Flagging the flash stops direct flash from hitting him, as you can see by looking at the light pattern on his face.
With a bit of thought, and understanding of some essential techniques, using flash need not look unnatural, nor spoil the ambient light. For those who disdain flash and prefer ambient light only, quite often flash can help augment the available light, without appearing like flash at all. It just looks like great light. This is especially easy to do where the flash isn’t the primary source of light.
camera settings: 1/60 @ f2.8 @ 2000 ISO // TTL bounce flash, flagged
Nikon D3; Nikon 70-200mm f2.8 AF-S VR II; Nikon SB-910 Speedlight
Here then we’re going to look at examples where flash is used in conjunction with the available light.
The basic technique here is that we meter for the ambient light, and then either:
a.) make sure our ambient exposure is correct, and then could use flash to lift the shadow areas and make it a better image than it would’ve been without flash. This is essentially fill-flash. The flash isn’t the major source of light, and just helps lift the contrast.
b.) we under-expose the available light to a certain extent, and then let the flash pick up the difference, and give us correct exposure.
In the examples here I used TTL flash since the technology allows me to get to correct exposure faster than I would’ve with manual flash. Ideal for the times we need to shoot fast.
A.) Flash as fill-flash, where the ambient light is (nearly) correctly exposed.
With this portrait of a couple, the basic ambient exposure as shown in the left-hand frame, is correct. But the contrast is too high. I had posed the couple inside the archway under the staircase in Central Park. There is a flood of light coming in from the side, but not enough light coming in from the interior. This causes too strong a fall-off between the lighter and darker areas. Not as flattering as it should be.
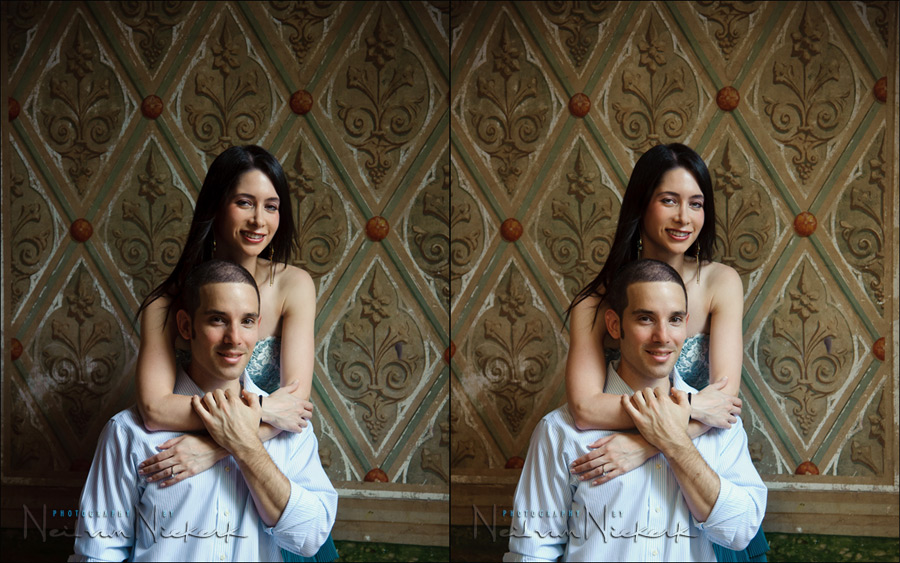
By bouncing my flash into the area behind me, I created a large light source. A large light source = softer light.
I don’t need the flash to “do all the work” in giving me correct exposure. The flash here is just fill light.
A closer look at the final image, where fill-flash was added:
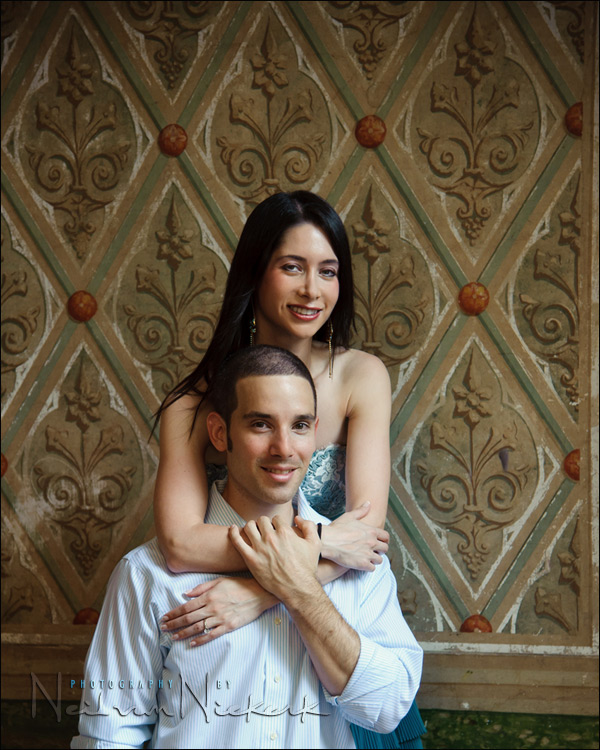
camera settings: 1/125 @ f4 @ 800 ISO
flash exposure compensation was set to around 0EV, even though it was acting as fill light.
(More about the choice of flash exposure compensation).
Nikon D3; Nikon 24-120mm f4 VR; SB-900 speedlight.
To give an idea of the size of the place that I bounced my flash in:

I bounced my flash into the area behind me, because I tend to bounce my flash towards the direction that I want my light to come from. I rarely bounce “towards” my subject except in specific situations. So the area behind me looked like that – a large open area with colored walls. With this, the light from the flash does pick up a color cast, and this is why it is imperative that we shoot in the RAW file format when bouncing flash.
related articles:
– on-camera TTL fill-flash
– bounce flash photography
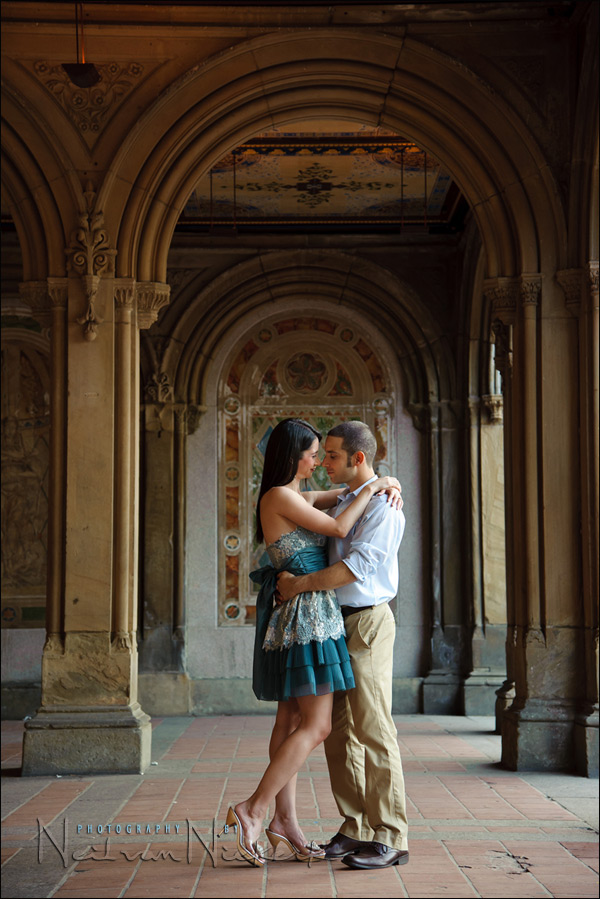
The photo above, is of a couple, Alli and Scott, whose New York photo session took place in Central Park, earlier this year. It is typical of how I use bounce flash to sweeten the contrast, and enhance the available light. I bounced the flash behind me into the large open area there. Enough light returned to brighten the shadows and make the photograph just that little bit more romantic.
camera settings: 1/60 @ f4.5 @ 800 ISO … on-camera TTL flash at 0EV
B.) Under-exposing the ambient light, and letting TTL flash give correct exposure
With this next image, I bounced flash off the church wall. The church was large, and the ceiling high .. but by holding the camera in a vertical position, I could bounce my flash straight towards the church interior wall to my left. This of course created a large light source, and this spilled enough light onto the couple to give flattering light.
I purposely did not use an omnibounce / Stofen attachment, since I didn’t want flash to spill forward for the series of images I took here. I did NOT set my flash to 45` since this would not have been a correct angle to bounce at.
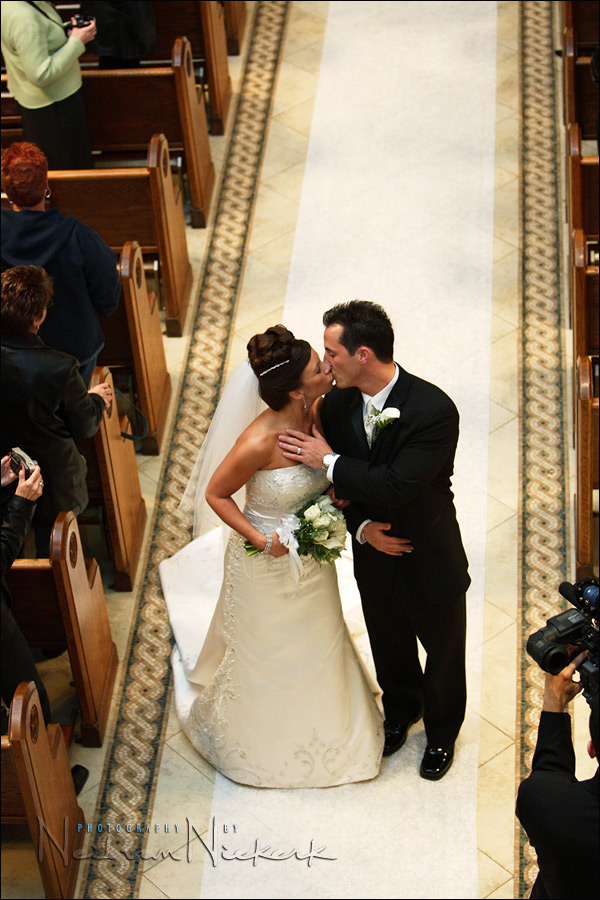
camera settings:
1/125th @ f2.8 @ 1000 iso
manual exposure mode – evaluative metering / TTL flash: 0 exp comp
Canon 1Dmk2N; Canon 70-200mm f2.8 IS
About the decision around the exposure metering and use of TTL flash:
I had figured out the basic ambient exposure before the bride and groom walked down the aisle. I did this by doing a few test shots of the backs of the guests towards the left-hand side of the photo. First without flash, and then with flash. This is how I arrived at a setting of 1/125 @ f2.8 @ 1000 ISO. When the bride and groom then walked down the aisle, I had my exposure settings down pat.
As the parents walked down the aisle, I had time to make a comparison shot without flash. (I did this specifically for presentation here).
So here are two shots in succession. The one with flash, and the one purely ambient light. The shot with flash had the WB slightly adjusted, the other is directly out of camera. Exposure settings remained the same, and I didn’t touch up exposure in raw either.

Note that the flash shot has no flash shadow. It looks natural, and a hell of a lot better than the ambient-only shot. By using flash, *I* controlled the light, and didn’t merely shrug my shoulders and complain that the ambient light wasn’t ideal.
To improve exposure for the ambient-only shot, I could’ve set a slower shutter speed, and risked blur as they move and from camera shake. Or I could’ve bumped up my iso to get the higher shutter speed, but then have to deal with increased grain. Also, the ambient light isn’t even. With flash I had much more control over how the final image looks.

Adding the fill-flash, enhanced the image – we don’t just have to rely on the available light.
 next section: Dragging the shutter
Help support this website
If you find these articles of value, please support this website by using these Amazon and B&H affiliate links to order your photo gear.
I also offer photography workshops and tutoring sessions. There are also video tutorials, which are online workshops on photography.
Join us on the Tangents Facebook group for further discussions.
Neil vN

Books by Neil van Niekerk

How do I slay the “green beast”? Maybe I missed it in your book or on this site. I know you have talked about florescent lighting but I’m not getting good results. I’m using a D200 with SB-900. I’ve set WB to florescent and also to “A”. I’ve added various shades of green gel and I still end up with a mild to strong blue tint. Other than going to my Quantum T2 to overpower the florescent lights is there something else I need to do?
Dwayne, so far my approach has been one of overpowering fluorescent lighting with flash. In other words, I under-expose the ambient light (fluorescent), and have flash as my dominant source of light.
The problem with filtering for fluorescent is that the colour balance of fluorescent lighting can vary dramatically, depending on design, brand and age of the tubes. So it is simpler usually just to drown it out with flash.
Earlier this year I did have the intention of photographing a model in a building where there was a lot of fluorescent lighting, with the idea of writing a tutorial about it .. but it ended up being great light to use as it is.
Dear Sir
need your advice, if we use tungsten lamp(s) surrounding model, and would like to fill light with flash, do we have problem on different color temperature ? should we fix it and how to fix.
rgds, suwat u.
You will have to gel your flash for the tungsten lights.
Your work is totally amazing, and with so much info to fellow photographer new and professional it’s worth every second that i took to read the blogs and view the amazing images.
Hey Neil,
I have been reading your blog posts all night. I also just ordered your book and it should be here monday! [2 day shipping, yes, it is that important ;)]
I just got a 430ex II and I have a couple of questions for you, if you don’t mind. Ideally, (I know it would vary from situation to situation, but) if you underexpose the ambient light by about 1 stop, would you then bump up the flash exposure to +1 to compensate? Especially if you are shooting ETTL and bouncing off walls/ceilings… I feel like this would be the case, right?
Also, I couldnt find a post regarding fill flash when outdoors when there is nothing to bounce the light off. If fill flash is necessary, do you typically aim the flash directly at the subject and lower the flash exposure significantly? Do you ever use a diffuser when using your flash for fill light outdoors?
Thank you so much,
Alex Girolamo
Alex, with TTL flash, the technology (in theory) will give you correct exposure regardless of your chosen settings. Obviously, you have to work within the range of what the flash is capable of.
With that, the camera and flash will work together to give you correct exposure even if your ambient is purposely under-exposed. It gets more involved than that of course, but that’s the basis of it … the TTL flash technology should take care of the flash exposure for you. When it doesn’t, then it is up to you to then nudge it with your flash exposure compensation.
Your question about what to do when there is nothing to bounce your flash off, is covered in a later post on this blog.
Excellent use of flash to highlight but not cast shadows and not using a diffuser makes it even better
Hi Neil,
Been following you for some time, since I first started using on camera flash actually. I’ve gone from knowing nothing to thinking i know a thing or two all thanks to your site!
A question though. Now that I’m comfortable with the basics I’m starting to shoot in more extreme atmospheres and conditions and encountering some issues.
Is it possible to under expose outdoor ambient light on purpose and use your flash to properly expose your subject?
Today I tried shooting a model outdoors, the sky was really quite beautiful. Extremely deep blue with patches of deep black and grey clouds all over with tons of blue breaks in the sky.
I thought I’d go for a dramatic portrait with the ambient under exposed by a stop or so, and let TTL-BL fill in the model properly.
The only issue was, it didn’t really work that way. Is there a maximum window for aperture size? Also I might add, that I reached proper exposure with my camera in manual mode and then increased my aperture by a stop to achieve the results I wanted with the ambient light (the ambient turned out great just the way I wanted it to look)
Should I be raising the shutter speed to dim my ambient instead of the aperture? for instance:
Proper exposure for the shot I was attempting was good at ISO 200, Shutter Speed 250, Aperture F11 , with WB set to cloudy as the moment i was shooting the sun was covered behind a patch of clouds.
I then increased my aperture from F11 to F13 and also gave F14 a shot.
The ambient came out perfectly how I wanted it .. but the model was coming out either heavily underexposed, or heavily overexposed. perhaps it was just the clothing and skin tones of this particular model.. but I shot with those settings consistently and changed my flash exposure all the way from -3.0 all the way to +2.0 in the smallest increments possible with the model in the same position the whole time, and none of them really came out with that “POP” or really awesome magazine look.
Might add that my equipment was a Nikon D700, Flash is SB 800 which was in an off camera softbox and lens was 24-70 2.8 model.
I’ve had good results so far however it’s been exposing the background properly (although I do find even when I expose the background properly that depending on the scenario I am getting a lot of overexposed images even when I back the flash up, or set the FEC all the way down to -3.0)
any tips or articles you may be able to point me to that I may have missed on your site would be greatly appreciated!
The more I think about it, the more it’s got me wondering. If I’m underexposing the ambient light so that it’s almost on par with my subject… should I be using TTL flash instead of TTL-BL , and or instead of what I’m used to in terms of lowing my FEC to -3.0 to -1.7 , I should be blasting it higher as flash is now becoming the more primary dominant light on my subject?
on third thought, completely scratch my question on ttl or ttl-bl, i just realized even though I had it on ttl-bl when it was on my camera, when i moved it to the softbox, ttl-bl isn’t even an available option.
so i guess im left asking for any good tips
overpowering the sun with flash photography
i just found this article on your site, it was exactly the kind of dramatic portrait I was going for. After reading this article I’m pretty sure that my problem was not having enough flash power.
I will retry the photoshoot in the next few days and try using 2 or 3 speedlites in softboxes instead of just the one and post back with my results. I’ll also include some of the failed attempts from earlier today as references.
alright, can disregard all of the above comments I left, I spent the better part of today pouring over some 15+ articles on your website, found a few key ingredients I had forgotten. Went out today and did a photoshoot with the wife, got some amazing results. Thanks so much again for all the info you share with us.
Hi there AJ … I am glad you were able to figure it out on your own.
I want to post links to other articles which would help bring it all together for you.
– Flash Photography tutorial
– balancing flash with ambient exposure
– flash and ambient exposure – where do you even start?
– combining flash and ambient light
Here’s a silly question… is there some trick to bouncing on-camera flash to your right, holding the camera in the vertical position? With Canon at least, rolling my camera so the flash is on the right side makes it incredibly awkward to hit the shutter button… Thanks!
Yup, it’s awkward; and no, theres no trick to it other than you have to hold the camera & lens properly in your left hand, so that your right hand doesn’t carry too much weight.
Neil
have you got a sort of maximum distance to bounce your flash?
I’m going to take some photos in a big church, and the closest wall I can use is about 5-6 meters from the bride…
By reading your articles and book, my “abetterbouncecard” doesn’t seem to be the best solution.
I don’t have umbrella, reflector (and I can’t use them in that ceremony)
The church isn’t very dark, but walls are distant and red-brown
tnxs
It is impossible to say what the maximum distance would be, since it depends on your flashgun’s power; your choice of ISO and aperture; and also on how far you are from the surface you’re bouncing off.
And … you do need an umbrella and radio transmitters if you’re serious about wedding photography. Some things need to be done properly.
Neil,
When using TTL flash exposure do you have to aim the flash directly at the subject? I have been experimenting with my new speedlight and I find myself using manual flash power and bouncing the light off of the walls.
TTL flash exposure is calculated via the pre-flash, as seen in this diagram.
The amount of light that is measured from this preflash (of known intensity), tells the camera and flash how much light to put out for the actual exposure. So you don’t need your flash pointed forward for this. In other words, if you bounce your flash, TTL flash is most likely the easier option.
Thanks again Neil, great stuff here.
I have tried using sb-600 flash for fill when the evening sun is side lighting or backlighting my subject. But the color of the sun is obviously much warmer than the flash fill which even at fec -2 or -3 is still enough fill to give a cold cast to the face. Have you had much success using filters on the flash to match the sunlight? I would rather not have to balance (correct) the colors of two light sources in post processing.. not my strength :) Is there a simple way to attach films to the flash head?
I sometimes have the same issue with tungsten light and flash indoors, but when bouncing off nuetral painted walls.. it seems to warm up the light enough. My main issue outside when i have nothing warm to bounce off of an have to point direct at the subject.
I do gel the flash if the general color if the light is warm.
Check comment #6 and 7 on this page about speedlights and accessories.
Hé Neil,
many years I’m reading your site and the two books because as a non professional I need practice and advise to much. So I come to this page to read it again. Thanks for sharing it with us and congratulations with your USA citizenship.
Great flash shot. When shooting weddings, no flash is equal to no camera.
We always have to fight raccoon eyes, sun, etc.
I see a camera in front of the BG but you must have been on a balcony because of the angle of the shot.
Hi Neil
In relation to flash + ambient light, and more so, when you decide to use fill flash as opposed to a predominant light source.
I’ve read all your tangents, and have both books, and I am looking for the most simplistic personal opinion / definition, so here goes.
How do you decide when the ambient light is correct and then use fill flash to lift shadows or make the image POP !!!
As opposed to “flat and even light” where you under expose the ambient light by a stop or two.
Is it the case that you can just look at the scene (light etc) and say, “yeah fill flash here “. The available light is so nice or !!!!!!
Cheers
Angelo (Australia)
hi Mr Neil
how are you ? i am so pleased your web – i study a lot from this thanks for your time – now i have a question about my remote trigger for my cameras
i have the remote trigger which i using – but today it suddently doesn’t work though it still turn on with the flashlight – i check anyway about the same channel turn on the receiver and tranmitter together and battery too ,but when i push the button for trigger on tranmitter for receiver on camera it did not work for can taking picture -but i push the button on receiver it work well
for make sure i bought the new one – this sittuation still happen ???!
can you help me ?
thanks
hope you in good health
Le
Le .. you’d have to give more details, such as which brand of wireless triggers these are.
Hi Neil,
Firstly I would like to say big thank you for the job you have been doing on your site. That’s great.
Could you please explain few things.
In the situation b) you are saying that you used manual exposure mode. Do you mean you set your camera into Av mode, chose aperture and ISO, set the exposure compensation to eg. -1 or -2 EV and you got shutter speed from your camera meter or you set your camera to M mode and got all the settings by try and error remembering to have accordingly under-exposed.
Thanks
Rafi
Rafi .. you’re making it overly complicated.
When I say I shoot in manual exposure mode on my camera, it is exactly that – my camera is in manual. I then mostly use the built-in meter, or I use the histogram.
hi neil do you use manual focus or autofocus when shooting bride and groom?
Auto-focus! There is no way I could focus as fast as the camera, especially in low light.
The style of photography has also changed – you could previously set a small aperture, and pre-focus … and then trip the shutter as the person(s) moved into the pre-focused area. But that means a lot of flash, and it just doesn’t have such a natural look to it.
So with cameras giving us incredible high-ISO performance, and coupled with amazing AF speed, it makes it easier now to nail the focus in low light, even if the subject is walking.
Hi Neil,
I have a question on the topic above. Is the left photo of parents walking on the isle the correct ambient exposure or you already under exposed it? Since the topic is underexposing the ambient light, i was thinking you would show us the comparison of the correct ambient exposure setting and the under exposed setting just before you add the flash.
The shot with the parents – my camera settings were decided on with a few test shots before everyone walked back down the aisle. So yes, the image is under-exposed. The flash picked up the slack in exposure, and gave me correct exposure.
I didn’t have the time (or inclination) to play with settings while they were walking down the aisle. At that point, I needed to have my mind made up on what would work … and what not.
So while you think I “would show you the comparison shot at correct ambient”, you have to keep in mind this was shot during actual work / a wedding I was photographing.
So just follow the thought-process. You don’t need the correct ambient exposure shot here to understand what was necessary to get to a series of images that work in the context of wedding coverage.
Thanks again Neil,
You are helping me a lot here. i am reading the flash techniques and try to digest it one at a time, so don;t get tired of me if i asked you again more questions on the next topics. Again thank you for sharing your thought to us.
Hello, I am loving and appreciating all of your articles! Very informative although it seems I find myself in a situation that I’m still not sure of what to do. The church I will be shooting in is triangular shape surrounded with dark wood with a triangular stained glass ceiling. I am unable to bounce my flash and am not guaranteed bright ambient light considering it may not be a bright day and the lighting in the church is yellowish can lights on the high triangular ceiling. I shy away from straight on flash although I do have a diffuser. Any suggestions?