
Flash photography: Overpowering the sun with flash
When we think about overpowering the sun with flash, we are most often really considering to match the sunlight with enough flash. We usually want to lift the shadow areas to the same level as the sunlit areas. There’s a tiny bit of math involved here which makes the algorithm or thought-process predictable. Since the Sunny 16 rule has it that broad daylight is in the order of 1/200th or 1/250th @ f11 @ 100 ISO … you’d either have to shoot with a bare speedlight, (which, as a small light source, will cause hard shadows) .. or use a much more powerful strobe with a softbox. But you want to be at (or near) that exposure level of f/11 @ 100 ISO with your flash.
If you want the flash to dominate, then you’ll have to be at f/16 or even f/22 to really be able to over-power the sun with flash.
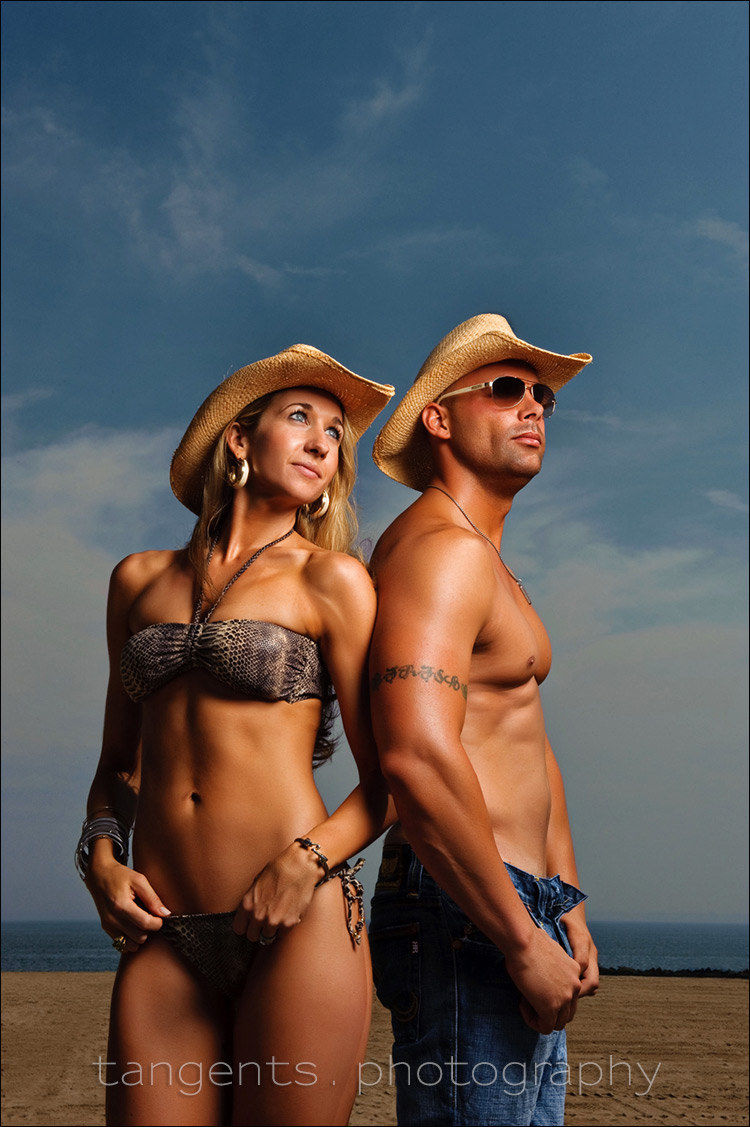
The sunlight on Coney Island was pretty harsh during this photo session with Sarah and Mark, and I needed to / wanted to clean up the sun’s harsh shadows with flash. For this image I used the Profoto AcuteB 600R lighting kit with 2×3 Profoto softbox off to my right, adding flash at full power. These days it would be the Profoto B1 flash (affiliate) that I would use on location. I placed the softbox and flash to come in from the same direction as the sunlight, adding as much light as the sun. The intention is to clean up the shadows caused by the sunlight, and because I am then under-exposing the background by a stop .. thereby also saturating the sky. Camera settings: 1/250th @ 160 ISO @ f22
If you’re unsure how the Sunny 16 Rule and maximum flash sync speed come into play here with these decisions, check out these related articles:
- Applying the Sunny 16 Rule & Flash Guide Number
- How to overpower bright sunlight with ON-camera flash
Better yet, let’s step through the thought-process on working in bright sunlight with flash – one of the most challenging lighting scenarios we’ll most likely encounter. There are a couple of steps we can take to make things a lot easier for ourselves …
How to overpower the sun with flash
If we can move our subject so their back is to the sun, we can get away without using flash. We make sure our subject is not unevenly lit with sun, and then we just let the highlights blow out as a rim light.
If we can use flash (whether off-camera or only on-camera), we’d still ideally move our subject so that their back is to the sun, and make sure they aren’t half-lit by sun and half in shade. But even if we can’t move our subject, this easy algorithm is the best approach:
When using flash with bright daylight:
1.) Use your lowest ISO
We don’t need 1600 ISO in bright sunlight, so take your ISO immediately down to 100 ISO or 200 ISO. If you really need the extreme depth-of-field of f22, then you can raise your ISO. You would risk image softness due to diffraction though. But that is the option.
2.) Go to your camera’s max flash sync speed
There is a reason why we’d go to the maximum flash sync speed,
a.) and not lower (for then our aperture becomes smaller and our flash needs to give more output),
b.) and not (immediately) higher than max sync speed (for our flash loses power in high speed sync.)
3.) Find the aperture
Ideally you’d use an aperture where you don’t lose important detail in your subject. But we don’t want to get too caught up in controlling all our highlights, for rim-light helps separate our subject from the background. So that controlled loss of detail where the highlights blow out, is a good thing. And also, sometimes we have to compromise and accept that some detail will be lost.
4.) Now, for that ISO and aperture combination, dump as much flash as is required .. and if you have reached your flash’s maximum, and still not getting enough light, then move closer.
The recipe is as simple as that. And it is an easy enough approach to keep things on track when battling under pressure in hard sunlight.
Off-Camera Flash Photography
With this book, I wanted the material in the book to flow as a truly accessible introduction to off-camera flash. The techniques here are within the reach of everyone.
As always, the aim was for those aha! moments when things become clear and just makes sense. And then, hopefully, inspire the readers of the book to see how easily off-camera flash lighting can expand our photographic repertoire.
You can either purchase a copy via Amazon USA or Amazon UK. The book is available on the Apple iBook Store, and Amazon Kindle.
Using High-Speed Flash Sync (HSS)
If you find you have the flash range / energy / power to spare at max sync speed, and you’d like the shallower depth-of-field that high-speed flash sync (HSS) affords us, then by all means go to HSS mode. But it is a good idea to start at max flash sync speed if you’re unsure, because at max flash sync speed you have the most likely chance of success in adding flash to bright sunlight. If you can’t do it at max sync speed, you can’t do it at any other shutter speed. This is explained further in the article on maximum flash sync speed.
Most often, when we’re working in the f11 region of apertures, and using a softbox or some light diffuser, then we’ll be at our flash’s maximum output. So then we’ll move our flash closer or further to give us correct exposure.
Using a light meter is the easiest and most sure way of getting right exposure of your flash. But, this isn’t an absolute. With the image at the top, I checked the back of the camera’s preview and estimated how close I need to move my softbox to my subject to get the correct exposure. I know, it’s strobist heresy.
If you don’t want to go to HSS, or your flash doesn’t allow it, then there is always the option of using a Neutral Density Filter to get to wider aperture.
- Using a neutral density (ND) filter to control DoF with flash (model: Ulorin Vex)
Camera settings & photo gear (or equivalents) used with this photo session
- 1/250th @ 160 ISO @ f22
- Nikon D3
- Nikon 24-70mm f2.8 AF-S
- The lighting used was the Profoto AcuteB 600R power pack,
but the current choice would be the Profoto B1 flash (B&H / Amazon) - The light modifier was the Profoto 2×3 RFi softbox (B&H / Amazon)
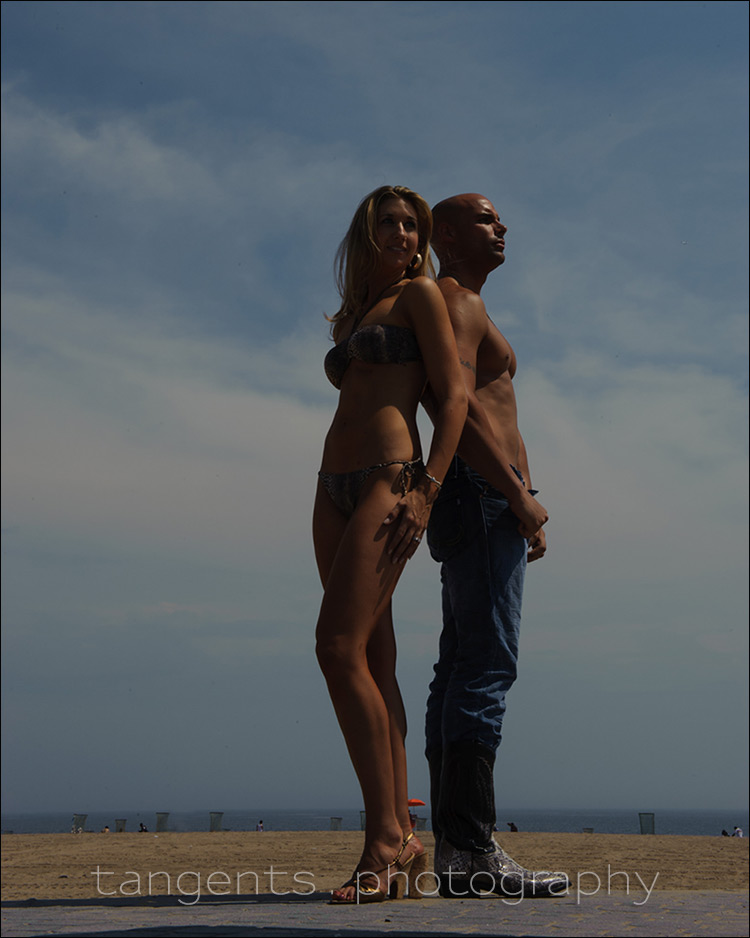
And for comparison, here is a test photo without flash.
Related articles
- Flash photography: applying the Sunny 16 Rule & Flash Guide Number
- How to overpower bright sunlight with on-camera flash (flower girls)
- Various scenarios: Balancing flash with ambient light
- Controlling bright daylight w/ direct off-camera flash (model: Molly K)
- Getting the most power from your flash / speedlite / speedlight (model: Shawna)
- Overpowering the sun with off-camera flash – what are my settings?
- More articles on Off-camera flash photography

Direction & Quality of Light
I wanted to distill the essence of what we, as photographers, work with – light! Before we can truly grasp on-camera flash and off-camera flash, and really, any kind of photography, we have to be aware of the direction and quality of light. We need to observe the light that we have, and then decide how best to use it, or enhance it.
With this book, I try my best to share those “aha!” moments with you, and I do believe this book can make a difference to your photography.
The book is available on Amazon USA and Amazon UK, or can be ordered through Barnes & Nobles and other bookstores. The book is also available on the Apple iBook Store, as well as Amazon Kindle.
Just a small correction: dust on your sensor cannot possibly have different effects when you change lens settings. f/11, f/22, f/8 – how would the sensor know? If you are seeing more dust at f/22 it must be from dust that is before the aperture.
I don’t have a D3, but is D3 capable of iso 160, or is that a typo? Did you meter for f22 or did you just chimp until you got the lighting you were satified with. Whenever I shot at high iso, my backgounds appear to look like a cheap studio back drop, with my subject pasted on it. How did you get your backgrond to look so natural at f22.
Hi Andy,
There is a little test you can try with your own camera.
Set your camera to your lowest ISO setting, then set your lens to the largest aperture possible,
hold your camera in front of a blank piece of white paper (Just close enough so the paper fills the whole view but not so close as to stop light entering the lens)
using manual focus make sure the piece of paper completely out of focus and take a shot or two,
Then repeat the above test using the smallest aperture of your camera.
Be prepared for a shock when you compare 100% crops from the second set of photos as this will expose all the sensor dust.
This is the test I use to check how clean a cameras sensor is.
I do hope this is helpful.
Kind regards,
David
Hey Neil,
I like the idea to add soft but powerful flash from the same direction as the sun. Because it is so new to what I have read so far. Others claim the best way would be to add flash from a different direction. But you have shown that flash from the same direction can have a really great effect. And you can go one stop below ambient by this technique. I’m impressed.
Kind regards,
Martin
Hey Neil, good stuff.Can you sugest I look at a 1000 Ws external battery pack or will a 600 one be good enough. I don’t do a lot of outside work thus far but hoping for an increase in the near future?
Michael
Michael … at full power with that 600 Ws pack, I still had to be aware of keeping the softbox close enough to the couple for enough light. (The Profoto is a double-baffled softbox so that does incur further light loss.)
So the moment I would want even more light or put the softbox further back, or use a larger softbox, I’d be at the limit of what I can do with 600 W/s.
For me, for now, it is enough and it was a huge step up from the 150 Ws of the Q-flashes I had been using.
For a first time buy, if you can afford 1000 or 1200 Ws power-pack as location lighting, then go for it!
Neil
I am interested in the part of your post where you talk about using an ND Filter next time to allow you to use a wider aperture. Wouldnt this require more flash power as the ND Filter would block light coming from the flash.
I have the same problem with outdoor weddings in that as my aperture is often up around F11 / F16 adding enough fill requires more power than my SB800 can put out.
I look forward to the rest of your posts on this. I am also anxiously awaiting the arrival of your book which is still some months away I believe.
Cheers
Jason, the neutral density (ND) filter does cut down the flash power by 3 stops (or however much the ND filter is) .. BUT .. the filter cuts the available light by the same amount.
So your balance between flash and available light remains the same.
Therefore the image at the top could’ve been taken at f8 instead of f22 and given me more choice in my ISO and aperture.
I recently bought a 3x ND filter, but still untested so far. I will have to see whether it is actually useful though and doesn’t make the viewfinder too dark to see or impair the camera’s AF. I’ll post about this as soon as I have played with it properly.
Neil, What a flash you have, at ISO 160 f22 you can still light up the subject. Aah, I want more power from my SB900!
Neil, I like how over the last few posts or more, you have started also displaying the original to show the exact results. Often, photographers, including myself think we are the only ones who spice up our photos. Most think the first image you display is exactly what came from the camera, leading us to believe that when ours doesn’t have the “pop”, we have done something wrong or we have inferior equipment. Maybe we didn’t do what you told us to the right way?
One example was the NYC Photo-Shootout Redux. The final image is stunning. I immediately started to wonder how you were getting those right out of the camera. Then as I read thru, you revealed the “magic”. I shouted and my wife came to me and I said, “I DONT SUCK” look Neil does it too! Hahahaha.
All the things you do to your photos, I have been doing for years, but I didn’t know all Pros did them. I thought I wasn’t as good as I should be and it required post to get all the final results. I do get some that really need nothing more than skin touch up and some USM and that’s it. But it’s tough to get that every time. So I never show my Clients the originals.
All the color adjusting, contrast, fill, sat, cloning….even the eye swapping trick….I’ve done that and thought, “Man you really need to start getting better in camera….I’m not the only one.
Thanks Neil. Showing the originals give us an idea of what to expect from trying your method. We can compare and know that even the instructor adds some pop too. Thanks again and I read all the time, keep up the good work. I look forward to your next closest work shop to Alabama.
I am assuming that you nearly ran out of apertures being limited to max synch speed for the flash(hence f22)
Neil – First, Great Blog! Thank you. You have helped me greatly in the past with your talent and you willingness to share it.
A tip on opening your aperture a bit when trying to overpower the sun is to use a polarizer filter. I used a light meter to check and mine is exactly 2 stops of light reduction. Plus you get all the benefits of the filter effect!
I also want to try a 3 or 4 stop ND filter but worry that it will make the view finder too dark. Since we are shooting in full sun, that may not make it too bad to work with – and it would allow for opening your aperture a bit more.
-Rudy M
Great pictures Neil – love the poses and high saturation.
Just wanted to say it’s a shame that flash heads limit you to 1/250s. Under these conditions I think the humble flashgun can win with high-speed sync allowing you to still shoot wide open.
A radio popper or latest pocket wizard is definitely on my wish list to get over the IR problems under strong light.
@Pat Bloomfield. Flash guns aren’t the limiting factor, their flash lasts about 1/10,000th of a second. The mirror within the camera body is the limiting factor. A nikon D40 has a sync of 1/500th, my canon 5D’s sync @ 1/200th but my my friends 1D Mk III syncs @ 1/320th. If I am on location with sun and flash, I’ll use my Canon 50D and can cync up to 1/400th depending on how much flash I dump and how I frame.
Niel, I was wondering, do you ever use reflectors on location or even a large diffusion panel to diffuse the sun? And if you do, what’s your thoughts on that. I’ve recently started to play with just using a big white bed sheet on a frame to diffuse the sun and then use a combo of strobes and reflectors to light on location.
JP Lumansoc
http://Www.flickr.com/jplumansoc
This is a GREAT little blog ;-)
The limitations of planeshutters, that are used in most of todays standard DSLRs, should now be obvious to everyone.
There is – of cause – annother way, the professional way:
If a pro were to shoot a great number of bikinis ( – for a client with the right budget !), the pro might use a high-end camera platform, like a Hasselblad or a LEAF.
The LEAF AFi-II(10) can capture at ISO50, and the shutter of the Schneider AFD Tele-Xenar 150mm f/4 HFT PQS ( -or any other PQS) can sync at 1/1000 sec !
So still using the Sunny 16 Rule, the pro can with this equipment shot at ISO50, 1/1000 sec @ f/4 !
This is good news for many reasons:
The large sensor of the LEAF (56x36mm) combined with the large working apperture, creates a beautyfully narrow DOF, to isolate the model and product from any distraction backgrund.
The four to five stop faster shuttertimer, is much better at freezing any play with the water at the beach,
and shooting a f/4, means that MUCH less flashpower is required to overpower the sun.
A typical 12000ws portable battery generator, from either Pro, Elin, Hensel or Bron, now suddenly comes to life, an the pro may now begin to use slow modifyers like softboxes or diffused ringflashes.
The only bad news is the price of the gear… c’est la vie ;-)
Hi Neil, Thanks again for the wonderful tips. I am curious, for this specific shooting situation, what you would have done or would suggest for someone with cheaper flash equipment, say one or two speedlights?
Beautiful pics and awesome website. Love all the great information you give. Thank you so much. That girl is amazing!! Any other pics?!?
Great post I know this is from sometime back but it still is a nice reference point for those who are looking to move into studio strobes for location shooting! As of now I have no way of combating the sun. I use only speedlites rated around 45 Ws! I was starting to think I only needed an ab400 at 160 Ws but thanks to this post, I’m starting to think that’s not going to be enough at all! I’m not always going to want to overpower the sun but I don’t want to be limited by it either. The hardest part is finding a system(inexpensive) that can fire 600 to 1000 Ws but still dial way down! I’ve got my version of overpowering the sun here… https://nakean.wordpress.com/2011/05/02/over-powering-the-sun-craze/
Sadly, I ran into this problem this weekend, except I forgot to switch over to manual flash and try to dump flash at full power. My mistake was running up the shutter speed. I had settings of 1/1000, f9, @ ISO 200, with a 3-top ND filter, but I was stupid to have stayed in TTL flash mode. I had both baffles out, but I couldn’t get the softbox closer to the subject, because the softbox’s shador started to be in the picture.
I need to try this again.
Stephen … a couple of things that need to be corrected there.
If you want to over-power the sun::
– Try not to into high-speed flash sync, since you lose 1-2 stops of flash power,
– Keep to maximum flash sync speed, because you have the most range here from your flash.
At your lowest ISO then, find your relevant aperture.
Deliver as much flash as that aperture and ISO setting dictates.
Only use the ND filter if you’re subsequently chasing shallow depth-of-field.
Neil,
Thanks for the reply.
I’m going to have to put the flash into manual and see how much flash I can generate at my aperture and ISO.
I’ll have to use the camera histogram/blinking highlights/Sunny 16 to help me verify the exposure, since I don’t have a light meter.
It’s a great shot Neil. I am totally envious.
Can I ask how you got the warm skin tones though? I’ve been using flash through softboxes and umbrellas, and the light from the flash always seems cooler than the light from your shot.
Were you using a gel of some kind? Did you manually adjust the white balance? Are the models slathered in fake tan lotion?
I usually shoot with the white balance set for flash, or daylight, or cloudy skies, so the white balance SHOULD be warming the colors. Yet my flash usually appears quite cool.
Anyway, thanks in advance.
The models did have a good tan, but the deep color is mostly due to post-processing. In fact, I think I may have taken it a step too far, pushing up the Vibrance.
I don’t do manual WB … I adjust the RAW file afterwards as part of my normal post-processing.
I think what may have helped here, is the lighting kit … the Profoto gives beautiful light, especially when used with the large softbox.
I don’t think anyone mentioned the technique where you use the electronic shutters of older bodies, like the D40, D50 & D70. With these cameras, you can sync all the way up to 1/8000s (most reliable up to 1/4000s)… you just need a TTL cable where you tape over a couple of pins to fool the camera into not knowing there is a speedlight connected. Buy a long cable, if you want to do a lot of strobist work.
With simple radio triggers, you can sync to 1/800s. With PW probably over 1/2000s.
If only Nikon (or other brands) re-introduced electronic shutters – or hybrid shutters… imagine a 36MP D800 with 1/8000s sync capabilities…
I got a question,what is an ideal Guide number to over power the sun?
Portable strobe at GN 68 with softbox will be good enough?
Ronnie, the GN of the flash will tell you how far to hold the flash from your subject, for correct exposure at the chosen f-stop.
GN = distance * f-stop
But you might not find the distance to be practical … hence, the higher the GN, the better.
Check this article on using the Guide Number of a flash.
The value there that you give, has no context …. such as meters vs feet, or the zooming of the flash head.
Hi, Neil. I have watched the video clip and I really like to know what the cable is for (the cable that goes from the top to the bottom of your camera)? It must have something to do with triggering the flash but I don`t know what.
Liebe Grüße
Florian
That’s the radio transmitter to fire the remote flash.
A big thank you for your post sir ; it was very informative.
I possess two basic strobes whose power cannot be controlled. They are,” fixed ” powered strobe flashes.
My question is ; can I use an ND filter to get the same results like u did ?
Shiva … with a fixed power, you can always control the distance, and thereby control the power indirectly.
If you need a shallower DoF than it would allow, then an ND filter is your best choice.
These three articles might also help you: