Flash photography techniques
Intro page ~ Natural looking flash ~ Flash & ambient light
![]()
Making flash not look like flash
I use flash very often in my professional work and personal work. But I try and make the use of flash not appear intrusive in the photograph. I nearly always have an on-camera flash, but I try to diffuse it or bounce it wherever possible. I use as little direct flash as I can, except outdoors where I try and use available light, and use flash only to lift the shadows and reduce the contrast. However, sometimes it is just best to overpower the ambient light with flash – but still try to make it look natural, ie, not like flash.
Let’s start off with these few photos. They were all done using flash on camera.
You’ll note that there is no discernible flash shadow. I absolutely loathe a distinct flash shadow. So that’s the ideal that I always strive for – that it shouldn’t be obvious that I didn’t just use existing light. It isn’t always possible, but that is what I try for in every photograph.
Indoors, where there are surface areas to bounce your flash off, on-camera flash is hard to beat as an easy light source to use.
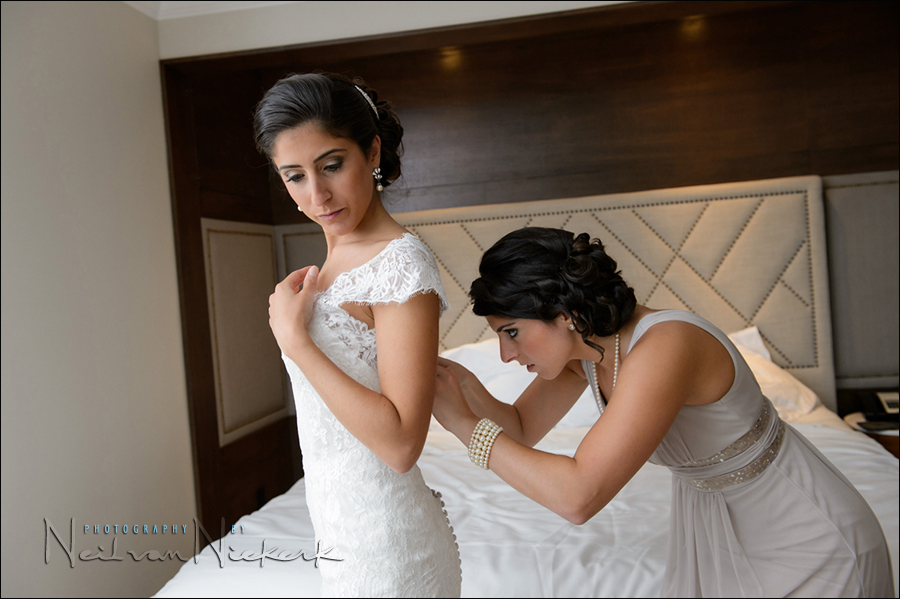
With weddings for example – during the bride’s prep and the groom’s prep, I rely heavily on on-camera bounce flash to give me soft, directional light. Here are two examples where the flash enhanced the available light – the flash wasn’t the primary light source, but it cleaned up the existing light to give me nice lighting on my subjects’ face.
For the image at the top:
- 1/200 @ f/4.5 @ 1600 ISO … 24-70mm f/2.8
- On-camera speedlight, in TTL mode, bounced behind me over my left shoulder.
There was a fair amount of available light in this room, but a touch of directional bounce flash gave me a more controlled light. I still had to use the local adjustments brush to bring up a bit more detail on the bridesmaid’s face.
The same approach was used for this groom’s prep photo at this wedding:
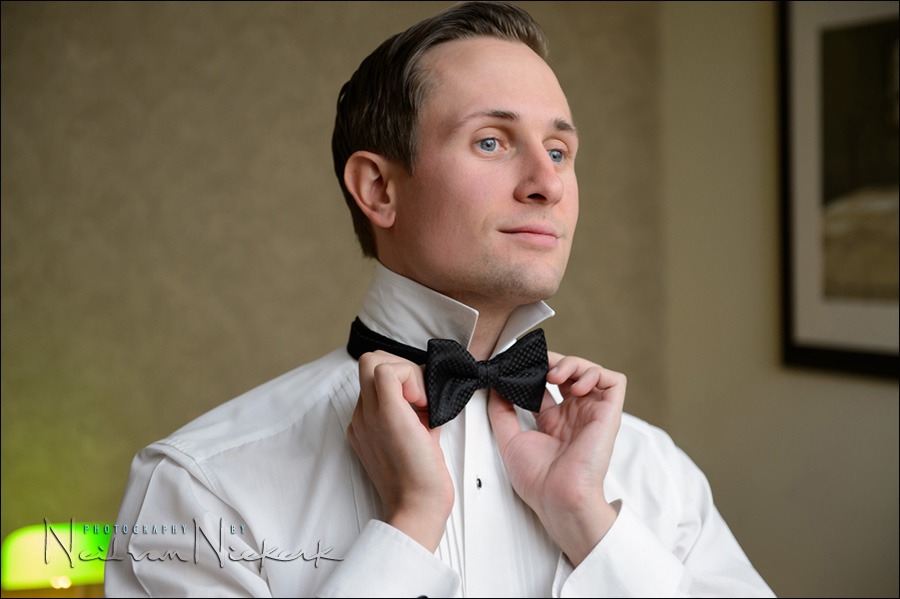
- 1/200 @ f/3.5 @ 1600 ISO … 24-70mm f/2.8
- On-camera speedlight, in TTL mode, bounced behind me over my right shoulder.
- My flash was flagged with the black foamie thing to retain the directional quality to the light.
With the window to my right, the fall-off from the window-light was too dramatic, and I used bounce flash here to lift the contrast. But I still wanted to keep that directional quality to the light, hence I bounced my flash into the direction I wanted the light to come from. This way the flash enhanced the existing light, without becoming obvious.
With both these images, my choice of camera settings here were dictated by the available light, and I just used a hint of flash by bouncing it into the room behind me.
Note that there is NO direct flash, and hence no flash shadow. NO diffuser cup!
By making my light source larger than just the area of the small flash tube, I am immediately making my light softer. And this is exactly the reason why we bounce flash.
related articles:
– the Black Foamie Thing
– Tutorial: Bounce flash photography
– On-camera flash light modifiers? Remove the plastic diffuser cup!
– more images from this wedding: using the Profoto B1 portable flash at a wedding
With those two images, the flash acted as fill-light. Just a touch of light, instead of the flash being the dominant light source. With fill-flash, you will most likely have to pull down your flash exposure a bit via flash exposure compensation.
That was fill flash. Now, when the light levels on your subject is such that:
– you can’t get proper exposure,
– your risk camera shake or subject movement giving you soft images,
– you need to balance your subject’s exposure against the background,
then your flash has to be a dominant light source, and be the main source of light on your subject.
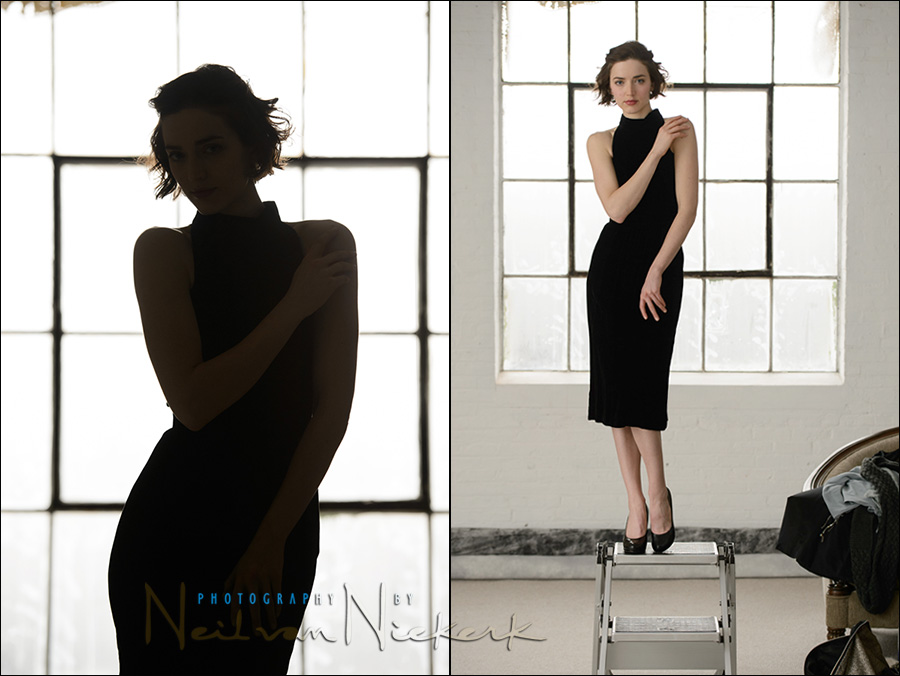
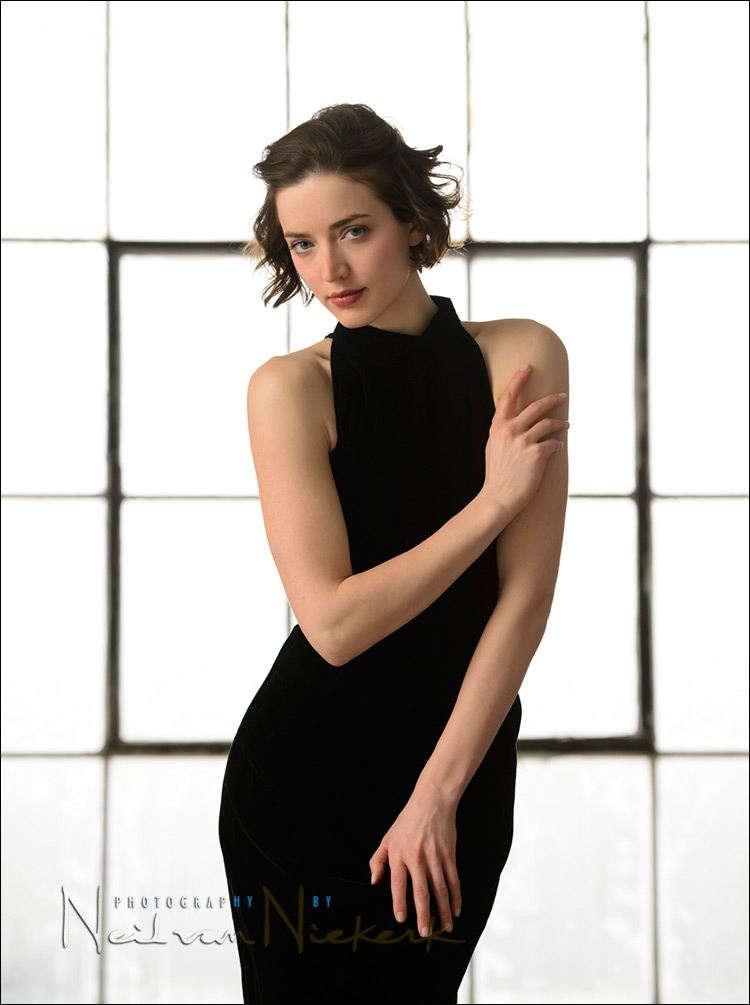
Our model, Anelisa, was lit just with on-camera bounce flash.
Note that there are no hard flash shadows, and that the light is soft, yet directional. There is more light on the one side of her face than the other.
This pull-back shot will reveal more. And this article will explain more about the camera and flash settings.
These few examples showed the range of what we can do with flash, yet still make it look natural, and not intrusively like flash was used. Of course, there is much more to flash photography than just bounce flash, but this is a good start. We’ll step through some of the options and the techniques in the following pages.
 next section: Balancing available light and flash
Help support this website
If you find these articles of value, please support this website by using these Amazon and B&H affiliate links to order your photo gear.
I also offer photography workshops and tutoring sessions. There are also video tutorials, which are online workshops on photography.
Join us on the Tangents Facebook group for further discussions.
Neil vN
Hi Neil,
Just a quick question…..
When you are using direct flash, or indirect I suppose, for fill flash during the evening when the sun’s light is more golden, do you ever gel the flash to bring the cooler light inline with the sun’s color?
I’m guessing that you would do that but I’d like to know for sure.
Thanks
Steve
Steve, I have done so.
One of the examples would be during this photo session, where I gelled my speedlight with 1/2 CTS so that the speedlight colour balance would be more closely matched with the early evening light.
Neil,
Funnily enough that’s the photo that prompted me to ask the question! I saw it in your book and wondered.
Great book by the way, so much info to get the brain working – it’s interesting to see how you think about certain situations and lighting conditions. Once you see the infomation in front of you it seems so obvious, I could have been messing about with all this for years without your help and guidance. Many thanks for sharing your knowledge.
Steve
I am just delving into flash photography. Your site is a great resource and your book should be en route to me now. As I read on I may find my answer but here is one burning question I have. Why are you shooting at high ISO. Why not do everything at 100. I have been doing microstock for the past 6 months and it has turned me into a pixel peeper and with My Canon 50D I see noise at 100% above ISO 200.
Bob, in deciding to use a higher ISO, I have several things which guide my decision:
1. It is easier to fix high-ISO noise than an image that is soft due to camera shake or subject movement.
2. The final use of the image often doesn’t necessitate the use of the base ISO, but gives me the freedom to choose a higher ISO and have more flexibility in choosing my settings. Quite often the final image just won’t be enlarged to any great extent. Then the high-ISO noise doesn’t appear all that visibly intrusive.
3. The shooting scenario quite often just dictates a higher ISO.
There are several articles on this site that covers the subject.
Here are two of them:
– dealing with high-ISO noise
– photographing the wedding processional
Neil,
So impressed with the results of your bounced flash. I would like to use bounced flash in a way that lights the subject directionally and softly (large point source, of course) BUT – that also falls off fairly rapidly so the background is fairly dark with only hints of detail. Obviously, that could be achieved primarily by moving subjects away from background. But if mobility is not an option, can you suggest some tips to achieve this?
Thanks, Bob
Bob, actually, the light falls off less rapidly with bounce flash than compared to direct flash!
With bounce flash, your light source is now now the flashgun itself anymore, but rather the area behind you or to the side of you that you are bouncing off. With that, the ‘lightsource to subject‘ distance becomes longer in proportion to the ‘lightsource to background‘ distance.
With on camera flash, you can at times, depending on the shape of the room and how you are positioned in relation to your subject and background, bounce your flash off a wall to the side of you, and thereby get more light onto the background .. compared to when you bounce flash behind you.
Niel,
I’m reading your book and this helpful site. Maybe I’ve missed it, but what determines the amount of flash compensation should be used? No doubt experience will be the most help, eventually. But where do we start?
Dwayne .. exposure compensation and flash exposure compensation are covered in some detail on this linked page.
Hi Mr Neil !
How are you ? i have a question i have used the speedlight 580 EX 2 – but i would like to use more flash for example 2 – 3 so i can use another flashes not canon ?
Last time i tried a opteka TTL flash with my canon flash, when my master canon works the my opteka slave was stil flash the same time – but when i saw on the picture it got too dark !!!
please ,explain to me
thanks
hope you be well ,alway
Hapy newyear
your reader
Duc Le
Hi there Duc Le,
It’s difficult making an accurate assesment of what is going wrong there with your setup, but I suspect that your opteka flash is optically slaved. Then TTL the preflash sequence from your Canon speedlights will trigger it BEFORE the main exposure takes place.
Here’s a part explanation of what is happening there with a related topic.
You need to trigger your slaves either with radio slaves or with the Canon wireless TTL system itself. Optical slaves can be a problem like that.
I just finished reading your articles on flash photography, and I must first say thanks for all the information you shared and the depth in which you covered it.
My question is this, you mention a few times that you bounce the flash behind you. How did you accomplish this feat? I am using the Canon 580EX, and while it can rotate 180 degrees, it cannot face backwards. Do you use a reflector of some kind?
Much Thanks,
Phil
Hi there Phil … thanks! Now, about your flash .. if you rotate it 180 degrees either side, then it does indeed face backwards. : -)
WOW! You just blew my mind! I’ve been using strobes for a few years and it never even occurred to me to rotate the flash head past 90 degrees.
(Ironically, I think I got my first strobe 5 years ago. Around the time you wrote this article)
Well I meant 180 TOTAL but I felt you wouldn’t have replied like that without reason so I went back to my flash and tried to rotate it again, past +-90 degrees. Turns out it was a little stubborn to get past there the first time, but now it does in fact rotate 180 degrees in either direction. Great discovery for me, it’s like I have a new flash!
Thanks,
Phil
Phil, it shouldn’t feel stubborn. The release button should make it an easy smooth twist to either side.
And yeah, it’s A Big Thing to have a flashgun rotate like that. When I moved from the Nikon SB-800 to the Canon 580EX a few years back, it really changed my flash photography. Instead of being limited in bouncing flash off the ceiling, suddenly I could bounce light into the direction I want my light to come from … and that completely revolutionized the results I achieved with my flash.
Hi neil
In reply to BOB Q9
I would suggest to bob that you just use diffused (you can buy large flash soft boxes) direct flash on automatic as this will light the subject and not the background – to me an unflattering result but is what you are looking for. You could also bounce into a smaller area or lower the flash output until desired fall off is achieved.
I’m aiming to use bounce flash more after looking at this site, the wide area that the bounced light reflects from creating diffused and scattered light with a far more pleasing result.
If you run into problems with reflective areas to bounce light into you could get an assistant to stand behind you with a metre wide white reflector and bounce light into that or simply suggest the subject moves to a more suitable area.
By the way – Its a great site and one i will be dipping into. There’s so much to learn.
Thanks neil
Hi Neil,
I’ve been going over and over your flash photography blogs for the last few months gaining a huge amount of information and knowledge, so firstly, thankyou.
Last saturday I shot my first wedding as a solo photographer (not following anyone else around) and I have to say what I’ve learned from you in regards to bounce flash and flash ratios in different lighting situations has been invaluable, so thankyou once again! The location and shoot it’s self threw lots of difficult lighting situations (mostly weather related and moving inside into a poorly-lit and crowded venue) at me.
I just really wanted to ask one question. My 2600mAh rechargeables didn’t seem to get more than 60 full flash shots or 100 fill flash shots per set. I ran through 4x sets between my Canon 580 EX II and Sigma EF 530DG Super speedlights on the day and was almost having to resort to pop flash (ewwww!!!). I was wondering if you could recommend something that would hold up to 200-300 shots without having to resort to external battery packs? I hear the sanyo enloop batteries are excellent.
Thanks once again, and keep up the great work.
To Sean Farrow:
I would suggest using the Energizer Lithium batteries (they’re blue and silver). I have been able to get 500 shots from one 580 speedlite (I then went to the battery pack and can now shoot 1500 images, or a whole wedding) without ever changing batteries. They do cost quite a bit, normally around $10 for a 4-pack or $16 for an 8-pack, but they’re worth it!
Sean, I would also strongly recommend using a battery pack of some kind. It will also keep your recycling times shorter.
Thanks :)
I’m doing a wedding as a 2nd shooter this weekend, and have purchased a few sets of sanyo eneloops just to see if all these independent tests I read online are true. So we’ll see how I go. I may look into a battery pack or 2 in the near future as my side business picks up (I work in IT during the week).
But batteries, gear, and everything else is all useless to me without the knowledge I’ve been able to get from this site. Thanks again.
First of all I wanted to say big thank you!!!
So much info, so much to learn and take into the filed to practice, practice and practice!
About batteries for flash I also wanted to mention the Eneloop line made by Sanyo. Of course- battery pack is much better, but if we are talking about the AA type- I have really been fond of them, they are rechargeable and high capacity. They work very well.
I know photomatte mentioned lithium batteries- and I have to add here, in case of Nikon speedlights the instruction states, that they do not recommend lithium type, as they can easily get hot and lock your flash.
With SB-900 at least there is a temperature gauge on the screen so you can sort of watch for overheating, but SB-800 or SB-600 won’t tell you, they will just stop working. And that’s probably least wanted situation to be in while shooting event.
I use rechargeable Eneloop AA batteries in my battery pack and are more durable of all I’ve tried.
Hi Neil,
I’m determined to figure out how to take beautiful flash photos consistently. I bought your book, studied it all day yesterday and then tried to use your techniques last night at a low key event I was hired to shoot. I had mixed success,but two main issues to ask you about: 1. I made a black foamy thing out of the neoprene case that holds my portable external hard drive. It’s double layer thick. Within 30-40 minutes at the event BOTH of my 580 ex units had stopped working. PANIC. I changed batteries on both ( energizer lithium) and discovered batteries were super hot, almost burnt my hands. I took off black foamy thing and in time flash units came back, though a bit slower than usual. So , do you think overheating was from too thick foam, or flash using more power bouncing off high walls and ceilings, or my type of batteries? Has this ever happened to you? And 2. I shoot mostly vertical shots. I’m a portrait photographer and I much prefer the aesthetic of vertical. I had difficulty sending flash in right direction. do I need to use a bracket? Or maybe I’m not doing it correctly?
Thanks so much for your help!
Hilary
Hilary .. I suspect you used the black foamie thing too wide. There was too much of it, killing too much of the light from your flash. This would cause your flashgun to work harder than it needed to … causing it to shut down.
A bracket would really help you in getting the vertical orientation without effort.
Thanks, but how do you mean “too wide”? that it covered too much of the sides of the flash? (which it did). This may also explain why many of my shots were underexposed….And do you have a recommendation for the least cumbersome bracket out there these days. Thank you so much for your help.
I fold back and manipulate the piece of black foam so it blocks just enough light from spilling on my subject or background. I also fold it back so that it prevents the flash from blitzing someone in the face when they stand behind me. Therefore it never is quite the entire 6×8 (or whatever) inches in size. Instead .. it is shaped to be “just enough”.
Also make sure your flash is zoomed to the longest focal length. If you’re at a wide setting, the black foam will eat up a lot of your flash’s light.
Have a look at the brackets made my Custom Brackets.
Thanks and one last question…i shot most of the night with my 70-200 at f2.8. at 800 and 1600 iso, is that too wide an aperture for black foam? could that have overheated batteries? and next time i will adjust flash zoom. Hope you’ll do a workshop in San Francisco one of these days!
Hilary
No, the wider aperture will mean your flash has an easier time of it than at a smaller aperture.
Neil, I left you a message (can’t find what page I left it on, but this is good spot for an update). I too, after reading all your blog, ordered your book and I’m a few pages from finishing the book (a real pager tuner ;-) and I just stopped at the craft store and picked up some 2 mil foam, I thought the 3 mil was too think, cut it down and started playing. You have truly “turned a page” in the minds of many in using a on camera flash the way you have deminstrated in your book and here on your blog. My biggest issue is that I have my first wedding after Thanks Giving and luckily for me that I’m comfortable using Manual exposure with Spot and the ceremony is outside. going to re-read the outside section and make sure I have the fill flash portion down. So just to be sure, I’m usine a 5Dmk II with a 580ex II and it will be full sun around 2:30pm should I be using the fill flash setting on the 580 or just dialing down regular flash (all in TTL of course). I also have a Fong that I have used before for the receiption, but after your lessons, I SO DON’T WANT TO USE IT and take what I’ve learned and let er rip!
The one thing I have going over most others is I’m a project manager by day and very organized ahead of time and can see the flow, etc. I worry most about the timing issues and not taking too long to setup a shot, etc. I have spent some time at locatons getting some basic metering shots to help me get going.
Any feedback is good
thanks
Mike
As Joe Don Baker said in Eischeid, “You done good.” I have learned a great regarding flash by reading your articles. I am primarily bug and landscape fella- but your advice has encouraged me so much I finally stopped using my old Vivitar flash and bought a Mecablitz 58.
Here is something I hope will help you: One can correct, or adjust to taste, white balance of a JPG in Photoshop Camera Raw. One can also individually adjust the black, grey, and white in Photoshop. There is a technique for determining what is black, white, and grey, if it is not obvious,before making such adjustments.
Again – thanks
I must say this is one of the most concise and well thought out tutorials and such that I have encountered thus far. Because of you I can now learn flash photography without running into it blind. I do have one question though, what is the purpose of labeling your exposure with every picture? Is it a good habit to get into? And is there a proper way to write it?
Jorge … I add the camera settings there to give others an idea of the range of settings used. The specific values rarely have meaning. Aside from maximum flash sync speed, which is a very specific and valuable setting … most other settings are more about the range, than the exact numerical setting.
But people still want to know. So I added it where pertinent.
Here’s a related article about choosing the aperture / ISO / shutter speed combination. It’s related to this idea that the specific settings aren’t all that crucial usually.
Neil,
Great article. I recently purchased a Canon speedlite and find your site very helpful for flash photography. I never thought to shoot the light behind me into a room for fill light as you said you did with the first shot. That is simply awesome! That is good stuff to know.
Thanks!
Fantastic shots. I always wonder why a slightly tilted photo (like the first) is considered acceptable, as opposed to purely vertical. While I love it myself, some people might think it was crooked! Personal taste or is there more to it, thoughts?
I’m not fond of tilted images, but it seems I often enough do tilt my camera to an extent. I guess it is a “feel thing”, but if you want a more specific reasoning about tilted compositions, there it is.
I am glad to have found your web site. i just bought a sb910 for my d80 I want to start photographing events. I want to transfer photography to a full time job in the future. all the advice is a priceless commodity, especially in this economy. I will be purchasing the 360 with an external battery pack. Thank you for taking the time to share your knowledge.
Just reading some articles from the past, and this stood out for me. I first read your blog when I was starting out in weddings, so most of my indoor photography is inspired by you, 4 years later, I’m still using the BFT! I just love how I can make the light instantly softer by bouncing it, and even make it directional with the BFT!
Hi Neil,
I cannot thank you enough for the invaluable tips that you have shared. I have been in photography for last 10 years and my photos have never been this crisp and well lit. It’s feels like a whole new world. I wish I had come across this earlier.
I would appreciate if you could shed some light on the white balance while using indoor on camera flash. I use a D750 and sb910 with a Tamron 24-70 2.8. My photos tend to come out warmer than I would like.
Hi there – fine-tuning the White Balance is something you do in post-processing, ideally when you work with your RAW files. Here is a further article on starting with the RAW files.