Tutorial: Bounce flash photography
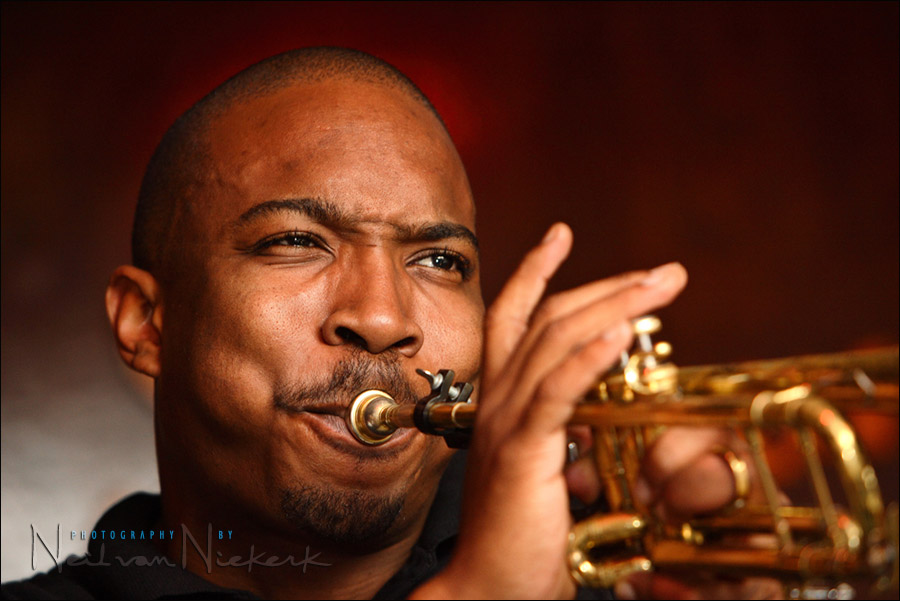
An photo of a jazz trumpet player during a session in a club, lit by on-camera bounce flash. Since it’s a perfect example of how I use on-camera bounce flash so that it looks nothing like on-camera flash, I’d like to use it to illustrate this summary of on-camera bounce flash technique:
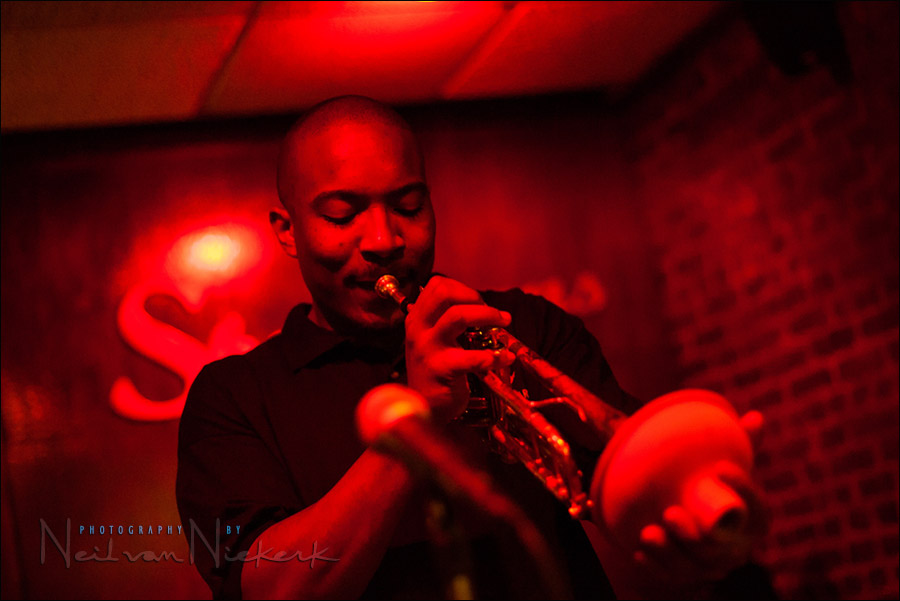
The light in this image is nearly all from my flash. The red hue in the background, and spilling onto part of the trumpet and his skin, is from the strong red lights in the night-club. To eliminate this, I under-exposed the ambient light, by choosing my camera settings accordingly. (See the comparison photo below.)
By under-exposing the ambient light, the flash becomes the main source of light … and this allowed me to control the quality of light.

The available light levels in the club was very low. As comparison to the image at the top where I used flash, here is an out-of-camera image shot at 1/160 @ f1.8 @ 1600 ISO
The camera settings for the image at the top where I used bounce flash:
1/250th @ f4 @ 800 ISO, flash exposure compensation at +1 EV
Canon 1D mark IIn; Canon 70-200mm f/2.8 IS; Canon 580EX speedlite
Without flash, the image is underexposed even at those settings. When I changed the white balance of the RAW file to 2500K, the color was still overly red. So this situation really did need flash to give a color image.
Regarding the shutter speed in the top image (where I used flash), I was at the camera’s maximum flash sync speed for a specific reason. Max flash sync speed is that sweet spot when you try to overpower strong available light with flash.
I specifically did not go into high-speed flash sync (HSS) territory, since this would’ve cut my flash power too much. To re-iterate: you can’t “kill the available light” with high-speed flash sync. Shutter speeds higher than max sync speed drop your flash output faster than the ambient light exposure is affected by that same change in shutter speed.
Achieving quality light with on-camera flash …
- I bounced the flash to my right, away from my subject. NOT towards him. This is a crucial element here. NOT towards my subject.
- Even though the light levels were low here, I was bouncing flash off the ceiling and brickwork – in fact, off anything to my right and behind me. I didn’t bounce my flash off a specific surface, but rather in a specific direction – the direction I wanted my light to come from.
- Since there is NO light coming from the camera’s viewpoint, the light is directional. It is coming from the direction I bounced my flash into. This isn’t an efficient way of using flash, but the light that returns is sweet indeed.
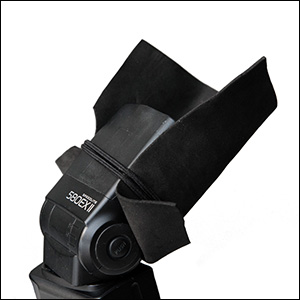
- To control the light from the flash so it doesn’t spill on your subject,
it helps to use something like the black foamie thing.
- You simply can not get this kind of light from your on-camera flash if you use a plastic diffuser cup or such device. This is because it will throw light forward onto your subject. Then you lose that directional quality to the light from your flash. Then it will look less like awesome available light or off-camera lighting, but more like poorly handled on-camera flash.
- Bouncing the flash like that, helps give form and shape to my subject. Bouncing flash above me would’ve delivered a flat image, and would’ve caused dark shadows under the eyes. Even with a flip card.
- Of course, the inevitable question is, what if there is nothing to bounce your flash off? Well, then you adapt.
When there are surfaces to bounce flash off, this bounce flash technique is repeatable and can give remarkably good results. Results that look nothing like on-camera flash.
The next step? Practice and compare for yourself.
On-Camera Flash Photography – revised edition
This book is explains a cohesive and thorough approach to getting the best from your on-camera speedlight.
Particular care was taken to present it all with a logical flow that will help any photographer attain a better understanding of flash photography.
You can either purchase a copy via Amazon USA and Amazon UK, or can be ordered through Barnes & Nobles and other bookstores. The book is also available on the Apple iBook Store, as well as Amazon Kindle. Also check out the Amazon Kindle store.
Learn more about how the cover image was shot.
Materials for the flash modifier used – the black foamie thing
The BFT is held in position by two hair bands (Amazon), and the BFT is usually placed on the under-side of the flash-head.
The linked articles will give clearer instruction, especially the video clip on using the black foamie thing.
Related articles on bounce flash photography
- Video clip: Using the black foamie thing
- Directional bounce flash
- The black foamie thing
- Bounce flash and catchlights
- Throw away the tupperware on your flash
- Using bounce flash to mimic window light
- How to get ‘short lighting’ with bounce flash
- Bounce flash photography & the inverse square law
Clarification
Since I’ve been taken to task by another photographer / musician for the photo shown at the top of this article, I feel I need to add this explanation:
I was there by invitation of the saxophonist of the band to take a few promotional photos of the band members while playing a small gig. I didn’t intrude – I was specifically asked to take a series of photos. It was a daytime gig in Harlem, with few people there in the pub / restaurant. I doubt the people in the pub even really noticed me taking photographs, since it wasn’t a concert as such. So, that photo (and others) were intentional, and not intrusive to the player or the audience.


It just became apparent how often I come to your site Neil – I remember this pic from the first time around. LOL. Thanks for the GREAT advice/instruction – you’ve really changed my way of shooting and removed that “if only I had equipment/accessory X” mentality. That’s not to say that proper gear isn’t essential – proper tools for a proper job etc.
Neil, great article as usual. We have been using your techniques for the last couple of years with great images. I think the most helpful lesson I learned in your class was to visualize that location that the flash is bounced to is like a large soft-box. Soft, gentle light illuminating the subject from a variety of angles and light intensities. It has changed how we see and use light for our images.
Two questions. Is adjusting the flash exposure on the flash or in camera as in the image above the same as changing an AC3 zone controller on the pocket wizard for TTL? Do you use the AC3 with off camera flash?
Thanks in advance for your answer.
So when using this technique you shoot in raw to make better color adjustments later because the light will pick the color of the surfaces it bounced in right? (What a mouthful :-). )
But how do you choose your white balance to begin with?
Keying off of Neil’s familiar refrain which appears in the third bullet, “…NO light coming from the camera’s viewpoint…” — I’ve come to distinguish three (at least) problems with on-camera lighting: (1) tell-tale shadows, (2) a flat look (as Neil notes), caused by lighting which doesn’t bring out the contours of a face, and (3) specular highlights, esp. from the facial “planes” that are parallel to the sensor’s plane (forehead, upper cheeks, etc.). I’ve come to think the third is the most problematic.
A wedding reception on a hot summer night, some dancing, a little sweat, and the specular reflections become more evident. And for darker-skinned subjects, the white of a specular-highlight area is more of a contrast with skin-tone than for lighter-skinned subjects (voice of experience) — possibly made worse by metering choices that boost the exposure because of darker skin.
Neil’s sample photo above doesn’t have these problems. So all this adds up to further endorsement of Neil’s bounce flash approach (or other means to get the light off camera).
Neil
First up, that’s an awesome picture.
Second, I really appreciate all of the resources on your blog and the advice you provide for free.
But third, you really need to qualify what you mean by ‘you can’t “kill the available light” with high-speed flash sync’. In a situation where you have just one flash AND where you’re using bounce flash, this might be true. But, as Syl Arena shows in his book, there are many situations where HSS does just fine at killing the ambient (even midday sun) and still providing great light on the subject.
The link provided will explain why working in HSS territory is often not to your advantage when you’re at the limit of what the speedlight is capable of.
If you’re “killing the available light” by adding more speedlights, then you’re really not “killing the available light” with high-speed flash sync. Then HSS is just something you do to get shallower depth of field or a higher shutter speed. It has NOTHING to do with “killing the available light”.
Syl Arena is most likely working well within the reduced range of the speedlight’s output when he goes to HSS mode. Where this will fall down, is when you’re at the limit of what the speedlight is capable of when you’re trying to match hard sunlight.
There’s an inescapable process at work here which is clearly explained in the link I provided at the start and the end of this article.
I found black felt sheets easier to work with then the foamiey thing. Softer and not as stiff as the foam.
Just asking myself why using black foam and not white foam when it is that dark ??
Thanks!
Why I use a light modifier that is black.
Dear Neil,
I’ve learned a lot from your site in the past few weeks and now I have some questions. I believe this is the most recent addition to your bounce flash tutorial, so I’d like to post my questions here.
1. You have referred to the 1/200 max as a sweet spot for my (Canon Speedlite 550EX). I believe you wrote that the max sync speed is best to use with ambient light that would be able to provide the main source of light. In other words, if I had enough light to use 1/20 with a low ISO or 1/200 with a high ISO, use the latter. Otherwise, in light that is less than perfect, I would be forced to use a slower shutter speed…unless I wanted the flash to overpower the scene. Do I have all of this correct?
2. I have used the BFT. When using it, should I actually get more effective bounced directional light on my subject than I would without it? Or would it give me about the same effect without it (with light being lost in other directions and possibly blitzing people in the eyes)? I remember reading somewhere that the “overall output” would be less…is this true? In other words, if I am bouncing behind or rear upper left correctly, and I’m not worried about blinding people, should I still use the BFT to get better results?
I’m sure the answers to these questions have already been given, so I’ll continue to read through the your pages. If you could please respond at some point, I would be very pleased. Thanks for helping out the artistic wedding photographers around the globe.
Sincerely,
Adam Kozik
Neil, thank you for your passion in helping others. Would you please cover on how you would bounce flash in a venue where the walls and ceilings are red? Interested in how you would set the white balance and if you would gel the flash or just use the red walls to tint the flash?
I thank you in advance for your response.
Here are two articles that deal with colored surfaces – not quite red, but still not white surfaces.
– bounce flash photography & white balance settings
– bouncing flash off non-white surfaces such as brickwork
Dear Neil,
Just happened to find your wonderfull site. Will browse every angle of it. The BFT thinking just got me THE best upgrade for my setup (a compact nex-6 hvl43M set). It works miracles and is very easy and very cheap! After having tried many things and books on the subject THIS works perfectly. Thank you for your efforts! Will get into the books also.
Again, many thanks and regards Perry
Hi Neil,
In this article at top you mention you made it a point that you bounced BEHIND him and not towards him.
In other articles you bounce off the wall TOWARDS that subject. Wouldn’t bouncing towards the subject (using the BFT) be better since it’s more of a soft side lighting?
Pat
Pat … I’m not sure where you’re seeing me mention that I bounced my flash BEHIND him, (and not towards him.)
Here’s what I wrote in two different places:
Where you write that, “Wouldn’t bouncing towards the subject (using the BFT) be better since it’s more of a soft side lighting?” … this is what I did. Read the article again. One of us is skipping a beat here.
So glad I stumbled upon your site, just what I {wasen’t} looking for!!!!!
The BFT is really simple and cool!
Thanks again,
William Perrelli