Bounce flash photography technique – mimicking window light
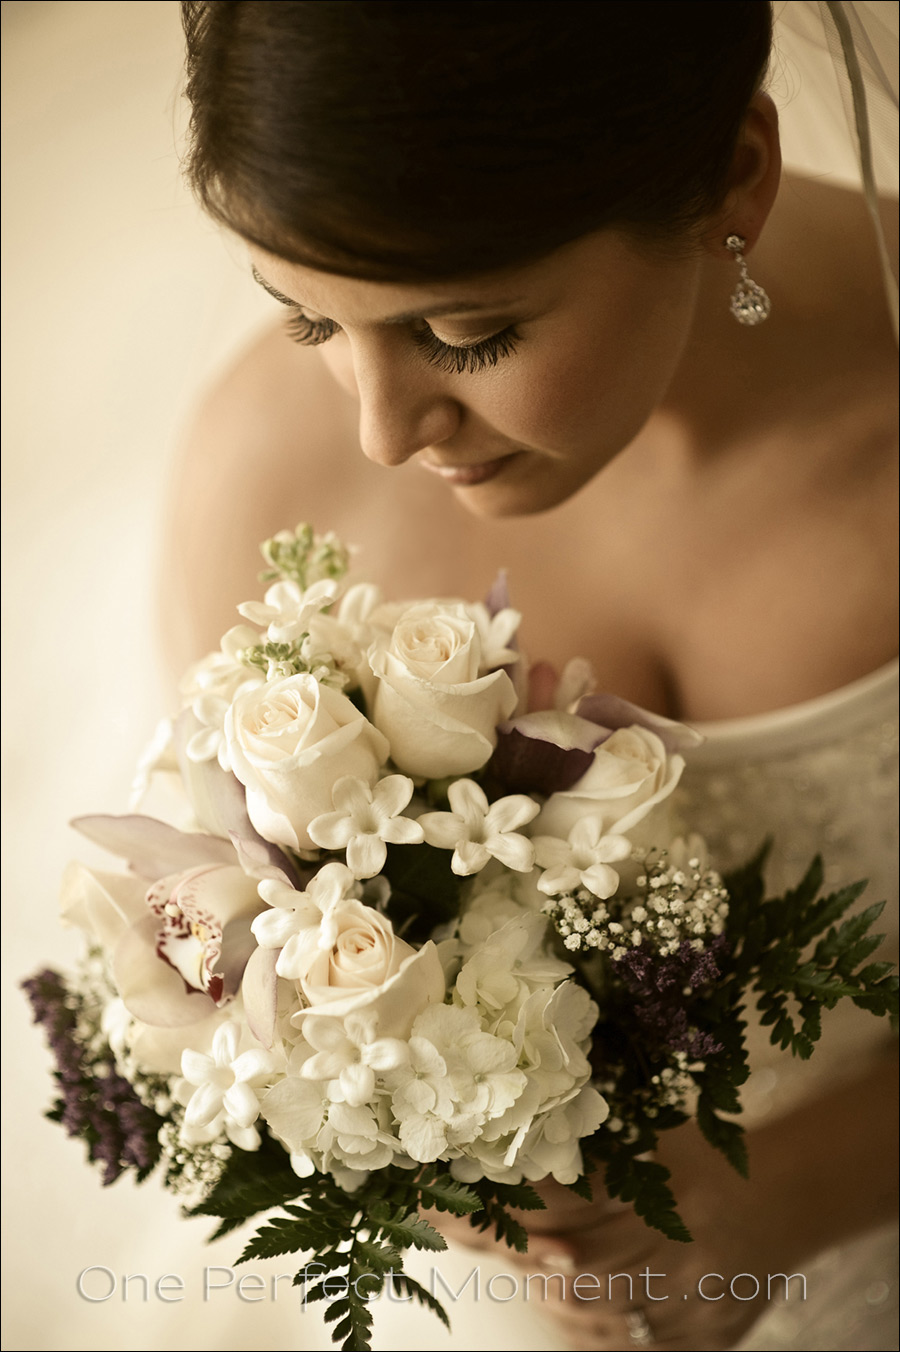
The classic shot – a beautiful bride lit by soft window light.
That’s a yes on the beautiful bride – but it’s a solid no on the window light.
What you see there is on-camera flash. (Which most likely won’t be a surprise to regular readers of the Tangents blog.)
This image is from a wedding this past weekend, and it makes a great example of how light, choice of lens, composition, angle and technique come together to make an image work. With a bit of post-processing added finally for that vintage feel.
Let’s look at the light first .. how I used on-camera bounce flash for my lighting here.

On-Camera Flash Photography – revised edition
This book is explains a cohesive and thorough approach to getting the best from your on-camera speedlight.
Particular care was taken to present it all with a logical flow that will help any photographer attain a better understanding of flash photography.
You can either purchase a copy via Amazon USA and Amazon UK, or can be ordered through Barnes & Nobles and other bookstores. The book is also available on the Apple iBook Store, as well as Amazon Kindle. Also check out the Amazon Kindle store.
Learn more about how the cover image was shot.
As is usual when working indoors and I want fine control over how I bounce my flash, I use the black foamie thing. I had my flash pointing ‘straight up’ into a vertical position from the camera, and pointed slightly forward. Which means that with this photograph, my flash was pointing directly to my left, and slightly towards the bride. But the piece of black foam shielded any direct light falling on her.
The wall that I am bouncing my light off, now becomes my light source. With a larger area like that, and how it is positioned, it now gives the appearance of soft window light. Simple.
I stood on a chair over the bride to get this angle, and focused on her one eye-lid. With the plane of focus, there is part of her bouquet that is sharp too .. but her eyelashes need to be sharp here.
My choice of lens in this instance was the Nikon AF-S 85mm f/1.4G (affiliate) on the Nikon D3.
My camera settings were: 1/160th @ f1.8 @ 800 ISO,
That f/1.8 aperture means that the Nikon AF-S 85mm f/1.8G (affiliate) would’ve worked just as well. And similarly, the Canon EF 85mm f/1.2L II USM (affiliate), or the Canon EF 85mm f/1.8 USM (affiliate), would’ve been perfect too.
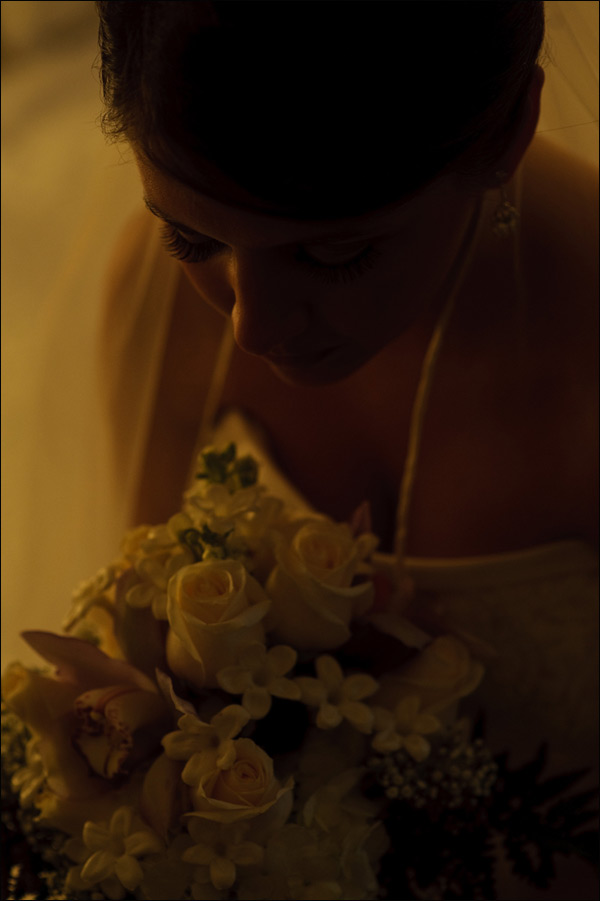
This first image below is the comparison photo where I disabled my flash, so that you can see what the ambient light levels were at those settings.
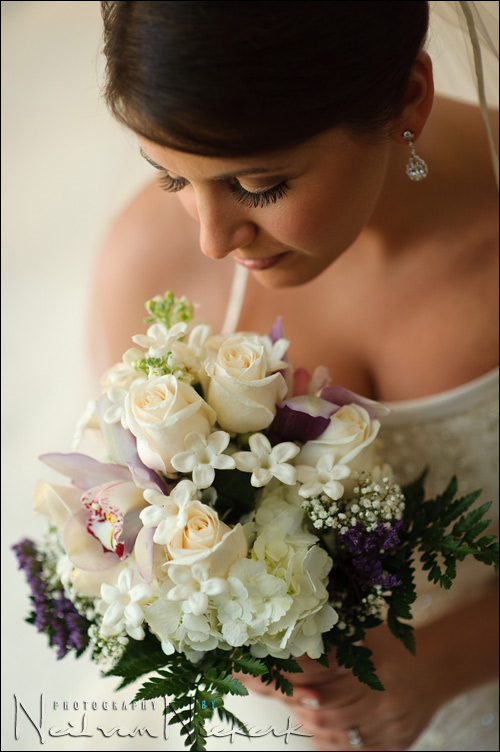
Switching my flash on, and being specific about how I bounce my flash, the next one is the image out of the RAW converter, with the WB adjusted. The skin tones are a little too saturated, but this is a good starting point for me to play around with the image further in ACR / Lightroom.
The first thing you will notice is that the colors were muted in the first image at the top. This is intentionally for effect. I wanted a vintage feel to the image. You will also notice that I cloned out the white line that leads from the bride’s chin to the flowers. That’s the edge of her veil, and I found it distracting. Ideally I should’ve taken care of it at the time by positioning the veil slightly differently. A few minutes work in Photoshop simplifies it by removing it all together.
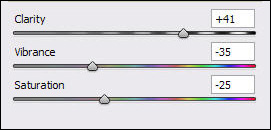
I pulled down the Vibrance and Saturation …
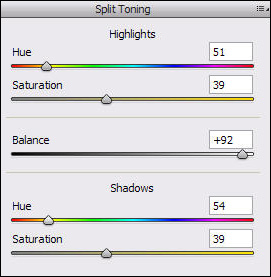
… and also adjusted the settings for Split Toning. There is also a slight vignette that was added in ACR (and editing out the edge of her veil later in Photoshop). The final result is this image, as shown at the top.
As is most often found, it is an intersect between a number of factors to create an image that has impact. In this case, (as mentioned at the start), a number of things have to fall into place .. light, choice of lens, composition, angle and presentation / post-processing.
On-camera flash modifier – the black foamie thing

The BFT is held in position by two hair bands (Amazon), and the BFT is usually placed on the under-side of the flash-head.
The linked articles will give clearer instruction, especially the video clip on using the black foamie thing.
A beautiful image Neil, the processing really fits the scene and only you told us it was not really window light who would have known any better.
Paul
Nice how the light was able to provide the highlight in the earring. Amazing stuff. The angle not only complements the bride but the flowers. I’ve never seen stephanotis look so good.
BTW I ordered your book yesterday. Looking forward to it. I am sure that with the commission you will be able to now afford another black foamie thing. ;-)
Wow, thank you for sharing your inside-information!! I like that you describe the whole process. It gives much more insight than just writing “applied some Photoshop Fairy Dust” ;-)
Really nice and soft lighting.
I photographed a wedding last weekend and the on camera (D300+ SB-800) flash with TTL and this black foamie thing made my day (stuffed with a half CTS gel). I have packed my lightstands and umbrellas including the wireless flash triggers and they stayed
in the bag in the corner of the wedding location. I didn’t use them at all. All thanks to your very good
book I ordered some weeks ago. It was very helpful.
The whole evening I was looking for walls beside me to bounce the flash to get
more natural lighting. Your procedure has already a fixed place in my brain :-)
And it worked very very well.
Neil, another really useful post. Thank you. I love the way you share your “before” images with us and explain how they came about and how you got to the “end” image. It really helps me to develop in my head a better vision of what I can do with different situations myself.
Great image Neil and ofcourse good tutorial. Why did you decide to go to vintage look? For me, original looks also superb :)
If I may ask you something around this techniqe, but it concernes my other problem? How about WB? Ok, for this image it is not such a problem since you have pure white dress. But what If you bounce your flash from colored wall? I have this problem with my recent photos, where I bounced from green wall (was no other option). And I don’t have clue how to get correct WB. Especially since I have multiple images and each a bit differnet color due to different green walls around. I want my photos (skin) to look the same.
Saso .. I decided to go ‘vintage’ on this image for no real reason than I wanted to play with the settings in ACR / Lightroom, and see what I can come up with … without having to go to an action in Photoshop.
Re your white balance problem. That is a tough situation, since you will have to edit the images individually when the WB changes from image to image. It’s an unfortunate side-effect of having a room with colored walls and a white ceiling, for example. As you change the direction of your bounce, you will get a different color balance.
Now, the big problem in bouncing off colored surfaces, is that if it is a deep color, such as bright green or blue .. then you have a real chance of the reflected light not containing the entire spectrum of colors.
This discontinuous spectrum could cause you to have difficulty in getting a good color balance in your post-processing. What this means is that you might not be able to just “shift” your colors like when you have the entire spectrum available (but at the wrong WB setting.) There will be gaps in the colors .. and when you try and adjust for a good colour balance, you can’t quite get it right.
That is the main hurdle with bouncing off brightly colored surfaces.
But you will have to visually adjust the images if you don’t have a suitable white point to click on.
Send me an email with one of the RAW files, and I’ll see what I can do.
Neil: thanks for an absolutely fabulous site. It’s hard to believe the site is free. In reading your discussion of the orientation of the flash head, I am not sure I follow your description. You said you had the flash pointed straight up and slightly toward the bride. You also said this meant the flash was pointed directly to your left and slightly towards the bride. Last, you said you bounced off a wall. How did you do a wall bounce if the flash was pointed straight up and not aimed to your left? Thanks, Richard
Richard .. thank you.
It seems that in my attempt to simplify the description of how I positioned my flash, I just confused things for everyone.
What I meant was .. (disregarding the orientation of the photograph) .. holding the camera horizontally, in the normal position .. then my flash was upright and tilted slightly forward. (As if to the ceiling)
So with me shooting vertically, the flash was still in the “upright” position, but now pointing at the wall to my side, instead of the ceiling. From this position I now rotated the flashhead slightly upwards again .. but just enough to hit the wall at the spot I wanted.
But mostly the flash was in the “upright” position, but my camera was held vertically.
I hope this makes more sense now.
fabulous and unique another shot. I love more and see again and again before the muted version. Lovely…Pinky..
sharing is empowering the world of art,God bless you Neil.
Hey Neil,
I have a question about metering for this image. In your “no-flash” image, it seems the scene is significantly under-exposed.
I’ve taken a look at your book, and I know you frequently meter for the bride’s dress, and then use the histogram to place the whites just to the left of blown-out.
In this scene, did you use your standard histogram-metering technique….then intentionally underexpose the image? How did you know how much to drop the ambient exposure so that the flash would become appealing?
Thanks for any help!
-Nick
Nick .. I do meter for the bride’s dress if ambient light is the major light source. Similarly, I can use the histogram method to determine correct exposure for manual flash.
This scenario is a little different though. Ambient light levels are low, and this means I want to use flash as my dominant source of light. In that case then I’m not necessarily concerned with metering my available light. I just know that the ambient light levels are much lower than my chosen camera settings would allow.
Then I simply use TTL flash and let the technology take care of my exposure .. with a nudge of the FEC if necessary.
So here I didn’t meter specifically. I chose my settings. I wanted f1.8 and I wanted hmmm .. 1/160th and yeah .. 800 ISO. It could’ve been a variety of combination’s of settings. It doesn’t matter all that much in this situation … because the TTL flash takes care of the exposure.
With that, this then becomes more about how I use the light, than the specific settings.
I am always amazed at what can be achieved with an on-camera speedlight. I wonder why Nikon doesn’t put out literature showing how to correctly use bounce flash instead of the dismal little diagrams they show about bouncing the flash 45 degrees off the ceiling. Before I found your site, Neil, I had no idea that an on-camera flash could be used to produce such beautifully lit photographs. If you were to post this image on any photography forum and ask people to “guess the light method” I would be gobsmacked if anyone mentioned an on-camera flash.
Thanks neil! that makes perfect sense. Ambient was a non-issue because all of your lighting was coming from the flash – which itself was being set automatically through TTL. I really feel like you’re one of the only people using on-camera flash with such finesse!
Very much looking forward to your next book :)
Nick
This light looks nice and soft. How far was the bride from the wall?
Allan, she was sitting on the corner of the bed, so she was a bed-length away from the wall.
Neil,
Great post as always…I think your onto something special by complimenting your already fantastic lighting/technique posts with practical post production information. Keep it up!!
Thanks,
Dave
Neil,
Awesome shot and post as usual. I know some people have asked this as well and I know you are very busy, but I would love to see a post on your raw conversion presets and also maybe one on what kind of monitor you use and how you calibrate it :) Thanks for all of the info you provide… you rock!!
Many thanks for the information Neil. I just got your book and have today set aside to study it. (What a great day!)
This is a WOW Factor image. I usually bump up vibrance and Saturation sliders in ACR. But never thoguht that sliding those down can give such a nice vintage look.
Really Cool.
Thanks for Sharing.
-MP
I love the tone of the image, yes the original is also beautiful but the pp is wonderful. I wonder if there’s any lr and nx2 gurus that could recreate this look using just nx2!
Neil, great book by the way – early crissie pressie to myself.
Ni Neil,another cool picture,though I like a bit more the original one :).One question about post-production.Do you normally use ACR to process all your images?.I’m asking that,because I spent some hours with a professional photograher and he showed me huge differences between Nikon’s and Adobe’s RAW processing software,by simply opening the original photo.Anyone could spot differences between color saturation [less on ACR],and sharpness [again,less on ACR].
Thanks again for your blog,It’s becoming essential!
Gorka.
>Gorka .. he might not have set up good default settings for ACR. If he had kept it to factory defaults, then I’d say the NX version would easily look better.
You really need to tweak ACR / Lightroom to your own tastes. Or perhaps to some specific standard. I have it set so that I get pretty good contrast and saturation as a default already .. and from there I can adjust the images as I need to.
One thing I am confused about which I hope you can clarify…
Let’s say you meter the ambient light(with the ‘P’ setting in Nikon) before taking the photo and it says: f2.8 & 1/15s & using ISO 800. As shutter is the only factor affecting the ambient light do you go to Manual mode and set those settings and use TTL from flash? also, assuming your camera lowest sync speed is 1/30 …does that mean you set aperature to f1.8? or leave it at 1/15 and let the flash freeze the subject?
Bit confused how you go from reading ambient light to flash exposure…
Bobo .. the metering technique was simpler than that. : )
But let’s first take a few steps back. When you say that “shutter speed is the only factor affecting available light”, you’re forgetting about aperture and ISO.
It is what I call one of the ‘urban legends’ of flash photography. That shortcut which is supposed to help with understanding flash exposure, actually works against you since it obscures a complete view of what is happening.
This article on how TTL flash exposure differs from manual flash exposure, is also an important read.
Okay, with that out of the way .. : )
I didn’t specifically meter anything here.
I didn’t first set some other slow shutter speed, etc. I decided I want a relatively fast shutter speed (for indoors), and chose 1/160th. Why? That’s where the spin of the roulette wheel landed me. 1/100th would’ve been good. 1/250th would’ve been good.
The reason for this is that the flash exposure dominates. The look of the photo is nearly entirely dependent on how I used my flash.
Back to the metering question:
I didn’t meter specifically. I chose my settings. I wanted a fast-ish shutter speed. I wanted a wide aperture, and I wanted a good ISO. (And on the D3 an ISO setting of 800 is still excellent.)
I chose 1/160th @ f1.8 @ 800 ISO.
It could’ve been any of a fairly wide range of combination of settings.
Even though I say I didn’t specifically meter, I did check my camera’s built-in metering display, and noted that it was more than 2 stops under-exposed at that point. Great! I want the image to be under-exposed for the ambient light!
By how much? It doesn’t reeaaally matter. As long as it under-exposes by 2 or 3 stops, and the flash can dominate as the light source. The TTL flash technology will give me good exposure. I might have to nudge this with an adjustment of my flash exposure compensation though.
And there you have it. It is quick though.
1. I want a specific look that a wide aperture will give me.
2. I want ambient light to be under-exposed.
3. I set the choice of settings I want.
4. I double-check to make sure the ambient light is under by 2 stops or so.
5. I let TTL flash technology expose take care of it for me.
6. I double-check my TTL flash exposure by chimping.
7. I adjust my FEC as necessary, and keep shooting.
Simplicity.
This decision process is but a few seconds.
I hope this helps make it all much clearer.
Neil vN
Thanks Neil for your answer.I didn’t know ACR needed “tweaking” to match other software,this is interesting.However,my flash pictures are already a lot better since I follow your tips.Suggestion: a new book [better a DVD] for the future ;-)
Neil, stunning image.
Dumb question, the setting you use in ARC would the match the corresponding controls in lightroom ?
dp
David, yes, the settings in ACR matches those in Lightroom.
Hi Neil,
maybe it will be interesting to include also as a part of your workflow tutorial “tweaking” the ACR. Do you use something like scripts, or Gretag macbeth cards or just visually … etc. ?? I think I’m not the only one hungry for such informations from folks here. :) Thanks.
Roman .. I do it the low-tech way, by judging it by eye (on a calibrated monitor). I do have a Gretag Macbeth color chart, but haven’t yet bothered with running any script to profile ACR properly. Since I already like what I’m getting with the low-tech approach, and since I’m not a commercial photographer, there’s no urgent motive for me right now to finesse it. But my opinion and approach to that may very well change still in the future. ; )
Absolutely beautiful! Thank you so much for the post!
Hi Neil,
What is “chimping”?
I looked for a glossary but could not find one.
Also, you “make sure the ambient light is under by 2 stops or so”.
Do you have a “stops” chart here?
Frankee
Frankee .. chimping is when you look at your camera’s preview … and add oooh! oooh! sounds in excitement at what you’ve just shot.
I’m not sure what you mean by a “stops chart”. A stop is a full indent on the camera settings. eg:
1/60th to 1/125th or
f4 to f5.6 or
200 ISO to 400 ISO
It is a doubling or halving of the amount of light hitting your sensor or film.
You can see the exposure reading in your D-SLR’s viewfinder.
If you’re still a little lost as to what is meant by a “stop”, then it is time to go shopping at Barnes & Noble, or Borders, or Amazon for a good introductory book on photography. I would especially recommend: Understanding Exposure, by Bryan Peterson
Neil,
Can you please explain a ltttle about wireless remote systems?
I mean, which one is best and why? I am a canon fan and I had a canon flash speedliite wireless remote transmitter ST-E2. Should I go for a third party equipment for a better performance?
At this point, as far as wireless TTL systems go, you’re better off either staying with the limited ST-E2 transmitter, or using Radio Poppers.
The new Pocketwizards looked promising, but have some issues.
You also have to consider that for decades, photographers achieved amazing results with regular radio slaves, such as the older pocketwizards. There are other makes and models though.
But all of this – wireless TTL transmitters – is a different topic though than this specific article, and is enough material for an entire book on its own.
Hi Neil, superb shot as usual.
I have a question about iTTL: Do you have to bin lot’s of photos due to ‘blinkers’ ?
Whenever I try using iTTL for people shots I always have trouble with the pre flashes causing the subject to blink as the shutter is fired. Maybe a lot of my family are just super sensitive blinkers, and it’s not such a big issue in general.
Marcus
Marcus, it’s not really a problem for me.
A question – do you use rear curtain sync? If you do, then that is most likely the cause of getting so many photo where people blink. Rather use normal sync, also known as first curtain sync.
Some cameras however, have a pronounced pre-flash sequence and do cause more blinks. The Nikon D70 was known for this.
Ahh.. yes, I usually have my flash set to rear curtain sync. I will go and swap that now [D200], and give iTTL another go, hopefully that’s what the problem has been. Pretty obvious now that you mention it, doh !
Thanks
I have just added a new article on when (not) to use rear-curtain flash sync.
Lightroom does allow one to select different profiles for RAW processing depending on your camera type also. For my Canon I typically pick Canon Portrait, Landscape, Standard etc as the case maybe to override the default ACR profile that Lightroom provides. The same concept should be available for Nikon and should help the person seeing the difference between the Nikon software and ACR.
Thank you so much for sharing your wealth of knowledge. I just shot with my SB-600 on my D5000 last night for the first time and LOVED the bounce light. Not liking the direct flash too much, but then again, have not really figured it out yet. Thanks again! :)
Many thanks for an excellent “knowledge base” for (flash) photography! Your reflections (no pun intended…) are greatly appreciated! I see that you often use a relatively high ISO (800-2000) even when using (bounced) flash. Is that because you’re at your maximum flash output, or do you intentionally set a high ISO in order to capture some mood from ambient lighting?
I also wonder (if you have the time :)) whether or not a doubling of the ISO in-camera would result in exactly the same image as a +1 stop exposure compensation in the RAW editing, in terms of noise?
Hannibal .. The reasons for quite often using a relatively high ISO when using flash, is a combination of those reasons:
– I want the available light to register and give some mood and context,
– to have a fast enough shutter speed to help eliminate camera shake,
– I am often bouncing in extreme ways to get some soft light from my flash,
– my flash works less hard, and recycles faster.
– because using a high-ISO capable camera allows me to do this.
As for the doubling of ISO in-camera, or via post-production, and whether this has an effect or not, and at which ISO level this might kick in .. there is some debate about this. I haven’t investigated this at all, working on the assumption that getting (close to) correct exposure is a good thing anyway.
Neil, did you gel your flashlight on the above picture?
Adi … I nearly invariably do when I shoot indoors where there is Tungsten lighting. My default is 1/2 CTS.
Sorry Neil – I’m a bit late coming to this one…. I did though want to comment on your line: “My choice of lens in this instance was the Nikon 85mm f1.4 (B&H) on the Nikon D3….which means that the Nikon 85mm f1.8 (B&H) would’ve worked just as well.”
I hesitate to disagree with one of my heroes, but in this instance I’m afraid I must. Most lenses are NOT at their best when fully open. By using the f/1.4 lens at f/1.8 you are FAR closer to the sweet spot for that lens (my guess is around f/2?). However, should you have used the f/1.8 lens, you would be using it absolutely wide open, with all the CA and other issues inherent in doing this.
I know it sounds a little as if I’m being a pedant, but this is why we pros spend such a fortune on fast glass. Not so we can always use them wide open, but so that when we DO use it close to wide open we are getting the best from that lens.
I always tell my students, an f/2.8 lens used at f/4 will give you a better image than an f/4 lens at f/4.
Nick, I do agree with you about image quality improving with aperture choice.
My comment about this kind of photo being accessible by any photographer, even if they can’t afford the more expensive optics, is that there has been some criticism about the material on this site. The criticism is that the techniques are outside of the scope of the everyday photographer.
So what I wanted to show here, is that this kind of image is totally within the range of anyone that can afford f1.8 prime lenses.
Hi Neil, I have just come across your website and it’s amazing. You are giving so much. Many thanks.
Hi Neil,
When you bounce the light from the flash, do you need to use only white wall? If for example there is no white wall in the room, how do you overcome this problem? do you need to use gel?
Thank you.
Regina
Regina … the bounce flash will pick up color casts, but this is why we shoot in RAW – it makes for a much easier adjustment of the color balance.
Here is a related article: Bounce flash photography – white balance settings
Hi Neil
I have spent the last two days reading up your site. Undoubtedly you are a brilliant photographer with in-depth understanding of what goes behind image creation. What amazes me even more is the way you share this for the benefit of others .. I used to think I was pretty good with multiple speedlights and nikon CLS — till you showed me what you could do with a single on-camera flash and BFT !! Cheers buddy .. keep it up.
Regards
Sumanta
Hi Niel,
Do you use a telephoto such as 70-200 canon often if at all indoors? I want to cut down on using that but instead use the 24-70 (full frame sensor) more now. I’ve taken thousands of indoor photos but i always recall just ONE that was super good directional bounced off the wall and i recall it was from the 24-70. I have a feeling that being a bit CLOSER to a wall is better for that open window effect than using a telephoto with too much distance from the wall, albiet it is softer light (maybe more soft than needed).
I do use the 70-200mm lens indoors at weddings.
Here are 4 images from the same wedding – toasts by the maid of honor / bridesmaids and best man / groomsmen – photographed with the 70-200mm lens.
While I don’t get (or even want) the same kind of fine control over directional light, I am happy with flattering soft light from my bounce flash.
Thanks Neil for your to the point reply. Doing a birthday party tomorrow at a community center. I’ve gone to the same one many times, but tomorrow with be a little different. Bringing my softbox 4’X 2′ for some posed shots and also going to underexpose (flourescent (probably cheap ie.green) to let the flash dominate. Getting better at this stuff but takes a long time of experience!
Reviewing this post in 2021 and is still very relevant. Thanks for the detailed description, really!