Catchlights in the eyes with bounce flash
I’m often asked about how I get those catch-lights in the eyes of my subjects. My answer is – if you bounce your flash properly, the catchlights have to be there!
When working indoors with surfaces that I can easily bounce my flash off, the question that I always ask myself is: If this had been a studio shoot, where would I place my softbox?
In a studio-type setup, you’d rarely place a softbox directly over someone’s head as a single light-source. There are two places to commonly place a softbox in the studio .. to left (and slightly above) or to the right (and slightly above) your subject. Which side of your subject is quite often dictated by how your subject is positioned. The simplest and most effective position is so that the light falls onto your subject’s face from the side opposite to the camera’s view. In other words, ‘short lighting’.
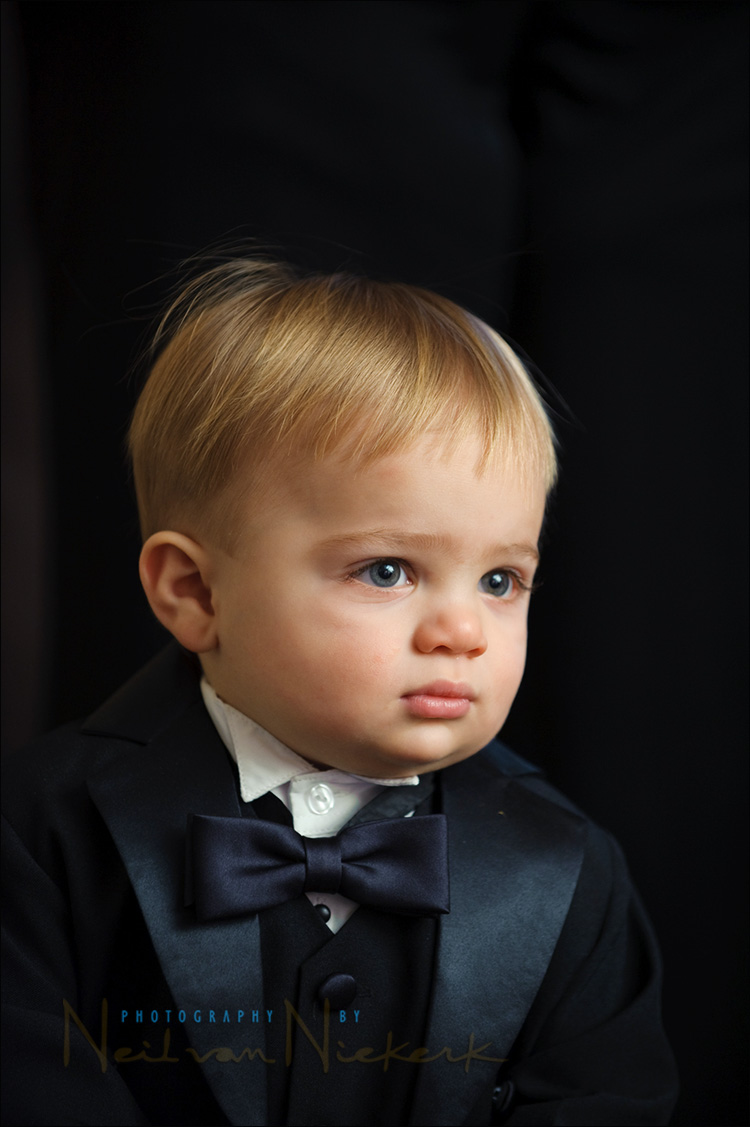
With this photo above, the lighting is pretty much just bounce flash, with a touch of available light registering. The boy is standing in front of someone wearing a very dark dress, hence the ‘black background’.
Now, looking at that photo, the large catchlights in his eyes should grab your attention immediately. How did I get those catchlights? The same way you would in a studio .. by the way you place your softbox. So in a way then, these kind of catchlights in your subject’s eyes are near-predictable if you bounce your flash with that softbox idea in mind.
Here I once again used the black foamie thing to shield direct flash from falling on him. I want indirect flash, and I want it directional and soft. Hence I bounce my flash towards the area I want my light to come from. That is how I ‘place’ my softbox. The key here is not to think of your flash as being your light source any more – instead, the area that you’re bouncing your flash off, is now your light source.

On-Camera Flash Photography – revised edition
This book is explains a cohesive and thorough approach to getting the best from your on-camera speedlight.
Particular care was taken to present it all with a logical flow that will help any photographer attain a better understanding of flash photography.
You can either purchase a copy via Amazon USA and Amazon UK, or can be ordered through Barnes & Nobles and other bookstores. The book is also available on the Apple iBook Store, as well as Amazon Kindle. Also check out the Amazon Kindle store.
Learn more about how the cover image was shot.
Related articles
The catchlights in the eyes can also be seen in these examples:
- Directional light from your on-camera flash
- Bounce flash & short lighting (model: Noreen)
- My choice of flash modifiers,
- Directional bounce flash,
- Bounce flash example – the cutie
Superb photo Neil – I really enjoy the website!
Groete, Sinuhe
When I asked about getting catchlights, I didn’t expect such a thorough answer. A whole post with examples–I don’t know if my question inspired this, but this gives me a lot to go on. THANKS!
Meryl
Hi Neil,
The said catchlight on the boy’s eyes are in white color because the bounced wall is in white color. Am I right?
Should we control anything to keep the size of the catchlight on this case?
I have seen one Nikon D3 image with the Metadata 1/3 EV(exposure bias), Manual (exposure program) and Pattern (metering mode).
(Another image has seen with minus exposure compensation on manual mode
like -1 1/3 EV)
Exposure. Camera body Nikon D3. Lens 70-200 2.8 @ 1/40 sec at f/ 3.2 iso 1250 flash fired. Focal length 140 mm
How can we do exposure compensation on manual mode?
Normally, we will do exposure adjustment like one stop down on aperture or one stop up on shutter speed on manual mode. The exposure compensation can be done with aperture priority or shutter priority modes only.
The metadata has been read by Lightroom and I feel nobody can play with it.
Here I am confusing. Neil can you please help me.
rafiayub .. I am sure that Lightroom must be seeing the Flash Exposure Compensation there.
However, with Nikon it is possible to adjust the overall exposure compensation on the camera’s body while in manual exposure mode …. and allow that to affect the TTL flash exposure.
Hi Neil,
Thank you for the quick reply.
I would like to ask you one more thing about this image’s bounced flash lighting.
The boy’s hair received a ‘v’ shape lighting. I mean, the inner-side of ‘v’ shape not lighten and remains dark.
The total bounced light has got a special shape and final image is better than a studio sitting. Is there any relation between selected focusing point, subject situation and ttl flash?
Neil, are you doing some thing special activities here?
I am facinated with your all work and trying to learn deep into it than simply looking and going. I hope, these arising questions are not bad (not for only wasting your valuable time) and it will be good to all those who are watching it.
thx.
I also noticed the pattern of light on his hair. This might be due to some available light in the room. There were tungsten spot-lights around.
However, I was busy shooting, so didn’t have the time to do comparative photos without flash.
So at this point I can’t give more info as to that specific light pattern on his hair.
Is there any relation between selected focus point, subject situation and TTL flash? While with some cameras your TTL flash exposure is affected by your focusing point selection …. and in an unrelated way, the quality and type of light is very much affected by how your subject is positioned …. I don’t think there is a direct relation between those three things as you mention them there.
Neil,
Do you find that for candids like these that your stop what they are doing for you to catch the moment? Obviously this little tike is a probably bit young to do it, but in other cases do you find in happening?
I’ve never shot a wedding, but my greatest fear in it is not getting good candids because people continue to move and do things, so to get the exposure right on the first shot is tough. Then you have to be like “okay, one more”, then dial in the new settings, hoping it’s right this time. Maybe it’s just that I’m always taking test shots of friends and fam, so they just ignore me now and go on with their business, but when the official wedding photographer stops to take a picture, they’ll be ready and willing and will wait a few moments longer if the first doesn’t turn out.
Do you find this to be the case?
Niel, When bouncing flash from a ceiling is the only option and there is also little available light in a dark room then the eyes will be too dark. What do you think of my method of using flash in this kind of situation: I still use the BFT to avoid that flash will hit my subject directly. Of course the BFT is on the front side of the flash. Then I add a selfmade with bounce card to the back of the flashhead. This with card is 8 cm small but longer then the BFT so it will give a little bit of direct fill light on the subject. By moving the with card up or down I can adjust the amount of fill light. So I use the BFT and the white card together. But… I have not tried this out in a wedding, just some test pictures at home. What do you think of this?
“…there is a problem with parents who react when they see me lift a camera. Too many of them interrupt their child’s natural behavior that I’m trying to photograph … and instruct to kid to “smile at the camera”. It just kills me. I have a photo then that is so much less than the natural one.”
Yep this really is a killer for me too…whenever it happens. You see that shot in your mind…its a split second process…you lift your camera …and suddenly that candid moment has been replaced by stiff, formal posing..and the moment is gone. I suppose it underscores the point that we can’t capture everything we’d like to. Just have to move on to the next ‘magical moment’ and keep the fingers crossed!