Using the Profoto B1 portable flash at a wedding
With wedding photography, there are nearly inevitably time-constraints. It is therefore imperative that you, as the wedding photographer, are able to keep everything running as smoothly as possible on your side. Which implies that it is important that you (and your equipment) are adaptable. And it is also hugely important that your gear is easy to set up, and very reliable.
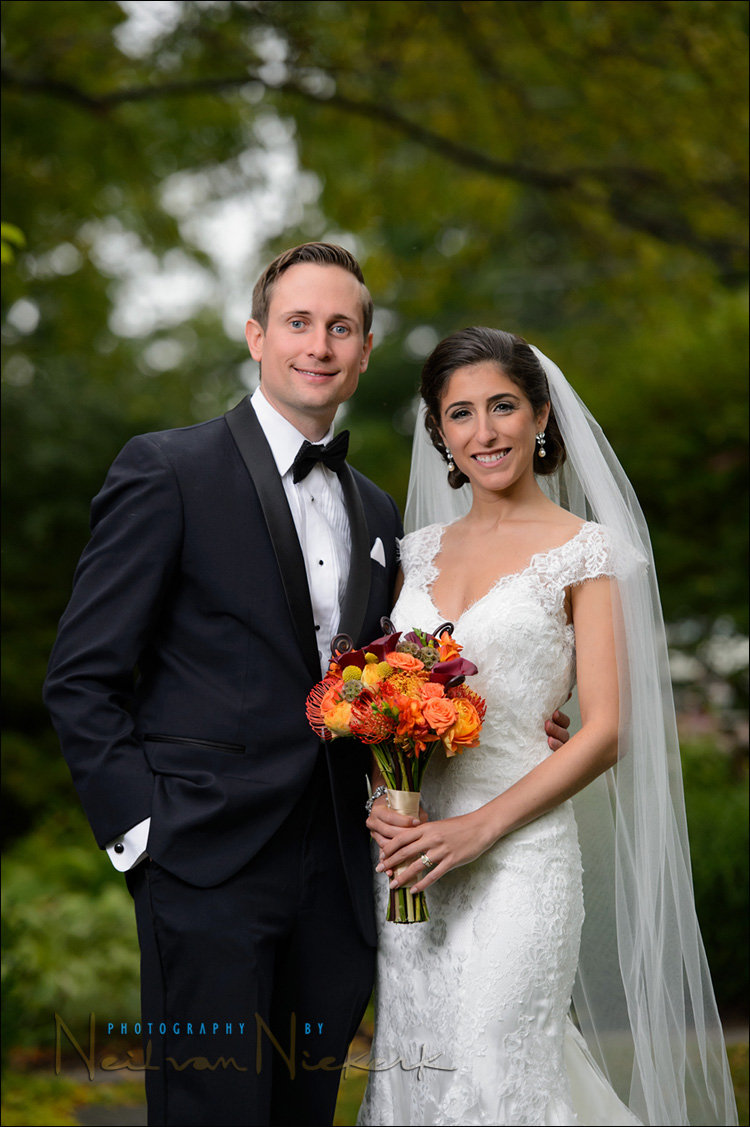
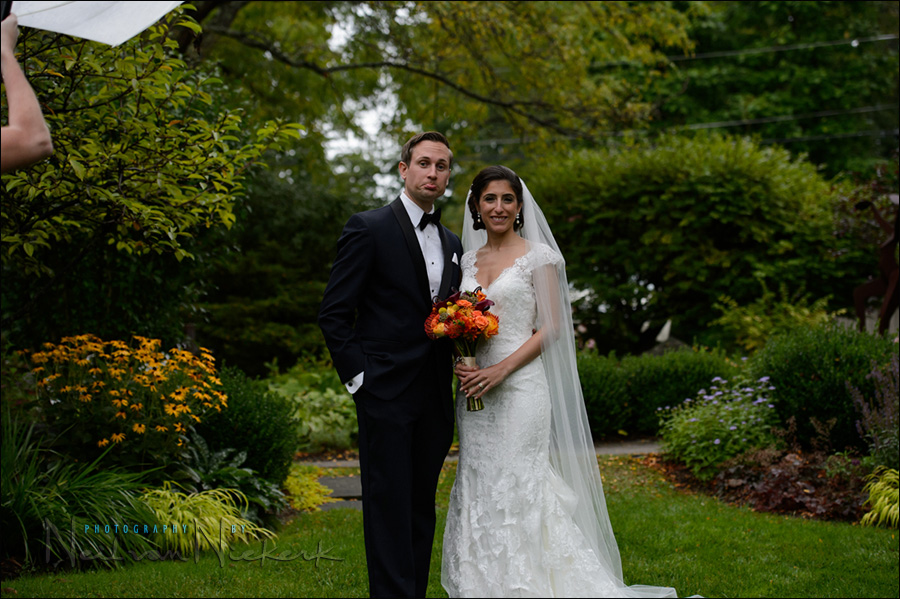
Karissa and Rory’s wedding was the first where I pulled out the Profoto B1 battery powered flash (B&H / Amazon). I’m even more impressed with it now, than I was when I first tested it for my review of the Profoto B1 flash.
When using additional lighting, you ideally need a few things from your lights:
– power!
– and yet, a delicateness to the light when necessary.
– speed of use is essential.
At 500Ws, the Profoto B1 dumps sunlight-levels of light, but you can pull it down 8 stops, to where the light can be used in subtle ways.
With off-camera flash, I’m mostly working with a specific distance, and then manual flash makes sense. The Profoto B1 (affiliate) offers TTL as well, and this might seem superfluous to some. But it really makes it easier and faster to get to correct exposure. You can do an initial exposure via the TTL mode, and then switch to Manual if your exposure is correct. This gives you the speed of TTL flash, and the consistency of Manual flash.
Here are more images from this wedding, with examples shot with the Profoto B1, as well as other images using various types of light ….

Direction & Quality of Light
I wanted to distill the essence of what we, as photographers, work with – light! Before we can truly grasp on-camera flash and off-camera flash, and really, any kind of photography, we have to be aware of the direction and quality of light. We need to observe the light that we have, and then decide how best to use it, or enhance it.
With this book, I try my best to share those “aha!” moments with you, and I do believe this book can make a difference to your photography.
The book is available on Amazon USA and Amazon UK, or can be ordered through Barnes & Nobles and other bookstores. The book is also available on the Apple iBook Store, as well as Amazon Kindle.
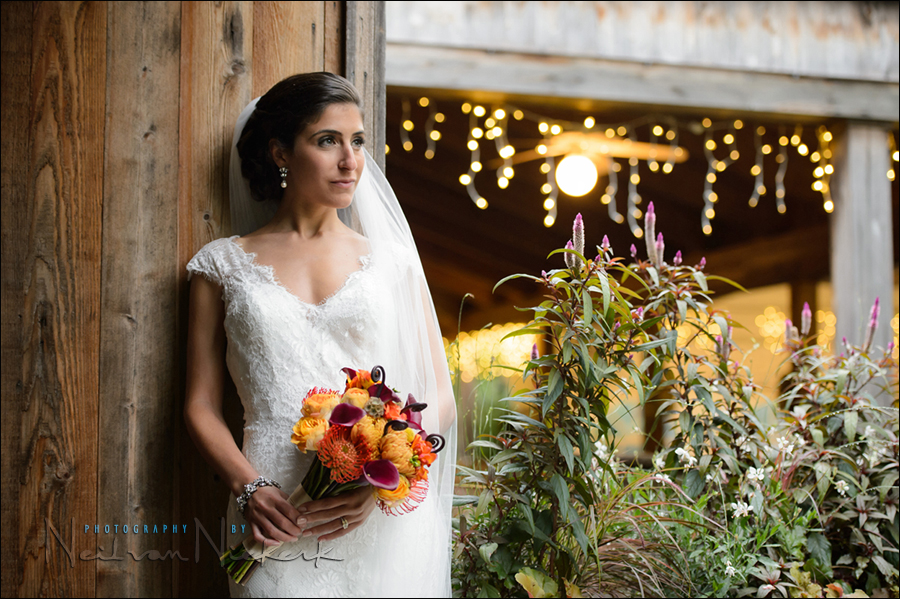
1/250 @ f/5.6 @ 800 ISO … 70-200mm f/2.8
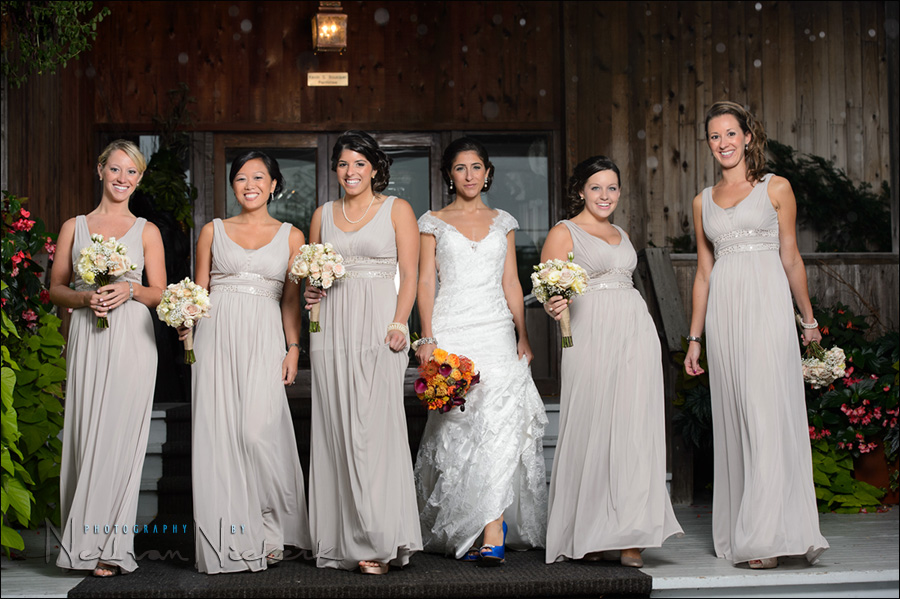
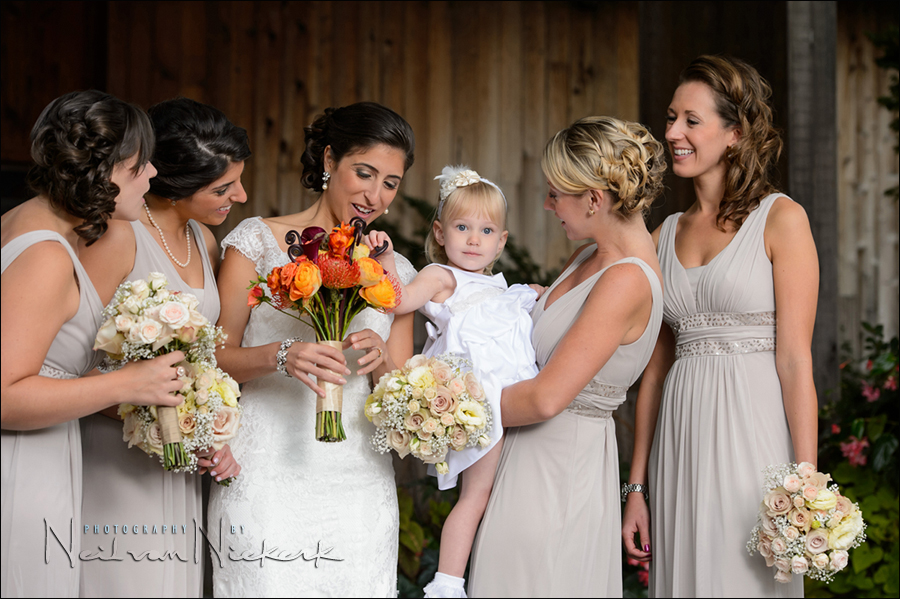
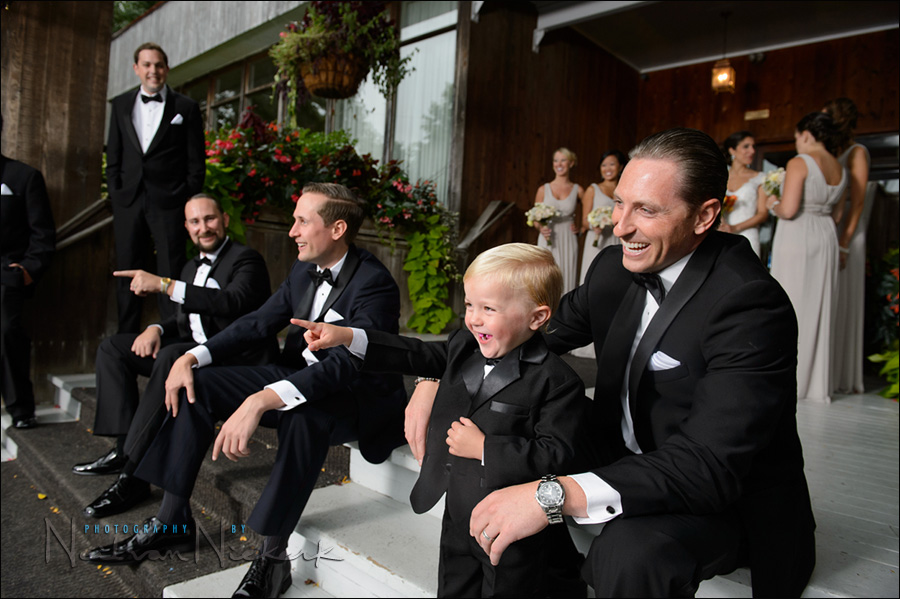
Since it was raining for most of the day, I had to do the photos of the bridal party, and of the families, under the front porch of the reception venue. There wasn’t anywhere else we could work, without being crowded inside.
This meant that I set the Profoto B1 on a tall light-stand in front of the entrance of the venue, diffused with a white shoot-through umbrella.
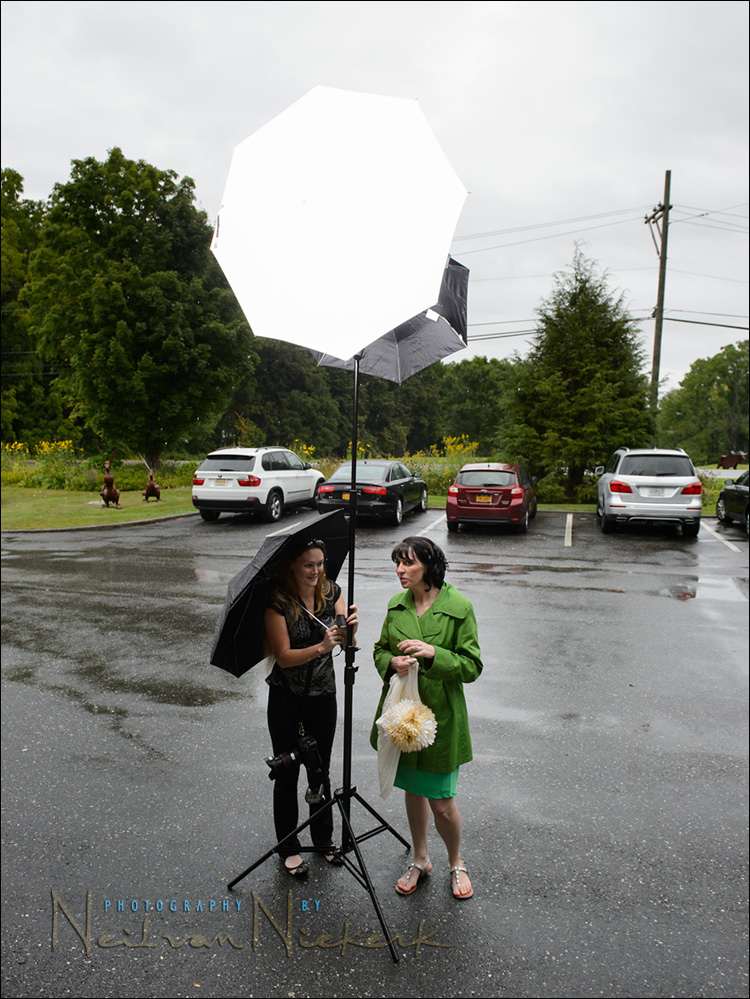
The setup: Profoto B1 with a shoot-through umbrella. The black umbrella that you see there, was gaffer taped to the B1, to make sure it didn’t get (much) rain.
Funny how that works – trying to baby a brand-new $2000 flash, while running around in the rain with two Nikon D4 bodies and two f/2.8 zooms, getting soaked. But that’s not unusual to use my cameras in the rain, as in this rainy-day wedding. Fortunately, the rain wasn’t monsoon-like heavy. Just a steady drizzly downpour. After a while though, I did look bedraggled and soaked through.
1/250 @ f/5 @ 800 ISO … 70-200mm f/2.8
The longer lens gave me the reach for these photos where the bridal party (or families) interact.
I had the Profoto set to about 1/4 power (if I recall correctly). This meant that I could fire the frames quite quickly, and not wait for it to recycle like I would’ve had to do with speed lights. The B1 just kept motoring on.
1/250 @ f/5 @ 800 ISO … 24-70mm f/2.8 @ 24mm
With the off-camera light parallel to the group, I am free to move about, and still have the light evenly spread to everyone in the frame.
1/250 @ f/5 @ 1600 ISO … 24-70mm f/2.8 @ 50mm
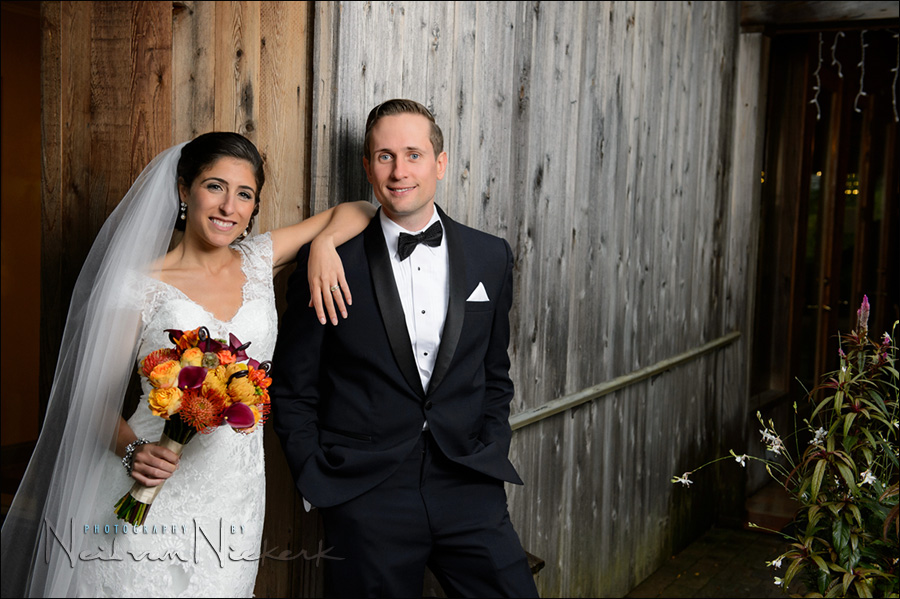
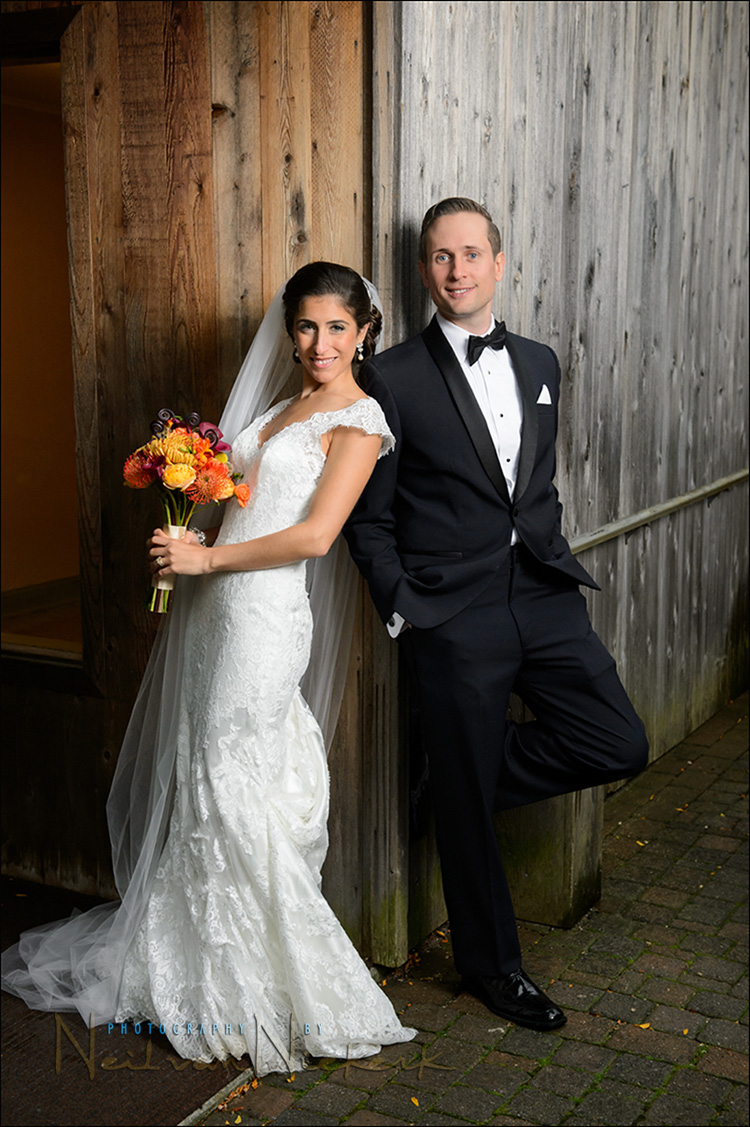
After the ceremony, we took a few more portraits of the couple. I had my assistant hold up the Profoto B1 on a monopod here, so we could move fast. The light was still diffused through a white shoot-through umbrella.
1/250 @ f/5 @ 1600 ISO … 24-70mm f/2.8 @ 50mm
1/160 @ f/4 @ 1600 ISO … 70-200mm f/2.8
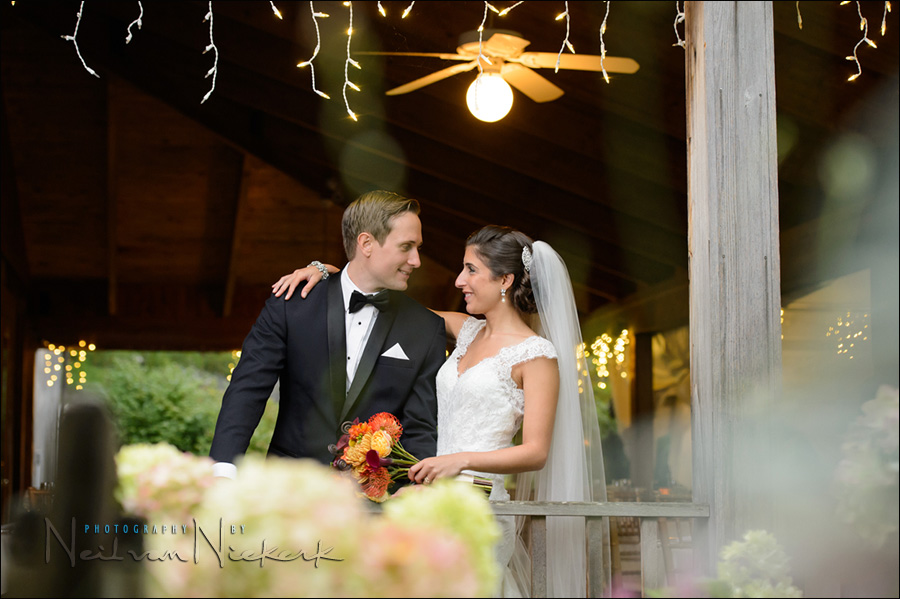
Still with the B1 on a monopod, and the white shoot-through umbrella attached. I had her hold it closer to the B&G (to camera left), just out of the frame. Just that touch of light to clean up the light on the couple, without being overpowering and noticeable.

1/125 @ f/4 @ 1600 ISO … 70-200mm f/2.8
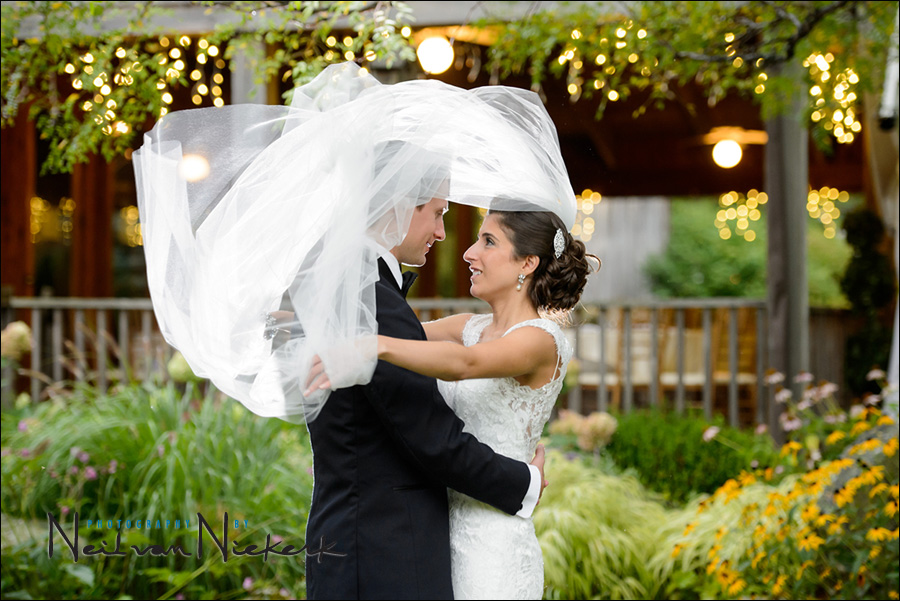
I had my assistant crouch behind them for several sequences where Karissa threw her veil around them. The flash was direct, and dialed down to minimum. I fired these at 10 frames-per-second on the Nikon D4, and the Profoto kept up.
For this type of low ambient light levels, the direct flash was a bit too powerful. So I will have to find a way of diffusing the B1 for these type of photos, or use a speedlight with a diffuser like usual. Still, I really like the effect.
1/160 @ f/3.5 @ 1600 ISO … 70-200mm f/2.8
Just before we headed back to cocktail hour, I wanted a few more traditional poses. The light outside was fading, but the background looked wonderfully muted. Using the B1 (on the monopod) with the shoot-through umbrella still, the light from the flash looked great. Clean, open light. And it was easy to adjust!

1/160 @ f/4 @ 1600 ISO … 70-200mm f/2.8
And here is the available light shot to show how much the flash lifted the exposure, and cleaned up the light.
Using a variety of lighting during the rest of the wedding day
Now as much as I love the Profoto B1 – and because of it I’m now carrying fewer speedlites to weddings – it would be completely unrealistic to think the B1 is a do-all lighting solution. Anyone who regularly follows this website, will know that I am a strong believer in having a flexible philosophy regarding lighting. Whatever looks best, or works best in a situation.
Available light where necessary. Or on-camera bounce flash. Or direct on-camera fill-flash. Or video light. It varies as best fits the specific situation, and whatever looks and works the best.
So similar to the article – adapting the use of light & flash photography – which discussed a fluidly adaptable approach to lighting, let’s have a look at the options I used during this wedding.
1.) Available light
I’m perplexed by the photographers who have the automatic response: “available light always looks better”. How could that “always” possibly be true? Additional lighting can really add pizzazz to a photo when the available light is flat. For example: the photos of the model, Olena, in this article: off-camera flash for that extra bit of drama.
However, when the available light is great, there’s no real need to fuss with additional lighting. Use what you have.
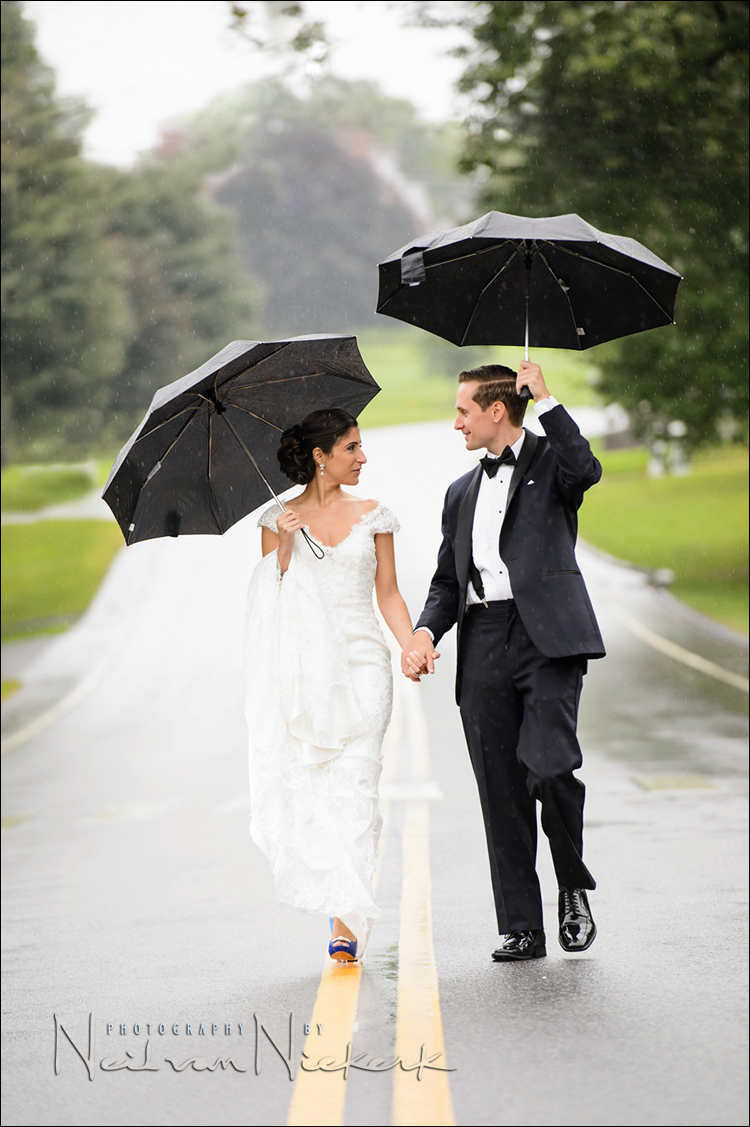
And sometimes, additional lighting just isn’t practical, such as when walking backwards in the middle of a main road, while the rain is coming down …
1/500 @ f/4 @ 1600 ISO … 70-200mm f/2.8
We cautiously went out to the main road, and when the road was clear, stepped in for a few romantic portraits in the rain. Again, no umbrella for me. I’m just happy the couple were fine with going out in the rain, and getting a wider range with the romantic portraits.
1/80 @ f/2.8 @ 1600 ISO … 70-200mm f/2.8
1/100 @ f/2.8 @ 1600 ISO … 70-200mm f/2.8
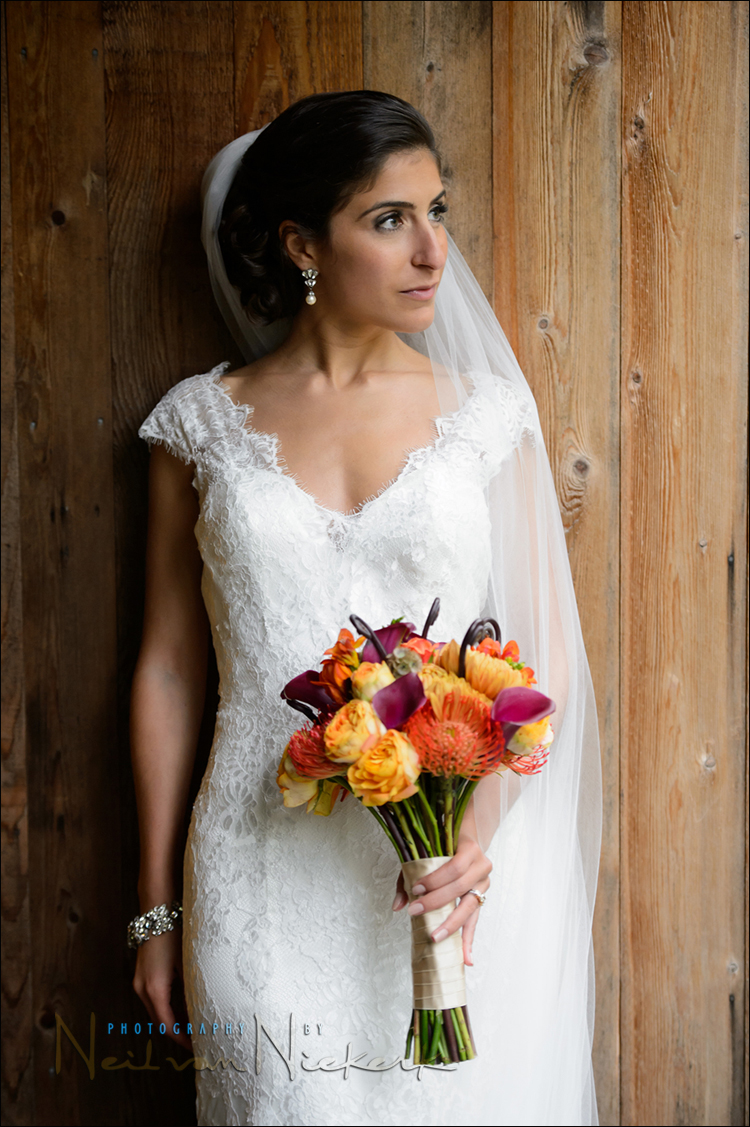
Posing Karissa half-way into this building’s entrance, I knew I would get dramatic light on her. (The rain had subsided by now.)
related articles
2.) On-camera bounce flash
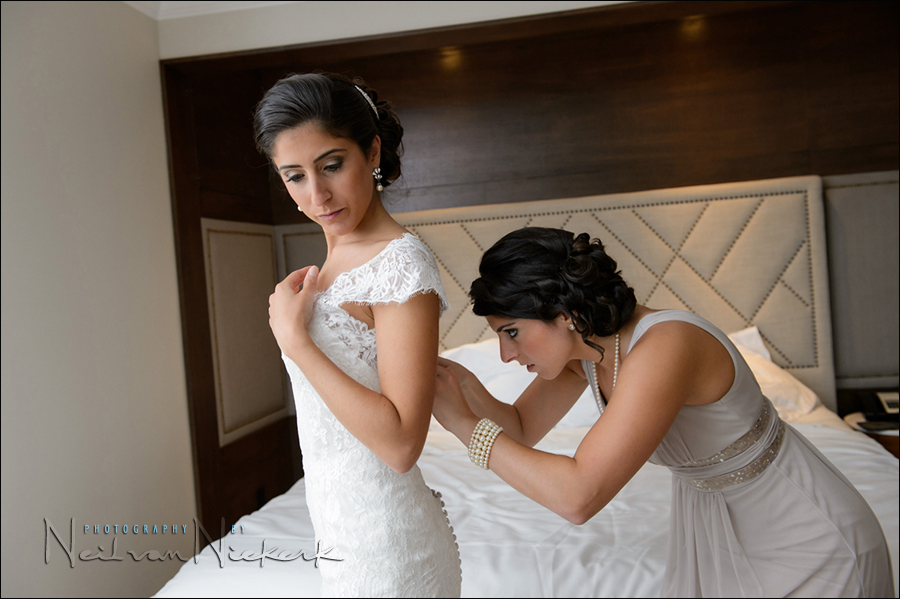
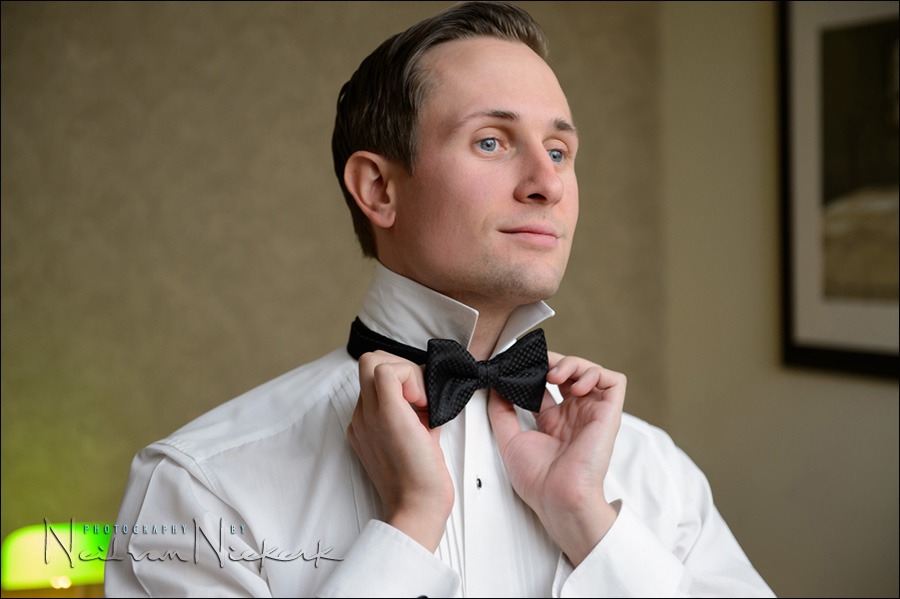
It’s no secret that I am a huge fan of directional light from your on-camera flash, when there are bounce-able surfaces indoors. Or even outdoors. With the bride’s prep and the groom’s prep, I rely heavily on on-camera bounce flash to give me soft, directional light.
1/200 @ f/4.5 @ 1600 ISO … 24-70mm f/2.8
There was a fair amount of available light in this room, but a touch of directional bounce flash gave me a more controlled light. I still had to use the local adjustments brush to bring up more detail on the bridesmaid’s face.
1/200 @ f/3.5 @ 1600 ISO … 24-70mm f/2.8
With the window to my right, the fall-off from the window-light was too dramatic, and I used bounce flash here to lift the contrast. But I still wanted to keep that directional quality to the light. Black foamie thing to the rescue.
1/100 @ f/4 @ 2000 ISO … 70-200mm f/2.8
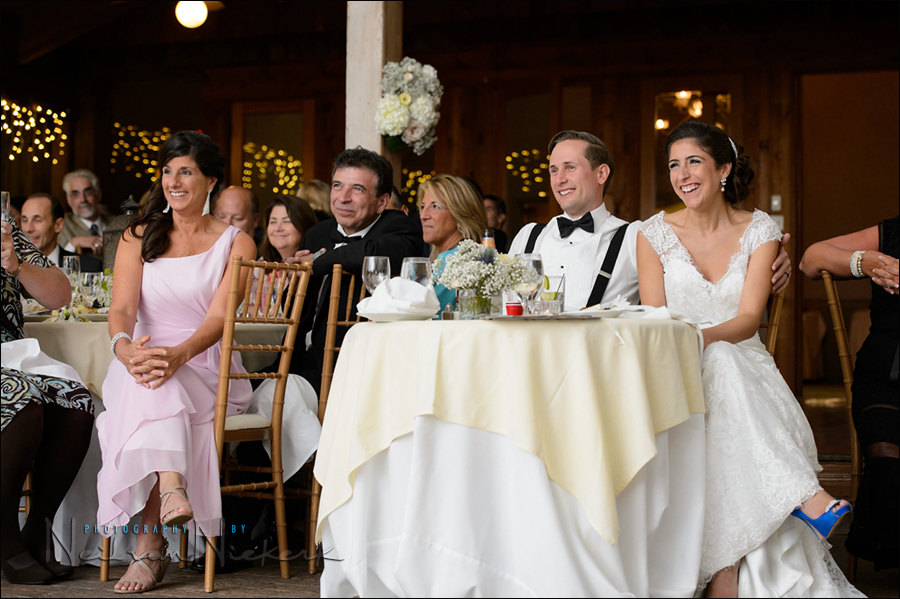
The reception was in the marquee tent, so bounce flash was super-easy and gave a good spread of light.
1/125 @ f/3.5 @ 200 ISO … 24-70mm f/2.8
1/100 @ f/2.8 @ 2000 ISO … 70-200mm f/2.8
For the photos during the wedding reception, I had a 1/2 CTS gel on my flash to bring the WB of the flash closer to that of the ambient light in the marquee tent.
Related articles
On-camera flash modifier – the black foamie thing

The BFT is held in position by two hair bands (Amazon), and the BFT is usually placed on the under-side of the flash-head.
The linked articles will give clearer instruction, especially the video clip on using the black foamie thing.
Gelling your flash
Since I frequently gel my flashguns to turn the WB of my flash much warmer (usually for Incandescent light), I use these gels that I cut up and tape to the top of my speedlight’s head. One of these sheets (which aren’t expensive), will give you a lifetime supply of these filters. For me, these gels are an invaluable part of flash photography.
Tape the gels down on your lens hood when not using the gels.

3.) Direct on-camera fill-flash
With overcast days, the light comes from all directions, but can be top-heavy. Then it often helps to nudge the available light with a bit of fill-flash from your on-camera speedlight.
The idea here is that the fill-flash is just a touch of on-camera TTL fill-flash. It’s not the same as you would deal with fixing a hard sunlight problem with flash. So you have to dial your flash exposure compensation down, because you are exposing correctly for the ambient light.
1/400 @ f/4 @ 1250 ISO … 70-200mm f/2.8
1/200 @ f4.0 @ 3200 ISO … 24-70mm f/2.8
There was a New Orleans style Jazz Band which lead the wedding guests back to the reception after the wedding ceremony at the lake. It was getting darker then, and with this being a rainy day and us under the canopy of trees, I had to bump up my ISO quite high. Still, a touch of fill-flash to brighten up anyone in the foreground.
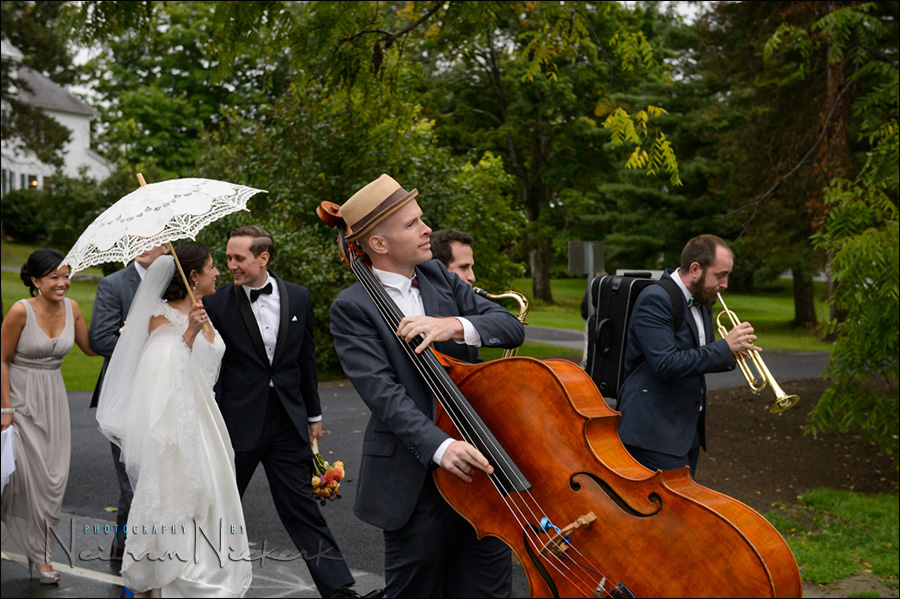
1/250 @ f4.5 @ 1600 ISO … 24-70mm f/2.8
Related articles
4.) Video light
Photographing the band playing during cocktail hour, I tried one test shot with bounce flash, but I already knew what would happen – the entire room would light up. Perfect exposure but the mood is lost.
I keep an LED video light (affiliate) with me in my bag at all times. What makes it so versatile, is that the video light’s White Balance can be changed anywhere between Daylight and Incandescent.
I had my assistant hold the light for me for various photos of the band members. My assistant would highlight whoever I wanted to photograph, so that there was this type of spotlight on them. This lighting retained the mood, but gave me camera settings that were useful, unlike the available light that was there.
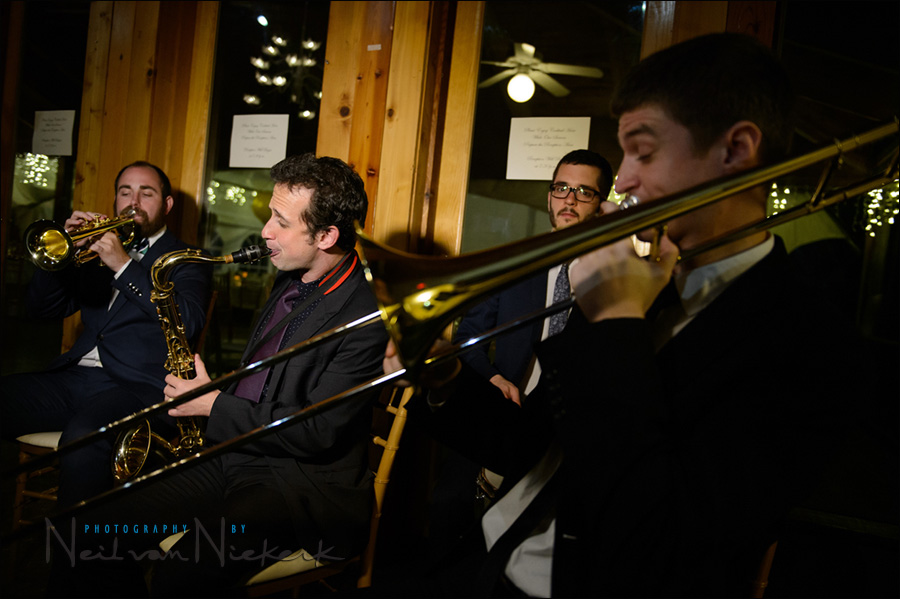
1/160 @ f/2.8 @ 1600 ISO … 24-70mm f/2.8
Related links
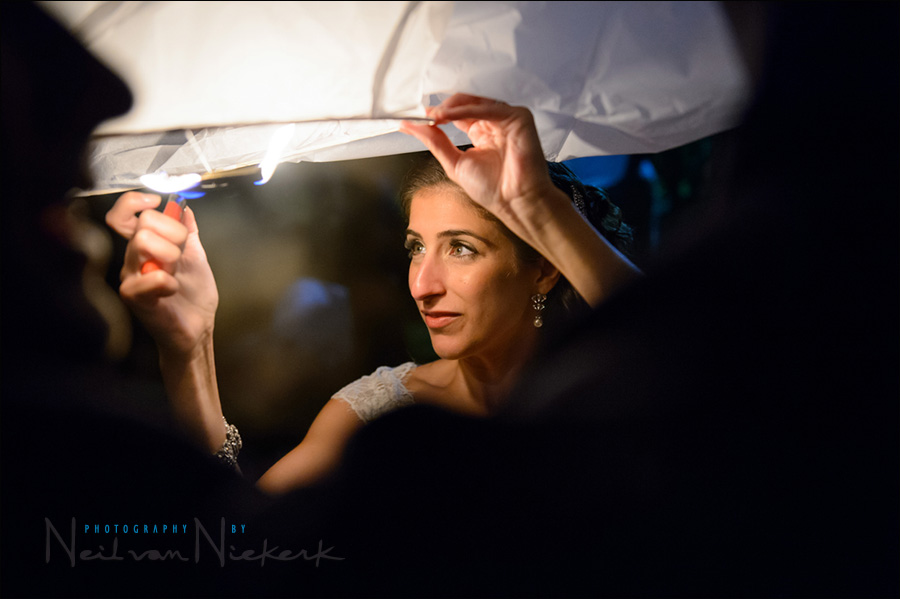
5.) Diverse available / found light
At the end of the wedding ceremony, Karissa and Rory, and their guests, sent off with wish lanterns. Challenging to photograph! The light from the flames were very low, but flash would’ve destroyed the mood entirely. I decided to just use the light that was there. More than 50% of the frames I shot were un-usable due to camera shake or gross under-exposure. The light was only enough to photograph by when closer to someone lighting it, or holding up the wish lantern. But the images that worked, looked amazing!
1/60 @ f/2.8 @ 5,000 ISO … 24-70mm f/2.8
The White Balance here is still very warm, but this is as much as the WB slider would go down.
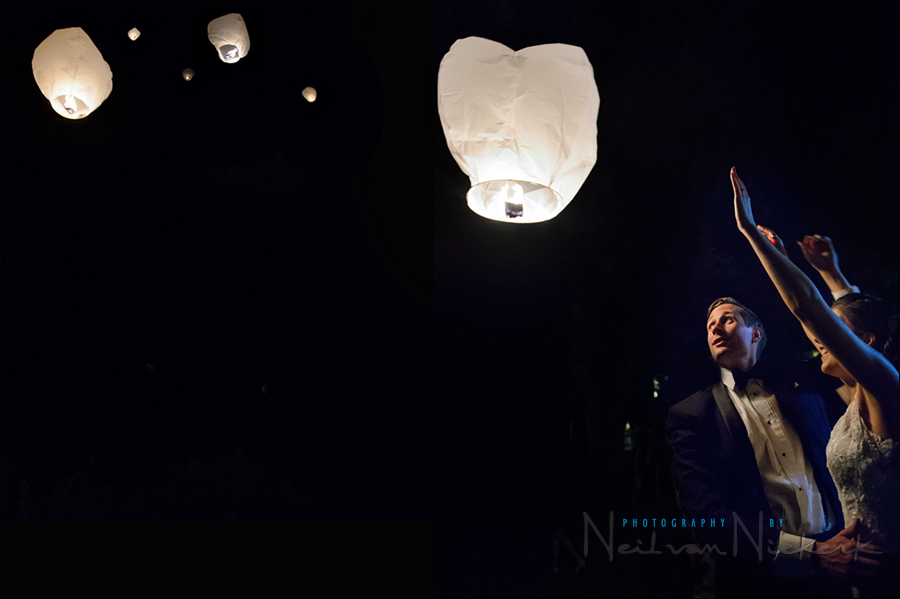
1/60 @ f/2.8 @ 5,000 ISO … 24-70mm f/2.8
This photo was a vertical shot originally. (The right-hand side.) But I wondered how this would work as a horizontal if I pulled in wish lanterns from other frames that weren’t so successful. I ended up really liking this composite!
Related articles
- review: Profoto B1 flash
- High-speed flash sync (HSS) with the Profoto B1 portable flash
- Comparing flash power: Profoto B1 / D1 vs. speedlites / speedlights
- Wedding photography – Adapting the use of light & flash photography
- review: Profoto B2 Off-Camera Flash – photo shoot
- Karissa & Rory – wedding photography – Interlaken Inn, CT
- NJ / NYC wedding photographer
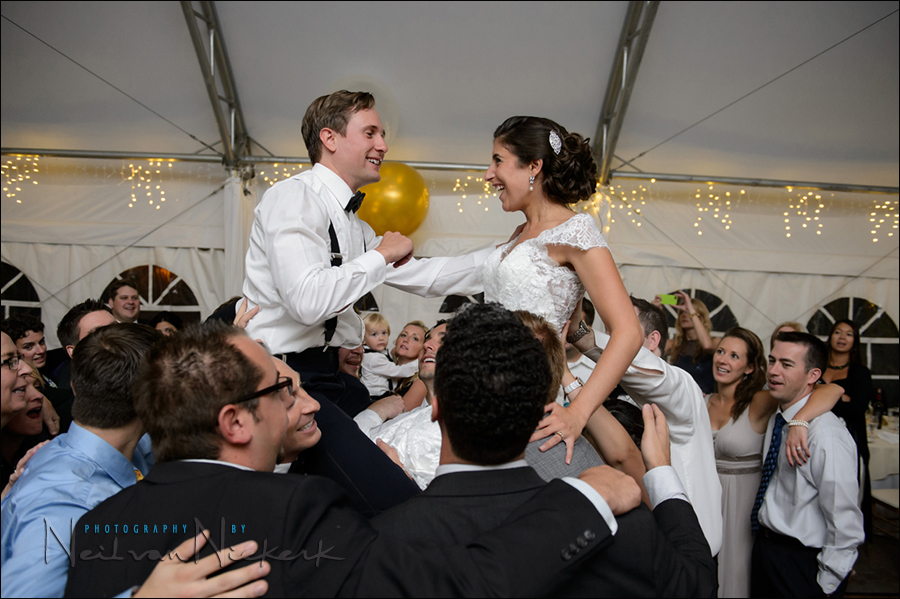
Nice set of images with the Profoto B1 500 flash. In that first example, with the bride’s veil lifting in the wind, I see you placed a light behind the couple; was this the B1 or was that a speedlight?
Scroll down and read the entire article.
Thinking about purchasing one of these! For run and gun type shots using TTL Nikon specifically, does the B1 have to be on an constant setting such as half or full power? I suppose that’s an open ended question but based on your own usage if you were to use TTL shooting!!
Rob, I’m not sure I understand? The Profoto B1 is in TTL mode for TTL, and manual for manual output.
What color settings did you use on your camera for the outdoor shots and when using the CTS gel outdoors? Love your photos, your colors are always spot-on.
With the Profotos, I kept the Nikon D4 to Daylight (+1).
The indoors bounce flash was either at Cloudy WB, or with the WB set to 3700K (when I added the 1/2 CTS gel.)
Thank you for the kind words about the skin tones and colors. The crucial aspect to this – I shoot in RAW, and I try my best to keep my exposure correct.
Great article Neil. It really helps the reader feel like they were there with you for the entire event. I loved how you broke everything down and the diversity of lighting used in various situations.
When I shoot wish balloons, I leave the white balance quite a bit warmer to retain the color of the flames and balloon light. I like the composite.
Nice work here Neil. I think the profoto is a bit of overkill here though. In this situation, considering the overcast sky, I would have just used a speed light or even added a second if recycling time was going to be an issue.
Jason … it’s not just about tons of light. Where the Profoto excels as well = ease of use, and it is compact.
Compare setting up two speedlights, with two radio transmitters, and two battery packs. And then clamping them together. It is bulky and cumbersome. Lots of batteries, and lots of switches. Lots of points of failure.
In contrast, there is a single Profoto B1 you take out of the bag, clamp to the light-stand … add an umbrella, and switch on.
I’ve done the multiple speedlights thing. The Profoto is faster and easier to set up and use.
Neil,
Very nice shots sir. I first saw the background images, and it strangely reminded me of The Grounds For Sculpture, in Lawrenceville NJ, just outside Princeton.
Nice article and awesome photos as usual. I pulled the trigger on B1 because of your first review :-). Funny thing, though, I love the last photo the most (the one w/o flash). The light coming off the wish balloon was beautiful while dramatic. It really sets the mood. I can imagine that must have been a very challenging shot. The horizontal idea was a great choice!
You’re so good, Neil! It’s disgusting! : ) So much to learn…
Thank you for the article on the B-1’s. How do they compare with the quality of the AcuteB2 600ws, which I have. I can tell right off the bat, that you are shooting Nikon. I also shoot several Nikons’ (primarily now D800/D4s) and the I get the same the same skin tones (which I don’t like). Even the same degree of lack of sharpness with the same aperture settings. FWIW I have recently tried Canon and testing in various light sources and the skin tones come through more reliable. Anyway, why shoot Daylight +1 with your setup? I would think a custom balance inside and one out would be better, or at least a grey card here and there. My thoughts, thinking of getting a set of B-1’s to set in place whilst I move. But I can’t help but think the speed light(s) will suffice for many of the shots, i.e. 10′ distance shots (I like and use your black foam). Appreciate your good comments.
The lack of sharpness? Which you see where?
I’m very happy with the sharpness of my Nikon optics, and it is one of the main reasons I moved from Canon to Nikon. So I’m not sure where you are seeing “lack of sharpness” from web-sized images here.
And I’m happy with the skin tones.
I shoot in RAW, so the specific WB settings are largely immaterial. The reason why I shoot with different WB settings – Daylight (+1) for the shots with the Profoto and studio lights, is that it gives me a better sense of whether the exposure and the overall colors are good.
Anyway ..
Sal,
Try this for the Nikon editing for skin tones:
NIKON SKIN TONES IN EDITING
To each its own. IMO still too green and skin looks plastic like. By product of Nikon. FWIW my fix has been, in camera go -1 magenta, or WB Auto2, or use Capture One in post to get accurate skin, red and WB. If I have to use ACR (yes, horrible rendition for NEFs and no matter where you start) then I start with camera portrait and build up depending on light sources. Interesting enough Canon shows much better in ACR camera profiles and I think Adobe is biased to it. Thanks
website to your work?
Click on the logo at the top, above the menu.
Hi Niel
Quick question for you , In third section Direct fill flash how did you determine the ambient light setting.
Obviously the subjects are moving so it would be hard to take a meter reading of the white or dark areas and do a test shot to get it correct , you would loose the moment..
Did you do test before hand and adjust, or did you use ” blinkies ” to make sure you weren’t clipping.
This some thing I struggle with so Im curious about the answer
Lou Recine
Awesome work, It makes me strive to be better
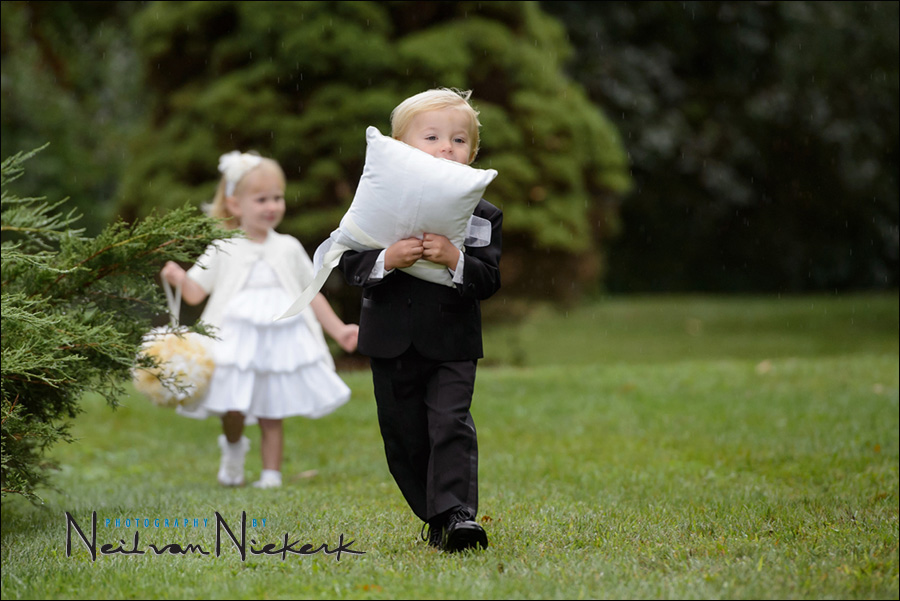
With the ring-bearer (and all the others that walked towards the ceremony site), the light was very consistent. Not a problem. A simple test shot or two, based on using the camera’s built-in meter.
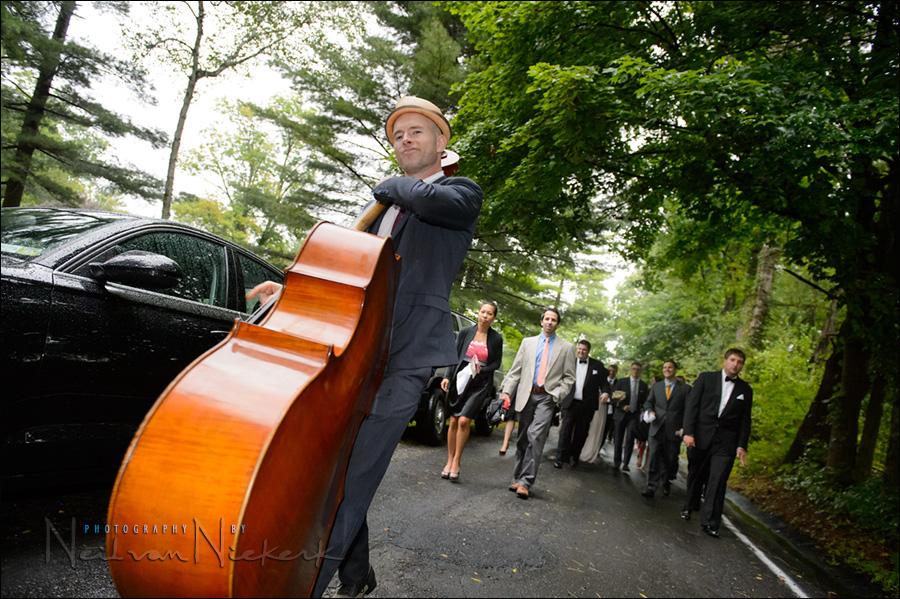
With the band and the guests walking behind them – this was more tough, since they were in and out of darker and brighter areas. But since it was so dark, I would run ahead, and wait for them to walk into areas where there were large bands of light streaming through. So even then, the light wasn’t all that dramatically up-and-down as it might’ve seemed. However, I did shoot a lot there, and changed my settings on the run … and ended up only selecting relatively few images when I culled them.
Nice article as always, Neil. Did you choose the white shoot-through for practical reasons (i.e., cheap, easy to set up, who cares if it gets squished) or was there a quality of light consideration involved?
Exactly for all those reasons. A big softbox might’ve been more efficient and have the light softer, but it becomes clumsy walking around with this. With a previous wedding I used a 4×3 softbox and it is borderline impractical. Beautiful light, but a bit of a mission.
https://neilvn.com/tangents/wedding-photography-lighting-on-location-partial-sunlight-shade/
Hi Neil, Thanks for another great tutorial.
I’d like to ask how you decided what power settings to use on the Profoto for the shots on the front porch. Were you going for fill in this series or was the Profoto the main light source? You mentioned an initial shot using TTL. Did that shot tell you how to set the Profoto and then you switched to manual? If so, how exactly did that shot tell you what settings to use on the Profoto? Essentially I was wondering how much was eyeballing it and drawing from experience and how much was light meters and formulas — re setting the Profoto?
In the photo of the bride and bridesmaids on the porch why go with ISO 800 if you had all that power in the Profoto? Would 400 with more flash power be too flashy?
Thanks Neil.
The photos of the bridal party on the porch – with those photos, the flash was most definitely the main source of light. No “gently lifting the shadows” going on there with the flash. In other words, without the flash, the photos would be hugely under-exposed. I didn’t keep any of the test shots to show as comparison. And there were no mis-fires either.
I used the Profoto B1 in TTL mode with every new setup. i.e., when the distance changed. That first shot would be my visual guideline whether my exposure is good. I do this by checking the LCD preview. Simple. I know this isn’t a “technique” as such and would be severely frowned on by a certain segment of photographers … but this is a wedding, and you need to shoot fast AND nail it.
So the initial shot would be in TTL. I would confirm the exposure is good, and switch over to manual. With this, the exposure is locked. Done.
If the TTL flash exposure looked under or over, I would nudge it via the FEC on the camera until it looked good. If I had already switched the flash controller to manual, I would bump up the flash power via the Profoto controller.
So for example, if my TTL test shot looked 1 stop under, I would lock the exposure on the B1 via the on-camera controller, and then just tap the (+) button 3 times quickly. I would then do a test shot again, and see if my guesstimate was good.
This is really so simple and fast in practice. All done from the controller on the camera.
“In the photo of the bride and bridesmaids on the porch why go with ISO 800 if you had all that power in the Profoto? Would 400 with more flash power be too flashy?”
I used higher ISOs where necessary to keep some of the ambient light.
Hi Niel
Top notch photos as usual here and your teachings are tremendous for us new newbies in photography. I have a B1 which I recently just bought and I have to say it is amazing. What did annnoy me though was the fact that according to some sources, you cannot adjust the power or FEC using the remote (Nikon remote) using the + and – buttons on the remote, whilst in TTL mode. You can however, adjust the FEC using the + and – buttons on the remote if you are using the B1 in Manual. Do you know if this is correct or have I been misled. If you cannot adjust the FEC from the remote on your camera, then this becomes a bit cumbersome because I would have to adjust the FEC from within the menu of my D750. Another little question – on a Nikon D750, do you have the FEC selected for entire frame or just background only?
Thanks in advance,
Paul
Hi there Paul,
My description was so ambiguous that it was misleading. I’ve corrected it now.
The +/- adjustments on the Profoto controller, work as a Ratio adjustment if you are using two or more flashes in TTL mode. If you are using a single flash in TTL mode, then you need to adjust the FEC on the camera.
This Youtube tutorial on using FEC adjustment on the Profoto controller, explains it very clearly.
You ran out of slider adjustment? Try clicking on the arrows next to the color temperature number, i.e. click the up or down arrow and you will get further adjustment range, or click on the value itself and just enter the value you want… Works with Apple Aperture 3….
Neil… I’ve purchased the B1 but really haven’t practiced with it yet. Just curious on your thoughts that if you were shooting a couple and were working solo without an assistant, do you think the B1 is compact and maneuverable enough to work and carry it around by yourself?
I did use it solo for this engagement session, and it is slightly more heavy to carry than a single speedlight with a Lasolite softbox, but it does give more power. There is the constant worry that it could blow over with the slightest gust of wind. So I really would want to use this light with an assistant holding it or carrying it. That gives me the mobility as well.
Hi Neil. Great article. I am wondering however why you were shooting on ISO 1600 at times? Part of using an off camera lighting system – I feel – is to also keep ISO low i.e 100-400?
If I hazard a guess its because you wanted soft fill light not overpowering light and in order to that that – the combination of available light and artificial still required bumping up of the ISO in cloudy conditions?
Thanks S
I used high ISO settings at times, (even though I had brute power available to me with the Profoto), because I wanted to keep the available light as context.
For example, this portrait of the bride looks so much better with the ambient light in the background, than it would’ve at lower ISO settings.
I didn’t trust my steadiness to use lower shutter speed settings. I was worried about camera shake, even with the stabilized lens. Instead, I rely on the camera giving wonderful results at higher ISO settings.
Hi Neil
For the B1 photos, are you finding you need to Gel the B1 at all? Are you compensating at all for it in the photos above with the B1?
I didn’t use a gel here, but did tape a large 1/2 CTS inside a 1×3 stripbox (close to the mouth of the box), at another wedding when I worked with Incandescent light in the background.
Neil.. do you think the results would be remarkably different if you omitted the shoot through umbrella vs just using the bare head? I guess I’m asking if you think you could get away without using a modifier on the B1 and still get great (or acceptable) results?
A larger light source is more forgiving than a small (harder) light source. And the more people you add to the group, the more problems crop up.
Hi Neil,
What size umbrella is that? I didn’t see it listed under equipment.
Excellent work, in case you didn’t already know.
Any 45″ white shoot-through umbrella would work.
I am so glad Neil that the clientele on weddings that hire you give you time to do your thing and be creative. My low budget weddings like I did yesterday said “enough pictures, let’s go eat” after 6 exposures and since I had no assistant, there was no way to set up and external flash and get ready and I could not convince her of all the images she would not have and she did not seem to mind at all. So hats off to you for attracting the clientele you do.
The B1 is such a beautiful light. I’m getting great shots both in doors and out using the RFI 2×3 softbox. I’ve tried a 3 stop ND on a few shots outdoors and it works great! With the ND on, I’m able to shoot at f/2.8 and without it, I’m able to fire out enough light even at f/11+ with this strobe!! It is awesome to have this much power and have TTL capability. I usually let the TTL take the first shot, …season to taste on the next shot or two, then move it to Manual and fire away.
That’s amazing lighting. Firing a flash at 10fps without overheating! Who would have thought?
Valent – the flash was set to the lowest power setting possible. So I wasn’t concerned about over-heating it.
Thanks Neil, received my B1 this afternoon and will put it to test this weekend!! Sharon posted a good question, were you on auto iso or just using your experience for the above shots!!
Nope, never Auto ISO. It just brings in one more variable.
Hi Neil,
Can you tell me which monopod you use? I don’t want to buy a flimsy one and watch my light crash down to the ground! (HORROR!)
Great stuff as always!
The tall monopod I was using for a while, is the Gitzo GM3551 monopod,
but I am now trying out the 91″ tall Lastolite extending handle.
Just a brilliant set of images with a whole lot informative text to go with them. That last image really does it for me though – the creative vision in compositing those two images is pure genius!
I really like your tutorials on using speedlights etc. I recently purchased your on-camera flash book(should get it this week). I am a little uneasy about the high iso values in many of your photos. Is there any way to lower the iso numbers by turning up the flash ? or would this cause the flash to overpower the available light and make the backgrounds too dark? I would appreciate your comments on this. I don’t like to see a lot of noise in lightroom. I’m currently using a Nikon D750.
[I just read one of your previous posts and it answered my question. You wanted to keep the background from going dark. Thanks]
Hi there Monty,
It is just as you discovered for yourself – Most often I want much of the ambient light to register in the photograph. This helps retain a more natural look to the images. The way to do that is with a wider aperture / slower shutter speed / higher ISO.
Often enough, ISO becomes the easiest variable to change. When I have just enough DoF, and I don’t want to risk camera shake, then the logical step is to control the ambient exposure with my ISO.
If you are hesitant about chasing up your ISO, then you need to consider how large you will need the images to be. We often make the mistake of scrutinizing our digital files at 100% when instead, we are printing them much smaller in wedding albums. The moment you resize the images to a smaller size, the digital noise is reduced too and is less apparent when printed like that.
Also, the D750 has really good high-ISO performance. So be bold!
HI
Love your work!
I wonder if it’s appropriate to ask this question… I have to shoot in a park, one to half an hour before sunset (Australian Autumn). There will be small groupings and up to 30 in final grouping. Previous large group shots I have just used on-camera fill but this has to be amazing as hired by owner of a camera shop!. I have x2 B1s and a 2′ OCT white beauty dish and an A1 with soft bounce. I can borrow another A1 and/or large umbrellas/5′ octa/the hard beauty dish. My query is what do you think would be the best, most flattering, lighting set up/arrangement/positioning of lights?
Hi there Brenda … you have all the lighting you need with the two Profoto B1 flashes. The next consideration is the light modifiers. Depending on how windy it might be, I would work with two umbrellas.
You could have the one umbrella fairly close to you – about 30 degrees (or less) to the side of you. Then the other flash can by symmetrically on the other side with the same power, or perhaps a stop less flash. Or you could have that flash and umbrella about 45 degrees off to the other side, and about 1-2 stops under for some fill light. This will give you soft enough light for the group, but still be dynamic light.
With that second flash to the other side, you now control the contrast. You can have even light (if you set both flashes to the same power), or you can bring the power down a little bit to make the lighting slightly more contrasty for more mood. Adjust to taste.
It’s as simple as that. Best of luck!
Hi Neil,
Thank you so much for your reply. You have confirmed what I was thinking about not having the lights at the same power (so it wasn’t too ‘flat’) and the umbrellas were my initial preference. But I wanted to make sure I was on the right track and I think I am going to have to outlay for an assistant in this scenario.
I really appreciate your time and generosity of sharing your expert knowledge.
Kind Regards
Brenda
Hi Neil,
We just bought a b1x with a Gitzo GM5561T monopod. Is there an adapter to couple the two together? I’ve been searching online and an not finding what I need to make them fit. Any help would be appreciated.
Thanks! and great article!
Hi there Tommy
You need some kind of stud to attach the Profoto B1 to the monopod.