
Off-camera flash vs. available light
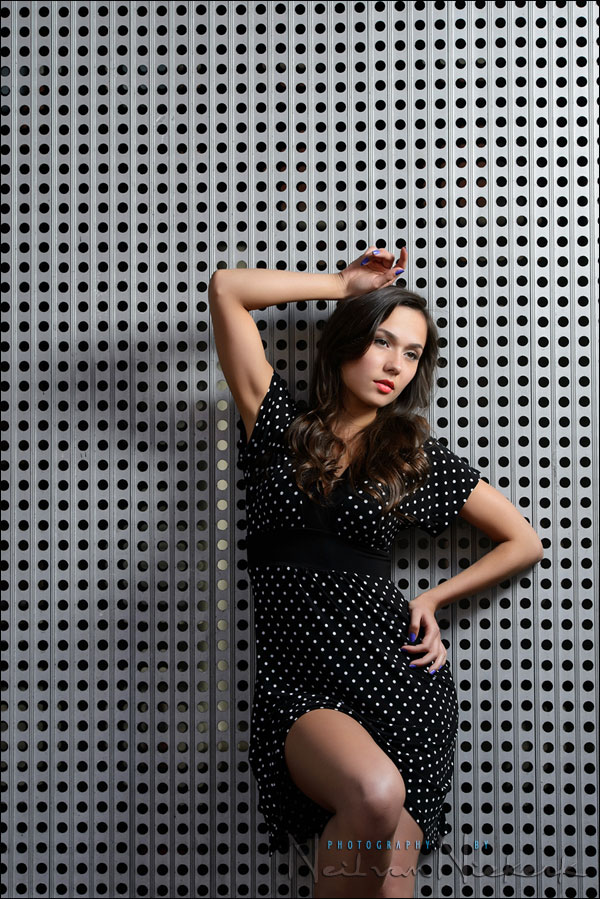
With this background, I liked the way the dots were repeated in Olena‘s dress in reverse – white dots on black, instead of black dots / holds on silver. I liked the repetition, and decided to work with the composition of this photograph a bit. For the final sequence of images – of which the image at the top is one – I asked Olena to really exaggerate the curve of her body to create an S-shaped, which in turn contrasted boldly with the rigid pattern of the background.
This article’s original title was going to be: Off-camera flash vs the snobbery of “available light is always better”. When you look at the available light photo of Olena, you’ll see that the available light was pretty sweet – soft and flattering. But it lacked punch. It needed just that little bit of drama to it. The available light shot just looked a touch too bland. Off-camera lighting to the rescue!
I had the flash in a soft box to create flattering, yet dynamic light on her. I wanted her shadow to be more defined and become part of the composition, but that would’ve meant a harder light source. Holding the Lastolite EZYBOX 24×24″ softbox (affiliate) fairly close to her was the compromise. This way her shadow added a subtle element to the composition.

camera settings: 1/200 @ f/4 @ 200 ISO
This gave me correct exposure for the ambient. It looks good. Now, to have the flash have the impact it has, I had to under-expose the ambient. Therefore I pulled the exposure down by 2 stops: camera settings: 1/250 @ f/7.1 @ 200 ISO … TTL flash.
Lighting & Design for Portrait Photography
Lighting & Design is a follow-up of sorts to Direction & Quality of Light. It’s a slightly eclectic mix, discussing the thought-process with various scenarios shooting portraits. The examples use available light, bounce flash, off-camera flash as well as studio lighting.
The idea is that in every one of the 60 sections, there is something to be learnt and applied, regardless of your level as a photographer or where you shoot – all shaped to form a cohesive narrative arc throughout the book.
You can either purchase a copy via Amazon USA or Amazon UK. The book will also available on the Apple iBook Store, and Amazon Kindle.
These photos were taken during a photography workshop in New York.
As an aside: I used the same background to different effect with a previous photo session where Nicole Jolly was the model – photo-shoot with a model: the progression of an idea.
Photo gear (or equivalents) used in this photo session
- Nikon D4
- Nikon 70-200mm f2.8 AF-S VR II /equivalent Canon EF 70-200mm f/2.8L IS II
- Nikon SB-910 Speedlight /equivalent Canon 600EX-RT Speedlite
- Nikon SD-9 battery pack /equivalent Canon CP-E4 battery pack
- Lastolite EZYBOX 24×24″ softbox
A little bit of homework
Before we get to the little bit of homework – on a forum I once saw someone sneer that with off-camera flash photography on location, it seems that everyone just under-eposes the ambient by a certain amount and then add flash. My thought was, well, that’s how you do it, because over-exposing the ambient isn’t a good start.
Now the homework:
Because the light from this relatively small light source (the flash in the softbox) is directional, you can now in a sense control the contrast by how much ambient light you let. How and why?
Hi Neil,
I’m just curious in situations like this do you use TTL BL or just TTL? Does it matter which TTL I use? Thanks for the great blog.
Christal, in this case, I was using the Phottix Odin TTL Flash Trigger for Nikon that belonged to the photographer who I tutored during the workshop.
So I have no idea what the system does to the Nikon flash settings, but I would guess it is just plain old TTL.
Neil
You’ve often demonstrated the idea of underexposing the ambient light and then using flash to add that ‘punch’ to the subject. In these images I think you’ve really underlined in red just what difference it makes. Looking at the above pictures really does make it oh so clear. Terrific!
Really helpful example of how the same elements can either be eh or wow with a few adjustments. Oh and I love the background. You always choose such interesting textures.
Neil, Any reason why TTL over Manual if subject is static?
It was faster to adjust and get results with TTL flash. I only needed a few frames.
Hi Neil,
Thanks for the workshop, I learned a lot and can’t wait to bring it into practice.
I really enjoyed it and had a wonderful time. I also created an article on my blog here:
Regards,
Jan
Jan .. thank you! It was cool hanging out with you on the day.
You’re absolutely right about the available light snobbery. So many photographers label themselves as ‘an available light photographer’ as if it’s better and more natural. I think they just don’t know how to handle flash properly to make a good image. I want my clients to have great images, and if that involves using flash then fine, if it’s all available light, great! I’ll go either way to make the image we’re happy with.
Regarding controlling contrast with ambient… If you let in more ambient, you have more fill, making for less contrast with the main. Less ambient, less fill, more contrast with the main.
Homework:
In TTL mode , you can control the contrast by changing FEC for example -1 stop.
When you under-expose the ambient by two stops, as in this example, then the flash becomes a dominant light source.
Pulling the FEC down by -1 stop right then, will just under-expose the photo.
The flash being the dominant light source will create the shadow effect when you under-expose for the ambient…
I believe I’m starting to understand when you talk about local contrast.
I hope it is not wrong to make a reply to this old post.
Now about that homework.
If we under expose ambient light by about two or three stops for example and use our off camera flash without any FEC to get a good exposure of our subject, then the difference in tones between our subject and the background will be quite remarkable. Being our flash is a small source of light, it creates shadows that bring more definition between those two light sources.
We control contrast by controlling the power or distance of our main ligth in this case our off camera bare flash and by how much ambient light we let to affect our scene.
If we use our flash just as a mere fill light then our light will just blend with the overal scene adding no contrast to the scene.
Am I right?
I really like to learn more
You’re pretty much spot on.
Thanks! That was good. Simple, sensible and good.