flash and tungsten lighting – gelling your flash for incandescent lighting
Flash, for me, is an essential tool in sweetening the available light and improving the quality of the existing light.
I often see comments on the photography forums to the effect that with cameras like the Nikon D3 or Canon 1D mk3, where you have exceptional high-iso noise performance, that you don’t need flash. The crucial point that is missed though, is that flash is not merely there just to use when the light is so poor that you can’t stop any motion blur from your subject, or stop camera shake spoiling your photos.
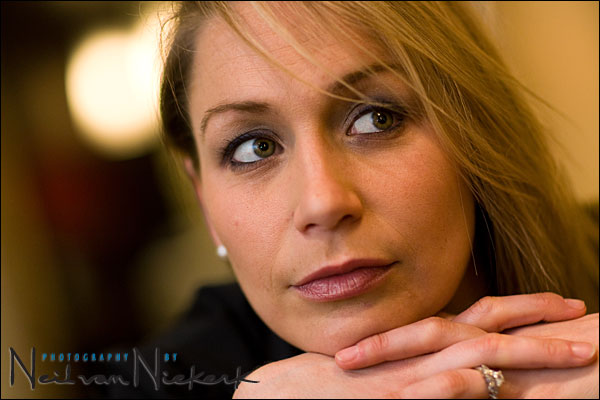
In these two examples, I used flash (gelled with a ½ CTS filter) to more closely match the available light in color. Instead of just accepting the uneven lighting on my model, Jennifer, and accepting that there will be darker areas around her eyes … I used directional bounce flash to make the lighting on her more flattering.
I used my usual black foam half-snoot to block any direct light from my flash on her.
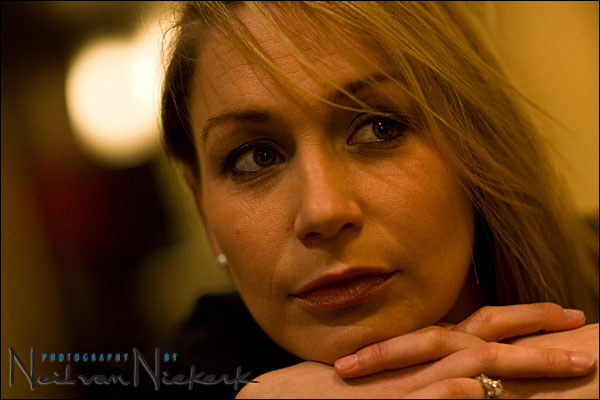
[ settings: 1/125 @ f1.8 @ 800 ISO ]
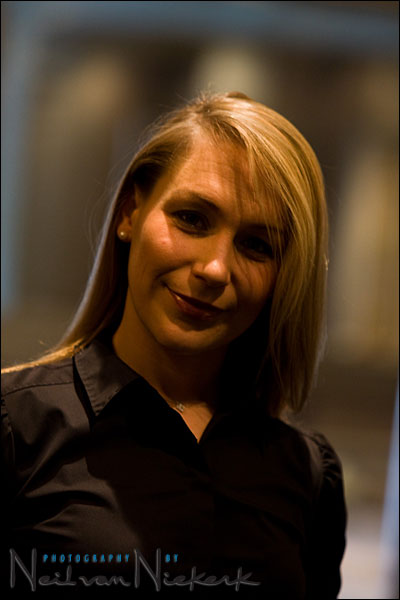
In this illustrative sequence of images, I deliberately placed my model under a spotlight in the ceiling to show how to deal with this specific lighting problem.
Normally we would try to position our subjects so that we don’t have to deal with this kind of harsh uneven light.
If you cannot move your subject, here is how to deal with this kind of lighting situation with an overhead Tungsten spotlight.

Bouncing flash off to the side of me, towards my left and slightly over my shoulder, I was able to lift the shadow areas completely, and even out the light.
BUT … the flash was not gelled for the Tungsten ambient light. You can immediately see that there are areas of skin tone that are blue, and other areas that are yellow. This isn’t as pleasant-looking skin tone than if the flash had been gelled.

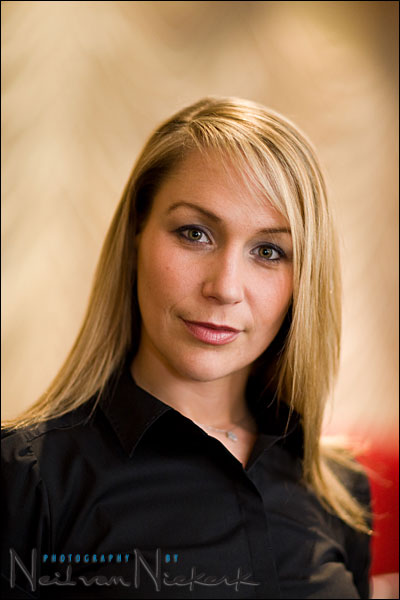
Here I did gel my flash. In this case, I used a piece of ½ CTS gel taped over my flash-head. This turns the blue-ish light from the speedlight into much warmer tones, similar to that of Tungsten lighting.½ CTS gel will filter the light from the flash to approximately 3800 K.
Incandescent light’s WB varies a lot around 2800 K. The WB from my flash will be different than 3800K because I bounced the flash off a non-white surface, which also changes the color. (Correcting for this to get to a pleasing skin tone is part of a raw workflow.)
In comparison, here is how I would normally have handled this straight-forward portrait – by placing my model away from the over-head light, and then using bounce flash to give soft and directional light on her. In controlling where we bounce our flash we can get a simple portrait with nice modeling on the face – the shadows and well-lit areas balancing nicely.

Thank you for another informative post! Also, thank you for linking to the gel filters at BH so that we know how to get our hands on some as well!
Linda
Neil, Not too long ago you had a product here that was a set of gels for your flash that were sticky and just peeled on and off as required I have lost the link and can;t seem to find it. Would you mind posting it again
Hi Neil,
Great post as usual. On the last picture where you did the more controlled portrait, was this geled too? You don’t mention whether you continue this technique in this situation. Thanks for all you great flash blog entries with beautiul examples!
Scott
Hi Rachel
I believe your talking about stickeyfilters.com
Hi Neil,
I’m a newbie who’s so grateful about all the tips and insights you have been sharing with your readers. However, I couldn’t understand this: BOUNCING FLASS OFF TO THE SIDE OFF ME, TOWARDS MY LEFT AND SLIGHTLY OVER MY SHOULDER. Are you using a remote flash or slave, or on-cam flash? Could you please make an illustration of the above?
Thanks, Turo from the Philippines
The part about using the snoot to keep direct flash from hitting her… was the black foam between her and the flash? I’m kinda confused and dying to know ;) Thanks for all your wonderful tips! I just love looking at all the photos and series shots explaining and hows and whys of how you do what you do.
Hi Neil,
I’ve attempted this technique of geling the flash to match the tungsten light on my last wedding but I don’t think that it came out as intended. What settings should I be making to the camera? Should I change the temperature to 3800 Kelvin and change the white balance to tungsten? I took a couple of shots this way but the pictures still came out very orange. Any help?
Nina and Mike,
Neil describes his WB settings here:
https://neilvn.com/tangents/my-choice-of-flash-modifiers/
Thanks for the answer! I’m also wondering the same thing. Is your WB set on tungsen when you’re working with your gelled flash? I’m pretty sure I read somewhere that that is your usual approach, but I can’t remember. Thanks!!!
Neil, great article but would it be possible to include a photo of you in action so that we can see how the black foam is positioned? It would be a great help. Thanks
Thank you,
Just found your blog.
This blog post help me argue my case with a friend who swears off using flash and then started to frown upon my us of flash, so i tried to explain it to him, but you offer a more clear cut visual explaination that made him have a priceless facial expression. You have been bookmarked for future reference. Take care.
Thank you Neil for another informative and extremely helpful article. I have a question about gels….sort of. Could a person get away without using gels and instead use a Whibal as a reference when editing in RAW? (Whibal is agrey card for those who don’t know what I’m talking about here).
Regards,
Tom K.
Many thanks for the info Neil. I’m off to buy some gels.
Tom K.
Many thanks for your explanation! I urgently have to test my flash using gels because that technique it’s not quite clear to me.
Neil, thank you so much for sharing your experience with us. I’m just getting into DSLR photography, and what I’ve already learned from browsing your site is priceless!
If I wanted to have a full set of useful gels on hand, which ones would you recommend?
Also, I haven’t seen this mentioned here yet, but do you recommend using a GretagMacbeth ColorChecker chart to assist with white balancing the RAW files?
Neil, excellent advice and I have found solutions to my problems here. I bought my flash a year ago and after using a few times put it away to use tungsten lights. After trying out some of your ideas here I’m going to practice, practice and practice as you have shown that flash can be natural.
In many of my situations I’m working with harsh overhead spot lights (you’ve covered that one here) but the rooms tend to be cloth covered and quite often very dark so bouncing will not be that good? As I have stands and brollies for my video lighting I’m going to try and get a hot shoe cable and flash mount.
Many thanks for your excellent site, please keep it up!
:-)
Mike
Neil, I love your work and you explain things very well. One thing I need to know is how much flash exposure compensation is needed when using gels and bouncing..I know that bouncing cuts down on the light some but gelling the flash cuts down the intensity even more…about how much compensation do you use??
Ok thanks..I’m still a little confused. I do shoot ETTL but if I’m bouncing how does the flash know to kick out that much more light when I have a gel on..do you press the * button to get a sample light for the camera to read to know how much more light to kick out? When bouncing I see I have to use ISO 800 f/5.6 or 4.0 at 1/60 or 1/30 anyway (I have a slow lens) with a +1 FEC. So that should be enough? I used a Demb flipit the other day and a gel filter and some of the images came out underexposed so I must have been doing something else wrong.
Charles,
something you might not have realised, is that your flash ALWAYS shoots a pre-flash when it’s in E-TTL mode (not Manual).
This means in the absolute split second when you think you flash has gone off once, it has actually fired twice!
The flash unit fires a pre-flash – the light bounced back is analysed and then the E-TTL calculations are performed (required light analysed) before the ‘real’ flash and camera combine to take the picture.
I have the same problem as Geoff when using TTL mode and bouncing the flash … the images almost always come out underexposed! It’s annoying! I end up almost always using manual mode :( What’s wrong?
I was referred to your site ia U Tube A Better Bounce Card..am grateful for the link.Thanks for the no non sense information you share
-Kudos
Mike
Thanks again Neil.
Do you have a ‘rough and ready’ way to estimate whether you are going to use a 1/4, 1/2 or full CTO gel. I have been guilty a few times in past of over-gelling which meant some work in LR later to get the skin tones back. I suppose it’s arguable what is worse, slightly orange skin or that terrible deathly blue tone that you get from too much flash in a tungsten environment.
Neil, great suggestion. I purchased an order of gels from Strobist and they contain CTO instead of CTS gels. How do they compare? Do you have a preferrence?
Neil,
I’ve been experimenting with CTS and 1/2 CTS gels, and I’ve been having a hard time setting the right white balance in camera. Of the default settings, the fluorescent setting actually gives the best results out of camera (I shoot with a D90). But even those results look a little funny. Like kind of cool/blue, but with a warmer, purple-ish tone. CFL’s seem to give me the hardest time, but the other bulbs in my home are regular “daylight” bulbs. Am I missing something? Thanks again for your time!
Jeff
GREAT POST!! Gelling for Tungsten light is GENIUS!! Totally going to do this!
Neil,
I know you said that the WB doesn’t have to be dead on when gelling the flash but that it should be close. I have a question though. I can’t seem to get nice skin tones. Should I gel my flash for overcast days, early sunset, etc? I want to get nice skin tones and they almost never come out like yours, I always seem to get hot spots and weird tones that make it worse. My thought is that the skin tones look off because if I’m shooting during an overcast day (6500k temp), I need to make my flash cooler to match, same for early sunset. I gelled my flash for early sunset but I think the flash was too orange and it caused problems.
I hope my question makes sense.
Hi Neil
Sorry that this query is written so long after your original post but, having read your books and all the comments made above, I am no closer to fully understanding the point that you make that “…if you simply adjust your white balance so that flash appears neutral, your background will go a murky orange.”
Granted, shoot an incandescent-lit scene with auto white balance and the resulting image is a dense yellow. Change the white balance setting to Tungsten and the colour caste in the image is a lot more neutral. I understand that gelling the flash with cts gels will counter the blues applied to skin tones by the bare flash. But I can’t see how the background will go a murky orange at any point once you’ve moved away from auto white balance. This is doing my head in! I’ve read and re-read your words but I still cannot fathom it.
I’ve just ordered some of these gels and am looking forward to utilising them – but just need to have the penny drop. Would really appreciate your advice.
Kind regards
Roy
I’ve already managed to answer my own query Neil. My CTS gels arrived in the mail today. I demonstrated their use to my family and – hey presto – they work. They make a tremendous difference to getting the colour balance right in a shot taken under tungsten. Love it. Once again, you have advanced my photography, making me better, more capable and – like colour – more balanced.
Yup, it’s one of those things you have to try, and see for yourself how it compared – with a gel / without a gel. It’s the best way to convince yourself about this.