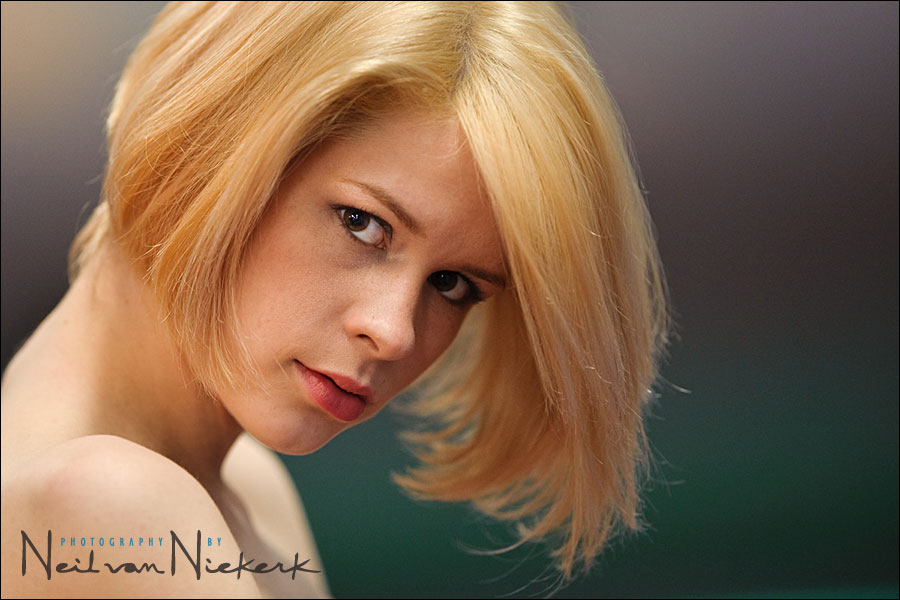
[ Nikon D3; Nikon 200mm f2 AF-S VR .. 1/100th @ f2 @ 1250 ISO ]
click on the image to see a larger version
My friend Steve Z from Colorado was around for a few days, visiting friends and family here in NJ. So we got together to do a photo shoot, and I arranged to meet up with Priscilla, a model with whom I’ve worked before. I also was fortunate in getting permission to photograph inside the Paterson museum – an interesting historic building.
Steve Z is also into photographic lighting, so we packed up a bunch of gear – a beauty dish, softboxes, speedlights and video lights. We were ready for a lot of playing around with lighting.
When we arrived at the museum, my heart sank when I saw the place was flooded with fluorescent light. In my experience thus far, fluorescent lights = ugly light. I decided that perhaps this was an opportunity then to get some material for a tutorial page on how to use flash with fluorescent lighting. When I’ve dealt with the ugly green look of fluorescent lighting before, I always over-rode it with flash. Fluorescent lighting often has a green color cast, and the discontinuous spectrum makes it difficult at times to get great skin tones. Also the lights flicker and the White Balance can even vary as you hit different parts of the cycle. So I thought this might just be material for a tutorial here …
In order to show that fluorescent lighting can cause that kind of change in WB for a sequence of images, I set an approximate WB via the Kelvin setting on my camera. With the Nikon D3 set to continuous drive, I fired off 3 bursts of about 8 frames each .. my shutter speed at 1/100th for the one burst, and 1/60th for the other two.
And to my surprise, the lighting looked awesome! Even light, image after image.
Not even a hint of green. It was warmer than daylight, but looked great.
So for much the entire 2+ hour photo session there, we shot with the available light .. fluorescent lighting! Knock me over with a feather.
That photo above there is all available light!
In post-processing the RAW file, I reduced some of the yellow in the WB as I recorded it, and also added a touch more magenta to give me a skin tone I liked. And with the local corrections in ACR / Bridge, I reduced two hot spots, and brightened up her eye a little bit.
I am still surprised that the lighting was so good and so even, especially from fluorescent lighting. So much for my preconceived idea that fluorescent lighting has to be bad.
Obviously this will depend on the specific fluorescent lights that are used, as well as other influences, such as the age of the bulbs. But whatever fluorescent tubes they used in the museum, must have had some magic done to it, for the light look surprisingly good.
.
![]()
.
Now you may well ask what is that color and shading there in the background.
And then I will have to explain to you that it is actually the USS Holland – the US Navy’s first commissioned submarine.
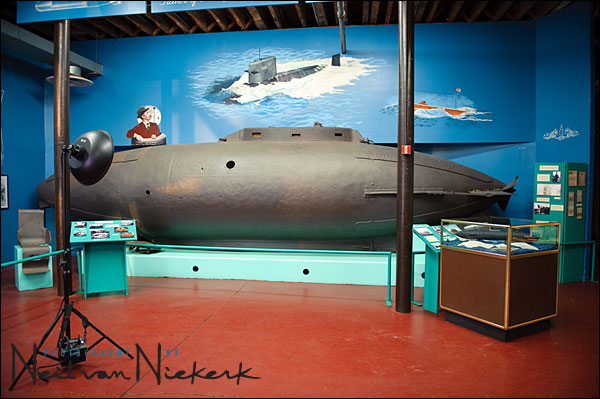
See that grading in the tones and colors on the concave hull?
That is the background at f2 as shot with the Nikon 200mm f2 AF-S VR lens, (B&H).
You know, looking at that image at the top, I think I just fell in love with this lens again.
Ok Neil, you have fallen into the trap so many experts who blog love to step into. Your statement: “I set an approximate WB via the Kelvin setting on my camera” hardly falls under the instructional category. Could you be more explicit in describing exactly what settings you use? Do you have a hard and fast Kelvin setting? Do you use a light meter? You said this experience was a great opportunity for a tutorial page on shooting with florescent light. I am hoping the tutorial is coming soon because this sure as hell ain’t a tutorial. Its a “look what I did”.
Craig
Niel, you could make the available light on the backside of the moon look good. Thanks for this….
Hi Neil,
This is kind of off topic of this entry but some things have been bugging me lately that this post did rekindle in my memory(referencing your shutter speed and the lens you used and then your mention of shooting RAW). It’ss fine if you need to address these in a later blog entry.
1)You’re getting away with shutter speeds of 1/100th and slower with a 200mm lens thanks to the VR of course but let’s say for instance you were shooting with a D90 and a Tokina 50-135mm f2.8 lens(which is what I’ve got right now along with a D50 and 18-70mm f3.5-4.5). Now the Tokina doesn’t have anything like VR on it so what would you assume a safe shutter speed to use when stretched out to 135mm? would you say 1/200th seeing as I’m using a crop sensor? Also if you were using the same setup, do you think you’d be going with tripod/monopod shooting right off the bat?
2)now this is going to start a big discussion probably but here goes: I started off shooting JPEG, then switched to RAW but now I’m back JPEG. I use Lightroom 2.0 and as mentioned above shoot Nikon. In the testing I’ve done the RAW files of course start off bland and seem to take quite a bit of work to get to looking decent but the other big thing I’ve noticed is that the RAW files show a lot more noise. Still I tried to justify RAW telling myself that the quality of the pic would be better, but when zoomed in 100% I saw no difference between some shots I took RAW/JPEG. And I really must say that I know I do not have bad eyesight, I’m actually quite particular. And I’ve also experimented with highlight recovery and fill light through lightroom with JPEGs and RAW files with no success in seeing “the light” so to speak. At this point the only thing still attracting me to RAW is the flexibility in regards to White Balance which if I understand you correctly is something you still need to do in camera while shooting RAW anyways??? Perhaps you can do a good thorough comparo with examples in the near future?
Thanks Neil, and as always your site and information ROCKS!
Hi Neil,
I’ve been following tangents for a long time and I’ve always wanted to see more of the shots you get. Do you post them anywhere? I’m sure you were able to get more than one good shot of Priscilla :)
Thanks,
Erik
Hi Neil,
the good light quality might be due to the fact that museums frequently use higher quality fluorescent lights.
Normal tubes have three different phosphorescent coatings inside the tube which emit red, green and blue light (or something in that ballpark at least). However with three coatings neutral white light cannot really be achieved, the red end is normally underrepresented and the spikes are not quite in the right place, hence the greenish cast.
This can be overcome by using 5 or 7 coatings but at the cost of reduced energy efficiency. Thus households, hotels etc will normally employ the type giving the colour-casts, museums, print-shops, etc will often invest in the higher grade tubes.
There is a measure for this called CRI (colour-rendering-index), measuring in % how well the tube reproduces incandescent light. A normal fluorescent light tube might be in the 80s, 99% are however on the market. (At a much higher price point both in purchase and operation)
People investing into these tubes would probably also invest in electronic ballasts, explaining that you found the lights to be flicker-free.
Greetings from Germany,
Niklas
P.S. Your site taught me sooo much … Thanks!!
Brett,
To answer your question 2, one possible explanation that RAW has more noise than JPEG is that you may have turned on noise reduction option, which only applies to JPEG, I believe. There could be other in-camera filters that are applied when saving the image as JPEG. At full resolution, one may not notice any difference in quality straight out of the camera. However, RAW is a lossless format, while JPEG is a lossy compression format. Adjustments that you make in any RAW processing programs (such as Lightroom) to a RAW file does not reduce its quality. However every time you change and save a JPEG, some image information/detail is lost.
It is true that you can set the white balance on the camera as you take the picture. Basic/entry level DSLRs do not even allow you to set the Kelvin temperature. However, light condition change. Like Niel and others have said, florescent bulbs tend to flicker and the colour temerature may shift. Plus, you may not know “exactly” what the light source’s colour temperature is. That’s why you may need to fine tune the white balance in post processing, and RAW would give you the advantage that changes you make will not degrade the original image.
Of course, the JPEG vs RAW discussion can go on forever. It will depend on your personal need. Do you want to trade convenience for flexibility and quality? This should be the question you ask yourself (instead of quality) when choosing which format to save the images.
albert, it’s always been my understanding that Lightroom performs non-destructive editing….JPEG or RAW. it only makes changes to ‘previews’ of the files. hopefully Neil or someone else will chime in to clear that up.
I have shot in flourescent light on several occasions and have never experienced bad or ugly lighting. I shoot RAW with a Nikon D3 and I do a lot of photography at a TV station where they use “Cold Lights” (flourescent lights). I carry with me a kit of flourescent lights to fill in to the existing lighting setup and come out with great shots. In fact, I have even shot with flash on the existing cold lights setup and the skin tones come out great with a little tweaking in photoshop.
I have also used flourescent lights in my own studio and I believe it to be a beautiful light source.
The trouble I am facing is with the ugly Argon lights when shooting industrial photos. They give out all sorts of colors each one of them and its hard to mix flash or tungsten or flourescent lights with argon lights.
Neil,
First let me start by saying it’s because of you that I am a better photographer.
Now on to my comment. Do you think that the florescent lighting in the museum could have been color corrected in the first place. I actually use 5500k florescent bulbs quite often. I’m thinking that maybe the museum is using something similar so that the colors of what they are trying to show are as true as can be.
Neil,
Since fluorescent lighting can vary in color temperature, I guess the best thing to do is to take some test shots with various WB. What did you set your WB as a starting point?
Hi Neil
Have you done a series on flash filter use?
Also, is there any references to read re kelvin numbers? I’d never have known to start at X say for tungsten or Y for flourescent etc.,
As for your teaching style, works for me – keep up the terrific work.
brett, yes it is true that Lightroom uses a sidecar XMP file to keep track of the changes that you make to an image. However, as soon as you try to re-save a JPEG file with the changes, the application decompresses the JPEG (which extrapolates any details that may have been lost when it was originally saved), apply the changes, then compress it again back to JPEG. So basically you have 2 quality changing steps. Working with RAW and saving the final image as JPEG, you’ll eliminate the 1st quality changing step since RAW is not compressed.
Your previous post also mention trying highlight recover and fill light. To test it effectively between JPEG and RAW, you’ll need an image with really over/underexposed parts, close to highlight/black clipping. RAW would be better in these situations because JPEG would have lost more information around these highlight/black clipping areas.
Like I said before it is pretty much a personal preference. It will depend on what you need the image for and if you want convenience or flexibility. If you think JPEG from you camera is good enough for you, then feel free to use it.
Hi Neil,
Thank you for all the great tips; just wonder if you have tried the Expo Disc and any good feed back. I like to get the WB right at first time with the mix lights and I know Raw will take care of the WB. Would you recommend this product or you have other product in mind? Thank you and keep up the GREAT work.
Wayne Lam
Canada
Hi Neil
Great work! I’m particularly impressed by the wonderful color contrast.
I’ve no experiences with Expo Disc, greycards or such. I’ve read about a new tool from datacolor.com – the SpyderCube. It’s designed as a calibration tool for RAW processing. Seems to be the allrounder.
A review can be found here:
Thomas
Germany
Hi Neil,
Probably a stupid question… Why did you decide to shoot the first picture of Priscilla at ISO 1250 and at that ISO setting why isn’t there any noticable noise?