
It’s a great pleasure to present this guest spot by Angie Lazaro – a good friend from way back in South Africa. Angie is a fashion photographer in Cape Town. Angie and I became friends at a time when I was still finding my way as a photographer, doing all kinds of freelance photo shoots … and she was still a photography student at a university in South Africa. We’ve both come a long way from those lunch-time conversations at the Full Stop café in Melville, Johannesburg .. and I doubt either of us could’ve imagined where we’d end up over time.
So I really am thrilled to present Angie now where she describes the setup of two photographs during a recent photo session in Cape Town …
on a photo shoot – decisions, lighting, tweaking, ka-boom!
a guest post by Angie Lazaro
The two photographs shown here are from a series I shot for a magazine fashion editorial (Top Billing Magazine). The location is a new trendy hotel in the heart of Cape Town – the venue suited my needs in that it had great décor interest and enough space to work and move without disturbing the guests too much. The clothing was about using basics, such as the white t-shirt and classic white shirt whilst making it very fashionable in different combinations. During the first shot we realized the model needed a stronger look, the make-up artist added a fringe which suited the style and overall feel we wanted to achieve. A shoot is all about team work …
using a single light to create two different images
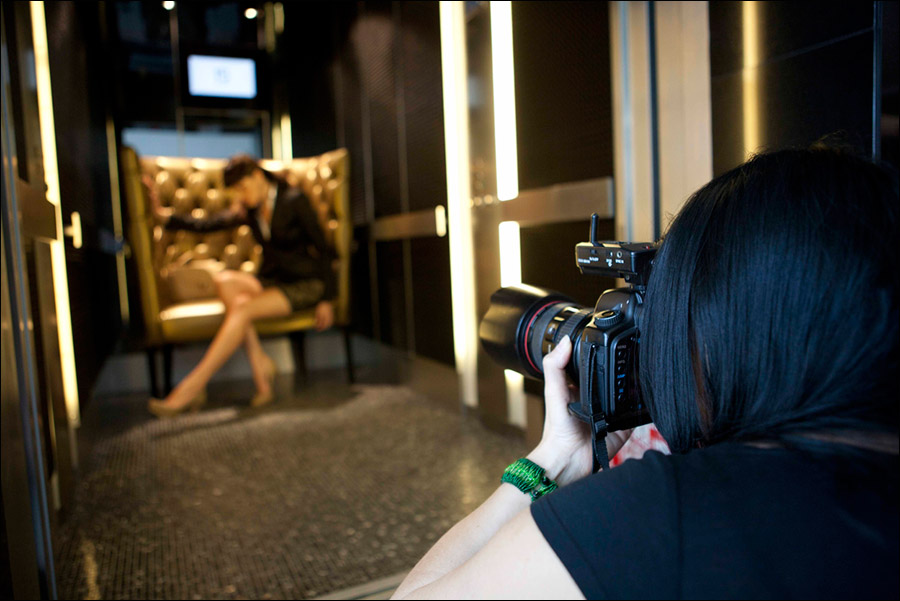
The golden high backed chair in the image above, was an obvious choice. The only inconvenience was that it was in the elevator. Using my studio flash box to keep the elevator doors open, we set to work. We held the elevator for 14 mins and after 186 shots we got what we wanted. I wanted the image to pop, with the right highlights and without making it too harsh; avoiding dark shadows and preserving the soft even tone of the model’s skin.
I used a small soft box, at a 1/60, f/8, 160 ISO, balancing the variables to get enough detail for depth with all the shiny décor detail sparkling. Behind the chair is a smoky mirror, but a mirror nevertheless. I placed the small softbox 90 degrees and head onto the chair to avoid the flash reflecting back in the mirror. I positioned myself below the flash and slightly lower than eye level to the model. We had the model in various positions but this one was more emotive and the garment and accessory detail was easily visible, which pleased the Fashion editor.
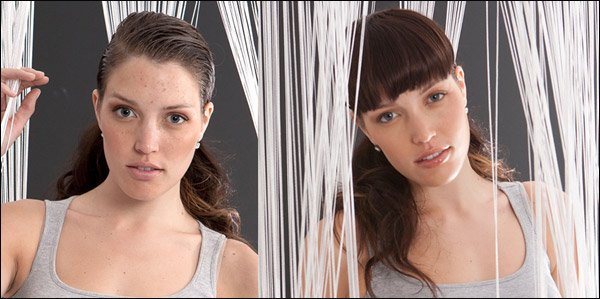
This shows how the model’s look was transformed by make-up, and by changing her hairstyle, adding a fringe.

The mirror and digital screen can be clearly seen which determined the angle of the shot.
Positioning the camera slightly lower than eye level to the model
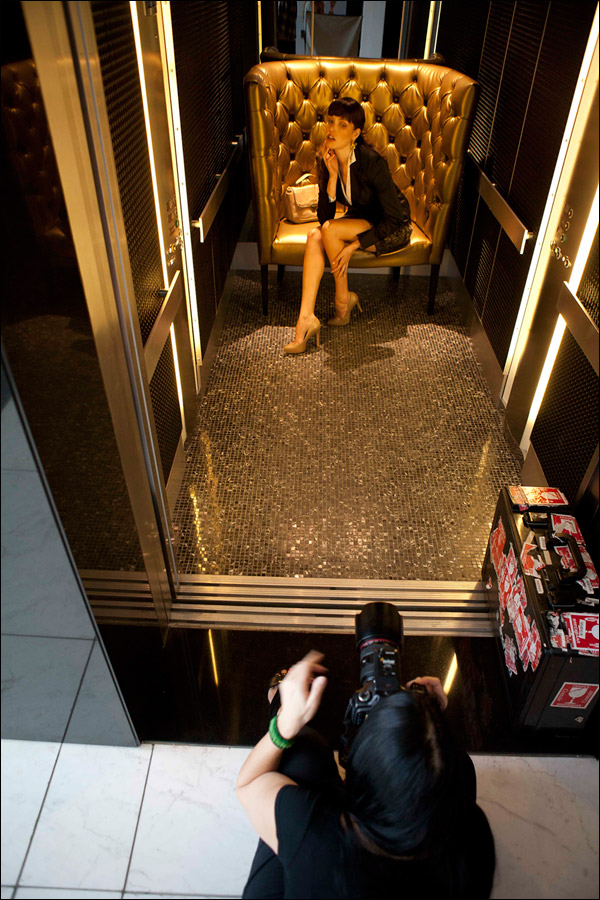
Bird’s-eye-view of the set-up
The second image:
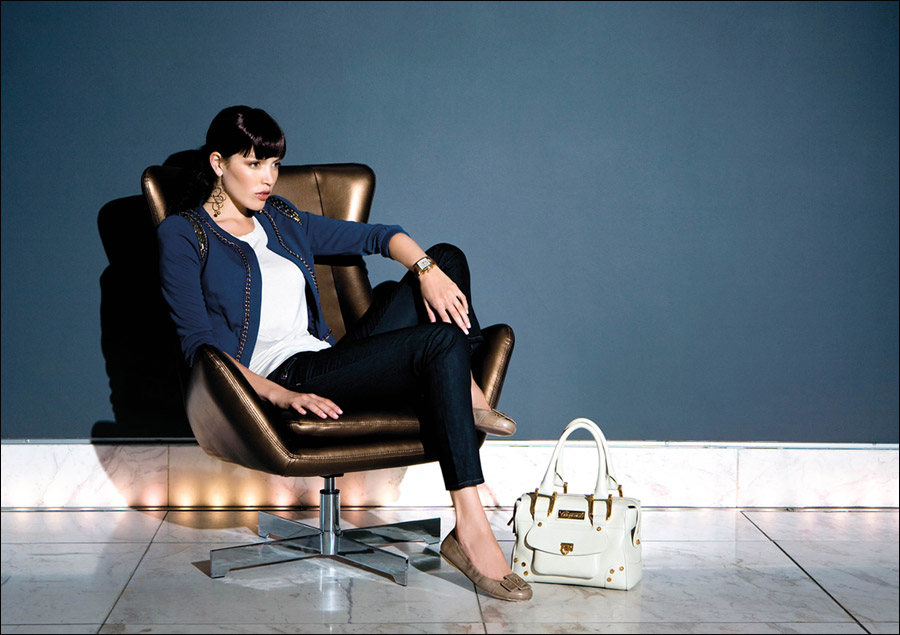
The bronze swivel chair in a glossy vinyl was in keeping with the previous shot. We positioned it in front of a untextured blue grey wall. I decided not to use the soft box here as it would flatten the image and make it less of a high-end look that we wanted to achieve. We also needed it to match the style of the elevator image.
I wanted the shadows on the wall to be a feature without it being distracting or creating a shadow behind the model’s head. I put a snoot onto the 600w light and placed the light far back – about 7 meters away and at twice the height. The shadows were strong but not deadly and the light appeared less harsh due to the angle between the camera and light falling on the subject. I exposed to maintain the light feature detail on the base of the tile skirting, which adds to the glamour-gloss of the shot. (f/8.0, 1/60, 200 ISO)
The context within which the shot was taken and the position of the flash.

This highlight of the floor lights that I wanted to preserve in the final shot.
summary
I hope these two examples show the thought process in coming up with ideas during a photo session. It should also illustrate how we adapt the lighting techniques we use, to the situation we find ourselves in during an on-location photo shoot.
equipment used
1 x Elinchrome RX600 flash head
1 x Prolinca 26 x 26” softbox
1 x Snoot
Trigger: Pulsar pocket wizard set
I was sure with a name like “van Niekerk” you were South African, now I know! What a pleasure to learn so much from a fellow South African!
“Baie Dankie” for all these awesome tips and articles you bless us with, I look forward to each one.
FYI I am writing from Centurion, Gauteng.
When I first saw the shot I thought you had put a flash behind the chair. Now I see it’s just the reflected light from the mirror. Love the look.
I thought the flash is actually behind the chair, with the falsh head facing the chair to prevent reflected light form the mirror.
Really nice post Neil. Im loving your posts with another photographers. When I saw the first picture I thought it was a ringlight.
thanks.
What a great shot. Love it!
Steve
Thank you Neil. Angie is excellent! Great description of the entire process, simplicity and sophistication at the same time.
This was a really cool post Neil! I always enjoy seeing the thought process behind the final image.
love the photos!!!
The setup photo shows that the softbox was behind the camera person so here, in case where we have mirror and other very reflective objects in the photograph why they did not reflect back? For me it looks like the soffbox was within the family of angles? Am I blind?
It seems like the softbox *is* within the family of angles, but the chair just blocks the reflection of it, since the camera is at such a low position.
Would that be accurate to say?