Tangents

photography tutorials, reviews & workshops

tangents photography blog
learn : discuss : share
  • Tangents
  • Tutorials
    • Flash Photography
    • Wedding Photography
    • Studio Photography
    • Posing People
    • Understanding Your Camera
    • Exposure metering
    • BFT
    • Best Photo Books
  • Reviews
    • Sony
    • Nikon
    • Canon
    • Fuji
    • Profoto
    • lighting gear
  • Workshops
    • Info: Workshops
    • In-person
      tutoring sessions
    • Online
      tutoring sessions
    • Workshops in
      New Jersey (NJ)
    • Workshops in
      New York (NYC)
    • Photo walks in NYC
    • Studio Workshop
    • Video tutorials
    • Workshop results
  • Books
    • On-Camera Flash (revised ed.)
    • Direction & Quality of Light
    • Off-Camera Flash Photography
    • Lighting & Design
    • On-Camera Flash (1st ed.)
  • Projects
    • Two Perspectives
    • B&W Infrared
    • Vintage lenses
    • Time-lapse photography
  • Info
    • About
    • Contact
    • My Photo Gear
    • Books by NvN
    • Join us on Facebook
    • Acclaim
    • Success Stories

using two LED video lights for effect

April 20, 2011 Neil vN 9 Comments

using two LED video lights for effect

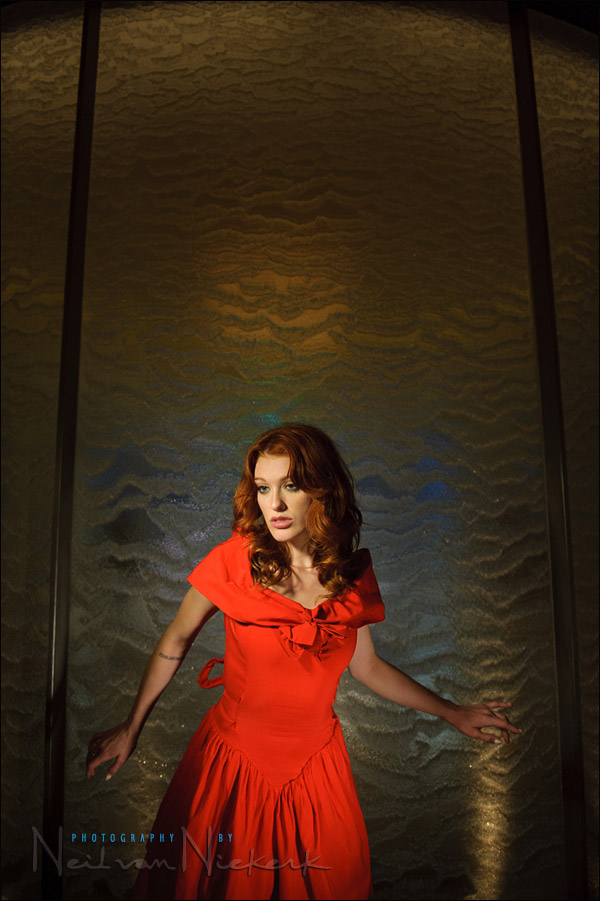
A favorite image from today’s workshop (Dana Point, CA), was lit by two LED video lights. Our one model, Virginia, was posed against the back of a waterfall display in the hotel lobby.

When I first saw this display in the lobby, and saw how it looked when backlit by the available light in the front, I knew it would make for an interesting backdrop.  Flash would even out the light too much though – especially bounce flash – so I knew this would be an ideal place for a dramatic portrait with video light. So in the late afternoon, the workshop group photographed Virginia against this display.

We resorted to two LED video lights though, since we were able to minimize a specific problem we had in using just one light …

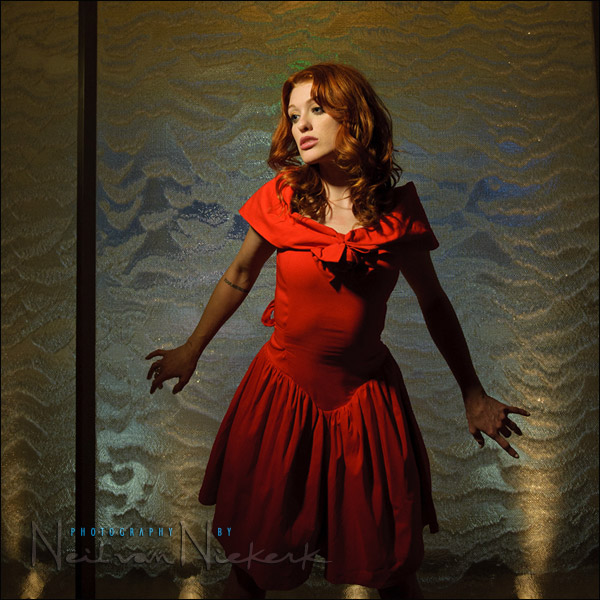
When we started off, we only used the one video light, but it immediately was obvious that the single light created hard shadows on her dress that was unflattering on her mid-riff. It was a problem with our lighting – definitely not with our model. We either had to change the pose, or change the light.

We then added a 2nd video light with the dimmer adjusted so that it only gave enough light to smooth out the shadows on her middle.

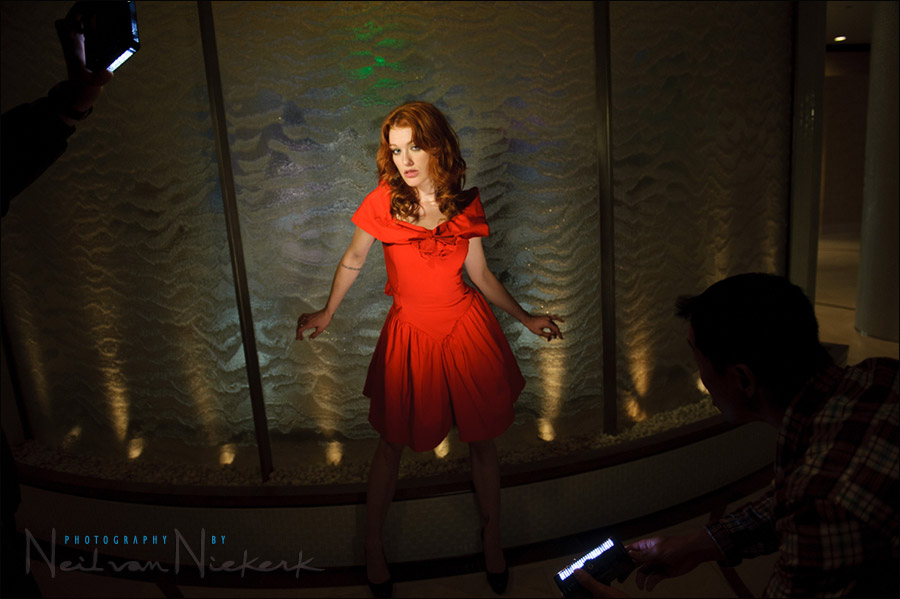
Here is the pull-back shot where you can see the positioning of the two video lights.

The 2nd light (with reduced intensity), also then helped in reducing the contrast and “opening up” the light on her. Far more flattering!

camera settings:
1/100 @ f3.2 @ 1600 ISO

equipment used:
Nikon D3; Nikon 24-70mm f2.8 AF-S (B&H) … zoomed to 24mm
Litepanels MicroPro (B&H)

Filed Under: Uncategorized, video light


Help support this website

If you find these articles of value, please help support this website by using these B&H and Amazon affiliate links to order your photo gear.

I also offer photography workshops and tutoring sessions, whether in person, or via online video tutoring sessions.

Please follow me on Instagram for more.

You can also join our thriving photo community in the Tangents group on Facebook, where we show our photos and discuss all things photography.

Thank you,

Neil vN

Books by Neil van Niekerk


9 Comments, Add Your Own

  1. 1Bogdan says

    April 20, 2011 at 8:17 am

    Did I mention how much I hate coming here? Not only I’m consistently shown my lighting skills are sorely lacking but I’m facing deadly gear temptations every single time ! :-)
    Joke aside Neil, would you please elaborate a bit as to why two flashes would not work in this situation? I understand video lights enable you to pre-visualize a concept but beyond that, two flashes zoomed in at about 50mm. (just guesstimating here) would do the job as well I think…
    Cheers!
    Bogdan

    Reply
  2. 2Neil vN says

    April 20, 2011 at 8:54 am

    I haven’t done any kind of comparison between a gridded (and gelled) speedlight in comparison with a video light. What sets the video light apart from flash, is that it is continuous light. You can can make adjustments on the fly and immediately see the results you’re getting. It makes corrections like you see in this example, so much easier and faster.

    Neil vN

    Reply
  3. 3Nikki says

    April 20, 2011 at 9:59 am

    Neil, the thing that always amazes me, along with your superb skills of course, is how you are able to notice those subtle little issues, like the shadows on her torso. Do you have a laptop or iPad tethered to your camera? Do you simply spend a lot of time zooming in on the camera LCD? If I’d taken the first photo, I’d have been so happy, and would’ve probably never noticed any defects. Of course seeing the two together, the second is obviously better, less ‘choppy,’ with smoother light overall. But it seems like quite a skill to notice and quickly make changes for those details.

    Also…just a note of thanks for everything you do here — I’ve got your first book and am planning to purchase your new one. And can’t wait to attend a workshop sometime. Seriously…this site gave me the confidence and inspiration I needed to get my lighting situation in gear! Thank you so much for all your work.

    Reply
  4. 4Neil vN says

    April 20, 2011 at 4:07 pm

    Nikki .. thank you for the wonderful compliments! With these photos I didn’t shoot tethered, These were examples dor the workshop attendees as we were setting up with the model. So no tethering to a laptop or iPad .. these were shot on the fly. I didn’t even have to zoom in on the image to immeadetely see the problem.

    I guess this comes with experience .. shooting a LOT, and observing while you’re shooting, and studying the images afterwards. I still often cringe at the mistakes I made, and the things that I didn’t catch at the time. In that sense then, I do believe that learning about photography is a never-ending quest. There’s never a peak in sight, where you can say you’d be on top of this mountain.

    And that’s the good news – there’s always more to discover and learn.

    Neil vN

    Reply
  5. 5Jonathan Seawright says

    April 21, 2011 at 1:53 am

    Neil,

    I got my 580ex today.. and now I appreciate your website more and mor. What was the first thing I did with the flash?
    I bounced it over my shoulder to my left into the ceiling, as I learned by perusing your tangents blog for hours and hours. Now I truly appreciate what you mean when you say “quality light” :P
    It just kinda.. clicked.

    And now I think I understand the advantages of having the LED video lights. I was trying to get a directional point of light on a self portrait I was attempting. I tried bouncing off of the wall, but I realized that just like in your situation, it opened up the scene way too much. I suspect that either a snooted flash or a gridded one would help me achieve my idea.

    Direct flash would be too harsh in my case, since the strobe would be a few feet away. So my only options would be a softbox, or an LED video light? (or grid / snoot)

    I have neither of those, I’m doing well to have a speedlite right now. However, I can see the value in not having to setup a softbox. It takes less time. And I’d wager that the LED video light is a bit more diffuse too?

    Another question: When you use the Black foamie thing, do you have to be much more precise in aiming your speedlite since you get less spill on either side? I think I need to invent a bounce flash target practice course for photographers ;)
    Last one standing… wins. Ha!

    Jonathan

    Reply
  6. 6Jonathan Seawright says

    April 21, 2011 at 2:09 am

    Neil.. case in point!!! :)

    I looked at this post again, https://neilvn.com/tangents/video-light-vs-bounce-flash/
    It’s essentially the same effect I was going for in the self-portrait. Now to get creative.. How could I get a similar effect with a flash?

    (I’m just getting speculative here.. since I’ve never personally used the gridded softboxes or snoots :P)

    Could I use a gridded softbox or a snooted flash up towards the ceiling pointed down to replicate the effect you got with Shawna?

    Sorry for the double post.

    Reply
  7. 7Neil vN says

    April 24, 2011 at 5:39 am

    Bounce flash will open up the area with more light.

    VIdeo light or a snooted speedlight, or gridded softbox will contain the spread of light much better.

    I’m sure you could mimic the look of a video light with a carefully modified and gridded speedlight assembly, but I haven’t bothered to do so yet. A video light is easier to work with and more intuitive and flexible for certain applications. And there are really cheap LED video lights available, so it makes sense to just get one anyway as part of your lighting arsenal.

    Here’s a post where I used a small softbox to bounce the flash, and partially bounce the flash.

    Neil vN

    Reply
  8. 8S.A. Caplan says

    January 6, 2012 at 1:37 pm

    As a video guy who does photography from time to time I am curious if those are Litepanel’s Micro LEDs, because I have 2 of them, and never once did I think of using them for a photo – it’s a good idea! I have used Rifa softboxes mixed with natural light for photos with good results.

    Reply
  9. 9S.A. Caplan says

    January 6, 2012 at 1:40 pm

    I should read a page fully next time. They ARE litepanels. What a great idea. Are you tunsten balanced with the 1/2 CTO gel in front or just using the full 5500K daylight spectrum?

    Reply

Leave a Reply Cancel reply

Your email address will not be published. Required fields are marked *

categories

Articles & Tutorials

  • • About myself & this site
    • Books by Neil vN
    • Best photography books
    • Black foamie thing
    • Photographers’ success stories
  • • Flash Photography Techniques
    • Natural looking flash
    • Flash + Ambient light
    • Dragging the shutter
    • Bouncing your flash
    • On-camera flash outdoors
    • Exposure metering
    • Flash exposure compensation
    • Bounce flash examples
    • Which is the best flashgun?
    • Flash brackets
    • Off-camera flash photography
    • Flash photography basics
    • Using video lights
    • Flash photography tips
  • • Photography workshops NJ / NYC
    • Models @ photography workshops
tutorials:
flash photography
Photography
Workshops

All rights reserved. Copyright © Neil van Niekerk 2025 · Customization by The Traveling Designer

Copyright © 2025 · NvN on Genesis Framework · WordPress · Log in