
Photoshop Tips – retouching for portraits
When retouching portrait photographs, I have a certain look that I (currently) like – a slightly ‘polished’ look, but still natural. Definitely not ‘plastic’. With a few steps in Photoshop, and a few steps that I may or may not add, I can easily get to the styling in post-processing that I want. Some of the steps are specific, but others are added depending on taste or ‘feel’. Some of the steps involve Photoshop plug-ins which are essential for me …
The photo above is of Oktavia, taken during part of this photo session. Instead of off-camera flash in a softbox, I used bounce flash for clean open light on her. The out of focus background is a piece of artwork – a pointillist Mickey Mouse. I thought it might be a cute idea to place her in front of it, and have the ears barely discernible. Mickey’s face then creates a kind of halo around her. There is some ambient light coming in from camera-right.
Retouching layer
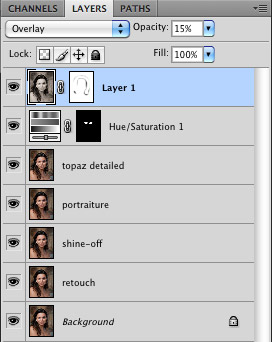
Pulling the JPG into Photoshop, the actual first step is to create a duplicate layer. This initial duplicate layer is the one that I retouch any skin blemishes on. I use the Clone and Healing Brush in Photoshop for this. (The person who designed the Healing Brush should be nominated for a Nobel Prize.)
When I am done retouching the image on this layer, I create a duplicate layer of it.
In the next step, I used to use a plug-in called Shine-Off to remove or reduce shiny skin or hot spots on the skin. That plug-in appears to be gone.
Instead now, I use this easy Photoshop method. Even better, is that this method allows you a lot more control and nuanced flexibility than the plug-in did.
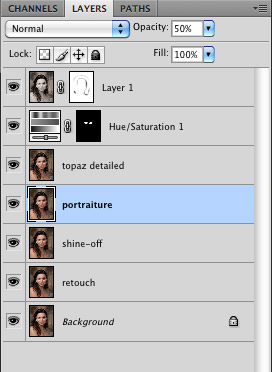
Imagenomic Portraiture
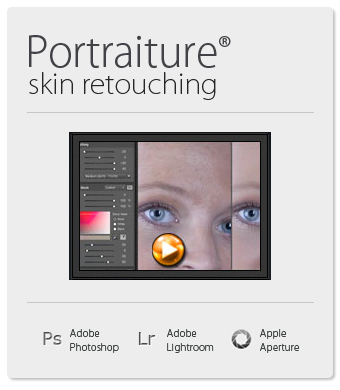
I do run it at 100% on the defaults, but we’ll change the opacity later on … and still add a twist to the proceedings.
We’ll keep it at 100% for now, and create a duplicate layer again of the Portraiture layer.
Topaz Adjust – Detailed
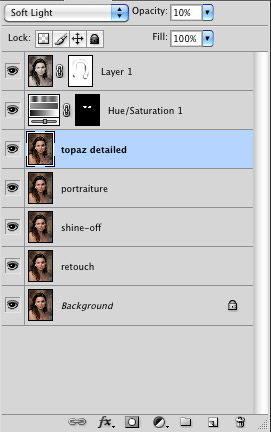
Now here’s the twist. The previous layer was over-smoothed, but with this layer, we over-enhance the local contrast by running the ‘Detailed’ action in Topaz Adjust.
The photograph will look quite heinous at this point, but we’re going to use it as a ‘Soft Light’ layer, and then pull the opacity down to 10% or 20% or somewhere around there. It depends on taste.
This just punches up the contrast and saturation a bit. This step in a way returns some of the nuances we might have lost with the Portraiture step. The photograph should look pretty good right now.
Now we pull the opacity of the previous layer (Portraiture) down to taste. I usually settle for around 50% but you can see what you like. Perhaps more, perhaps less.
Further adjustments
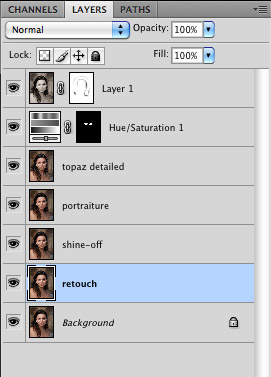
For this photograph, I removed a blue-ish tint I saw around her eyes.
Then as a final step, I added a black-and-white version of the photograph as another layer, and blended it as an Overlay layer at reduced opacity. It changes the contrast in a way that I like. However, I brought back some of the detail in the darker areas of her hair, by brushing it in with the layer mask.
Summary
This is obviously not something you’d do in a high-volume workflow, but it does work well with individual portrait images. And of course, all this is a matter of personal taste. I leave steps out, and change opacities as I please. It’s all wide open to interpretation.
Finally, the comparison between the first retouching step, and the final image.
Related articles
- Basic photo retouching
- More articles about digital imaging
Could you show the SOOC too
Hi Neil
Very nice article.
As an idea for a future one I’d be interested in seeing your workflow and photoshop techniques that you use for your model & couple shoots that are shown on this site. You have a very nice natural yet eye popping ‘style’
Great information Neil. I just started evaluating Topaz Adjust so I was very interested to see that you used it after Imagenomic Portraiture (which I love). I’ll give that a try, thanks.
My workflow is very similar, but I never use Topaz Adjust on people pictures….I tend to use an action called “Punch out!!!'” (TRA actions) – at about 15% opacity, and also use Nik Pro Contrast to adjust contrast. Finally – I run a sharpen as well.
everything else in your workflow looks like we knew each other from a long time :)
Neil,
The Topaz Adjust 4 link isn’t working for me.
Thank you for the interesting insight into your workflow.
David
Neil,
Why do you convert to .jpg before processing in PS? Is it faster to process? Or just personal preference?
I’ve always opened my RAW images from LR as is because I thought that editing .jpgs was more “destructive”.
Thanks for sharing your workflow!
-Sarah
Dude! With pretty much every blog entry you make, I respect you more and more. With so much of today’s photography being pushed to the point of over the top, hyper-real effects, your work achieves a subtley and naturalness that is just awesome and sets you apart. Keep the advice coming … you give me a lot to aspire to.
BTW – I’ve got my fingers crossed that you find yourself in the California, Bay Area leading a class or seminar in the not so distant future.
Rob
i’d like to see the “before” image for comparison :) thanks!
Great Blog Neil,
I always look forward to catching up with your exploits in my lunch break at work.
I use Imagenomic Portraiture on a lot of my female model shots. At default but then adjusted to taste with the opacity toned down. It is an absolute gem of a plug in!
I was very interested to hear about the layer where you add in a mono copy of the file for contrast change. Can you possibly expand on that or should i be able to understand how it is dealt with from your narrative?
your work is beautiful as usual but she is STUNNING……….
So each layer above the background layer contains the previous layer’s effects? For example, the “shine off” layer is the “retouch” layer with the shine-off effect applied. Then, you duplicate this layer and name it your “Portraiture” layer, where you run Portraiture.
I was wondering what order to apply the effects. Thanks. Portraiture at default settings is fantastic, although I didn’t add the soft-light layer at 10-20% opacity.
Also, for those who have Lightroom 3 and Photoshop CS5, the RAW engines are identical, so when you select “edit in Photoshop” from LR3, it can pass the LR adjustments directly to Photoshop. Only when you save this image in Photoshop does it save the changes back into LR as TIF. From a workflow perspective, this is faster than saving to JPG, but you will end up with a large TIF file.
Your results are just gorgeous. I thank you so much for sharing your workflow on this.
Excellent, never heard of shine off looks good. Great post as always.
Hi Neil,
Thank you for your incredibly inspiring website. I purchased and received your book “On-Camera Flash”. It has absolutely changed the way that I see lighting. The effects that you create are phenomenal. It is such a relief not to have all the off camera paraphernalia. Your simple home made snoot works wonderfully. It was a problem getting the CTS gells in South Africa but B&H Photo in New York were happy to send them. I so appreciate you sharing all that you do. It inspires both beginners and professionals alike. You are a master at what you do. Thanks for being so generous about passing on all your knowledge. I would highly recommend your book to all photographers out there. Again many thanks.
Linda
Neil:
I, like others, enjoy very much of your blog. I thank you for sharing your knowledge of photography to all of us. I wish that you do more of post production tips ( such as this photoshop workflow)
I have one question:
I notice that face in the edited copy is skinner and the width of the image ( of the edited copy) is not as wide which produce a more elongated face.
I wonder if you do Transform > perspective step on the final image?
Did I get this observation correctly ?
Roy
Hi Neil
As usual extremely interesting
What about the skin tones ?
What is your tip for that : your model are very alive with the perfect skin tone every time
Do you do it with a correct exposure only or do you balance it with LR using a method of yours ?
Thanks a lot for the trick
jcdae
Excellent post really. I come from a large illustration/digital matte painting background and have always been interested in these kinds of touch ups. Thanks a bunch Neil!
Do you convert to jpg using camera raw/lightroom or something like nikon’s capturenx?
Reason I ask is that although camera raw/LR has the camera profiles now, I find that nothing compares with the .nef opened in Nikon’s own software. I do exposure and white balance in viewnx (don’t have capturenx) then export for final edits in photoshop.
Thoughts?
Neil,
A fantastic article (again) with plenty of takeaway ideas for all parts of the workflow. I note that you utilise a lot of add-ins here rather than using many of the in-built standard functions within Photoshop. Do you find the results from the add-ins to be notably better than anything that can be done with Photoshop standard tools or do these simply make your workflow quicker? If the latter, roughly how long would you consider too long when working on a single portrait like this (granted, this is a fairly subjective question) and if use of standard tools in Photoshop is just time-consuming, what about using the Actions function to speed up and simplify?
Many thanks.
Thanks for the detailed tips…I purchased a couple of the plugins you used through your link. Love your site, and your book on on-camera flash…I’ve referred to it many times in the last year, and love the freedom on-camera flash gives me, and the natural-looking results.
Neil,
Your site is one of most precious finds! You give so much, and I’m learning a great deal. Although I absolutely love Lynda.com, Chris Orwig, and Zack Arias, your site just gives that little “extra” for beginners like me!!
I was looking into Portraiture when I ran across Portrait Professional. It is really simple and amazing to me. It combines skin smoothing, shine reduction, and an amazing transform function into one fairly automated program (all the features can be tweaked or disabled, so it is very easy to adjust to taste.) If you’ve given it a try, I’d love to hear your likes and dislikes about it.
Bob
I tried ALL of these plugins and Portraiture is the best but is WAY overpriced. Portrait Professional is good but too slow if you have 100+ images to do, you’ll be all day. But again, you have spent well over $400 on plugins that you won’t need if you take the time to learn PS! But if you must have PS plugins go with Mama:
It sounds like a bargain at $99… But I have yet to try it.
A try before you buy would be nice.
Hi Neil, do you create your own camera calibration profiles for LR, or do you use the default profiles as a base. i use a D300 and i find the color shift can be very different especially in skin tones.
I used Portrait Professional for 2 years, and upgraded to their pro version which works on RAW files. But many times, it would give a green cast to the images. i turned everything off and it still make this sickly green cast. I emailed the company and they asked me for images, and I sent them – then nothing. Its been 9 months and never heard a word back from them – much less any update to the program. I stopped using it completely. It can do some ugly things to people’s mouths, and bone structure and eyes, and its easy to overuse. The newer version is slow to use too.
What I am pretty happy with now, is PS’s healing tools, then using Nik’s software Dynamic Skin Smoother in their Color Efect Pro – it allows you to select the skin tone and fine tune it a bit. Then some custom actions based on magazine articles. I also bought some dvd’s on retouching and learned how to use PS tools to do a lot of retouching and that gives me more control. After you do it 100 times, you get pretty fast at it too.
Hi, Niel! I don’t know how your search button works (nothing found from what I want to), but I found this article only manual, searching by myself one by one…
I just wanted to say that Capture NX2 it seems to me the most STUPID (but other words are in my mind for creators) soft I ever tried in my life, having tons of problems and billions of errors. In fact he does a very good job, only when you don’t have errors. It’s a shame for Nikon, I’m gonna try ACR and your advices… thanks a lot for your support! A NX2 support I didn’t find…
Hi Neil,
Great article. The entire site is really priceless for the amount of information you share. Quick question with regards to Shine-off, are you using it in 64-bit mode? I can’t find a lot of documentation that mentions it. I appreciate the help and the website. Thanks.
Thanks for being so open and sharing all this info’.
This blog is fantastic.
For anybody else interested: I have been using Nik Software Color Efex Pro 3.0, and there is an effect called Tonal Contrast that very closely mimicks Topaz Adjusts Detailed effect, to my eyes. You can substitute Topaz Adjust in the blog article above for Nik Software Color Efex Pro 3.0 Tonal Contrast and achieve similar results.
Just installed a trial of ShineOff 2.0 but here the trouble starts…
Im using PS CS5 on a MacBook Pro and followed the installation advices (install plugin in folder “…/Applications/Adobe Photoshop CS5/Plug-ins/Filters”). But the plugin doesn’t show up in the filters menue inside of PS CS5.
Any advices appreciated.
Mika,
Shine off for the Mac is written as 32-bit code. Photoshop CS5 for the Mac runs in 64-bit mode, so you cannot see the plug-in in the filter menu. You would have to right-click on photoshop.app and select the option to run it in 32-bit mode to be able to see the filter.
Thanks a lot, Stephen,
I just figured out the 32/64-bit thingy a minute ago. Pretty annoying anyway, because 32-bit mode ruins my 64-bit filters…
FYI – All Image Trends plug-ins including ShineOff now support 64 bit on both Windows and the Mac.
Hey Neil!!
Since I discovered your blog, I’m always here :) Great work so far. Looking forward to your future articles.
I have a quick question regarding your digital workflow:
When you import your RAW files into Lightroom (if you do that), I know that LR makes a few default changes to brightness, contrast, etc. Do you clean these settings (i.e. apply Zeroed preset – i don’t remember the exact name) before you start to work on the RAW file?
Hi Neil,
I am a newbee from Singapore and i learned a lot from your website specially the entries from your Tangents. I already bought your book on ‘On Camera’ flash but still could not get the ‘Off Camera’ flash. According to the bookstore they place the order 3 moths back. It is exactly what i want to learn at this stage.
My questions from this post are:
1. Do you use or advice to use any mask from the shine-off, potraiture and topaz steps? Will those steps not affect other parts of the picture?
2. In your last step when you add B&W set to Overlay, which version of the photo did you use (i mean from which step)?
3. The Portraiture plugin price is a bit too high, is it OK to use Topaz Clean? It does have some feature on smoothing the skin and the price is reasonable. Will it achieve the same thing?
Thank you so much and more power!
Shine off is a plug-in that only works on wet skin. It does not correct bright areas of skin caused by overexposure.
Hey Neil, I’ve noticed a few references from you about shine off plugin, i was going to try it out but wasn’t very impressed by the example pics, i have a similar technique which is much faster and gives what i feel is the same if not better results and is non destructive, you use the adjustment layer selective color and choose the option whites from the drop down and then adjust the bottom slider for black level, this is basically photoshops version of highlight protection but it will only apply to highlights, I was wondering if you have ever used this technique and in your opinion how it compares to the shine off plugin?
Brad
Neil, Thanks for being the photography guru that you are, your tips have enhanced my work tremendously in a short time. I have a question regarding your working in JPG format for this tutorial:
“The first step is creating a JPG created from the RAW file that has correct exposure, decent contrast, and pleasant white balance.Pulling the JPG into Photoshop, the actual first step is to create a duplicate layer.”
I have heard that you can non-destructively work with JPG’s (newly exported versions from LR to PS), so I gave it a try. What a time saver as far computation of the work! So my question is -do you then save the work (layers) as a psd or tiff? And what are your thoughts on workflow from LR to PS? Thanks in advance, keep on producing the quality of work I hope to achieve! cheers, Kelly Wise
I like working on a separate layer for some things, such as adding an effect from a Photoshop plug-in, because then I can pull down the opacity.
I rarely save the PSD files though. Only if it is an image that I know I might be revisiting in future.
hi neil,
what format do i need to take my pictures if i want to edit my pictures on LR?
Toxy,
You can take both RAW, Jpeg to edit in LR, but RAW most definitely give the better result with its retention of data, as jpegs are compressed and data thrown away in camera when shot like that.
Generally the RAW format of your camera is best.
Hello Neil, how selective are you with applying plugin effects to your images?
For instance, do you let Portraiture apply its result to the image globally? Or do you create a mask and restrict Portraiture to certain areas only?
My workflow is I create a layer mask where specific areas of the image gets processed by Portraiture or some localized sharpening. The step that consumes most of my time is hair selection and I wish there was a way to speed up that. How do you handle hair?
I run Portraiture in its default mode on a separate layer in Photoshop. Then I pull the opacity down for that layer – adjusted to taste, but usually around 30% or so.
I don’t mask the hair or anything like that. I often mask out the eyes and eyelashes if I feel I have lost crisp detail there. But the hair – that doesn’t really concern me.