Photoshop action – selective sharpening (download)
Jim McGuinness, a regular follower of the Tangents blog, has made available a tutorial on how to do selective sharpening in Photoshop. Even better, he has made it available as a downloadable action as well.
You can download the action and the instructions on how to use it, from here.
Right-click & save-as, 2 of the files files:
– the action as either Windows / Mac compressed file
– the instruction as a PDF
Expand / uncompress the sitx file. You’ll get a Photoshop icon.
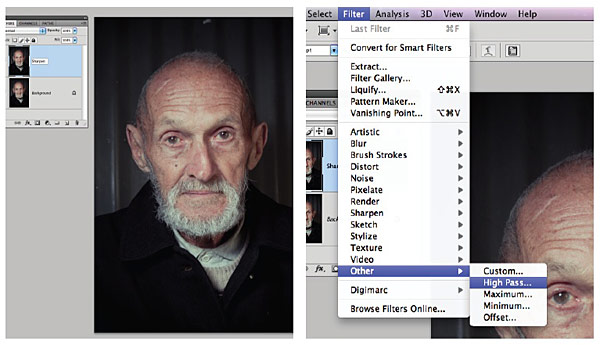
Drag your image onto the icon, and photoshop will run it.
I’ll let Jim follow up for any questions that may crop up.
[ Jim McGuinness is an Adelaide based wedding and family portrait photographer ]
The stx file unfortunately cannot be uncompressed by non mac users.
Neil, just emailed you a zip file that should open on pc!
Ta
Jim
a brush – Soft Mechanical 100 pixels – is missing?
Sorry, I’ve got it :)
Any brush you have will work, I find a soft edge brush works best. The size is dependent on the detail you want to highlight!
Enjoy!
Nice tutorial I’ve been a big fan of High pass sharpening for years.
Windows users don’t need the sitx file just create your own action following the tutorial ,very easy & quick to do & learning how to create your own actions is a huge time-saver.
Any tips using Wacom Intuos tablet?
In my humble opinion photos in PDF file are over sharpened. And I don’t see the reason to go back through time and use high pass technique when smart sharpen already has similar method integrated into it. And allows faster and more comfortable work.
Actually the action is not really complete in the Windows file, you still have to manually change to Hard Light Mode, no biggie.
Fix:
Go to Actions Palette Fly-out menu
Uncheck Button Mode if you are in that Mode
Find Action
Run Action
Click on Record
Change Blend Mode to Hard Light on the new layer
Stop Recording
Change back to Button Mode
This will now do the final step of the correct blend mode.
Although this action method would be a VERY good “gritty” look with males, as per pdf samples, old buildings, etc. and would be good also in the selective sense if a part of an image was slightly out of focus, back row of people for example, it would be tedious to just sharpen part and avoid skin tones.
I use the normal Unsharp Mask, but, I utilise the Red Channels [Inverted] on a dupe layer, built into an action; Sharpening this way protects skin tones, via the Red Channel and no need to ‘selectively’ sharpen. You can be more aggressive in sharpening without worrying about pixelating the skin tones.
Build your own skin protecting action:
First, make sure you have your Channels Palette open and you can see them clearly.
1] Create a new set. Call it: SHARPEN PROTECT SKIN
2] Create a new Action. Call it: SHARPEN 250 PROTECT SKIN then click RECORD
3] Duplicate your Layer. Rename Layer to SHARP 250. Shortcut: Holding down the Ctrl/Cmd & Alt keys, hit letter J, you get a window up, type in SHARPEN 250, hit OK. Saves having to rename later.
4] Hold down Ctrl/Cmd key and click on the Red Channel [this will give a selection of the reds]
5] Hold down Ctrl/Cmd & Shift Keys together and hit letter I [inverse] OR go to Menus ‘Select’/’Inverse’] to Inverse the selection so just the rest of the image is now selected, as this is what you want sharpened, NOT the Reds.
[Hint: To ‘Hide’ the annoying selection, if you wish, use Ctrl/Cmd H keys, this will HIDE the selection it WON’T Deselect it.]
6] Filter/Sharpen/Unsharp Mask
7] Sharpen 250 Radius 1.8 Threshold ZERO [I *never* use threshold, defeats the purpose of sharpening] Hit OK
8] Stop Recording and deselect [Ctrl/Cmd D] if you still have the ‘marching ants’.
Now, of course you can create a new action, into the same Set, call it whatever the percentage you want and get different results, obviously you can also simply change layer opacity to suit.
The above figures I use are for full resolution files, and you should take into account at what size they are being printed.
I thought I would add this since sharpening the way you should for wedding/portrait, you don’t want sharpened skintones.
Trev
Another simple technique: apply The unsharp mask filter then set the source for the history brush to the unsharp mask go back one step to before you sharpened & then use the history brush to paint in sharpness where needed from the future history state.
Trevs technique inverting the red channel selection sounds good will be checking it out.
Great effect, I like it alot.
-Dan
Trev, your suggestion sounds very interesting, but it is over my head. Care to make an action and share?
HI Rob,
Unfortunately I cannot upload an action here nor in the forum.
If you were willing to simply create a ‘throw-away’ email address [one you don’t care about and you can delete it later or don’t use again] and post here I can email you the actions I have created. Up to you, but no problem on my behalf.
Cheers,
Trev
HI Neil,
No worries. I shall include some other actions in the set, and write up a brief explanation of each and how to use.
Trev.