![]()
The diminishing value in using a Facebook Page
In the past week or so, Facebook once again changed things on us. I know, I know, another week, another unannounced roll-out of something new and fabulous on Facebook. This time however, the change is a big deal for photographers who rely on their Facebook Page for marketing. You simply won’t reach your audience unless you pay Facebook … per post.
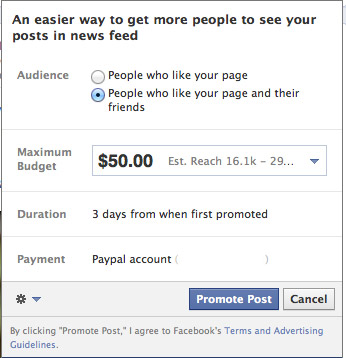
A while back, Facebook brought in the ability to “promote” your page by paying for more people to see a new post in their FB news feed. Obviously it’s a way of making more money off people who want to promote their FB Pages to their audience.
I tried it as an experiment way back when they first started, and there was no noticeable difference in the final number of people who saw a new album of photos on FB. The paid and non-paid posts (which were photo albums), reached about the same number of people.
There was a lot of talk about engaging your audience, and getting your audience to interact. The more people talked about it, and commented on it, and shared it … the more FB would feed your new post to the FB news feed of others. Fair enough … it could be seen as a way of pushing forward the posts which were more popular. ie, the posts which “engaged” your audience. It made sense.
But then, they changed the algorithms heavily against us.
I first noticed it this week when I posted new photos of weddings I had photographed, on the Facebook Page for my photography.
Currently I have more than 9,000 fans, and previous to all this, every time I post a new selection of photos, it would usually show after a few days that I had reached an audience of around 4,000 to 7,500 people. That sounds good. A majority of people who liked my page, saw the new posts in their news feed.
Then this week I noticed that a few hours after I had posted a new photo album on FB, it still had only reached an audience of 6 people. Yes, 6 people! A massive drop.
Something was up. When I mentioned this on my Facebook profile, a number of other photographers mentioned the same, and also linked to web articles on the topic:
MarketingLand – Facebook Accused Of Changing A Key Algorithm To Hurt Advertisers
“One thing’s for certain, the move towards paying for reach has arrived. While admins can focus on posting quality material, and growing an engaged fanbase the reach simply can’t be guaranteed without payment.”
Business Insider – Facebook Continues To Tighten Organic Page Post Reach
“Facebook can fix this at any time, and may be forced to, considering the backlash they are about to receive from the very advertisers that are practically their sole source of revenue.”
“… for a brand to reach beyond the fraction of core fans who see every post, an advertiser must pay to run campaigns such as promoted posts, which last longer in users’ news feeds and are thus seen by more people.”
“Doak put it more bluntly, framing it as Facebook gaming the system against the very brands it has encouraged to use pages:
This change is more than just a minor tweak. This is Facebook doubling down and admitting that they really don’t have any interest in brands having a real relationship with the fans they’ve accumulated”
With this, Facebook has just radically cut down their use for me.
As a Facebook user, what really really pisses me off here, is that I don’t have ready access to the things that interest me.
For example, I’m a fan of the music artist, Parov Stelar, and hit the “like” button on his page a long time ago. Yet, not a single story ever fed to my newsfeed. Why not? Didn’t I distinctly notify FB that I’d like to be kept up to date with new posts on this page? So now Parov Stelar would have to pay to reach me? Alternately, I will have to manually check. Similarly with so many other pages and interests that I have liked on FB. (I am aware of the ability to have an Interests list on FB, but this is just another change in the goalposts.)
With this, Facebook has hugely affected its use for me. It just underlined the point that if I want to keep up to date with my interests, I am still better off with subscribing to mailing lists and checking blogs and having a list of RSS feeds.
The linked articles above mention a loss of up to 60% of people that see the pages. I’m in the region on 90% if I have to roughly estimate it. By reposting the album of photos, I have been able to get more people to see it, but the numbers are still way down.
If this trend with Facebook continues, I’ll just put more accent on my blogs. FB doesn’t bring discernible income to me. It’s a marketing thing, sure. But I can’t say that I have had any income which was solely because of FB. I don’t have anything to sell in the way a retailer has … so there isn’t much driving me to pay FB money for other photographers to see my FB page. I will just send the link to the FB albums to my clients, and they will share with family and friends, and I am content. That’s all I really need from this. But there is no reason for me to use Facebook to the extent I have in the past.
This new change in algorithm is driven by FB being a public trading company, and they are trying to squeeze max $$ out of everyone and everything. With a heavy hand.
In another article on Business Insider, Facebook’s director of product management for ads, says that FB is charging money to have posts feed to others, because of cluttered news feeds. Now, to me, this spin on things makes no sense whatsoever. Why not just feed the posts regardless? It is obvious they are charging money in this way because it is something they could milk us for $$$. Don’t make it sound like a service to us that wouldn’t exist otherwise.
Now at this point, I can hear a chorus already, dismissing this with arguments such as: “Facebook is a free service.” Etc. My counter-view here is that *we* as the users are their product, and advertisers are paying mega-money to reach us with targeted adverts and the infernal games. As such, I do feel we Facebook isn’t free. Us being there and using Facebook, is what gives Facebook such massive value. Damn right I will have something to say about what affects us all.
My advice – create content for yourself. Not Facebook.
Something I’ve been preaching for a long while now … there is no sense in creating unique content on Facebook by writing long pieces there. A self-hosted WordPress blog where YOU control the images and text is much more valuable to you in the end. And you can back it up and protect yourself, instead of being at the mercy of a larger force pulling the rug from under you.
There are examples of photographers who have been locked out of their accounts because some random stranger reported an image. It can be as innocuous as photos of a burlesque show. Boudoir photographers are especially vulnerable here from abuse by others by having images reported and pulled.
Further musings:
Something I’ve been wondering about, is whether this move isn’t related to photos taking up so much more bandwidth than simple text or links.
I noticed that when I post a link to a new article on the Tangents blog, that the number of people who see it, is nearly to “normal” levels of a few weeks ago. But the photo albums are heavily affected. Text and links take up minimal bandwidth. But by the time a large album of photos are propagated to thousands of fans of a page, then the bandwidth overhead must become substantial … even though Facebook heavily compresses posted photographs. And this is perhaps why FB has decided that the high-bandwidth posts with photos need to be pushed along with the help of some $$$
The screaming irony here is that if you’ve been placing targeted adverts on Facebook to get more Likes for your FB Page, you’ve just been screwed … those people won’t see your posts unless you pay again. And again.
A bold statement perhaps, and I could well be proven wrong here, but I strongly suspect this will backfire on them. And with this, I wouldn’t be surprised if Facebook backs away somewhat from this heavy-handed move of choking news from our Facebook pages.
I’m very interested in what everyone else has to say about this, or have experienced.
Very interessting article Neil ! Personnaly I follow only your blog via RSS, so each time you post something, I can see it. Never had looked at your FB page…
Same here, I only use facebook to see news from friends. Anything else is done through RSS.
Hmm…
Could this be the downer for FaceBook and the start of Google+ rising?
;)
As a user, I don’t “like” pages I’m actually interested in on Facebook at all, I subscribe to them via RSS in a feed reader (you can google for a guide on how to do that, it’s not very intuitive to set up). That way I get to see all the posts I want to see, regardless of what the EdgeRank algorithm or my engagement (I don’t actively engage with public pages) or the page owner’s payment would make Facebook think I want to see.
But the trouble with the new system isn’t just that huge companys have to pay for reach, it is that pages that are not run for profit have no more way to reach an audience since paying obviously isn’t an option.
I hope that few enough people actually spend money on that so that that Facebook has to revise that decision. This is just ridiculous.
It’s immensely frustrating… but I’ve been noticing the same as you.
I also think it’s about the photos… I’ll have to change the way I post on Facebook until they change the algorithm again
Hi Neil.
I too have felt the diference of audience numbers in the last weeks… I’ve got only 1800 fans, more or less, and saw a decrement of around 80% the people reached by each post.
Also I felt that I have stopped receiveing in my news feed the publications of pages that I’m fan of.
What facebook is doing here is just cooling down to a stop the dinamics of the content creators and of all creative people. Brands and big corporations pay little money (as they have bug budgets) to been seen and heard in facebook. Good for them, bad of the rest of us.
I’m now replicating every publication throught my personal profile. It’s not the same, but it’s a way to try to get the most people out there possible.
Another thing i will be doing is to post links to my site, blog and porfolio pages, instead of uploading photos to facebook.
Hope this changes a bit for the better in near future…
Keep shooting!
Must say I completely agree with the above 2 posts. Yes, I have ‘liked’ your FB page, and I get notifications of new albums when they appear but I simply much prefer the RSS method of notification and access. Its clean, focused and specific to my interests in photography. I don’t get ‘mathered’ by game requests, pointless advertising and messed up content on timelines via RSS. I check your actual tanget page regularly anyway, its something of a ‘treat’ actually!
As you’ve said the current solution sucks for normal users who *want* to see posts from pages – and it was already iffy before Facebook started charging. I’ve actually got a Facebook list with all my friends (as in people, not pages) in it because even the “Most Recent” news feed doesn’t show everything that it should. I also have a list for photography pages and a list for motorsport pages but that’s mostly because I don’t want them spamming up my main feed.
They should just make business pages a pay-for service as standard and limit the number of likes you can have at certain pay levels to keep the price reasonable for your business.
They definitely should be charging somehow though, it’s insane that they provide what they do for free. It’s understandable for user profiles because they need those to make advertising appear worthwhile but letting businesses use Facebook for marketing at no cost, even if the effectiveness of the marketing is heavily in doubt, is madness.
It’s like eBay. People complain when eBay put their fees up but the user base of eBay is colossal so the service you receive is usually worth the price. Facebook need to balance what they provide with what it costs and it sounds like they’ve got that wrong at the moment.
Hmmm, I haven’t noticed a drop off at all. A photo that I posted yesterday got about the same number of views as ones from 3 weeks ago. I think that it may have a lot to do with the times and days that posts are made at so as to get a greater interaction when the post is first made so that FB sees it as important and then continues to present the post to others who may not have seen it yet.
This was in 2012. Now, in 2017, it’s even worse!
I use the RSS feed to keep up to date on whats going on with you and your blog. Facebook has little value to me at all, I have an account but if I log in once a month, thats a lot. I’ve never equated Facebook with serious business use.
The move by Facebook to choke off the reach of my studio’s post relegates its use to something akin to a flickr account with some social media thrown in, and nothing more. The appeal of having a good audience and growing a business there is now gone, and as Facebook contents are not indexable by Google, one’s presence or absence there won’t affect your page rank. I simply fail to see Facebook being anything other than a rather counterproductive pass time…
Time to move on perhaps…
I get some of your posts but not always. Trying to drive traffic to a blog can be hard considering the Monopoly FB has on the market. I post to FB, links to my website but not a real click through found. Or is it a case of a thousand and one photographers with their cameras and my work is not up to scratch?
Although I have a low number of “likes” on my page I have seen the steady decline in post views as the rest of you. And just like everyone else I’m not happy. But we are at the mercy of any and all brain farts FB may have.
I’ve had an interesting conversation with my sister about end user interaction and engagement. She is in her late 20’s early 30’s category, and as many they do like to have a higher “friend” count. But this poses a problem for them within the feeds it’s just filled with noise….. As I’m sure we have all seen. The remedy for her and her friends is to just spend more time in lists with people they wish to interact.
So as the end user has become more educated on how FB truly works and wishes to interact with the creation of “lists” will a promoted post show up within lists?
And now Facebook is gearing up to offer Pinterest-style image collections.
Hubspot – Facebook Tests Pinterest-Style Feature Called ‘Collections’
quoting from the article:
“… the fact that Collections posts are only visible to Facebook fans also makes it critical for business pages using the feature to build up their fan base in order to get users to collect, share, and click through to their product pages.”
Hi Neil,
I was approached recently by a company who told me that from January, Facebook would be charging UK businesses to have “Fan” pages. After the brief conversation, the only research I could find was that FB would be charging to promote posts, which we are now falling victim to.
I use my FB page to help promote my business. But, in its infancy, I haven’t had any work come from someone finding me on FB. But, it is a great way of interacting with my clients.
The fact that FB will be trying to hold us to ransom to get a bigger reach is shocking. I know Mr Zuckerburg didn’t do too well on the Stock market, and I see this is a way of recouping $$$$s.
Before this, FB didn’t get any money from me. So, nothing has really changed as they still won’t be getting any money from me. I will find it a shame not to get updates of favourite pages. However, I have friended Crash Taylor and get better updates from his personal FB account than I would with his Fan page. Neil, I’m sure you already do this yourself.
If FB want to change the rules, then so can we. I might start to integrate more of my business stuff in with my personal FB stuff. It would be a great way of clients seeing my personal side along with my business side. It would mean having more friends, which I don’t mind. And, you can at least say whether you want to see their drivel in your newsfeed.
I think giving clients a link to the FB page gallery is a great way to circumvent it. Alternatively, if you are friends with them on FB, then tagging them in the photos will help boost the circulation without having to pay the premium.
I already subscribe to your monthly news letter. I will have to also sign up for theRSS feed to get up to date tangents. I shall miss the FB posts of you after an assistant for a shoot and hoping it would be near me in the UK.
Many thanks,
Gary
thanks for sharing these insights especially the differences you are seeing with image/album posts vs. links, text, etc. online marketing seems like as we go along there are always adjustments to be made as things change, so this is one of those times we have to regroup and come up with new plans.
Thanks for sharing Neil. I follow you via RSS as well.
ref. Gary Smith “If FB want to change the rules, then so can we. I might start to integrate more of my business stuff in with my personal FB stuff.”
From FB TOS Registration and Account Security:
“4.4. You will not use your personal timeline for your own commercial gain (such as selling your status update to an advertiser).”
I have posted some of my business activity on my personal FB page and I know some photographers that are still actively using their FB personal pages to promote their business, but FB can terminate your personal page for doing this.
I think it is time to go back to using our web sites and blogs and forget about FB unless you want to pay for the ride. There are no free lunches.
Gene
Thanks so much, Neil. Very helpful information. I don’t use FB very much, I get so disgusted when I do get on there, because, in our area, there are so damn many little twits posting God-awful looking photos and passing themselves off as photographers. I refer to them as Shoot and Burners. I will, on occasion post one or two photos from a session and then refer them to my website. Keep up the good work, I always enjoy your articles. That is the first thing I do each morning, go to your website and check your work.
To add insult to injury, Facebook constantly pushes on my feed those “Take mind-blowing photographs. No skill required.” adds constantly. I REALLY NEED to see THAT (or so Facebook thinks).
New Media Rockstars (Oct 5, 2012):
Facebook’s new algorithm change slashes fan page reach by up to 40%
This is where the people who have been placing targeted adverts on Facebook to get more Likes for their FB Pages, should get really angry. You’ve just been screwed over by Facebook because those hard-won fans won’t see your posts unless you pay again. And again.
Something else I noticed today (but it could have been before too):
I have – just like we all used to do with RSS feeds – categorised as much as I can into facebook’s “lists”. (I’ve been trying to use this facebook facility since the day after they copied “circles” from g+)
So I have lists for “Current Affairs”, or “Jazz” or “Photo Teachers” yadda yadda. Each time I have “liked” a “page” I have tried to put them onto a “list”.
Since this discussion has come up, I have noticed that, yes, there is a “red box” notification on the left hand side menu next to the list name – saying that I have new items that have been “RSS’d” to that list. After checking the “new” items, and closing down to go somewhere else, I tend not to go back for a while. But since this discussion is around, I have been going back very often. Suddenly I am finding that there are now other posts and pieces of information tucked inbetween the original posts that I just saw.
Looking at it another way – let’s say a “list” says there are 3 more posts to read. I go in, read them and then exit. Before the next notifications come, I go into the same list and then all of a sudden see more than 3 posts, and some of them from way back, chronologically speaking. So there could have been 20 updates, but only 3 showed in the first visit.
So, in some weird sort of way is the algorithm saying “if you go back to that list so many times, then we’ll give you more info to see” instead of it being a simple “RSS” type of feed that just shows the 3 + 20 posts anyway?
It makes no sense to force fan pages to “Promote” things into the News Feed of existing subscribers. The best reason to include ANYTHING on the News Feed is to give the user another reason to click to another page (which contains more ads, potentially more revenue, etc.) which may lead to more browsing there, which includes more ads, etc.
I think they’ve shot themselves in the foot, and with as many “Facebook photographers” as there are, they’re shooting up around the ankle, too.
We’ll see how long the outcry takes to get back to the “powers.”
I’ve had the same experience. Approx 3K fans and I used to reach 75% of them with each post, now it’s less than 5%. While facebook may not add up to direct revenue, it’s definitely the biggest way my future clients discover me. I’m worried about this change of events, I can’t afford to promote every post I make.
Jon-Mark .. what exactly was the vector by which your clients found you on Facebook?
For example .. by randomly finding you? (Unlikely)
Targeted FB adverts?
Or by being friends with a family member who reposts your images from your FB albums?
I’m not surprised. There’s no stability with facebook, and I would never rely on it for business purposes long term. In a few years, facebook may be in a sharp decline. I’m glad I didn’t put too much effort into building a solid business page. I think it’s unfortunate for those who did.
wow, i did pay to get more FB fans and now this is making me mad!!! i have stopped using FB for my business because of this a while ago… talk about biting the hand that feeds you….
One of the main reasons I joined FB was to get updates etc from companies and firms etc. The “friend” thing was secondary.
FB may be free, but we are data-mined for their own purposes and they are doing well out of it obviously, so I feel no need to feel grateful towards FB, so all I want to say to FB is, “Give me ALL my news feeds back, that’s why I’m here”.
As many have pointed out, Facebook has changed their algorithm to force business page owners to pay to promote posts in order for them to show up in fans’ and friends of fans’ newsfeeds.
As a test this morning for this article on Fstoppers , several photographers and I compared data on what had happened when we promoted posts to our fans and friends of fans. Almost immediately I began getting likes and page hits from the middle east, africa, and asia — areas not in any way connected to my fans or friends of fans (I am in Virginia and nearly all of my fans are in VA and NC. Also, none of the new likes are listed as having mutual friends, and I am friends with nearly all 600 of my fans). I could have taken it as a coincidence, but every single new like since then has been from the middle east. Several other business owners shared the same results.
At best, Facebook’s algorithms are incorrect and displaying the promoted post to the wrong people and not delivering what is promised. At worst, it is a case of fraud where people are PAYING to have shell identities and foreign spam bots overload their pages. My blog post in the suggested website box above shares a quick account of what I’ve seen. Another photographer left a comment on the post which shares her own example – her new likes were coming from Brazil.
Lauren .. it is interesting to see how quickly the news about this broke, and that the team at fstoppers and many other bloggers posted about this at the same time … and the tone is quite negative. I’m still convinced that there’s a backlash brewing that FB didn’t anticipate.
– fstoppers – Facebook Changes Trouble Business Page Owners
– Jeff Doak – Facebook Quietly Destroys Half the Value of Your Brand Page Overnight
I keep facebook for staying in contact with friends and family, and don’t use it to follow companies / photographers / etc.
Instead, I use RSS and Google+ for that purpose, as I find it works better for me.
There is no insult intended in this question.
Did everyone out there really think that this service was going to stay free????
People fail to think things through to their logical conclusion. Again, there is NO insult intended in my statements.
This conversation should be opened up a bit wider to the subject of publically traded companies (PTC). They are always looking to show growth in their profits because that’s what their investors demand. PTCs can’t just stay with the same perfectly good quality product that they have been producing. They have to convince consumers that they need the latest and greatest, re engineered “sameness” that they have been making all along. While technology does get better, is it worth the extra cost, year after year?
Some companied like Facebook give their products out to some for free; in this case it’s server based real-estate. Again, did you really think that this was going to stay free?
With any PTC, you have to think things through to their logical conclusion. Take, for instance, the highway (airline) robbery act of charging you for your luggage. They claimed that this was needed to stave off higher fuel costs. When fuel prices dropped back down a few years ago, did they stop charging you for luggage?
A few other examples are: Unlimited Smart phone usage (ha!), Netflix, Cable TV/Internet billing, iphone4, 4s and 5, paying for food or even getting offered food when you fly, fuel prices and health insurance. I admit that the last one more complicated than just squeezing out a profit for stockholders.
PTCs are always going to look for profits by cutting, redesigning, charging more and maybe even making a better product. In this mix, PTCs look at us as $$$$$.
Sorry if I rambled. It’s late.
Neil, See you at Photo Plus Expo (Friday)
My photography business has been steadily growing, but not because of Facebook (thank goodness), rather through word of mouth. I was about to start promoting on Facebook, but it all seems too complicated and time consuming. What I see myself doing maybe next year is getting a website where I can showcase my work and do a simple blog and just concentrate on that and my clients. I really want to take care of my clients that I have now since they are the ones promoting me.
BTW, even if you weren’t not on Facebook I would still check your website, because you keep it current. I follow about 4 photographers religiously (you included) and not on Facebook. I have you all bookmarked :-)
I noticed this when an musician I follow via “like” booked a second concert in my town – the news of which I was waiting for, and I finally found the announcement on her FB page…which had never reached my news feed (and I only have about 200 friends/likes so my feed is not exactly overwhelmed). As a result of my reliance on the FB pushing of news to my feed I did not learn of the extra show until a week after tickets went on sale…So I understand your comments “As a user”.
It also guarantees I will not move to FB for my photography.
One more reason to stick with the trusty RSS feed and awesome NetNewsWire Mac and iOS apps
Wasn’t FB supposed to be keeping up with your social circle (or keeping tabs on old acquaintances) more than commercial ads?
Noting how FB wants you to pay through the nose for exposure, it makes you wonder how much some political entities are paying to get this kind of exposure:
https://www.bbc.com/news/technology-19895750
Just wanted to add my experience.
facebook albums are a MASSIVE benefit to my business as a photographer. And I always rage when they change things and how things are displayed.
Because of the way that fb were displaying my new albums in peoples feeds – very large and obnoxiously – I was loosing page likes. So I changed it to NOT “post images”‘ing and instead I take that album link and include it in a status post.
This makes the new album more subtle in peoples feeds and gives me more control over how they are displayed on the page.
I have not noticed any difference in reach. Typically 200-250 people reached in the first 4-7 days, slowly increasing to an average total of around 1,000.
It might be worth doing an experiment. Compare a “post photos” action to a status update with the album link in it and see what happens?
Neil,
Thanks so much for posting this. I found your blog via a discussion on a LinkedIn photography group I’m in. I am dismayed at the way Facebook is treating fan pages now. Actually, it’s not just fan pages. Even those with personal accounts can pay to promote their posts to guarantee all their contacts will see them. It seems to have turned into a network of advertisers rather than a network of “friends” and “fans.”
I started noticing several weeks ago that people on Facebook are not seeing what I post there, sometimes even my events! I’m so glad that I also have a blog, a website, and my own e-mail list so that I don’t have to rely solely on social media, especially since the rules and metrics of it keep changing all the time.
As far as I’m concerned, Flickr is still my favorite social network for art and photography. While a lot of people have moved on to Facebook and Instagram and Pinterest, the ones who have stayed at Flickr are the serious photographers who aren’t just posting baby pictures, pictures of their pets, and photos of baked goods. (That’s what those other networks are for.) Some of the Flickr groups I joined several years ago have dwindled, but many of them are still very active and are still a great way to see very inspiring work and get information about techniques. And the pictures I’ve uploaded are also indexed by Google, so that helps me “get my name out there” as well. I don’t mind paying $25 per year for that.
I wouldn’t mind paying to advertise on Facebook if those ads led to actual sales. So far that hasn’t happened. Most of the people who buy my art aren’t that into social media and most of the people who “like” it on Facebook don’t buy anything from me. And I don’t see the point of being like the small local bakeries I “like” on Facebook whose ads I never see because Kraft is paying to promote their cookies instead.
Your article was forwarded to me by a photographer, what you have written about covers many points I thought about and been trying to tell people about. Owning and controlling you content is the key, facebook is like a street wall, great for flyposting.
Thanks Neil, I’ll share with the Guild..
Couple of things Neil. I’ve decided to kill my FB fan page and just focus on my personal page…just not worth the hassle. Secondly, FB just revamped (again) the way photos and albums are viewed on both computers and smartphones. They eliminated the ability to easily rearrange and order your albums by clicking and dragging. And the default view when you click on “Photos” when using a computer is a bunch of recent mobile uploads, etc. as opposed to a view of all the albums(note that this change hasn’t been implemented when you’re viewing on a smartphone yet). Sucks if you organize your photos in albums…now you have to know to click on “Albums.” Also, the new photo viewer in the smartphone app requires a higher res image be uploaded to display with the same quality as the previous viewer…go figure. And I’ve yet to encounter a company that does such a poor job of explaining to it’s customers/users the changes it’s implemented to it’s product or service. Guess most of FB’s core users don’t really care about any of this stuff.
thank you for taking the time to lay it all out. One more reason to update my blog. I have never paid for anything Facebook offered. If they had better customer service or anyway to actually talk to a human being I may reconsider. But what reassurance are they giving that once you pay people actually see the post/image you are promoting?
My favorite way to keep up with the blogs I like to follow is for those blogs to post the link of Facebook. I don’t currently subscribe to any RSS feeders and I don’t really know how they work. I guess I’ll need to figure that out so I can keep up with my blogs. AND… it’s time I started a newsletter of my own and get people on my email list. Something I’ve been putting off because I thought Facebook was a great way to let my fans know about my blog.
This is why I had a FB page for about three days, a few years ago, and never checked it again.
This is interesting and a shame, I feel facebook is going downhill for business users and individual users.
I feel that now is the time to focus on putting that content to your own self-hosted website rather than keeping the traffic on FB. I understand that the presence on FB is still somewhat essential, however with proper setup, you can get your blog/site posts to appear on FB anyways.
I have been trying to utilize Google+ more but my customer base mostly are on Facebook, so switching entirely has not been possible. With this development I guess I need to start a campaign on my blogs to get my base to move to Google+.
Of course then Google will change their structure!
what you are writing is totally correct except for one thing: this is only true if you have over 400 fans… I am not saying that it is better to have 400 fans than 9,000 but with 9,000 fans you are a “large” business whereas with under 400 you are a “small” business… so the costs are different.
As for Facebook making changes: it is a public company now and MUST earn a living… I mean they must be profitable else they are done and gone. They have no choice but to find creative ways to make money. This is one of those creative ways.
Let’s not forget… Facebook is a business… not a toy… and who said anythign should ever be free to anyone other than air and water? (and is your water free by the way?)
Have a great day everyone!
I added an image to both my ‘personal’ and also my ‘business’ Fb pages yesterday morning to test this.
After exactly 24 Hours, the image on the business page had reached 34% of the number of page likes (Fb analytics). Virality discounted as this was based purely on those who ‘liked’ the image. The personal page image figures again are disregarded as they relied on ‘likes’.
Looking back over the last few months, my daily image reach has dropped from +60% but has also been lower than the 34% in this exercise. Not totally scientific, but proves a point!
As I am relying on Fb for a particular project my posts will continue as now, but come January Fb will be significantly less important- I certainly don’t intend to pay to advertise there!
Incidentally, I have had two wedding enquiries through Fb, both at the too cheap end/neither successful (!) but I have sold a number of prints which I wouldn’t have done elsewhere.
I use Google Reader as my favorite online RSS feed reader.
I had to come back and post again.
So at about 2pm today (Sunday). I posted a page status update that included a link to one of my new albums.
The post has now (10pm Sunday), been viewed by 89 people.
At 8pm today (Sunday). I posted a page status consisting of only text. The text was congratulating Felix Baumgartner on his jump from space.
That post now (10pm Sunday) has been viewed by 238 people
The Modern Tog – Facebook is holding your fans hostage
From that article:
“This is what you risk by building an asset on a third-party platform. They can do anything they want. And if your business has been built on their platforms and rely upon them, they can ruin your entire business.
So instead of relying upon third party platforms to build your business, build your business with things that you control completely and look at these third party platforms as benefits, not assets. Use them, but do not rely upon them.”
Interesting story. Makes sense for me, having read similar stories about FB inconsistency.
I read your blog. That’s good for me.
Really useful post. Thanks.
Couldn’t agree more that the cornerstone for any photographer marketing online should be the website, and in terms of getting found, the blog is a most powerful tool.
Said differently, content is the currency of social media (and search)…same as it ever was.
This is a longer term solution, but one that many other photographers I follow are doing: start posting on Google Plus also. I’ve been moving my reading of posts over to G+ as people start posting there too. Competition is the only way to beat something like this. And periodically post to your FB feed that you are on G+ and encouraging people to move there.
I, like several commenters above, prefer RSS and the blog to FB, but FB is a necessary evil at this time. Although they do their best to make themselves irrelevant.
Whoops – of course you *are* on G+, but what I was trying to emphasize is that you should promote that fact. Perhaps start doing some of your posts on FB as only a link to G+ (they let anyone see their posts, unlike FB) and see if that works.
Art … the obstacle for most photographers to jumping ship to Google+ is that their potential clients aren’t on G+ but are still on FB. eg .. colleagues of the bride’s mother, etc.
Certain photographers are doing very well on G+ like Trey Ratcliff for example. But he has a different client base and audience than most other photographers.
So jumping ship from FB, would mean a big adjustment in marketing. One which is becoming increasingly necessary since FB has now aggressively throttled the news feed from FB Pages.
As always, things are in a state of flux.
Interesting, seems like Facebook wants to increase their profit.
Since the stock market debut, it has only gone down Facebook. Since listing in May, the company has lost around 42 percent of its market capitalization
Intresting article and could explain my recent dissapointments with likes and comments etc. I recently posted an album on my page, Rob Grist Photography and I thought it was some of my best stuff to date. I thought I had got it all wrong with the views and comments and such. But if what you say is true then it could explain away my doubts.
I am not a fan of Facebook at all and only use it for convienience, maybe now I;ll try a new way to get my work out there. I have a blog on my site hosted by Zenfolio but I have to put a lnk on facebook to get strangers to visit so it does have it’s uses!!
Thanks for bringing this up, I knew FB was doing something with posts and charging, but I wasn’t sure of the details. This explains it. This definitely will change my marketing strategy and I will be concentrating on other sources of traffic.
“My counter-view here is that *we* as the users are their product”
Hah. No, YOU are their product, the paying advertisers are their users.
Same as comment No1. I even didn’t noticed that you have a FB page. My observation is that I do not have any client from my FB page
You never noticed I had a Facebook page before this?
So much for the Social Media buttons there at the top of this blog.
Neil, I only look at your website (bookmarked) and I am also a subscriber on your email list.
No interest by me in logging in and looking at Facebook whatsoever. Your website layout is great and easy to use. Just send the email updates, no problems mate!
I’ll also add that I ‘discovered’ you first on I think it was the Strobist website, then found your website.
I find interesting reading peoples’ questions and your replies, then later bought 2 of your books on flash photography.
Mark Cuban says Facebook is driving away brands
I’m so glad I stumbled upon this post. No wonder why page views have been dwindling! But I guess, like you said…it doesn’t matter now.
I have noticed this so many times .. I get useless updates about acheivements my brother got in Farmville or what ever game he is playing and friends sharing cat pictures to the point that recently I been turning up to FB with over 100 activity posts, but as I follow a few bands and I know one is on the verge of releasing an album (something that would be of use to know about posts) but no I dont get the useful updates .. and “configuring” facebook to get the right updates is an arcane wisdom. All I read in Photo mags is the worht of “networking” but I find Facebook more a case of a game location or an ego playground for people to rant or amaturs to post :S
P.S. Parov Stellar :)
Add this to the long list of why I have never used Facebook.
From Forbes:
Facebook Pages Are a Bad Investment for Small Businesses
“Our biggest disappointment was our misunderstanding of how Facebook Pages work. Instead of building a database of users that you can contact at will, you are essentially paying Facebook to build a list of people that you can then advertise to”
I’m an amateur photographer 4 years. Nonetheless, I don’t know who could afford to pay for ‘reach’ projecting the costs into the future. Perhaps the most profitable corporations with marketing budgets that could feed a small country?
In the long run, could a small business justify the money vs. the results? I’ve never really liked Facebook but I’m experimenting with an account to see how long I last(Family and friends are there). Posting faces, portraits, etc., not my thing outside of family and friend stuff.
As far as photo/photographer friendly, it’s okay…Just okay. In reality, I think a photographer might get more use out of a blog and a focused Twitter account and Flickr. At this point I have to say I still prefer my blog to Facebook. This is a really helpful article and comments. Particularly comment 75 from Forbes.
Neil…
Thank you for sharing this article! Albeit it almost 2 year old it still holds validity to it, especially when FB switched gears (once again) with intellectual property use last Sept. It’s been with careful thought that I’ll be disabling my FB page and profile fairly soon. I want to explore other social media outlets to market my work. Granted FB has the marketing majority when it comes to small/large businesses. But the key is to find a social media outlet that works best for that person’s business. One’s potential clients and audience is of great importance and FB has decided to put limits on much information gets out there short of paying a fee.
I feel there are many social media users that would prefer to pay a subscription fee and retain rights to their own content, etc.
It’s unfortunate that there hasn’t been other social media sites (similar to FB) that have stepped up to challenge FB’s network. Honestly in the 10 yrs since FB came online it was MySpace as their competitor and we know what happened to MS since that time. I’m certain there will be changes but it doesn’t look like anytime soon.
Good move on WeChat not selling itself to FB. Obviously the FB is trying to buy out competitors so they can hold down the market.
I feel the same way with the facebook fan page, BUT i will create a new personal facebook page, and use it for my business instead of my current fan page, because I asked people who already do this and they have no experience with this issue… :) so why do we have to use fan pages? what are their advantages for us after all? when we add friends on personal pages, it is like we add new likes to our fan pages… and you can do contests on your personal page and earn even more friends or followers
A couple days ago on my personal Facebook page I had a sponsored post that was 2nd in my feed from the North American Fishing club on how to stay warm while you were ice fishing. I don’t fish. I don’t make posts about fishing. I doubt there is much ice fishing that take place in California. I don’t think the San Francisco Bay is going to freeze over and thereby create ice fishing for the locals.
Yet there it was in my feed. Facebook has a real big problem. They don’t make enough money to justify their extremely rich stock market valuation. They are charging for everything they can get away with. Sooner or later it will bite them in the butt.
There’s a little bit of good news today if you click on Insights for your FB business page:
This is oddly phrased – an updated way we measure how many people like your Page – I would think people either like it, or they don’t. On / off. Black / white. Up / down. But apparently they will now “measure it differently”.
But then again, I don’t trust Facebook’s management at all.
I think this depends on how you use Facebook within your overall marketing scheme. I have gotten some business from Facebook but it use it as a virtual “word of mouth”. If I shoot a client I have them tag themselves in my photography page on Facebook. For people who have it blocked from letting people tag them I tell them they can have free Facebook sized images for anything that they have bought prints from as long as they tag my Facebook photography page when they post it on their wall. This way it shows up on their wall as well. Although it is against policy from using your personal account directly for business I think what you can do is post to your artist page and then share that post with your personal page. Once again Facebook is not my primary marketing tool but as part of the plan it seems to work for me.