Fuji cameras manual focus mode
The way that Fuji implemented manual focus mode on their cameras, turn them into possibly the best manual focus cameras around. Now some will say the most recent series camers’ AF is so good that you don’t need manual focus. However, I’m not convinced of that. The AF is pretty good, but there are times (such as with strong back-lighting), where even the top cameras of any brand would struggle. Then manual focus can be a huge help. And it makes sense to be familiar with the manual focus options on your camera.
Anyway, here is why I think the way that they implemented manual focus on the Fuji cameras are so good – using the Fuji X100s (B&H / Amazon) to explain:
Accessing the Manual Focus mode works the way it does with most cameras – a slider switch on the side of the camera. Great. So far, so easy.
Now keep in mind that it takes much longer to read all this, than to actually do it. It really is simple and fast.
- enlarged view
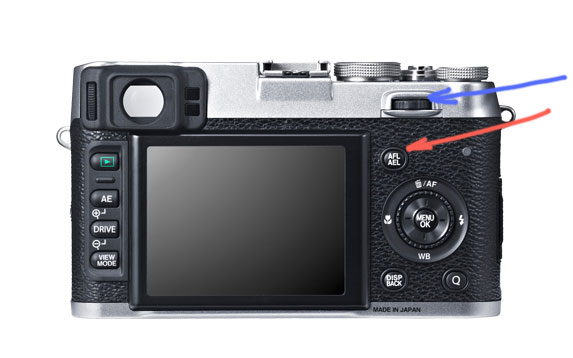
Hold the camera to your eye (and momentarily fawn again at the marvelous Optical Viewfinder), you will see that as you turn the focus ring on the lens, that an enlarged view pops up in the viewfinder. (Or the back of the camera if that is your preferred way of working.) The enlarged view (even if it is an electronic display), makes it pretty easy to see exactly how sharply you’ve focused on some part of your subject.However, you might not want to touch the focus ring if you’re already correctly focused. You might just want to confirm that your focus is correct. To bring up the enlarged view, just press the Command control lever (check the blue arrow on the diagram.) Just press it lightly to toggle between normal and enlarged views.
- spot focus
Instead of twiddling the dial until the image snaps in focus, you can just press the AFL/ AEL button. (The red arrow in the diagram.) The focus is activated, and the camera auto-focuses for you … while you see the enlarged view. Perfect. This gives you instant accurate focus. And if you feel you can tweak it to focus a bit sharper, or that you’d rather focus on another part of your subject, then you turn the focus ring. The Spot-Focus method works very much like using Back-Button Focus on a DSLR. By letting go of the AFL/AEL button, the focus is now locked since the camera is in manual focus mode after all.
- spot focus with enlarged view
Combining those two techniques, you’d be able to use the Command control lever with the AFL/ AEL button to get quick focus while in the enlarged view. This part is what I think is so awesome! Fast and accurate manual focus.
- toggle between Manual Assist options
There are three different focusing aids for manual focus:
– Standard (where the image just enlarges on the screen / viewfinder)
– Focus Peaking (where the correctly focused area shimmers.
– Split-screen (the camera electronically mimics the split-focusing-screen of the old film cameras.)Instead of delving into the menu to change between these, you can simply push the Command control lever (check the blue arrow on the diagram) for two seconds. Now by pressing this lever, you get to toggle between the Manual Focus Assist options. Personally, I prefer the Standard view. But the other two options are there for anyone that has a different preference.
Do keep in mind that you need to enable Focus Check in the camera’s menu. It’s under the blue spanner icon #2 for the Fuji X100s.
I believe it is worth it to play with these options, in case it is necessary, or just easier than using auto-focus.
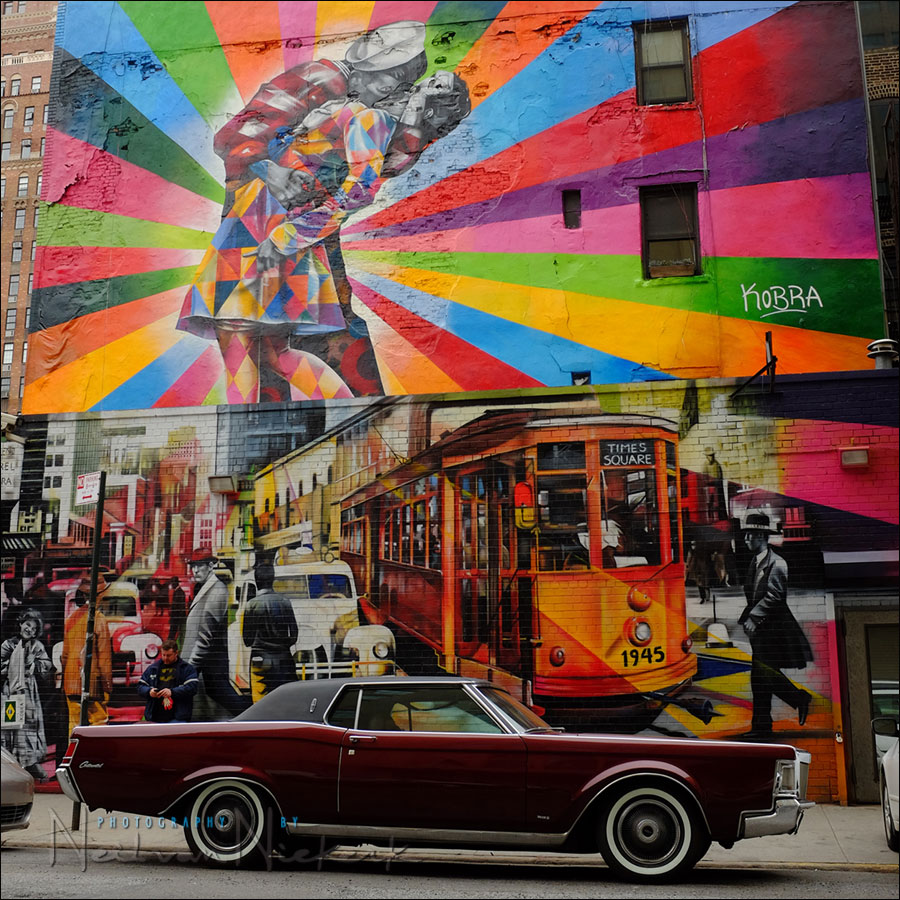
About the image at the top
1/320 @ f/5.6 @ 400 ISO
These two beautiful murals in the lower part of Manhattan, New York. The car – I’m not sure if it was purposely parked there to enhance the display – in other words, to be part of some greater Art display. Either way, it just really gave more impact to the scene. I processed the RAW file in-camera to the Velvia/Vivid film type to give me this out-of-camera JPG. (The square crop was done via Photoshop.)
Related articles
Thanks!
I’ve been too lazy to RTM about manual focus – and now I don’t need to :-)
Dear Neil, Having recently purchased the x100s I have also adopted the back-focusing technique, using the AEL
button and Peaking assist. You mention having Standard assist as preference and after having tried it I agree that
it gives tack sharp results, FOR ALL THINGS STATIONARY. Adopt this method on the street and your subject will be
out of frame before you can hit the shutter button! From what I can understand it’s a three stage technique, focus
the lens, hit the AEL button for AF on the enlarged section, and finally press the shutter button to take the photo.
Could you please explain your method of focusing for moving objects, Kind regards, Alan Thomas, confused 77 year
old.
In manual? I don’t use manual focus on moving subjects.
Hi, Neil. I seriously love this photo; I’m very drawn to it. When I see art that I really love, I have a hard time conveying exactly what it is I like about a piece, so I’m afraid I can’t tell you *why* I like this so much. That’s a good thing, though, I think. –To be left speechless by a work of art. :)
It was really nice chatting with you at BBB last night–hope you’re happy with your new Vue!
-Mary:)
Thanks, Neil, for this explanation. I recently purchased the X100S and I will be shooting in manual focus mode for the first time today. I have a beautiful bouquet of wilted white roses. This is going to be a real learning experience. I would love it if you could post a YouTube video of this tutorial.
Despite the improvement in AF, do you think it still lags behind the performance of a typical modern DSLR?
I always seem to feel that high end compacts and mirrorless cameras, notwithstanding all there other merits, seem to have a momentary hesitation before taking the shot while with a DLSR it is instant and no moment is lost.