Hanging out with my friend Brooke, (NYC boudoir photographer), at a recent workshop, I noticed some of the images on her iPad that she was showing to explain her lighting techniques. The photographs had an interesting mix of gold and blue tones, and I thought the way she achieved it would be of interest to everyone. It might be familiar to regular followers of the Tangents blog.
Inspired boudoir photography lighting
by Brooke Ismach,
New York boudoir photographer
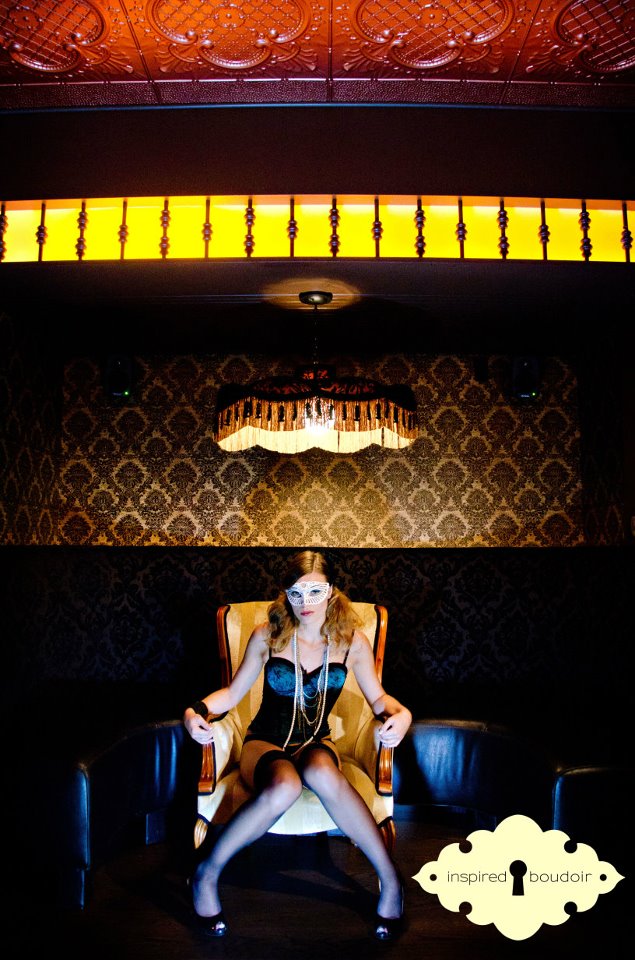
Since launching Inspired Boudoir, a joint photography venture with fellow photographer Laura Eaton, I have been lucky enough to speak quite a bit about boudoir photography. Which means I’m showing boudoir images to photography groups. Consistently, I am asked one question more than any other: How did I achieve the “blue” background lighting in the attached photo. Most photographers guess using gels, but the answer is actually simpler than that …
When it comes to boudoir, I feel confidence is sexiest thing a woman can wear. If a woman isn’t projecting sexy, flirty, playful, hot – some believeable emotion, the image is going to fall flat, no matter how amazing your backdrop is. That said, when given the opportunity to shoot in a venue that has almost as much personality as my subject, I’m going to treat that venue like a second invited guest. Not quite with the same priority of my subject, but I know in addition to all the tightly framed sexy shots, I want to capture at least a few wider images, that also showcase the venue.
The speakeasy where this image was taken, was stunning. But it was also very dark, almost solely candle-lit and without windows.
I knew I had two challenges. First priority was to flatter my subject; and secondly, flatter the venue. Which in this case meant lighting both separately.
I ultimately used 3 light sources in this photograph.
The main light, faced toward the model is a Lowel ID Light (video light) on a stand. The second, the noticeably blue background light, is a Nikon speedlight, powered by a pocket wizard. And the third light, is an LED video light that I simply placed on the floor pointing upwardto illuminate the brass ceiling.
As I said, my first priority was to create an image that flattered my subject, meaning believable skin tones. My second was to show off the venue. That said, accurately representing the color of the couch, or showing every minor detail of the room, was less important to me, than not allowing the background to fall off and go dark. The Lowel ID Light is a tungsten (very warm) light, whereas the Nikon speedlight is a much cooler light. Had I set my camera to account for the light output by the speedlight, the Lowell would have turned my subject a very warm sickly orange. Instead, by setting my camera to account for the tungsten lightening, I knew my subject would look natural and the speedlight would throw off a very cool, blue-ish light.
If the speedlight had been gelled for tungsten light, then the color of the flash would’ve been more neutral in relation to the video light. But by keeping the color temperature of the Lowel ID-light, and the color temperature of the flash separate, there was this distinct jump between the colors. By setting the camera’s WB to Tungsten, the light from the flash turned blue.
Boudoir is about fantasy. The blue works, because it creates visual intrigue, in this case, complements my clients blue lingerie, gives the background some umph and creates depth separating my client from what’s behind her. Success.
– Brooke Ismach
Related articles
- Lighting for boudoir photo sessions
- More articles about boudoir photography
Very nice. I totally get the emotion you’ve intended in the shot. Works for me.
For those of us that don’t have tungsten video lights with us, howsabout shooting raw, and processing two shots, with different colour temperatures, and layer masking for the same effect? Would that work as well?
Helix .. that’s a long day spent in Photoshop, and I doubt you could do it with the same subtlety.
The worst part about doing this in Photoshop, is that you’d have a series of images that you’d have to edit … and by the time you’re done with all that, days & days later, you’ll realize it would’ve been much cheaper just to buy a video light and have fun with it during the shoot. Life’s too short to waste it unnecessarily with Photoshopping images.
A very nice image!
This is a classic technique, which can easily be applied to strobes and Speedlites by gelling the key with a full cut of CTO and setting the white balance to tungsten to allow the background – which is lighted with a neutral light – to go blue (I’ve recently done something similar, though using a much less appealing subject…http://tinyurl.com/7plnajr).
As Neil says, I’d stay well clear of mixing colour temperatures and trying to fix them in post. That’s a Photoshop nightmare.
Helix,
I agree with you it can be done in photoshop and it’s not that difficult, there are commands in PS that make the masking and blending very easy and quick. Calculations and color range commands are what I use to blend multiple processed images. I will also agree that doing it in camera is the best way but if you are comfortable with masking it can be done.
Barney, while doing this for one image might be a fun little challenge, it quickly gets tedious if you want to do it for multiple images. Then trying to get a consistency in the look in images that were shot at different angles .. and then you’ll also quickly decide that perhaps it would’ve been better doing this during the actual photographing of the session.