A recent thread on the Flick group on flash photography techniques dealt with exposure metering .. and the questions revolved around understanding your camera’s built in meter. One of the group members, Arnold Gallardo (Zeroneg1), replied with a lucid explanation on exposure metering, relating it to the Zone System in a clear understandable way, using images from my blogs. I’d like to present this article by Arnold Gallardo as the latest guest spot on this blog.
I might not have such a specific linear approach to metering any more during the actual shoot, since with practice it becomes near instinctive .. but this analyzing of a few images might make an interesting outside perspective to the thought-process in exposure metering.
Zones of Light – an approach to exposure metering using the Zone System
a guest post by Arnold Gallardo
We all have made a picture where we didn’t get the representation we wanted it was either too dark or too light or not quite there in terms of how we wanted the camera to capture the scene or how it imparts an emotional element to the image. Then we realize how professionals do it ‘so easily’ when thinking about well exposed and composed images. Well, a Pro would have developed an innate sense of tonal placement and tonal awareness that has been developed through experience as well as ‘seeing’ and not just looking and solving things on the fly.
Okay let us talk about tonal placement and what does that term really mean?
Let’s look at a series of images from a recent workshop:
In simple terms, tonal placement is the willful and deliberate exposure changes so that the desired shade or tone in a scene is altered or rendered the way the photographer wishes it to be. This could mean a whole area or section of the scene is altered or a specific part only is affected. Tonal awareness is something else and it is an innate ability to look out into a real world scene, and instantly recognize how the lighting in that scene would affect a photograph if it were exposed in a certain way. This is just being aware really of how dark and how light things are relative to each other and how the ‘light behaves’ in the scene. Is it directional’, diffused or it is bright or specular?
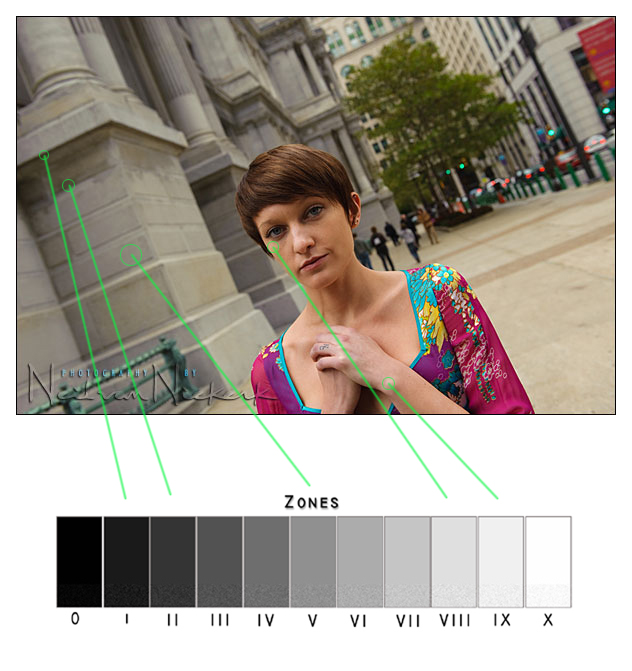
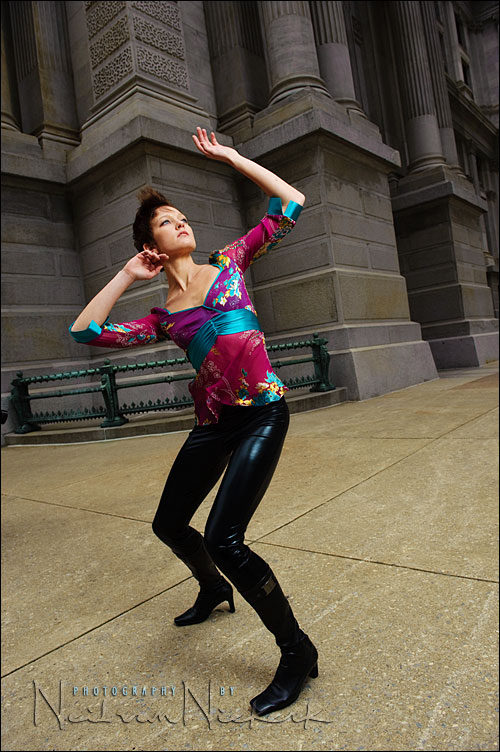
In this image Neil took a reference shot to confirm how the tones in the scene registers in the camera. This includes the important parts of the scene that would be included and in this case, the building on the background (left) as the beautiful model’s hair and skin tones as well as her striking wardrobe. Notice how the background is relatively bright. Although the model can be seen in the image she does not really ‘pop out’ in the image and actually quite blends in to the background. By taking a test image, Neil already has considered how to tackle this problem, so let’s analyze the process …
Look at the model’s highlighted skin and how close that is to the building’s tone. So what’s the solution? You can either lighten the background but then the model would lighten as well. Darkening the background would be an easier approach but yes the model would darken too. The solution is to take control of the ‘important tones’ in the scene. So what’s the easiest way to develop this ‘tonal sense’?
The Zone System
Ansel Adams developed the Zone System as a way to control the limitations of his film (as well as prints) in capturing the kind of image that wants. The key word here is ‘want’ because you can actually have the kid of tonality that you like (within limits) in an image if you plan ahead as well as analyze it well .. and also have the available resources to pull it off. Ansel Adams divided the tonalities in an image into 11 Zones.
Zone V-Your most important Zone.
The camera meter sees Zone V which is the middle gray also known as 18% gray because it reflects back 18% of the light falling on it. Remember the light meter ‘sees’ nothing but this tone. The newer segmented (‘Evaluative’ or ‘Matrix’ ) light metering systems aim to get beyond this limitation by breaking up the scene and analyzing each section or area and judging if that is an important area to consider for the overall exposure or not. Segmented light metering systems still does not know which area in the scene is most important to you, it can only guess based on its database of previously taken images (converted into an equation or algorithm). You must still decide which tones can be ignored and which tones can be compromised.
Zone VII-VIII are the highlighted texture zone which are the most ‘important highlights’ like a wedding gown details like lace and ribbon patterns or more commonly the textures on a white towel or subtle undulations on clouds.
Zone III are the detailed shadows areas. This mainly would be charcoal darkness but with visible details and patterns. In practice this would be a dark tie with design or dark tuxedo embroidery. This could also be black rocks and stones with discernible features.
This means you expose for the most important tones in your scene. This is why just following the meter blindly would lead to wrong tones being captured. This is why most professionals use Manual Mode because they can place the tones on a sliding scale by changing the shutter and aperture and the ISO, or a combination of any of those.
.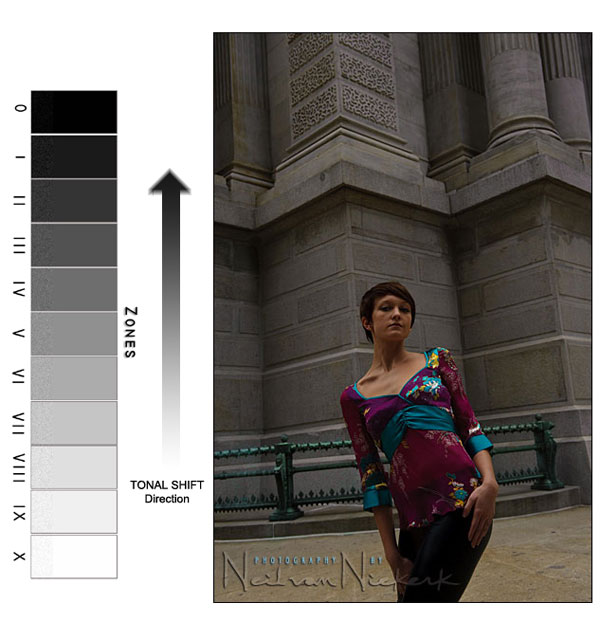
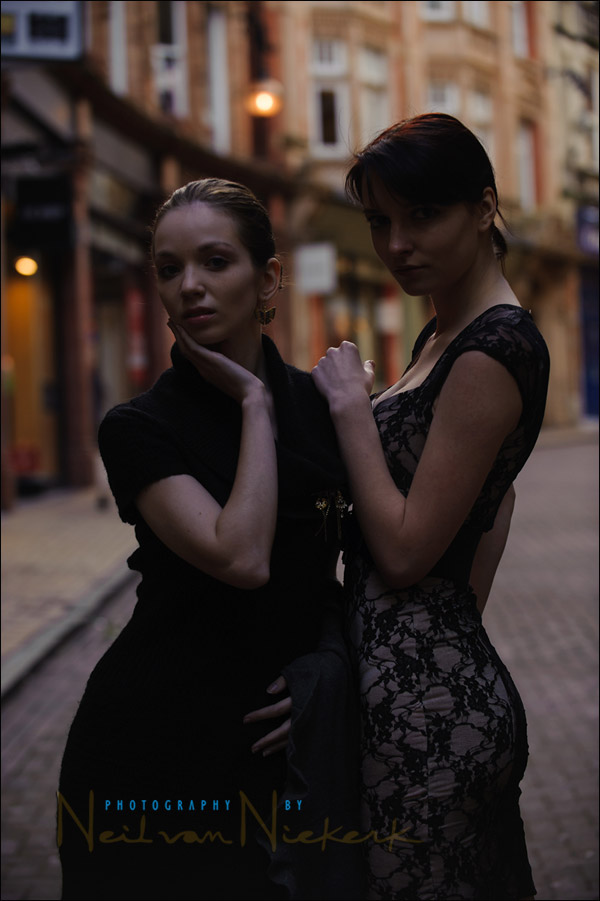
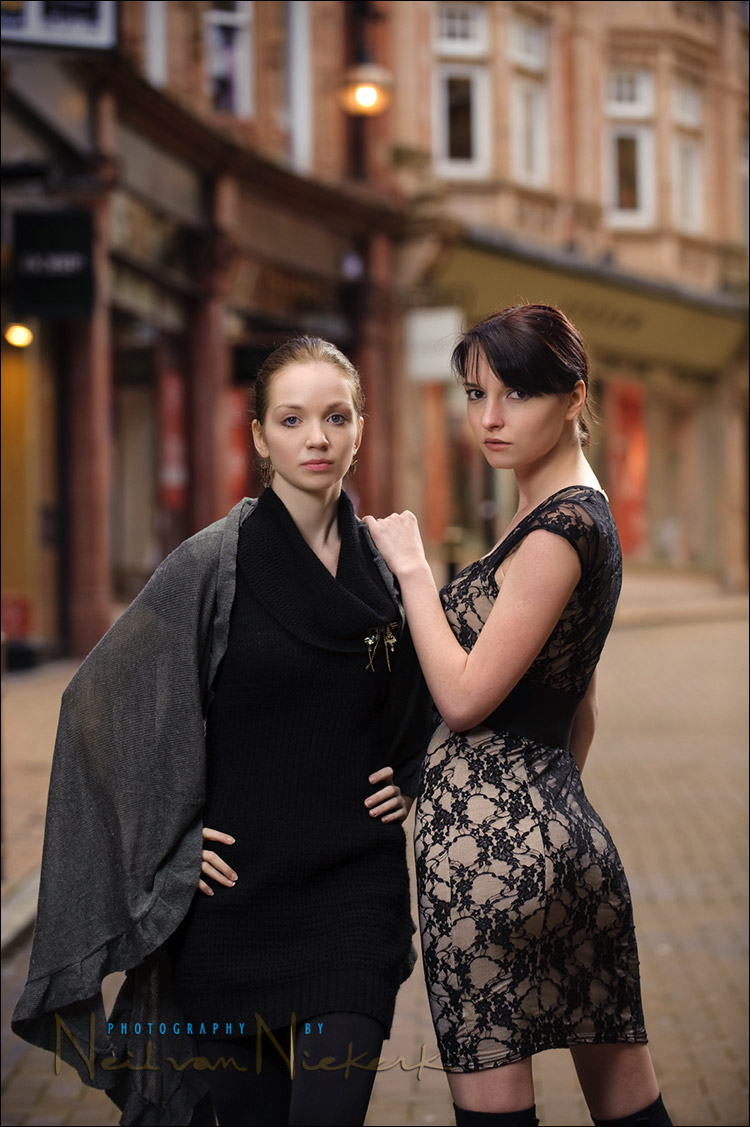
In this image Neil underexposed the background so that it would create contrast and ‘drama’ as well as have it fade into the background because dark objects always seem to recede back into the background. What he did here is to ‘push’ the Zone VII-VIII (highlighted textures with detail) down by 2 stops (-2.0) so they now became Zone IV-V which is much darker. Note that when he ‘underexposed’ everything else is ‘pulled down’ with it – the bright ground is now a grayish yellow tone as well as the model’s clothing. This part is Neil taking care of the background’s tonality so it would not blend with the model and has some sculptural element to it and not just a building. Also notice the perspective chosen.
Naturally, the model’s skin tone also became dark and she just lost all her definition. Since the model is the subject and the most important part of the image, she must be made ‘alive’ and ‘vibrant’ with life. The solution now is to take care of the tonalities in her skin, hair and clothing. Neil’s solution to this is to use a portable softbox to illuminate the model, to bring her ‘out of the shadows’ and make her ‘pop out’.

Look at how she just is totally separated from the background and seems to exist on her own space. All this by ‘placing tones’ by dealing with separate parts of the scene through exposure changes and lighting control by dealing with the background first through underexposure and lighting the foreground subject through the portable softbox.
What Neil actually did for the model is to bring out her Zone IV and V and even Zone III tones and push them UP to Zones VII and Zone V to Zone VI. Also look at her pants, there is detail in those so he pushed the Zone II’s into Zone III-IV. Nice contrast too with the ground creating an outline and leads up to her torso. Her pose and gaze also counts in the way it leads the eyes where to look. All of this however would not have looked good if the lighting and ‘tonal placement’ is off and did not work together..
![]()
This whole metering thing and 18% gray is even more complicated if you use Matrix Metering or Evaluative Metering. Overall however it still if prudent to be able to place your tones. Basically what you do is if you have time, spot meter the most important tone in the scene.
To fully use the Zone System, it is better to Spot Meter, (if not using Center Weighted), since Matrix complicates this because it also checks its database of stored images to compare with the scene you are looking at and judges accordingly.
On some newer D-SLRs the AF indicator also plays an important part in determining your ‘most important tone’ because the metering system weighs the exposure toward where the AF indicator is placed.
All of this means you have to meter the most important area you want to have in the image. The Zone VIII and Zone III are the ones you need to have but sometimes due to lighting conditions the number of stops you can capture gets either expanded or contracted. This is where you must decide if you would augment the existing scene with flash or change the dynamic range with filter (ND filter/Polarizer/Soft FX filters) or expose it as it is.
If you scene is flat you have to create contrast, this is done by either using filters or using flash to overpower the sun. Also when there is too much contrast you can then either use fill flash to ‘Brighten up’ the shadows areas to push them towards Zone IV from Zone II or Zone III or by using filter like an ND filter to compress the tones.
So after metering you must evaluate what kind of scene do you have, is it flat, normal or contrasty. How the scene is captured and metered would depend on your lens as well as in your camera. Different cameras have different dynamic and tonal range depending on the ISO and lens used.
All of this is shifting where the existing tones on the scene are placed. This are controlled by your aperture and shutter speed as well as any flash or filter you use. Essentially you should consider the existing tones in the scene as being on a sliding scale of Zones where you can move the tones UP or DOWN depending you how you expose them. Your ‘baseline’ would always be the Zone V or middle gray. Some people meter only the ‘textured highlights’ and ‘detailed shadows’ and extrapolate the middle gray based on the Zone VII-VIII and Zone III placement on the scene.
These tones and how they are rendered can also be altered in Photoshop using the CURVES and LEVELS but that has a limit. You do want you most important tones to fall closer to Zone V (middle gray) than outwards to Zone IX and Zone II because it is harder to recover those tones even if you shoot RAW. Shooting in RAW could only save you so much, therefore proper exposure is still preferable to doing everything in post-production.
![]()
Finally the workflow is:
1) meter the most important tones you desire and ignore the others.
2) evaluate the scene before you based on the meter readings. Which tonality is more important than the others?
3) decidehow you will expose the most important tones in the scene. Will you WEIGH or LEAN your exposure towards the ‘Textured Highlights or towards the ‘Detailed Shadows’? Deciding on this depends on your exposure and your camera and lens.
![]()
The work flow for spot metering :
1) Look at the scene with your eyes.
Now, just by looking you already know which parts of the scene before you, must have proper tone capture.
2) Meter the most important tones, based on the above evaluation.
This means you meter the ‘textured highlights’ (Zone VII-VIII), middle tone (Zone V) or middle gray,as well as the ‘detailed shadows’ (Zone III) and anything in between. When you meter each section, the meter would tell you the exposure. Take a note of each tone, plus their exposure values. They would be different for each tone.
3) Once you have ‘evaluated’ each important tone, you will now evaluate how much dynamic range or f/stop difference there is between the ‘textured highlight’ and the ‘detailed shadows’. This f/stop difference would tell you if the scene and the tones you are trying to capture would be.
4) You expose for the most important Zones – so you basically expose for Zone V based on your reading for Zone III and Zone VII-VIII. This is why this becomes a sliding scale because if you expose a little more, the tones on the scene would shift and slide along with your exposure.
Essentially all this means is that you’re doing the Zone V exposure for another Zone, eg Zone VI-VIII. This is the placement. How do you do a Zone V exposure for a Zone VII-VIII area? With B&W film, by overexposing for 1.7 to 2 stops (+1.7/+2.0). Alternatively you can do a Zone V exposure for a Zone III area by underexposing for 2 stops (-2.0). The subtle tones in between the Zones are handled by your camera’s 1/3 f/stop setting instead of having it change f/stops say by 1/2 when you change it. This is much easier form the old days when you can only change 1/3 to full stops.
You are using the ‘Zone V exposure’ for another Zone because that is the only tone that the camera meter in spot or center-weighted actually just sees. It doesn’t know that your subject is a white gown or a back tuxedo or a red shoe or a blue dress.
![]()
Finger Rule:
a) Contrasty: (Five Fingers) There is a five stop range between ‘textured highlights’ and ‘detailed shadows’.
Contrasty scenes have sharp shadow outlines that can be traced.
b) Normal: (Four Fingers) There is a four stop range between ‘textured highlights’ and ‘detailed shadows’. Normalscenes have visible but diffuse and soft shadows.
c) Flat: (Three fingers) Three stop difference between ‘textured highlight’ and ‘detailed shadows’. Flat scenes have shadows with little or no definition and form.
Now the ‘textured highlights’ and the ‘detailed shadows’ areas that you pick would be the ones you feel that are important and not necessarily be the only ‘textured highlights’ and ‘detailed shadows’ in the scene. They must be the the ‘textured highlights’ and ‘detailed shadows’ that you care about – the ones that are important to you.
4) You expose for the most important Zones – so you basically expose for Zone V based on your reading for Zone III and Zone VII-VIII. This is why this becomes a sliding scale because if you expose a little more, the tones on the scene would shift and slide along with your exposure.
If you are comfortable with evaluative/matrix metering instead you can also change the tones in manual mode by changing your shutter/aperture combination after making a test exposure and shifting your exposure through changing your shutter speed or f/stop.
This is why flash use is there for it to augment the existing lighting for you to be in charge of the final image rather than being limited by existing light and ambient light quality. Make everything work for you!
![]()
Here are some more examples of tonal placement:
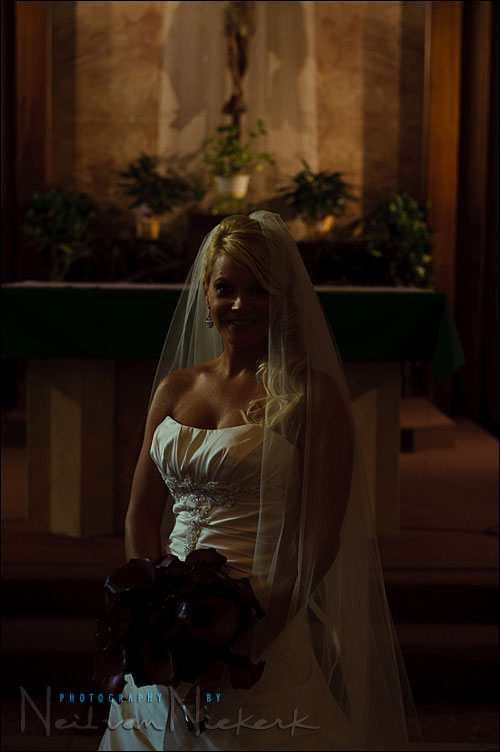
Background tone test shot as well as evaluation. Now look at how Neil took care of the tones in this image.
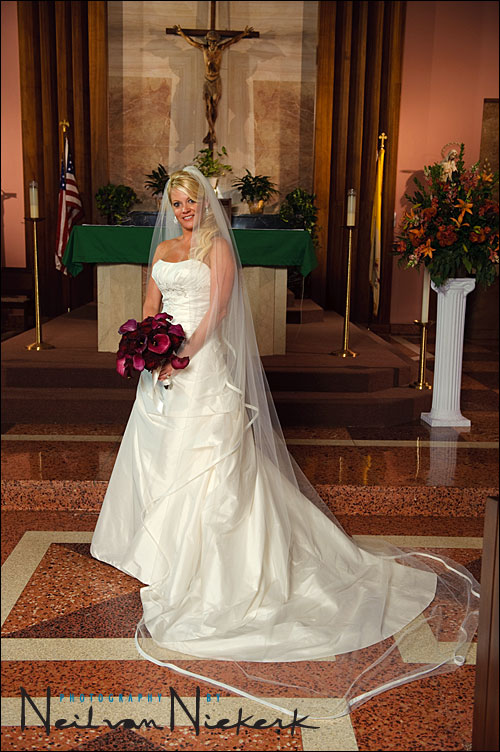
Notice that the tones in the altar behind are quite close to the final image from the ‘test shot’ with no flash. All Neil had to do is to handle the bride’s tones now by pushing the Zones up by augmenting the existing ambient lighting with a powerful flash creating a very diffuse light.
.
Here we see the same approach:
Neil ‘tests’ and properly exposes for the background as well as check how much this exposure for the background affects the models. He then again brings then ‘out of the shadows’ by using flash to stand out the models and isolate them creating this:
![]()
In all of these examples, note how much the tonal placement helps by seeing the Zones on a sliding scale by manipulating exposure and adding to the existing light and making it your own and actually ‘owning it’. Whether this is done though exposure (always preferable to do this in camera) or post-processing, it is all about tonal manipulation and control. If you develop this way of thinking, you would no longer feel limited by existing light that is available to you but work around it as well as make it work for you through the Zones of light.
Neil, Arnold (Zeroneg1),
If God were a photographer, you two could have written the Bible… Thanks for finally clearing up the skies… Keep up the good work.
Best regs,
Roel
Hi
I understood the bit up to the lighting.
“What Neil actually did for the model is to bring out her Zone IV and V and even Zone III tones and push them UP to Zones VII and Zone V to Zone VI.”
OK so say your bg is done, you are on manual, you work out your subject needs to go up 2 stops. Say you’re using TTL flash. How does that translate to what FEV/EV you use? I just chimp, but that’s not using the Zone system.
Val .. Even though I believe that an understanding of the Zone System is essential to the understanding of exposure metering, I use a variety of methods to get to correct exposure.
If a ‘good guess’ and a quick chimp of my camera’s preview gets me there too, then I’m okay with that. It’s the end result that counts.
(I hope this answers your question.)
Great explanation. Thanks for the tread.
Val he changed Zone IV and V and even Zone III tones and push them UP to Zones VII and Zone V to Zone VI, with his flash – most likely on manual mode.
John
I’m not sure I understand how to meter for the most important tones. What is the process? You mentioned spot metering, so would I place the spot on the most important tone and that is my base exposure? Please elaborate.
This was awesome. Very concise, start to finish. For anyone unfamiliar with the zone system, this lays out the basics in a manner anyone should be able to understand. Thanks for the writeup!
Thanks Neil for posting this! Also it was nice to have finally met you in person at the PhotPlus trade show after your presentation.
This is by no means a complete Zone System article but it just applies this to the workflow that were have been exposed to through Neil’s work/blog.
It surely is not a ‘linear’ thought process when you do this on the fly because you are evaluating so many things and changing things on the fly. I am sure for Neil this is a very fluid process.
Thanks again Neil and I hope this helps somebody understand this process better. Also don’t forget to buy Neil’s book since this is ‘tonal placement’ is there in more detail.
Neil, I have a related metering question. When I take a gray card and use my spot meter in the camera to get the proper exposure, one where it reads 0, I get a histogram that shows the gray is a stop too bright. Meter error?
There are several factors to consider why you are getting a stop difference with a gray card reading on a DSLR.
1) Graycards are not totally matte surfaces but are ‘specular diffuse’ which means it has a but of sheen to it, although very minimal.
2) DSLR sensor and light meters are more than photodiodes these days but actually are silicon photo diodes which sees a lot more than the old light meters (sees only green and blue spectra). DSLR sensors are actually reading RGB colors these days. This is why color are accurate as well as metering.
3) Your lens and ISO setting affects the reading as well. Your lens because of the lens coating and lens elements as well as aperture used. ISO because of the sensitivity of the sensor affects how it ‘sees’.
Compare you reading using a Flash Meter (incident light meter) with a flat diffuser and see what you get. I hope this helps you understand why there is some discrepancy.
I would wait for Neil’s answer here as well I am sure he has his own insights.
Thank you for sharing this in depth explanation. I think I’ll be reading this one a few times over!!
Brian
Clarity and brevity ! Well done to both of you.
Once again, stop and think before pressing the shutter button.
Regards,
Jim
John and Neil, what I mean is, I’ve chosen my bg exposure, I may know I want to light my subject by 2ev.
This doesn’t tell me what to set my FEV, and so I have it initially at FEV 0
If this is wrong, then I chimp and guess, but this bores my subject.
So I was wondering if there was a way to limit the # of guesses needed to nail it.
There’s a lot of factors that contribute to this. Firing the flash and making FEC are the only way to do this because more likely there would be SUBTLE tonal changes that you are after and a TWEAK in shutter speed/f/stop togtehr with 1/3 stop FEC adjustment is the only way to get the EXACT tonality you are after.
What you set your FEC is tricky there is no making formula because the FEC level depends on your subject and what your subject is wearing and their shape and form and all that. Your FEC would be different for people with different skin tones as well as for a tuxedo or a white dress (and compromise if your shooting both a tux and white dress). It is subtle but you need to compensate there too to the get best tonality. This is partly why Neil exposes for the ‘textured highlights’ because that is harder to recover and it most cases the rest fo the tones falls in LINE. Essentially this is a ‘slide film exposure’ approach which digital is because of its response.
Neil talks about this in detail in his book specially in dealing with contrast control using flash. Ultimately if you don’t want to guess and get it maybe in one shot my suggestion would be to do the old way and used an incident flash meter (with dome or flat diffuser for light ratio). But this is not a guearantee either. Remember that most Pro’s specially Neil shoots on the fly and ‘on-location’. This is not a studio work where things are easier to setup with full control. This is not a ‘celebrity’ shot (that most people seem to care about) but rather on-the-fly exposure work with real people.
If your camnera has an FV Lock (flash exposure value lock) that sometimes help specially if you need to replicate the tonality you got and you made changes to your zoom or bounce. FInally if you do this enough you would more likely find a quick setting as your BASELINE. I think Neil has the capability to look at a scene and instantly know what baseline exposure would be needed for background and foreground. This is somehtng that takes years to develop.
I think I’m confused. Sigh.
1) I’m using a camera with flash. My subject is wearing white. If that white outfit is important to me (I want the details to show), I will use the histogram method/LCD highlights and adjust my aperture/ISO/shutter speed until the white is white. This is equivalent to moving the white outfit from Zone V (gray) to Zone VII-VIII (where textured highlights should normally be). This is usually +1.7 to +2.0 on the exposure needle (for most Nikon cameras, although each individual camera will vary). Every other tone in the scene will shift in relation to the shift of the white. Ok, I think I get this. In this scenario, is the presence of the flash mounted on the camera factored into the camera’s exposure needle?
2) If a light person’s skin is the relevant tone, then that skin color is around Zone VI (it’s bright, but not ultra bright), so I don’t have to shift as much. That’s why Neil only has to shift by around +0.7 on the exposure needle. Every other tone will shift in relation to the shift of skin tone. Do I understand this correctly?
3) What I don’t understand is the photo of the bride or multiple tones. The blog entry says that the background was metered and then the flash was used to bring the white dress into the proper zone. Wouldn’t we meter the bride’s dress, which is white?
It sounds as if you would meter the background for ambient light and place the background in the “proper” zone. The subject’s dress, now in the “wrong” zone, needs flash to bring it to the “proper” zone. And you do that using FEC. Through experience, you will get a rough sense how much flash (via FEC) to add to the scene to shift the bride’s white dress to the “proper” zone. It sounds like you have to use flash in localized areas in the scene to push those other tones into the “proper” zone. It sounds like it is easier to meter the darker background (shadow) and use localized flash to shift everything else.
4) I remember Neil saying once in the workshop I attended that I could just as well bring a white towel or white index card and use it for metering to shift my white tone in the camera, even though the scene doesn’t actually have white. Is that still a valid technique?
1) On Nikon cameras the camera’s exposure compensation works with the flash. They are not independent unlike in Canon’s. Exposure compensation in a Nikon camera is cummulative.
Okay try this for a Nikon DSLR (sry my Canon camera is on loan so I cannot test) : Find a black sweatpant or shirt. Zoom in and fill up the viewfinder and take a shot using Aperture Priority/Manual. What do you have? Grayish rendering right? Zone V-VI right? NOW do an in camera exposure compensation of -2.0 stops. Take another shot. What do you have? Black right? Zone III-IV right? Good so far?
Now take another shot with the flash. The flash if in TTL mode (dont use TTL-BL) would NOT drastically overexpose the image. You will see the influence of flash but basically you still have a relatively black rendering of the tones. What did the flash do then? Notice that the flash broiught up the ‘highlights’ and some Zone V but basically left the black areas black. The FEC added is when you want to moderate how BLACK do you want the IMAGE RENDERING would be when you added flash.
Now find a white towel and do the steps above as well. The first shot should give you a gray image with texture. 2nd exposure with +2.0 stops (or +1.7 because +2.0 could be too much) should give you a textured white image.
Now what happened when you added the flash? You got a drastically whiter image right? Adding flash pushed tones and compressed the upper Zones (Zones VI-VIII). So what do you do? This is where you add FEC to contorl HOW much of the whiteness do you want to control.
2) Correct and you understood correctly.
3)If you did the exercise above then you will have an idea now what the answer would be. It is a bit more complicated if there is a background situtauon to consider now isn’t it? But as you can see form the tests you did above, the flash affects hightlights more and light tones more (Zones V-VIII) than the shadows (Zones 0-III). You are correct that the brides’ dress TONES would shift once you decided you would place the background tones first. This is specifically why you have to add flash and control the direction and quality of flash so that it not only bright out the tones whwre you want them but also ‘MODELS’ and ‘Shapes’ the sujects as well as controls the ‘Contrast’. Again this are all in Neil’s book :)
4) Oh certainly. That’s an excellent tip from Neil. Maybe I should attend hiw workshops myself someday :)
I would wait for Neil comments here myself since I am sure he has more enlightening approach. I won’t assume I know how Neil actually works but could only decontruct it based on his images and his blog and now based on his book as well.
Neil + Arnold,
thanks for putting some light into this very complex topic and applying the old gold standard (zone system) to digital photography. it will take me a while to digest for sure.
now as a side question – i would like to know how from you experience on location (esp. outside) does the choice of flash modifier (i.e. the size of the softbox you use or just portable “naked” flash unit) affects your ability to separate the subject from the background?
Thanks and congrats on your new book! see you around DWF or in Vegas one of these days!
As for your question, in my experience separation depends on subject to background distance, existing background and subject tonality and color as well as the distance of flash to subject as well as HOW LARGE and diffuse the flash is.
In most cases ‘naked’ flash creates a very specular lighting aka highly directional if not a ‘specular diffuse’ which is quite harsh if close to the subject. Using large softboxes with powerful flash solves this problem but the background underexposure,color and tonality also helps a lot in creating THAT separation. This is why I never found sto-fen of any small on flash diffusers to be of much help unless it is overcats and I need to create ‘drama’ with it. You need to make your diretional key light source (‘modified’ flash) a large as you can do it for dramatic soft studio lighting effect.
Arnold,
Thanks for replying. I will run the tests.
When looking at a black or white surface for these tests, does it matter to the camera if the flash is direct or indirect?
I have Neil’s book as well, and while he dedicates a chapter on directional lighting, he doesn’t have a section like you guest entry. I think your blog entry (or something similar) would be an excellent addition to the second edition of the book.
–Stephen
Well you can try direct and indirect. The tonality you get and HOW they are affected would be a function mainly of two things, flash to subject distance and how large the ‘light source is’ in this case the flash head and if you have any ‘light modifier’ on it aka Sto-fen ‘diffuser’ or ‘bounce card’ etc or ‘bare’. Bouncing it would create a much large light source hence would require more power for you to get an appreaciable result. But the main idea is to see WHICH ZONES/tones are effected more by flash. Which tones are SHIFTED more by the flash after ‘tonal placement’.
You are saying that Nikon’s flash compensation (FEC) works cummulative, while Canon’s FEC works independent.
Does this mean that with Nikon, if I do a -2 stops exposure (to darken ambient) with a +1 FEC (to light the subject), the subject would be lit with -1 stop exposure by the flash? While with Canon the subject would be at +1 stop exposure by the flash?
That’s right. Actual captured tonality would depend on the subject’s clothing and material but in general yeah.
You will find out that if you do a -2.0 and a +1 FEC that the FEC affects more of the upper middle tones and textured highlights (Zones VI-IX) than the lower zones (Zones III-IV).
Nikon works this way because the Flash technology is embedded/integrated with the metering system and the sensor going back all the way to the Nikon F4. This is why the Nikon flash system is considered the most advanced. Canon only has begun to do this specially with the 7D. Some people prefer independent body exposure control and flash exposure controls while others want it integrated and cummulative, it all depends on what you want to get in the final image.
Arnold
PLEASE help me understand the following about metering. We is South Africa can’t get Neil’s book anywhere, we can’t attend his courses and NOBODY here knows as much as you guys about flash photography, everybody has different approaches and despite attending three courses, I’m still in the dark… ;-)
1 “In this image Neil took a reference shot to confirm how the tones in the scene registers in the camera. This includes the important parts of the scene”
That is exactly my problem – please help me understand – where did Neil aim his camera’s AF meter when he made this shot? In fact – what exactly was the process of metering? Point the AF meter at…, then…, then…
2 “Notice that the tones in the altar behind are quite close to the final image from the ‘test shot’ with no flash. All Neil had to do is to handle the bride’s tones now by pushing the Zones up by augmenting the existing ambient lighting with a powerful flash creating a very diffuse light.”
When does one expose for the background, and when for the bride’s white dress?
3 “This whole metering thing and 18% gray is even more complicated if you use Matrix Metering or Evaluative Metering. Overall however it still if prudent to be able to place your tones. Basically what you do is if you have time, spot meter the most important tone in the scene.
To fully use the Zone System, it is better to Spot Meter, (if not using Center Weighted)”
Please explain what you mean by “if you have time” – why does spot metering take more time? And why does one not use Center Weighted when Spot Metering? What should one use instead?
MANY MANY thanks
Hi Lydia,
That’s too bad you cannot get Neil’s book there since it is excellent. Amazon doesnt sell it there? Ok let me try to answer some of your questions. Please keep in mind that I won’t presume HOW Neil actually works since I could ony infer base don his blog,book and images.
1) Neil just took a ‘reference shot’. This could have been done in ‘Aperture priority mode’ for most people. As for Neil in more likelihood, he shot this on MANUAL mode with the Sunny F/16 rule ‘as a guide'(as he has said in his blog and book many times) . Where Neil placed his AF indicator is not much relevant here. Why? Because it is ‘Neil’s reference baseline image’. It is not yours or mine, it is Neil’s :) It is up to each and individual photographer HOW to establish a reference image baseline. Why? Because the tonality that is important to you might not be important to another photographer. So in this instance a photographer could have used center-weighted or Segmented/Evaluative/Matrix metering or even spot metering. Ultimately this is nothing but takign ashot and looking at the captured tonality and evaluating it based on your shutter and f/stop settings as well as your ISO.
2) Exposing for the background IS THE tonal placement procedure. Neil had to expose for the background base don HOW MUCH he wants the backgorund tonality to BE in his image. That is his decision on EXACTLY how much to expose for it. The point is to PROPERLY expose the background for YOUR DESIRED TONAL placement base don your ‘test tonal reference image’. If you read Neil’s blog, that picture was done with a large umbrella with a very powerful flash. It makes sense that he needed a powerful flash because there is alot of area to cover as well as he needed alot of light to bring up ‘the Zones’ on the bride’s dress and skintone. Ultimately what Neil did this is, expose for the background using ambient light and expose for the foreground subject using flash. There is no WHEN here just separate ways of tackling tonal placement using flash with ambient light exposure.
3)it takes time to use Spot Metering because you have to either move your camera around and zoom in to the important tones (only if you have a constant aperture lens, don’t use variable aperture for this) or you move the AF indicator around to the ‘most important’ toens in the image. This actuallty take times because you have to mentally make note of the DYNAMIC range of the most important tones you have evaluated. This means taking note of the f/stop and shutetr speed of the metered Zone VIII area as well as the Zone III and ZOne V areas etc. This is why it takes time because you have to ‘sample’ most of your important tonal areas in the scene. Realistically this is more practical for static subjects and ideally works on the ‘ground glass’ of a Large format camera using a flash meter probe :) I do use spot metering if the subject mater is affected by highly specular light sources like backlighting and such. For fast moving subjects center-weighted or Evaluative/Matrix metering is preferred.
Why not center-weighted? Lets say you are takign shots of the B&G in the shdes behidn a tree wiht the sun beidn them. If say the sun (a very strong specular light sources) peeks behind the trees, the center-weighted metering more likely would now be affected by this ray of sunlight. This would BIAS your metering and it would be fooled by the sunlight. If you used a spot meter and meter say for the B&G’s faces, the metering system won’t be fooled by this ray of light peeking behind the tree.
BUT you have to make tests and evaluations on HOW your camera and lenses registers an image for ecah of this matering type. This is the part where you have to know HOW your particular camera and lenses react to your metering system. This means loking at how it evaluates ‘the Zones’ and how your lenses too affects the tonal rendition. There is no excuse for getting surprises with your equipment so you have to actually make evaluations and tests for your existing equipment and new ones too.
I hope this answers your questions. Tot Ziens!
Thank you, Arnold and Neil – your patience is truely appreciated – I think I’m finally beginning to see the light ;-)
Arnold – Amazon.com does not operate from within South Africa, I’ve seen them only in the USA and UK – but I’m too clueless and scared to use a credit card for online ordering from abroad. Wonder if Neil can do something from that side about SA’s online stores (kalahari.net, for example) not listing his book yet. I emailed them to complain, but haven’t heard anything.
Oh yes! now i see the light too! ; )
What a great illustration and breakdown of practical zone metering usage :D Wonderful.
this is the best article about photography i’ve read in the web! thanks a lot guys for being so generous :)
wonderful article and now easy to put into practice…thankyou!
I’ve watched 6 of those 7 videos so far, and the video series does explain the zone system in a very good way. The material confirms what Neil has been doing all along: Under ambient light, if the relevant detailed/textured tone is white, Neil has mentioned that he usually starts at +1.7 to +2 exposure on his Nikon. For Caucasian skin (textured highlight), he starts at +0.7 exposure. Now if I look at a scene that has mixed colors, I’ll have a better idea of what to meter for a baseline (or using a gray card or white towel to anchor the meter)
I finished watching all those videos, and it deals with using the zone system on ambient light. It doesn’t cover how the zone system works with flash as the dominant light source (despite part 7’s caption mentioning fill flash, and not actually talking about it), so this blog article explains that part.
FYI: One of the Tangents forum users discovered that Vimeo has removed those videos about the zone system. Apparently, the content came from a DVD called “Perfect Exposure” by photographer Tim Cooper.
I am glad people still find this one still informative. I have not seen the videos referenced above. I guess this would be easier to demonstrate ‘live’ or in video form since the thought process and procedure isn’t complicated by words :)
I have learnt more in your tutorials than i’ve done in five years of wondering where i have been going wrong! Thank you so much :-)
You’re awesome! I discovered your site yesterday and it has already helped me understand so much! Thanks
Great article! It really cleared up a couple of problem areas for me. Isn’t it amazing that with all the technology and advances in equipment, light stays constant and the rules stay the same?
Great article! One question I’m a bit confused by the following:
“How do you do a Zone V exposure for a Zone VII-VIII area? With B&W film, by overexposing for 1.7 to 2 stops (+1.7/+2.0). Alternatively you can do a Zone V exposure for a Zone III area by underexposing for 2 stops (-2.0).”
Isn’t it the other way round i.e. underexpose to shift VII-VIII to V?
Thanks
No :) The light meters ‘sees’ the world/scene as middle gray (Zone V) hence to expose for ‘textured highlights’ (Zone VII-VIII), the ‘overexpose’ term here is used in the context of an aperture/shutter speed change rather than an ’emulsion exposure’ change. I think this is where you are getting confused. I should have clarified that one and I am sorry for not doing that, I thought it was clear that the context being discussed was exposure change rather than change in the way film responds to the amount of light it receives.
To clarify further, it is all again about ‘tonal placement’, to place a ‘textured highlight’ tonality the scene, you must ‘overexpose’ that part of the image by +1.7 to +2.0 stops for it to register at that tonality because of you do ‘underexpose’ it as you say, underexposing a ‘metered’ Zone V tonality by -1.7 to -2.0 stops would result in a dark image rather than a light image. I hope this clarifies it.
Hi Arnold, Thanks for the clarification and quick response!
I re-read and realise now you were specifically talking about spot metering on zone VII-VIII which (as you say) would give you a combination of aperture/shutter that would result in these tones exposing as Zone V (zero on the metering scale). Therefore you must bump up the exposure by 1.7 to +2.0 to place these tones “correctly”.
I was still thinking about one of the previous sections where, based on the reference shot, the VII-VIII zones in the background were being underexposed to shift them down to IV-V.
Definitely a few “aha” moments in this article!
Thanks again,
Andrew
Ahh I am glad (and Neil as well I hope) that you had an ‘aha’ moment since that helps enormously in moving forward to understanding concepts. You must try to pre-visualize in tones what you want to capture through tonal placement and the job is half-way done.