Nikon D3 camera settings – custom settings
The Nikon D3 brought incredible image quality to the usual reliability of their cameras and unbeatable optical quality of their lenses. The multitude of settings make the D3 a high-precision camera that can be configured in a personal way, depending on shooting style.
When my D3 first arrived, it was with huge excitement that I unpacked it, fired off a few frames just for the thrill of hearing the shutter whir by in continuous high-speed drive … and then proceeded to change the settings to my preferences with Nikon cameras. So here is an overview of my preferences for the D3, and the settings that I changed immediately upon getting the camera out of the box:
Playback Menu:
Display mode – Highlights enabled.
It is absolutely essential to have the highlights enabled as part of an exposure metering method.
Image Review – On
Shooting Menu:
File naming
I need all my cameras to have a unique file name. It makes post-production workflow simpler if the images already have a unique name directly out of the camera.
Image Quality – RAW
Really, JPG isn’t an option for me.
NEF (RAW) recording
– Lossless compressed RAW
– 12-bit depth
I chose 12-bit depth over 14 bits (for now), even though some tests (such as this thoughtful consideration by Bob Johnson) show that using 14 bits give slightly better shadow detail.
My Menu:
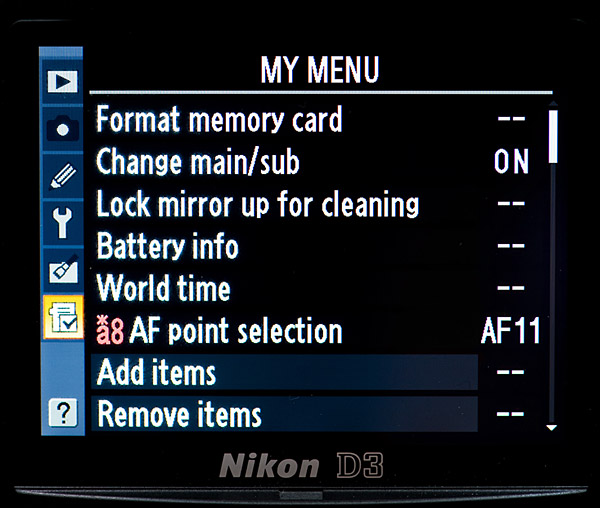
- Format Memory Card
It is useful to have this setting immediately available when formatting numerous cards. (Although I have to say that due to my paranoia, I never format a card while on a shoot. Always before the time as part of the preparation for a shoot.)
- change main / sub
After so many years of shooting with Canon D-SLRs, I have a hard time adapting to having the shutter dial on the rear, and the aperture on the front. So for more instinctive shooting habits right now, I have the shutter dial and aperture dials swapped around from the Nikon default.
- Lock mirror up for cleaning
- Battery info
- World time
These are just general house-keeping settings that I like having grouped together.
- CF a8 – AF point selection
I constantly flip between the 51 point and 11 point selection, although I most often keep the camera to 11 points selection.
Custom Settings Menu:
a1 .. AF-C priority selection
AF-C is the Continuous Focusing mode, where the shutter can be tripped whether the subject is in focus or not, ie, Release Priority. With this setting, you can turn AF-C into Focus Priority.
default : Release button (ie, FPS is maintained),
my preference : default
With this custom setting the photographer now has a very powerful option – to change the usual behavior of AF-C mode in only tripping the shutter when the subject is in focus. Although I’m not sure that is how most photographers would want to use Continuous Focusing, I find it reassuring that the camera will only trip once the subject is in focus.
more info on Nikon focusing modes – Nikon D300 / D700 / D3
a3 .. Dynamic AF area
With this setting the number of AF points can be selected.
default : 9 points,
my preference : 51 points (3D-tracking).
The 51 point, 3-D tracking mode works amazingly well in tracking moving objects when shooting in AF-C (servo mode), and setting the Auto Focus mode to Dynamic Area (the center selection).
more info on Nikon focusing modes – Nikon D300 / D700 / D3
a8 .. AF point selection
This option allows you to choose either 51 or 11 AF points for manual focus-point selection.
default : 51 points,
my preference : both.
I flip between the two selections, so have this custom function accessible in the My Menu option.
a9 .. AF-ON button
Customize the function of the AF-ON button.
default : AF-ON,
my preference : AF lock only.
I prefer using the shutter button to auto-focus and then lock-and-hold focus, instead of using the AF-On button. I don’t use AE lock feature since I shoot nearly exclusively in manual exposure mode, but at times I do want to lock my focus separately from the shutter button, and therefore I have this custom function set this way.
b1 .. ISO sensitivity step value – 1/3rd stop increments
b2 .. EV steps for exposure control – 1/3rd stop increments
b3 .. Exposure comp / fine tune – 1/3rd stop increments
Keeping your exposure controls in 1/3rd stop increments allow for finer tuning of exposure.
c4 .. Monitor Off delay
With this setting you control how long the LCD display stays up.
default : 20 secs,
my preference : 1 min.
I like seeing what I just photographed, and also, the histogram and blinking highlights are indispensable tools. Therefore I *need* to chimp. Having a much longer LCD display time helps.
d5 .. Control Panel / Viewfinder
With this you dictate whether you see your ISO setting or Exposures Remaining in the rear control LCD, and whether you see Frame Count or Exposures Remaining in the viewfinder.
Viewfinder Display:
default : Frame Count,
my preference : Exposures Remaining.
I’m not interested in my frame count while shooting, but the Exposures Remaining is directly useful information I need to see in the viewfinder.
d7 .. LCD illumination
This option controls whether the LCD lights up only when the power switch is rotated to the lamp position, or when any button is pressed.
default : Off,
my preference : On.
I most often work in dim areas, and I want to be able to read my LCD without having to precisely select the Lamp button. With this function selected, the LCD will light up whenever I hit any of the camera controls. It just makes it easier for me when the LCD lights up as soon as I handle the camera – then it doesn’t become an extra control that I have to push.
e3 .. Flash sync speed
This option controls whether Auto FP (High-Speed Flash Sync) is automatically enabled for shutter speeds over max sync speed.
default : 1/250th
my preference : 1/250th Auto FP.
I do know that the flash’s range is halved by going into Auto FP mode, and therefore stay at 1/250th or below if I need the most output from my speedlight. But I also like the option of not hitting that ceiling of 1/250th if for some reason I need to go to a higher shutter speed while using an on-camera speedlight.
f1 .. Multi selector center button
With this custom function, the operation of the center button of the multi-selector is defined for the Shooting Mode and Playback Mode.
Shooting Mode :
default : Select center AF point,
my preference : default
I like the default here over the other choice (Illuminate AF area), since this allows me to instantly re-select the center autofocus sensor if I have been using another focusing sensor instead.
Playback Mode :
default : Thumbnail on/off,
my preference : Zoom on/off.
I really like to be able to see a higher magnification of the image. And with the way the joystick works of the multi-selector, it is easy enough to move to any part of the image. Sweet!
f4 .. Assign FUNC. button
This option allows a variety of functions to be assigned to the FUNC button. It is in settings like this, that helps make the D3 shine as a powerful tool for the photographer.
FUNC button press
– default : none
– my preference : Flash Off (the Speedlight is disabled
This setting is entirely personal preference, since there are a variety of options here that could be put to great use by different photographers. I like the idea of instantaneously being able to disable the flash by pressing the FUNC button, instead of having to pull my eye away from the viewfinder to switch the Speedlight off.
f5 .. Assign preview button
With this control, you set what the action that preview button will perform. It has a similar set of possibilities as the FUNC button.
Preview button press
– my preference : Spot-metering
f6 .. Assign AE-L / AF-L button
Similarly here, with this button you set whether the AE-L / AF-L button performs the default function of locking exposure and focus, or any of the other options, similar to that of the FUNC button.
I use this button to disable my flash. Originally I used the Func button, but it gave me an awkward hold on the camera when I used my ring finger to keep the button in. Much easier for me now is to use the AE-L / AF-L button to disable the flash.
f9 .. No memory card ?
This option disables the shutter release if there is no CF card.
default : Enable release,
my recommendation : Release locked.
Changing away from default makes a lot of sense. You really don’t want to get in to a situation where you think you are capturing images, but in fact aren’t. Of course, if you shoot tethered, this might be an option for you.
f10 .. Reverse indicators
With this custom setting, the direction of the exposure meter display in the camera can be changed.
default: + —0— –
my preference: – —0— +
This has long bugged me that the Nikon metering displays are non-intuitive about their direction. I know the intention is that the metering display shows the way the controls should be turned, but it still makes more sense to have the + on the right-hand side for display. That’s the way we are trained to see an increase, or a plus.
Hello Neil
Thanks for posting your settings, this is a great read and has made me review my own settings. One setting that I recentley switched to however has made me wish I had used it from the beginning.
I find that I keep the camera in af-c mode at all times, hit the af-on buton to focus and shutter release to meter and take the shot. By using this method, I can choose to tap the of-on once and shoot shot after shot of a static subject and not worry about refocusing, or hold the af-on button for continual focuse. This method really combines the af-s and af-c button into one function and then the ae-l/af-l button is used for exposure lock.
I could never go back to using the shutter button for autofocus after using this method.
hi neil-
wow!!! with your talent and with that camera, i fear that nothing now can stand in your way. =) i’m glad that you’re enjoying your camera.
again, thanks for being such an inspiration and especially for being grounded and humble.
happy new year!!!
//ed pingol
gongrats on your new book. I notice that you will be in Albany ny in may. It is only a 3 hour drive from Montreal. I may drop a few $000 s and get of work and drive south. I am sure you don`t need assistance as your beautiful assistant at Hoboken was quite capable but it might be nice for me to touch base late afternoon and perhaps goin youir group for supper … show you some of my work but most importantly ask you the many procedure questions i am gathering.
Ps the framed photo on the book cover is not squared .. so it IS your style as i see many off angle shots.
i am starting to shoot photos of a beautiful med dark black beauty
I will e mail you some shots but i assume you use only experienced models for the work shop.
i shall call you next week. best wishes for the new year
Ron lemish Lph. 3533
Thank you for your tips i have been a photographer for a long time , more old school (still shooting dig as if i am shooting E6 fillm). I would really love it if you could give some tips on how to sett the internal settings of the camera to get better results instead of having to go through the process of trying to fix everything in light room or the PS bridge.
EG set up better colour sharpness etc from the d3 as i still think its a great camera
thanks
Joseph,
To get better ‘in camera’ results you would need to be shooting Jpeg only, since no matter what (apart from White Balance, Exposure) if in RAW the other settings do not affect your final RAW file.
The only thing you will see a change would be on the LCD as that’s the jpeg embedded in the RAW you are viewing.
So, on that context, if shooting jpeg, you can change all the settings you want in the jpeg format settings like Sharpness, Saturation, Color, Contrast.
Obviously the only problem with that you would need to be ‘bang on’ with your settings as there’s not much latitude to work with from jpeg in terms of bringing back highlights, WB.
Being a wedding photographer there’s no way I would even dream of shooting jpeg personally (still shoot jpeg for happy snaps) and the fact that RAW means what it says, you are working with the raw ingredients you still need to then adjust color, sharpness, etc. to get the crisper image associated with jpegs.
There is no shortcut to good quality I am afraid.
Dear Neil,
Hope this quick mail finds you -Family-health -Photography business all doing well.
Just read your brilliant 2008 settings for the Nikon D3 , I know it’s now an old DSLR.
But as a Keen Nikon Man all day long & keen amateur > now I am shooting with my D600 body and using my Used D3 as a backup or mainly for sniping portraits with my 70-200. (2.8 lens)
How can I get my colours as good as the D600?
I know that it’s now and old sensor and the New processors are more advanced with Nikon amazing technology.
I wonder what your in camera colour settings would be for this camera? As you didn’t mention this in your write up?
For weddings and portraits would you select Neutral or vivid ?would you up the sharpening ? Would you bring down the saturation?
I know you prefer to respond as mention but a quick email of your preferences would help as I would like to get the best skin tones and simular colours to the D600.
I sometimes shoot mix raced couples , and the odd dark skinned Indian origin and some Couples from the Caribbean.
I would appreciate your professional take on this great camera Picture control settings that you feel
Thanking you for your brilliant review back in the day
Blessings & regards
Will in London UK
Shoot in RAW, then you have more choice in how the final image will look.
Then the choice between Neutral and Vivid is moot. Makes no difference.