how to carry your camera over your shoulder
An interesting comment came up in the article on choice of lenses for wedding photography. The observation was that the photographer, Lou, felt like he was the proverbial bull in a china shop when he carried two cameras over his shoulder. With the lenses protruding on either side, it was tough going through doorways without knocking something.
There are numerous camera strap solutions available on the market – rapid straps and holster systems. Most of them work well. I still like the old-fashioned camera strap on the camera. One thing I should mention here is that I really got to like the way the Canon bodies work. Attaching the strap to the bottom of the camera makes absolute sense. Then the camera dangles vertically, and it is easy to swipe the camera to the side under your elbow when it hangs from your shoulder.
I liked this so much that I got thise Camdapter plate to attach to the bottom of my Nikon bodies. This allows my Nikon cameras also to dangle vertically from my shoulder. Perfect. If I had to choose from scratch again, I’d probably settle for the Kirk plate. This too has a place for the camera strap to loop around, at the bottom of the camera. Perfect.
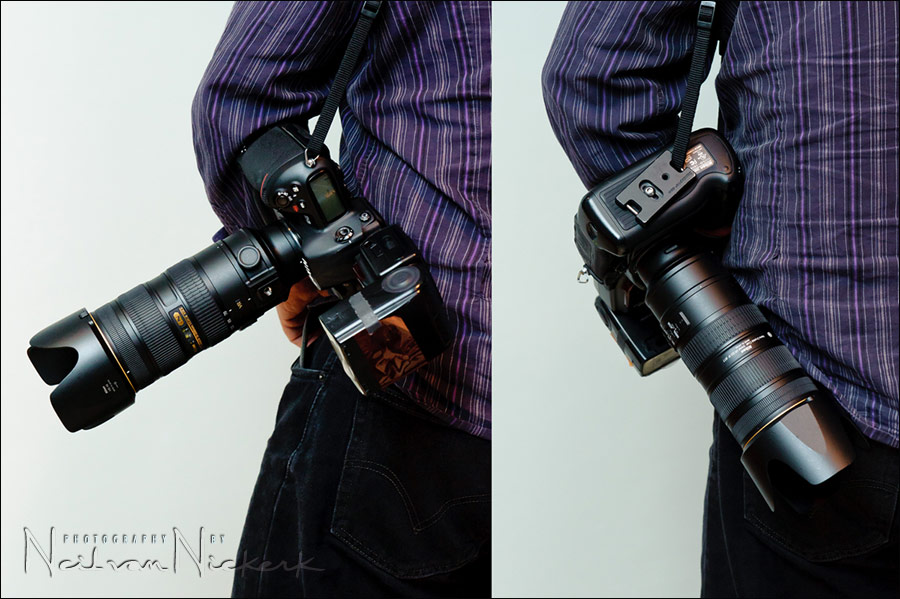
Now, it might not be immediately obvious when you pick the camera up and hoist it over your shoulder, but there are two ways to sling the camera …
You can have the lens dangling outwards, catching on everything, and knocking stuff over, and smacking little kids in the face … or you can turn the camera around, and tuck it behind your body under your elbow. Out of the way. Simple, and less of a hazard to people around you, and less of a danger to your own equipment.
I have already a hand strap, but I used it only for my hand, never thought further (reading the older post, I see I’m not the only one). Thanks to you, I can have it now hanging on the shoulders, too. Nice tip!
I have this problem. I never thought to turn the camera around.
Don’t you have to turn the camera around to shoot or do you shoot from that position?
Stephen .. just try it, and see how easily you can slide the camera into position in your hands.
I’ve gone a little overboard with my carrying “system”:
I’m not a very big guy (tall, but thin) and I never felt comfortable with a normal camera strap over a shoulder. I was always paranoid it would slip off, as I’m not affluent enough to replace busted cameras on a moments notice. The idea of carrying two cameras in such a manner gives me the heebiejeebies.
I’ve got a rapid strap dual-strap, and a spider holster two camera system. Both of these can be broken down into single-camera systems at will, though the spider holster takes a bit of time. The camera’s weight sits on your hips when not in use, and the straps provide drop protection. The belt also keeps the cameras from swinging around too much while walking.
The downside? You end up looking like some sort of mercenary with all the straps and belts. Probably not practical for extremely formal situations, though I’ve managed to make it work with a 3-piece suit (sans jacket). However, I felt that it was worth while to keep my back from killing me, and the straps provided a good place to hang flash battery packs (SD-9 knockoffs from flashzebra/cheetastand).
Hi Lance
Just read your comment , I was looking at getting a Second SD-9 for my flash.
How has (SD-9 knockoffs from flashzebra/cheetastand ) been working for you?
Lou
Hi Neil
I only have one thing to say about this posting.
D’oh!
Lou Recine
Lou,
I don’t have an actual SD-9 to compare them to, but they both seem to be fine from my perspective:
Each is slightly different from the other, I’ve got one of each. The power connector on each is identical, the battery tray on each is a bit different from the other. The tray from one *will not* fit the other. They both come with a softcase that has a snap closure on one end (battery tray end) and a velcro closure on the other. They both have a web on the back for threading a belt, each is of a similar style (could be threaded on the belt upright, or lying on it’s side). I forget what the brands are exactly, but I believe the version sold by cheetastand is branded “Pixel”. I can’t recall the brand on the other. The Pixel branded one’s softcase has no other external bits, but the one I got from flashzebra has a sort of strap on the front. I havn’t really found a use for it yet, but that one’s case does seem to fit a little more snug than the one from Pixel (cheetastand). I put sanyo eneloop’s in both of mine, and I shot all of my sister’s wedding rehearsal, formals, the ceremony, and most of the reception on a single pack. (Thanks to Neil for the site, I wouldn’t have been up to such a task without his desire to teach!) I did have to switch out to a new pack for the last half of the reception though. I think that speaks more to shooting style, number of photos, and the batteries than it does to the function of the battery pack/container itself though.
They’re essentially chinese knockoffs, but they function perfectly well. The pixel branded one has easier to see ‘recharging the flash’ lights on the top than the one I got from flashzebra; it’s hidden on one side sort of under the flap, opposite the cord. While there are minor differences, they’re basically the same thing. If I remember there’s also about a $10 price difference in flashzebra’s favor.
I only carry one camera body (not a photographer.)
I have always attached both of the camera straps to the same side of the camera body.
(Usually the right.)
That way the lens hangs behind my back or down my right leg.
I hold the right side of the camera body in my right hand, ready to raise the camera and take a photo.
It’s quick to bring up to my eye and doesn’t bump into things.
This requires a modification to ‘purist’ photography technique.
In order to shoot portrait orientation, the right side of the camera body is down, not up
I’ve been using a camdapter for this purpose for the last couple of years… It’s nice to see a respected name suggesting this accessory.
I found that the strap, when connected to the usual lugs, was simply getting in my way when I was shooting in portrait orientation. Sure, having a grip gave me a button in the right place, but the strap kept falling across my face. Moving the straps to the same side of the camera, the “down” side when held in portrait orientation, eliminates this problem.
Camdapter now has an L plate for the Manfrotto quick release, as well…
I’ve got both the R-Strap and one of these. https://www.kickstarter.com/projects/customslr/c-loop-camera-strap-mount-solution
Both work great, but the latter lets you continue using your existing camera strap if you like.
R-Strap Sports, here… Bought it two weeks ago, ran around for 5 days in Spanish Barcelona with a D300 + 18-200 Combo for 6-8hours a day.
Man, what a joy it was! ;-)
Roel
Hi Neil,
I just took my camera out and tried to put over my left shoulder as shown in the example pictures. It does feel weird to me initially. When I bring the camera up, the battery grip is “upside down”, so my right hand isn’t immediately able to grab the grip. I can readjust quickly, but the shoulder strap falls off my shoulder. But I guess if one is shooting at a steady pace at an event, the strap does not need to be on the shoulder at that point. It’s something I’ll just get used to.
Thanks for this post and reply.
Stephen, you’ll have to work on the Ninja moves there.
With the camera slung like that over your left shoulder, bring your left hand up to your shoulder with your left thumb under the strap on your shoulder … and slide your thumb down, closer to your camera. Now pull forward on the strap, and let the camera swing sideways and forward of your body … just in the right place for you to grab it with your right hand. With a bit of practice it becomes an easy reflexive move. No struggling.
I’m using the Black Rapid Double system for one year now, works great unless you’ll have some blanco shots from the battery grip button hitting my waist.
In my field as an extreme sports photographer – on the water – I have made my own slings which are a simple loop of seat belt webbing over the shoulder and fixed to the underside of the camera by a quick release hook into a stainless steel ring bolt (yachting fitting!) The thread of the ring bolt is fitted with an O ring which assists in securing it to the camera. This together with the hand strap ensures the safety of my two cameras – both working from a high speed chase boat or a helicopter. The cameras are free to slide over the loop. The straps being over the shoulder eliminate the load on the neck – which can be considerable when pounding over a wave. Contact me if you would like a pic of this very simple system. [email protected]
Protip: use prime lenses. Your neck, back and shoulders will thank you. Hehe :D
Except by the time I add enough prime lenses to cover what I do with zooms, my knees would buckle. Or, I’d spend too much time rifling through my camera bag. Zooms are just much more convenient for how I shoot.
Hey Neil,
Not sure if you have covered this someplace else. Do you shoot with two different camera setups 70-200 on one cam and 24-70 on another? If you do that, then do you just have other camera on other shoulder? around your neck? Thanks
Ray
I use two cameras. One has the 24-70 and the other has the 70-200 f2.8 on it.
Both are slung around my shoulders …. I did buy a Spider Holster recently, but couldn’t adapt to them.
Neil,
I own the Spider Holster, but I bought the attachment extra so it fits the ‘Think Tanks’ Steriod Belt, much wider, more comfortable and the camera hangs perfectly like the old cowboy’s sixgun-in-a-holster.
Balances great, and ohhhh so much more easier than that strap biting into your shoulder all day.
I can bend, twist, kneel down with the D3s+70-200+Flash on it no problem, with no dragging weight on shoulder.
Trev
Trev,
How long have you been using the Spider Holster? My concern with this and similar products like the R-strap is all the equipment weight is on the screw mount of the battery grip/bottom of the camera. It’s been said that Nikon didn’t really design that mount to handle that much weight. It’s a single point of failure. The camdapter at least distributes the weight between the screw mount an the shoulder hook.
Stephen,
The plate that goes onto the bottom of the camera fits snugly over the leading edge of the camera body and is fairly large surface [with extra screw holes to attach other stuff also, like an extra bracket for my Pocket Wizard Plus IIs], and since it fits this way, it’s weight is distributed more evenly, no different to the camdapter, or putting the camera on a tripod, then pick up that tripod with the camera ‘hanging off’ when carried horizontally.
The actual plate is bevelled on that leading edge towards the camera front, so it fits slightly over the rounded edge of the camera body very neatly.
I have had not had any problem at all, and it’s so much easier to carry than over the shoulder, weight, ease.
The camera does swing a bit more ‘loosely’ when walking, but if you angle and set up the pin in the correct place [you can change where the pin itself goes] in the plate, it fits snugly against your leg when walking and it’s easy enough just to put your hand on the body when you need to walk.
Here is some shots [flash slide] of the plate and what it looks like fitted.
https://spiderholster.com/product-category/spiderpro/
Trev.
Trev,
Thanks for explaining further. I might get this in the future then.
I bought the Spider Holster, tried it … and it just isn’t something that feels comfortable or that I’d be able to adapt to. So I’m selling it again. Oh well.
Especially in studio, we like the one arm through, with your dominant arm out. You would be pulling the camera over in your shooting hand much like you would pull a sword out of its sheath. Especially convenient when working with kids and you need both hands at any second during your shoot. Just what works for me.
This is using a traditional padded strap.