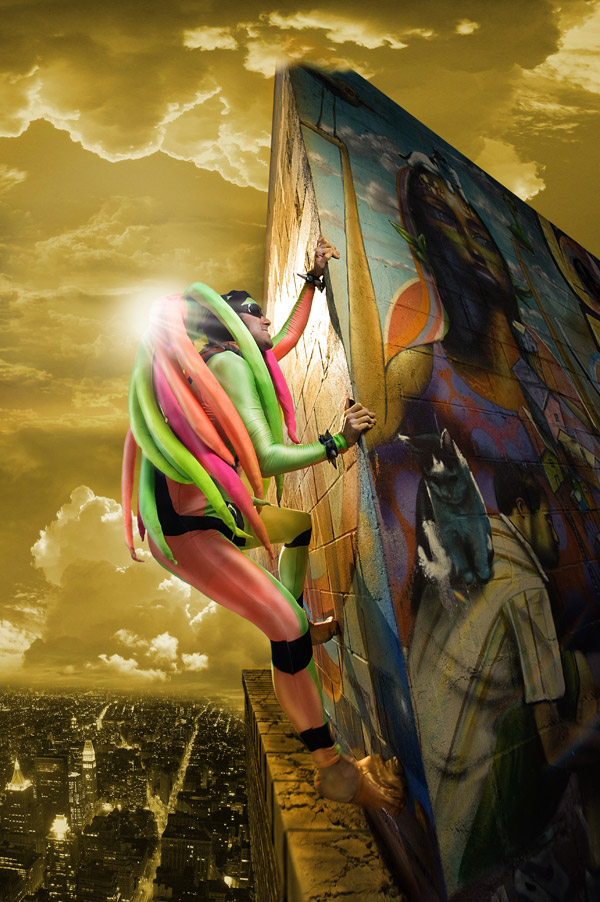
I’m happy to announce the winner of the Photoshop contest from last week. The winning entry was submitted by Hanssel Galeano, and he will receive the $50 B&H voucher for this effort.
Before I let Hanssel explain his process in editing the image,
here is the original again for comparison …
I’m so happy I won! Ok like I told you in my e-mail I’m a photoshop amateur and so I don’t know how to explain what I did in a “guru” way, but I’ll give it a try.
First thing I did was to go to www.morguefile.com to find some pictures that I needed. This was based on the idea that you had for the picture: “the tall building and the character climbing it”. Then I placed the character and the wall in a separate layer (1st layer) since I wanted that to be the main scene in the composition. I placed a picture of a balcony behind him to create the illusion of a ledge. I then erased everything that we don’t need, by using a layer mask – a non destructive approach.
Then I placed different pictures of clouds on the background making sure that the light and shape of clouds matched – not just putting one on top of the other but doing a “puzzle” and made sure that all the pieces were in the right place. Then I looked for a city to create the illusion of a tall building. That was the hardest part since the picture had to match the perspective in which your picture was taken. Since I live in New York, the city had to be New York. When I found it, I placed it behind the “fist Layer” and the “clouds layer”. I made sure the horizon in the city and the clouds matched and looked like “one picture”. You do that by playing with the brush size; the hardness of the brush and opacity.
Since there was flare on top of the character, I had to make sure that the light coming from the clouds matched the same point of origin as the one of top of him. Next I created flare behind him by picking a color from the brightest part of the clouds to matched the color of the sun. You paint it and make sure it fades with the clouds and not only a big circle as a source.
In the original picture the sun cast rays on top of him so I had to recreate some and make them bigger. You do that by grabbing the “polygonal lasso tool” and follow every ray of sun that comes from behind him and just make them longer. Then with your selection in place or the “marching ants” active, you pick the gradient tool using the same color that you use for the “sun ” or the bright source behind him, and drag it from the “sun” to the end of your selection. Do that for the rest of the rays.
Since the picture of him and the wall was in one layer and the “ledge” in a separate layer I didn’t like the way it matched, I went to the original image and selected part of the sidewalk because I like the texture it had and I thought that it will look good as part of the ledge and gave the illusion that for a long time nobody had being there and it was his “secret hideout”. (I’m sorry if that sound so cheesy, but I had to think about a whole concept for the picture.)
Now I started working on the character and pay attention to detail, I fixed the hole in his costume, the broken wall and any chipped paint. I wanted the character with a little more punch and to make the costume “shine”. I used the burn and dodge tool to enhance the brightness on the costume and make the darker areas a little bit darker. That creates the illusion of a “glossier material”. Finally I use a “hue / saturation adjustment layer” to the whole scene to integrate everything as a one photograph. I painted a orange reflection on the wall matching the rays of the sun bouncing from the sun and hitting the wall and consequently the character. Anything to unify the picture.
The last step was to sharpen the image to make it more interesting. I hope that the explanation was helpful and that I didn’t miss any steps, is easier when I do it that when I have to explain.
Hanssel Galeano
Congratulations! Very nice.
Very cool!!
Wow, it looks great!
Wow, that’s pretty good!
The heights of image manipulation?
Very nice Hanssel, great job! I wish I was a Photoshop amateur like you.
I think you might be better than you think at this, very creative and nice work!
PRINT IT, SELL IT!
Congratulations Hanssel, you have done an outstanding job. Can you, or Neil, recommend a good book to learn how to perform these techniques in Photoshop?
I want to thank everybody for the comments, I love photoshop and I love photography and everyday I try to learn something new in both fields, for Alfredo Medina and his request for a book to learn photoshop techniques, I bought a book many years ago and until now I keep reading it for ideas “the photoshop 6 wow book” by Linnea Dayton and Jack Davis; and the internet.
Thanks Hanssel. I’ve already ordered from Amazon the book “The Photoshop Wow Book” in its latest edition, 2010.