Photoshop tips – avoiding moiré when resizing
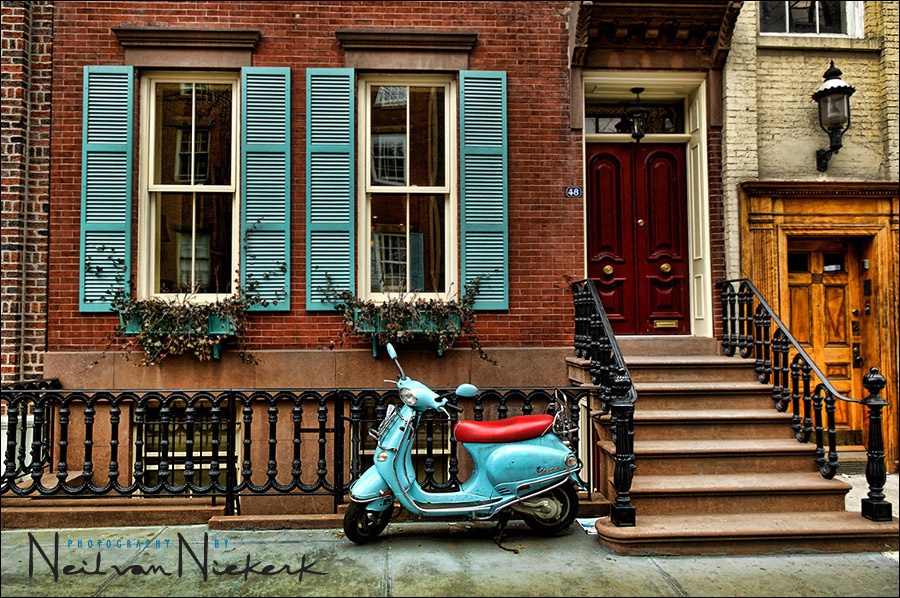
When you resize an image with repetitive patterns, you stand the chance that the pattern itself will form another pattern. This is called moiré. When I resized this image for web display, I had to take care to make sure the blue window shutters didn’t generate a moiré pattern.
By going from the original 12 megapizel image (4288 pixels wide), directly down to 600 pixels in a single adjustment ..
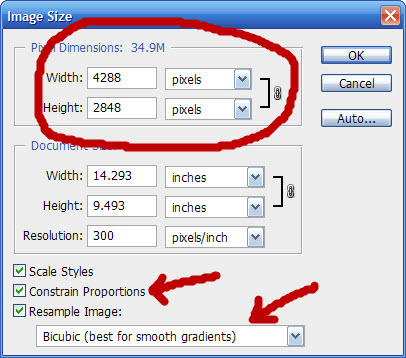
.. I get an image where the detail looks like this:
You can see the moiré pattern there in the blue window blinds as a diagonal shaded pattern. You run the risk of this happening if you do a massive jump in resizing in one go.
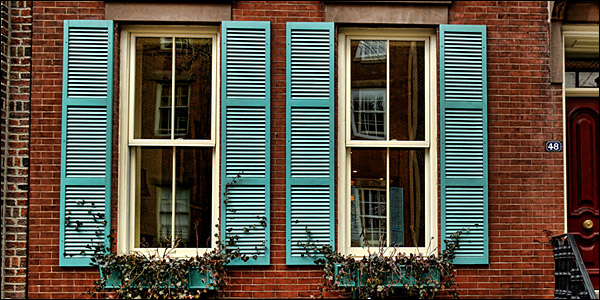
But by doing the resizing as 10% reduction steps, you can most often avoid that. Here is how it looks when resized as a sequence of resizing steps:
Instead of changing the pixel dimension from 4288 pixels right down to 600 pixels wide, instead do it as approximately 10% jumps in size. You would now change from 4288 pixels (as an example), 3900 pixels wide. And from there you would change to 3500 pixels, all the way down to the size you want your image to be. The diagonal moiré pattern has now been nearly completely eliminated.
Sharpening an image (as you have to when you resize an image for web use), also enhances the pattern. Therefore, with this image, I removed the sharpening for the window shutters to further reduce the effect.
Of course, doing this kind of step-by-step resizing, is best done as an action. You can create your own, or use one of the many available on the internet. The best actions also provide some sharpening as an intermediate step for best results.
A little bit about the post-processing of the image …
For this image, I used Topaz Adjust as my post-production enhancement. Specifically the Spicify tool. I ran this at the default settings, and at 100% opacity. I then changed the Levels a little bit as a final step, to make the image a touch darker.
Here is the original image, pre-Topaz:
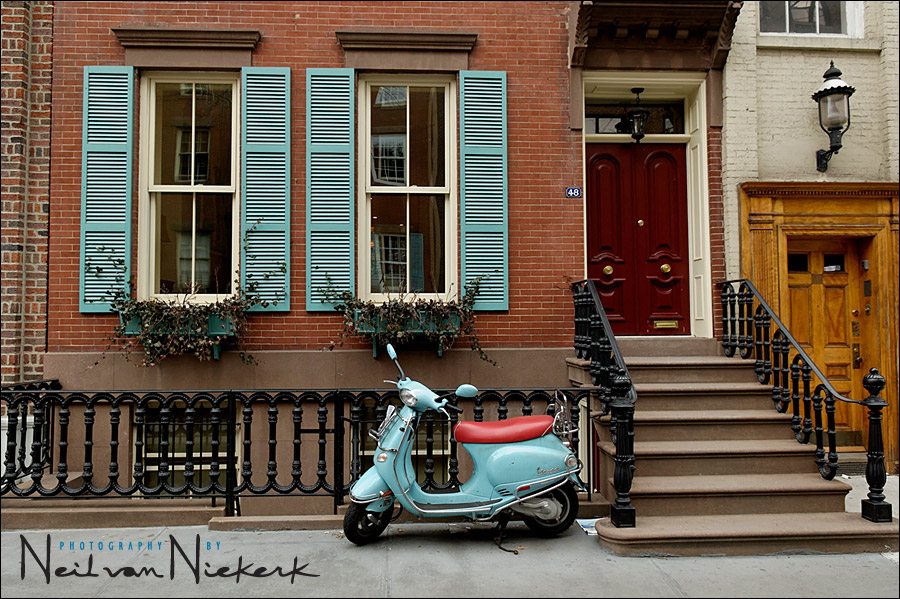
And here is the image with a little bit of Photoshop Fairy dust, courtesy of the Spicify tool in Topaz Adjust:
This was a very easy adjust with Topaz, to give some needed snap to the image.
I like the Spicify tool. Really brings out the details in the brick.
Nice work, i must look at the Topaz adjust, ps I love your site. Thanks for sharing.
Neil,
thanks for the tip, but specially for the beautiful picture. It’s love at first sight.
The cyan-blue balance between the Vespa (motorbike) and the windows covers is excellent. The yellow door on the right hand side pulls the eyes delivering motion to the full picture.
Hi Neil,Rather an exciting way to start your new year.BTW can you create an action to do these small jumps? otherwise It will take a long time to do it manually?
Michael
Hi Neil,
Out of interest what happens if you halve the resolution a few times instead of 10% steps? Does that still produce moiré? I notice the 10% steps also reduce fine details in the brick work.
I also notice that the Topaz adjust enhances a slight remaining cyan diagonal moiré pattern (going in the other direction) what is your thoughts on masking the blinds before applying the Topaz adjust?
One last question, does Topaz adjust produce similar results to the Clarity slider when developing a RAW using either ACR or Lightroom?
Thank you for your time.
Kind regards,
David
would you consider this resized image (600px) to be facebook ready too? I notice that you do get reasonable good quality to your pics on FB. mine just screwes up everytime. The warm tones on skin tones gets lost once uploaded on FB.
Hi again, Neil! I looked here for advices about resize photos for web (of course, for gallery and portofolio in personal site-Flash at this moment). I didn’t find any; please, could you help me with that? Personally, I can’t resize a jpeg at maximum quality less than 400-500Kb. I use 1 action (keeping Exif, even I don’t need) that give sharpness, too, but I didn’t make it either in Photoshop-resize for web. Should I drop down the quality? Cause your 150Kb photos are looking very good, even you are not using, I guess, so much sharpness. Thank you so much!
Hi Aniversari,
There is a great set of actions from the website “The Light’s Right” [TLR] of various things.
There is a great set of resizing actions one of which I modified my own adding a further step to make sure the action opened the ‘Image Size’ dialogue box and changed the resolution to 72 pixels/inch for web/screen viewing.
There are Upsizing and Downsizing actions, including even set Crop presets if you want to crop images to a particular size.
Comes with a text file of instructions and what’s included in the action.
Actions from:
The action is for CS versions in purple link at bottom of this page.
Have a look around in there also, lots of other actions you may like.
If you have Lightroom, you can also resize down very easily with correct output for web based images. I prefer just running a Batch Action on a folder of selected images so I can simply walk away and come back later when done.
Cheers,
Trev.
PS: Sorry, cannot edit previous post, but yes, the action resizes Up/Down are in 10% increments as Neil explained at top of post to give a much better result.
Trev
Trev, thank you for answer, you are very kind. I will give a try, I have a feeling it’s gonna be fine, and little steps will result in a smaller final size. Anyway, reading again all posts above, I’m more confident.
I just encountered a real-life example of where a picture of a building, made of very regular strips of metal, would indeed show heavy Moiré patterns or aliasing when resized in one step. I remembered your post and tried the step-wise reduction and sure enough, it worked. It got me thinking and I’d like to share another method. Not necessarily better or worse, but another trick for in the bag.
Essentially, the issue is that too little surrounding pixels are taken into account when the image is resized. Intuitively, you would expect that if you resize your image by a factor of 10, every pixel in the resized image should be some kind of average over a 10×10 block of pixels. Unfortunately, this is beyond the capability of the Image Size command. I don’t know the details of the inner workings of Photoshop, so don’t pin me on this, but usual block sizes are 1×1 pixels (nearest neighbor), 2×2 pixels (bilinear) and 4×4 pixels (bicubic). This explains why Neil’s method of reducing the image size in steps works: you’re effectively enlarging the area over which the destination pixel’s value is determined, beyond the 4×4 block limitation. (To see this, imagine a block of 2×2 pixels that are the result of a first reduction step. Assume that each pixel in the block comes from a 4×4 block of pixels in the original image, that was non-overlapping with the other blocks of the remaining pixels. You could simply reduce the image again, even using the bilinear algorithm, and you effectively have averaged the final pixel from a 16×16 block of pixels).
Neil’s method works fine, and an action script is a good solution to prevent doing repetitive stuff. I thought of another method, which essentially ensures that the pixel values of more remote pixels (outside of the 4×4 block) are still incorporated into the averaging. The approach is very simple: apply a Gaussian blur before reducing your image. The radius of the filter should be large enough to ‘inject’ enough of the neighboring pixels into each pixel. It’s worth experimenting a bit, but I got good results for a radius of 0.3*reduction to 0.5*reduction. So, for a 10x reduction, I set my radius somewhere between 3 to 5 pixels, and then reduced my image size by a factor of 10. (For the technical-minded people, you’re essentially applying a low pass filter before downsampling).
I had one observation, and that was that the resulting image could be a bit soft. I blame the type of blur, as I wrote that ‘some kind of averaging’ is needed and Gaussian simply isn’t the optimal one. I simply fixed that with a smart sharpen pass of 100% with a radius of 0.4.
In the end, either works, but possibly this method is faster as the amount of steps can be less, depending on the size of the reduction.