I often check the websites of regular followers of the Tangents blog, and I recently noticed some interesting urban landscapes and architectural photos by Tom Kaszuba. What caught my attention about these is that these images were enhanced with high-dynamic range (HDR) processing. HDR images look bold and detailed. Quite distinctive. Sometimes though, HDR processing can appear garish and overly bold. Tom Kaszuba went for a more subtle look – detailed, yet understated. Just beautiful.
I asked Tom to share some of his technique and ideas with us with a guest blog post …
Photoshop tutorial: HDR done right
a guest post by Tom Kaszuba
I have always enjoyed HDR or “high dynamic range” photography. Images with a very wide dynamic range can bring scenes to life. The pictures seem to jump off the screen, brimming with a visual flair not seen in “conventional” photography. High dynamic range photos pack a wallop when done right.
While I saw the great potential in HDR I also saw many of these images across the web that looked garish and way overdone. Surreal, cartoonish and overcooked were just some of the things that came to mind when viewing HDR photos. They reminded me of the velvet paintings that were popular in the early 1970’s. Painful on the eyes.
Over time I have picked up bits and pieces from tutorials and articles on the web about HDR editing. HDR processing software was important. In my case I settled on Photomatix software to begin the editing process of the HDR images. While other software exists and Photoshop has it’s own built in HDR rendering tool, my personal preference is Photomatix.

The first thing I do when capturing HDR photographs is to grab the most important ingredient for the successful outcome of a great HDR image. My tripod. Then I make sure I use my remote switch to eliminate camera shake completely. The tripod, remote switch combo are the HDR shooters “must have” tools.
Now comes the actual shooting procedure …
I enjoy wide angle work in my HDR images and frequently shoot 16mm on a full frame DSLR. However, any lens will do on almost any digital camera. Once I find a scene I want to photograph I set my tripod down and frame the image. I always shoot in manual mode with HDR. Always. My preferred aperture is f/8. It gives me very sharp images with good depth of field.
With the camera firmly planted on the tripod and the remote switch in hand, I look through the viewfinder and set the exposure to dead center. That is my reference point. From that point I shoot at least 5 exposures one stop apart. In most cases however I have been shooting 7 frames and sometimes 9 frames to get all the dynamic range I possibly can out of the scene. Better to have too many frames than too little.
I currently use a Canon 5D and three clicks of the little wheel on top of that camera is equal to one stop. Once I properly expose my reference shot I then click the wheel on my Canon three times to the left for each stop so if I wanted to do a 7 shot HDR I would roll the wheel to the left 9 clicks. That puts me at 3 stops above reference. I then take a shot. Then simply go three clicks to the right and take a shot. Three more to the right and so on until I am three stops below my reference shot. That is 7 images ready for processing.
Note: I focus my lens on the subject using autofocus. Once perfect focus is obtained I then switch the lens to manual focus so the focus stays the same for all the exposures.
Keep in mind that if you shoot a lot of HDR images, your hard drives are going to fill up much quicker than single shot photography. Also, having a relatively powerful computer with a decent amount of RAM makes life easier when working with HDR imagery.
Now it’s time to drop all those photos into your computer and start editing. As I mentioned, I use Photomatix and Photoshop for all my editing needs.
I simply look at my photos in Adobe Bridge, choose a sequence of exposures of the same image I want to develop, and then drag the files and drop them into Photomatix. I never have Photomatix do very much. I use the default settings and I only adjust the White point, Black Point and Gamma. Most times the black level slider is pulled all the way to the left and so is the white level slider. I adjust the gamma slider to the right. My goal is to get a very flat looking image that looks a bit overexposed. It’s not technically overexposed but with such high dynamic range the image will seem as such. Take a quick look at the histogram in Photomatix to make sure it is not truly overexposed.
Note: Having a flat/dull looking image is crucial at this point. It eliminates many of the aspects of HDR imagery that make what I consider bad HDR. Halos being enemy number one.
Then I save the image in a separate folder I named Pre-Finished HDR.
Then I locate that file in Bridge and right click on the photo and choose Open in Camera Raw. The important action happens in Adobe Camera Raw. It’s there where the outcome of your photo is determined.
While in Camera Raw I lower the Contrast slider dramatically and move up the Fill light slider as much as I can without posterizing any parts of the image. Again I am looking for a flat, dull and slightly overexposed looking image.
Then I hold down the Shift key in Camera Raw and open that flat looking image in Photoshop as a Smart Object (that’s why I held down the shift key). Opening the image as a Smart Object in this method is the holy grail of the technique. I will give you a sample sequence of what I did to edit the photos displayed in this article but once the Smart Object is opened in Photoshop the editing possibilities are infinite. Experimentation will assist you in achieving the look that you want.
I then go to Layer > Smart Objects > New Smart Object via Copy. Then put that top layer in Overlay mode. You will see the image start to come to life.
Then double click the the top layer and the image will reopen up in Camera Raw. Move the Saturation slider all the way to the left creating a black and white image. Hit OK and see how the image looks. Double click on the top layer again and move the Temperature and Tint sliders around to increase contrast a bit. **note** (Another alternative would be to go to the 4th tab from the left in ACR (HSL/Grayscale) and click “convert to grayscale”. Then hit OK. This really diminishes and mutes color in the image.)
If you want bold, bright colors then yet another alternative would be not to use HSL/Grayscale and go to the curves panel and increase the contrast with a slight “S” curve boosting blacks and increasing contrast in general. Then use the Vibrance slider, Saturation, Temperature, Tint, etc, to achieve the look you want. The editing possibilities are endless.
Hit OK and see how the image looks.
For the images posted here I used the HSL/Grayscale method.
So I double clicked the top layer again and in the HSL/Grayscale panel I adjusted the color sliders to add contrast. Experiment because with smart objects you can go back and re-edit as much as you like.
Choose OK in ACR and see the change it makes to the image in Photoshop. Then do the same thing to the layer under that…just tweak the image to add even more contrast.
Tip: Increasing the Blacks slider in Adobe Camera Raw a bit can really make the image pop.
Click OK in ACR again and see the changes to the image. You can do this until your heart’s content. Again, the possibilities are endless. You will get a good feel for this once you have practiced it a few times.
Flatten the layers when you’re happy with the way the photo looks.
That ends the Adobe Camera Raw and “Smart Objects” editing portion of this method. At that point you can use your personal touches to edit in Photoshop to taste. Many times I just sharpen the image in Photoshop and that finalizes the process.
I frequently do some dodging and burning to increase contrast. I also am partial to a vignetting around the corners of the image.
It may sound a bit daunting when reading all these steps. I have been doing this for a while now and I can tell you that once you follow this method a few times it’s as easy as pie. I can create an HDR image with these steps in relatively quick fashion. I enjoy the process.
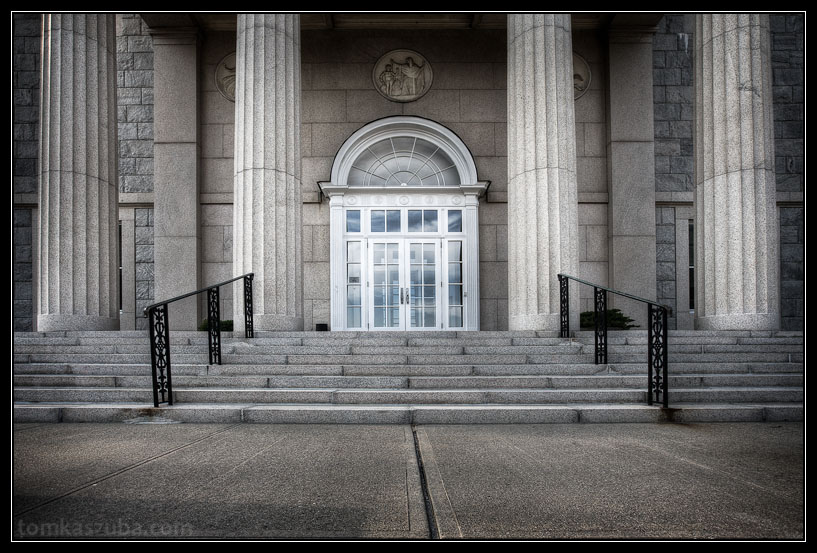
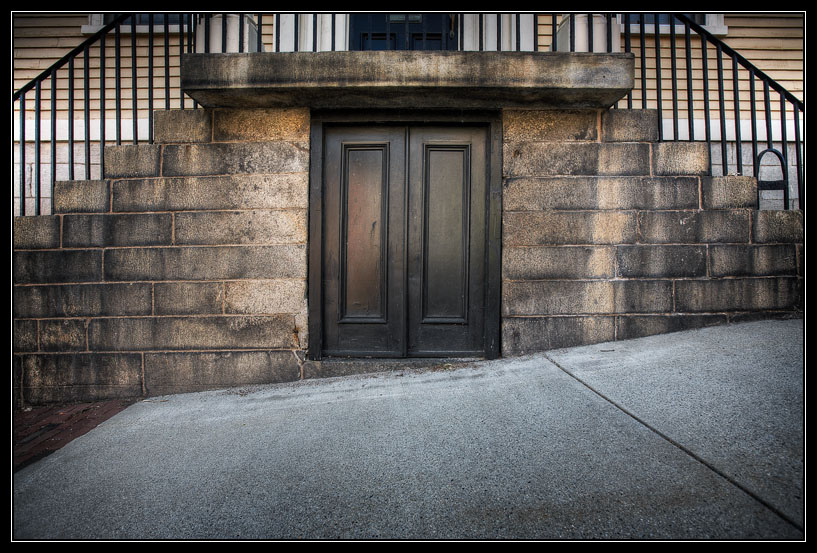
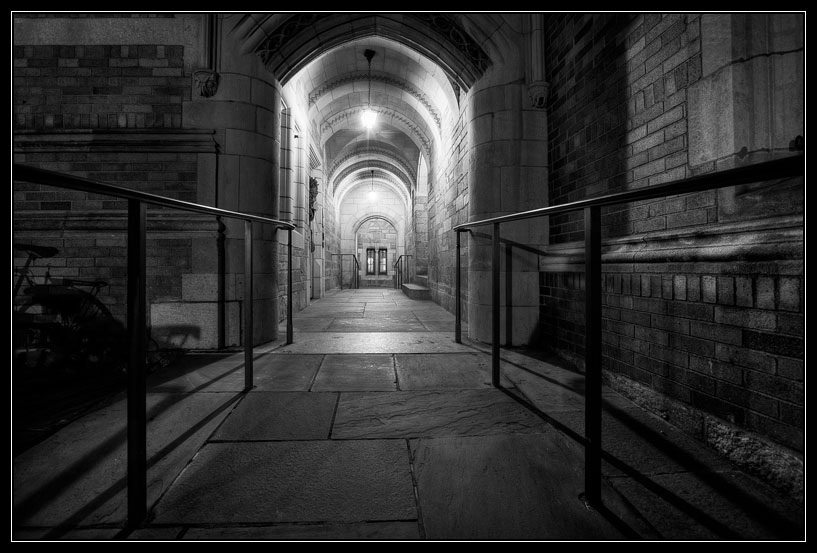
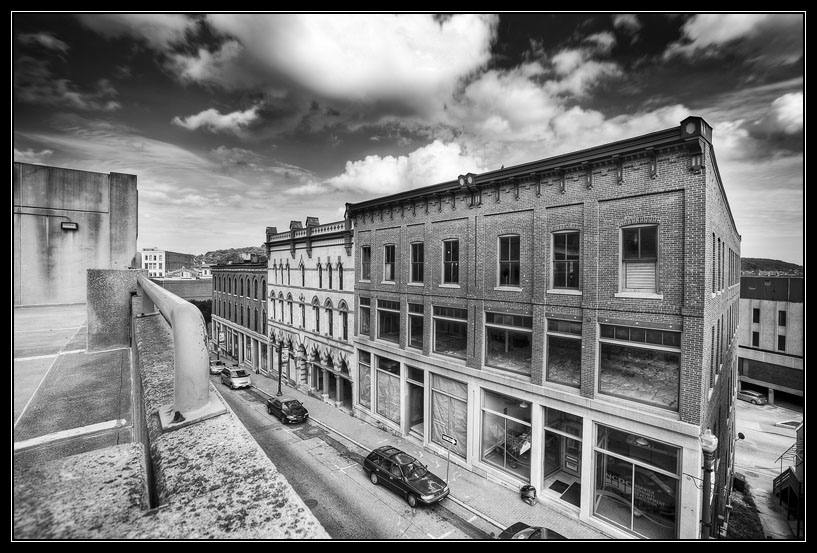
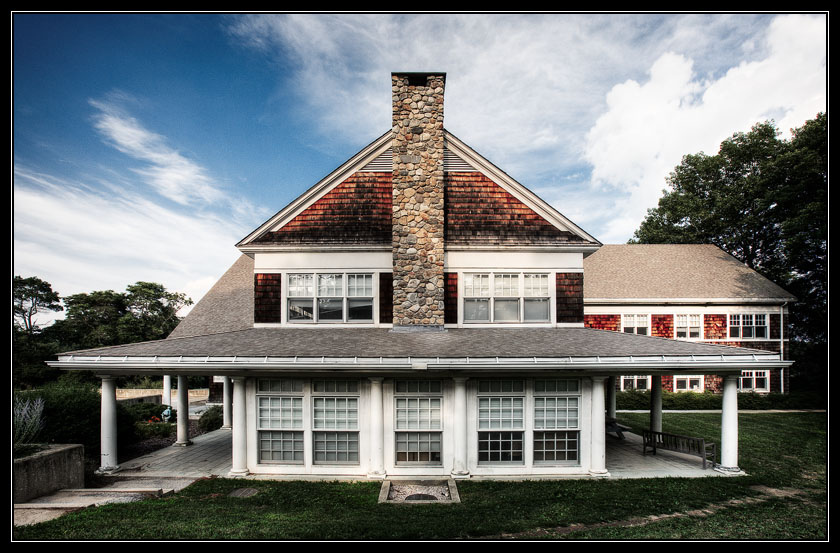
Here are a few examples of what this technique can do.
In conclusion. Some folks may wonder why someone would take 9 exposures of a scene when one good exposure would do. I have discovered that I can grind out an incredible amount of detail from multiple exposures rather than one good exposure. There is more information in an HDR image. Thus, more to work with.
I tend to make HDR photos that don’t look like HDR photos. It may seem odd but that’s what I’m aiming for. Not the garish ultra saturated images we see all the time. I like the subtle yet gritty look.
Please note that some of the subdued, muted colors in my example photos here are decisions I made in the editing process. I am color blind which may explain my reasons for these editing choices. You may wish to showcase vibrant and brilliant colors in your work.
The most important point of this article is that Using the Smart Object, ACR combination opens up an incredible amount of photo editing possibilities. In this process ACR is where that action is. That’s the place that will determine how your image comes to life.
Tom Kaszuba

Tom, this is great work. I know there’s a lot of people who share your sentiment about over-HDR – thank you for the detailed how-to.
Thanks for sharing your technique. To me, however, these images almost look like they’re computer-generated imagery (CGI).
Thanks Tom! That was some great HDR info. I attended a seminar on HDR and what I learned from you in just a few minutes simply blew away that 2 hour seminar. I’ll be putting your techniques it into practice for sure.
As always, a very special thanks goes to Neil for posting such informative, artistic and practical articles, not to mention the openness of his blog as demonstrated again by the “guest blogger”. Always such valuable lessons learned here! And that can only make you a better photographer.
Thanks Neil and Tom,
Peter Salo
Hi Tom,
I am a novice photographer. Who was looking for some good tutorials on HDR photography equivalent to Planet Neil for Portraits. Thanks to Neil and You I have got it right at my doorstep. (Planet Neil is my door to photography). I completely hated the fake look of some (most) of the images and blogs on the web. I was lookibng for something like this. It is a great article the images are just lovely and they way I was perceving it should be but didnt know how to get there
. Neil saved me few years in flash photograhy and now you saved me another few on HDR. I will start playing soon.
Another thing I am keen on is wide angle portraits. I have two little who I take pics often. So far I have taken more than 30,000 portraits of them with various nice soft back grounds.. I am begining to get bored. I am wondering if Neil you or some of the fellow readers could kinldy give me some tips or point to blogs on how to use a wide angle lens (16-24mm) for (kids) portraits. I have done a few I am liking it to an extent. As it is give a feel about the evn my kids where in / playing. But sometime it is too cluttered or their face is distored (my wife likes it too as long as she was not part of the image!).
Thanks
Arun
Tom, Neil great post – very informative. I shall be trying this technique in Ireland very soon.
Also, Neil, can I just echo some of the comments here – your blog has greatly enhanced my own photography, thanks for that! (especially the black foamy thing)
All the best
Noel
Thanks for the tips, Neil and Tom!
I just recently discovered the power of smart objects via camera raw and blending modes (been watching a lot of tutorials!), but hadn’t though to use the techniques for HDR.
Neil, how do you feel about HDR? I know a lot of pro’s think it is gimmicky, but that is probably because a lot of people don’t process the images very well, making them look more like neon signs or old saints with halos than anything. Do you personally shoot HDRs, or do you like the more “purist” approach? (judging by your thoughts about natural light purists, I think I know the answer).
Steve
Awesome. Thank you, both!
Tom, thanks for the guest post. I like that your HDR photos are normal photos and not overly processed like the typical HDR photo. Good stuff.
Tom,
Are your tripod and thumbscrews completely rock solid? Your scrollwheel may be better than the one on my camera body, but even when using a remote to trigger the shutter, I can tell there was a hairsbreadth shift in my camera position when I’m lining things up in post. Short of bringing a laptop into the field and remotely controlling one’s camera, do you have some method of pushing buttons and turning wheels that doesn’t disturb your camera body, or do you just grin and bear the imperfections?
this is great! I can’t wait to try it. I love the subtle HDR images where you can’t tell it’s HDR.
Tom… you know I love your work! Reading about the process makes me appreciate it even more. Excellent tutorial. I’ve tended to shy away from HDR processing but you’ve inspired me with your tasteful, talented use of it. Thank you and congrats on having your work showcased.
Tom your work stands out in the crowd of HDR photographers, you truly have master this art. Thank you for sharing your techniques with us all.
Wow!! I’m usually not a HUGE fan of HDR or landscape/architectural photography, but you’ve made me change my view. I am ready to go outside and take some pictures of my shed now :) These images are spectacular!
Great stuff Tom. I particularly like the muted browns on the first image.
Just to be clear, when you use Photomatix, are you tone mapping or do you use exposure fusion? I assume the former. I played around with this a bit tonight and struggled to get a decent result. Posting an example of your flat overexposed starting point would be helpful.
Thanks
Anthony
Hi Tom, I got a bit lost on the PS part since I don’t use it much. Just wondering why you didn’t do the complete tone mapping etc in Photomatix? Wouldn’t it be easier to do it all in one hit?
For a while now I’ve hated HDR photography. All for the reasons that you mentioned at the beginning of your article. I now have a new-found appreciation for it. Thanks!
Thanks Tom for the quick response and the example. Not sure if I’m missing something in Photomatix – if I Generate HDR, there are no white / black / gamma tools. I have to go to the 2nd step of Tone Mapping to see those.
Having seen your example, I think I was going too far with the gamma.
Anthony
Tom
Great tutorial and enjoyed browsing your blog
As opposed to Vals question and your explanation that you aim for a flat image out of Photomatix, could you not get that out of Photoshops HDR function, I have CS5 now which is supposed to have made improvements in HDR processing although maybe not as good as Photomatix.
Seeing as you add a lot of the contrast via smart objects in PS made me wonder if this would work as well
Phil
Hi Tom
I would like to request permission to reprint this article in Flash, the magazine of the Pretoria Photographic Society, please. Circulation 100, to members and sponsors.
Thanks
Tony Roberts
Hello Tom, those pics are wonderful.HDR well done,at last :).As I imagined Photomatix is only the beginning of the creative process,and there’s a need of other “tools” to get a proper HDR image.One question,I got lost in the Camera RAW/Photoshop switch,and thus my images still suck.Maybe is because I used jpeg pics? [my camera doesn’t record RAW]
Thanks,yet again!
Gorka.
Thank you,Tom.I’m really looking forward to buy a brand new Canon DSLR,and have another go at your method.I love the first and last of your pics :)
Neil,
Thanks for sharing this article on your site, I think it compliments your articles well.
Hard to find good HDR, but when it’s good, it’s good….
-Bob
Tom,have you tried command line tools such as “dcraw”,”zero noise” and “tufuse” to do all the image blending?.I’m new to them but it’s very easy to get natural looking HDR images with little effort.Moreover,noise levels are reeeeally low,which is quite extraordinary.
This tutorial by Guillermo Luijk explains it all:
http://translate.google.com/translate?u=http://www.guillermoluijk.com/tutorial/zeronoise/index.htm&langpair=es|en&hl=EN&ie=UTF-8
Gorka,
I am not familiar with this technique. I thank you for pointing it out to me. It looks very interesting.
Tom K.
Tom,if you wanna try another options to Photomatix,here it is a free GUI for tufuse.Simply drag and drop your TIFF files and click “enfuse it” button.Afterwards apply a proper tone mapping with your favourite program [Photoshop,Lightroom,etc].It couldn’t be any simpler :)
http://software.bergmark.com/enfuseGUI/Main.html
Looks pretty cool Gorka. I’ll give it a whirl.
Tom, fantastic tutorial, thanks. When I look at the examples, I see that you are doing incredible stuff with HDR.
Really love these. Such great work in bringing out the details, but not looking overdone. I will reconsider trying some HDR myself after reading this. Thanks, such a great article!
Your results are outstanding. Thank you for sharing your method. I’m keen to experiment a little. Can I please clarify: When you save the ‘Pre-Finished HDR’ in Photomatix are you saving as a jpg, 8 bit or 16 bit tff?
Thank you SD Smart. The “Pre-Finished HDR” is saved as a 16 bit tif file.
Hi Tom.
I like your method for HDR but I get the colors are not very real. I do not get good color as your images.
Two questions:
1-When you make adjustments in the top layer in ACR are seeing in black and white, because you have saturation at -100 (or HSL / Grayscale). Then click OK to see the result in color in Photoshop. Is this OK?
2-I do not understand when you say “Then do the Same thing to the layer under that … just tweak the image to add even more contrast.”
Thanks.
Vicente J.,
The colors I am getting in the examples above are muted. This is due to the top layer being in Black & White and the bottom layer being in color.
Basically with the top layer being Black and White and the bottom layer being color the Overlay mode blends the two layers together which in this case reduces the color by half.
I’m colorblind and it’s easy for me to work with this method as opposed to getting full “natural” color.
As far as tweaking the layer under the Black & White layer…..that is done to do things such as adding a bit more contrast or perhaps making the image a bit brighter or darker.
Once you get the hang of this method it will open a world of possibilities for you to experiment with.
Best of luck to you,
Tom K.
This is the best article on HDR I have found to date. But I only use Photoshop Elements so the reference to Smart Objects goes over my head. Can you help a peasant to produce a work flow that gives the same results as yours?
Barry
Barry,
I have never worked with Photoshop Elements so I am at a loss as to how to approach this problem.
Best of luck.
Tom K.