Post-processing workflow: Removing color banding in photos
Photographing people in the studio against a darker background, I’ve been plagued with banding problems. Some of it had to do with the limitation of working in an 8-bit environment in Photoshop. As described in this article – how to deal with color banding – a work-around was to editing images as TIFF, and thereby skipping a few steps where I would previously just have edited the JPG. The additional info in the TIFF file minimized color banding.
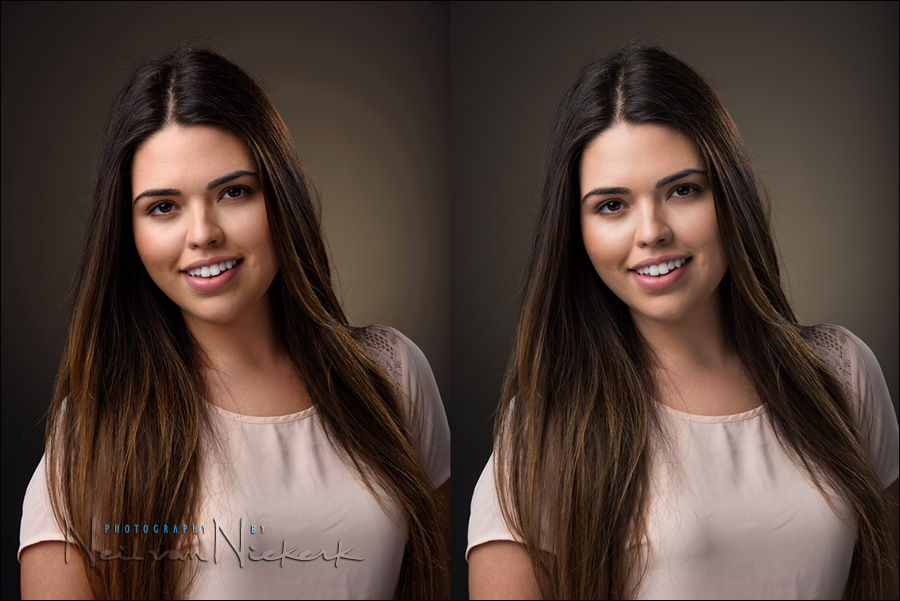
But then with darker backgrounds which have a bit of color in them, the problem still cropped up, as shown in the left-hand image. Then I stumbled on the cause of the problem – the camera profile in ACR / Lightroom.
At some point I had changed the camera profile away from the default – Adobe Standard – to Camera Standard. I liked the added contrast and saturation (as can be seen in the comparison above.) But this unknowingly, come at a cost – increased color banding in smooth transitions in darker tones. This isn’t something you’d notice in the background if it consisted of a landscape or an urban scene. But the moment you have smooth gradients of darker tones, this problem rears its ugly head.
It’s as simple a solution as that – keep the camera profile in ACR / Lightroom to Adobe Standard. Or, if you use a different flavor via one of the profiles you purchase, just be aware that this could be a problem.
I wanted to share this, since I spent an entire morning on Photoshop tutorials on dealing with color banding – none of which worked in this example. All it took was going back to the root – the camera profile used in editing the RAW files. If you see color banding in your photos, then perhaps, perhaps the solution is as simple as this.
Edited to add: The images were shot with the Nikon D810.
Great tip! Didn’t know that one, and color banding is a bugger to get rid of. If all else fails, one other option is to go to the Canon DPP software (obviously if you are a Canon user) and process your RAW through that. It’s not workflow friendly, but it helps in a pinch.
Great to know. Thanks for sharing and possibly saving us an entire morning…or longer.
Well, the good thing about this, is that I now know how to use the “Spatter” filter, and how to add Noise, and how to use Gaussian Blur to get rid of this in other situations.
There have been recent discussions on the new Nikon D810 having issues if you use anything but Adobe Standard as well (posterization, artifacts). Sounds like you have hit upon yet another reason to be careful with the camera profile setting.
Yes, this was shot with the Nikon D810
Oh my word! Thanks for sharing this. I use a gray seamless a lot and I thought I was going to lose my mind and now it’s an easy fix!!!
Great image and great tutorial! Her skin looks great, do you mind sharing or pointing me in the right direction for skin like this?
RE. D810 Raw Conversions
Is it just me…? I think Adobe ‘should’ be paying royalties to the camera makers for their ‘RAW’ formulas ( rather then reverse engineering a ‘close enough’ approximation ) ~ we know all to well how Adobe has almost all photographers in a vice as far as software is concerned and how camera manufacturing is slowing worldwide thus making great software development increasingly too expensive for them to continue… Even Apple’s Aperture will now become defunct in favour of iPhone cloud service ( the small amount of Mac users could not support competing with Adobe ). If you allow monopolies, then it stand to reason they ( Adobe ) should be paying for the privilege! Maybe it is just me…?
I don’t know about other camera makers, but Nikon do not share this information with third parties. So not really Adobe’s fault.
I believe ‘Fuji’ is the same way, with their X series cameras. Adobe just doesn’t want to pay for these proprietary RAW formulas… opting for workarounds rather then supporting the camera makers.
The point I was trying to make was that Nikon don’t share this information with third parties, period, regardless of whether the third party want to pay for it. It’s not for sale.
I never knew that about Nikon, John. Hopefully, now that NX is nix’ed things will change for the better!
Great Tip Thanks.
Also, is the background you are using here just a dark seamless paper?
Neil, have you ever played with the Color Checker Passport by X-Rite to make accurate profiles for your gear? It’s brilliant and simple, I love it.
Neil, have you tried using color checker to get custom camera profile?
It may solve your issue.
Neil,
This tip made not only my day, but many weeks of searching the web! Thank you very much!
Colin
Makes me realize how much I was blindly accepting the Adobe Standard profile for all my professional photos. I filter my personal stuff with VSCO, which swaps in its own custom profiles, but I always noticed how images became flatter upon import. Not necessarily a bad thing if I can build the contrast back up, I suppose, but for pics that I can’t have fancy filters, it’s nice to start off with more inherent contrast.
Nice! BTW, how was this lit if you don’t mind?
Well, since you asked – here are all the lighting details.
I d guess it was lit with a beaty dish on left , a reflector on the right facing up, hair accent on the right and a strobe centered and possibly with a grid for the background…I d guess
It’s a quandary, I guess. There are some photos where Adobe Std. just isn’t accurate enough color-wise. I have nothing newer than a D700, so fortunately the other profiles (esp. the v3* variants) tend to get the job done for me.
“These updated Camera v3 beta profiles for the Nikon D3, Nikon D300, and Nikon D700 are designed to reduce banding and highlight color artifacts. They also address the “too bright” tone curve issues with the previous “v2″ version of the D3 and D700 profiles.”
https://forums.adobe.com/thread/780605?start=0&tstart=0
Neil,
Seems Adobe has released a new set of camera profiles to help correct the banding for the D810 files if you haven’t seen them yet. Here is the link to their page:
https://helpx.adobe.com/lightroom/kb/camera-standard-profile-displays-posterized.html
Chris
Ha! And there it is. Thank you!
Another fix for banding that I have found useful in the past is adding 1-2% monochromatic noise in post. Banding vanishes and it adds subtle texture to often overly smooth looking seamless backgrounds.
Hi Neil,
I’ve had the same problem in the past with a D3 (but thank you, reminded me to check my D810) and the standard Adobe profile (Particularly noticeable in B&Ws that have been pulled around a bit). The only way around it was to create a camera specific profile using a Gretag CC24. Smooth transitions all the way after that. Every camera is going to be slightly different and in the darker tones, a photon out one way or another is bound to show up eventually.
All best
Si