
software review: Capture One Pro v7 RAW Converter Tests
guest article by: Adrian
Mackay wedding photographers
(Adrian is better known as Trev in the Tangents forum)
Recently I have been trialling the Capture One Pro v7 Raw Converter to see if I could get my files better from the get-go before I started tweaking in Photoshop.
Short Verdict: Simply outstanding; makes ACR and Lightroom look very mediocre compared to Capture One Pro v7 in initial rendering of images.
Now, to be clear, I am not doing full edits within it like a lot of people do in ACR/Lightroom, etc. but basic edits like WB and Exposure, Shadows, then I export out to PSD files and tweak it in Photoshop.
The reason I wanted to try was mainly to see what sort of highlights I could retain so I experimented on several images which were well over-exposed, up to 3 full stops. The samples shown here are 2 over-exposed images and 1 very difficult image with extremely bright Highlights and very dark Shadows, shooting against the sun, seascape type image.
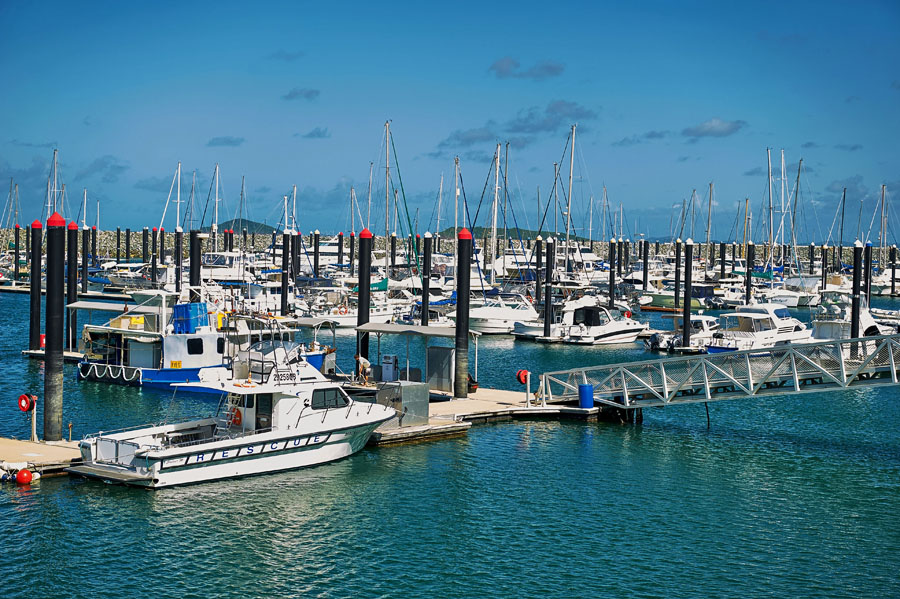
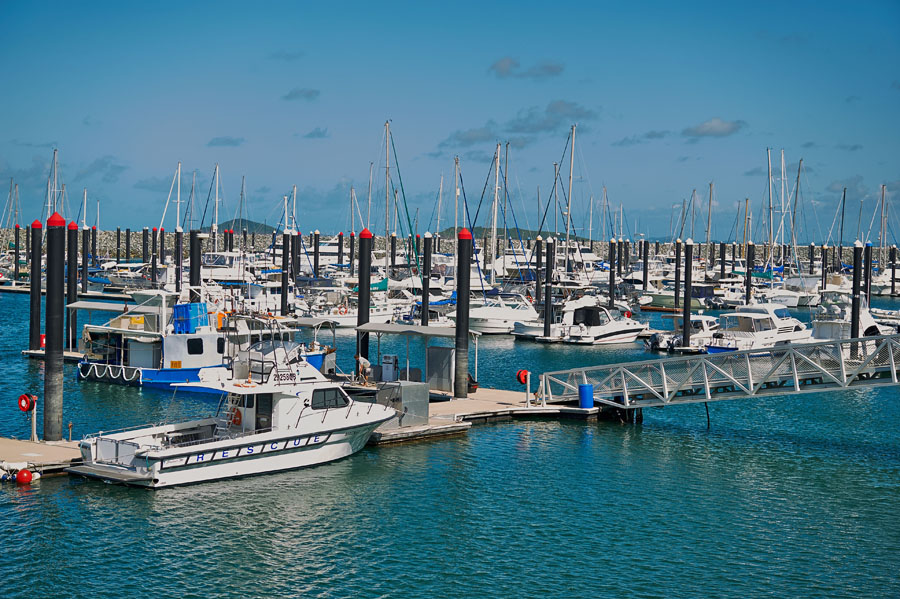
ABOVE: This is the image as edited after exporting from Capture One.
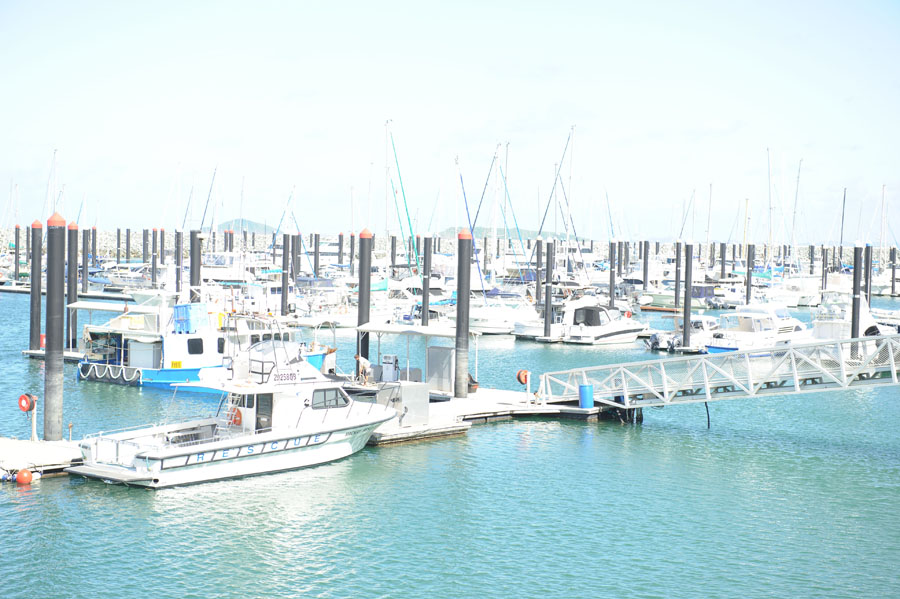
BELOW: We initially started from this +3.0 e/v over-exposed RAW file:
Upon installing the trial (you get 60 Free days) I opened it up and then had to figure out my Palettes, what was what etc. Even though I am very software orientated, it took me a couple of days to figure out stuff, and am still figuring it out.
When you start the trial there are 2 Versions of it, you have to choose between the full Pro 7 Version or an Express version. I realised very early, if I was going to get it, I needed to spring for the full Pro v7 version. (229 Euro – $315US)
‘Capture One Pro 7’ v’s ‘Express’ Version: Pro has saveable workspaces, floating window palettes (click to open image in new window) – which I was able to dock into one long Edit Tab with all the tabs I needed to finalise an image without have to click different main TABS like ACR or scroll/open tabs in LR.
With the ‘Express’ version each time you open it, it defaults back to original, and as I prefer my TABS on the right hand side and also with there being no option to save your Workspaces, it’s not ideal to my needs so I would not get that.
Also in the Express version, you cannot move the Palettes around, no floating/docking/combining options.
First Impressions:
The very first thing I noticed was the rendering of an image I had worked on a lot of times from ACR or LR from Capture One Pro v7.
Chalk and cheese. First up, the clarity of the image was so clear and the WB was so different from ACR with both on ‘As Shot’.
I noticed it’s rendering the images a lot better in terms of showing almost the perfect WB settings I had set in Nikon D3s and my Canon 1D MkIII files.
eg: Nikon D3s I set manually 5560K, in Capture One it shows Kelvin 5570 & 0.8 Tint. ACR shows 5450 & +9 Tint. Not a great deal but in the actual color it shows how I perceived the image on the back of the LCD screen initially, but in ACR it’s not warm enough.
Next, with NO sharpening applied in ACR or Capture One Pro, no contrast (apart from defaults) I found the file when viewing in Capture One was simply outstanding compared to ACR/LR.
Testing image ‘Boats’
Testing was seeing how much I could recover highlights, general settings, etc.
When comparing images here, in ACR & Capture One, the White Balance was the same, any Shadows fill I applied I did the same, Sharpening was turned OFF on both, and any Contrast was ‘Default’ in the Tonal Curves. No other adjustments done.
The 2 test images (‘Boats’ and ‘Lighthouse’) you will see here were really over-exposed by +3.0 e/v.
Below is the As Shot Image of ‘Boats’.
Next is the exported image out of ACR I went down to -3.00 e/v, and still I had some highlight warnings and the image really started to ‘muddy’ up somewhat.
I applied a Shadows of +60 in both ACR and Capture One.
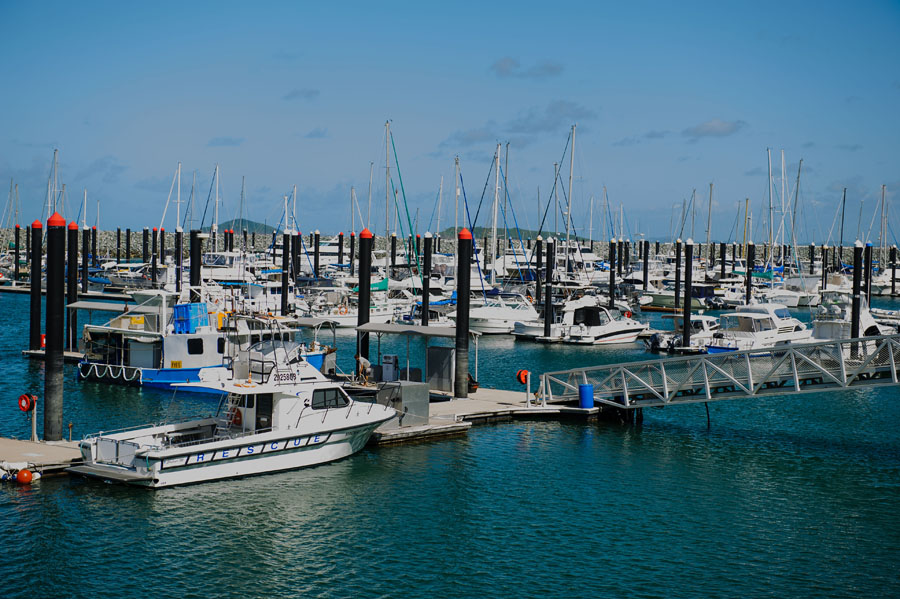
In Capture One Pro, I initially went down to -1.80 e/v and noticed all clipping disappeared, but I still took it down to the full -3.00 e/v to get more details in the whites and to compare like for like with ACR, result is amazing, look at the details you can see in the Capture One exported file, with no adjustments.
In Capture One Pro, it has a High Dynamic Range Palette, with Highlights and Shadows Sliders.
I used the +60, same as in ACR, on the Shadows and it was so much better applying opening of shadows compared to ACR it was not funny, subtle graduation of the darkest shadow, to the ¼ tones and did not affect the overall image.
Finally, I did an edit on the exported file I did from Capture One (what you see at the top of page) and here it is again:
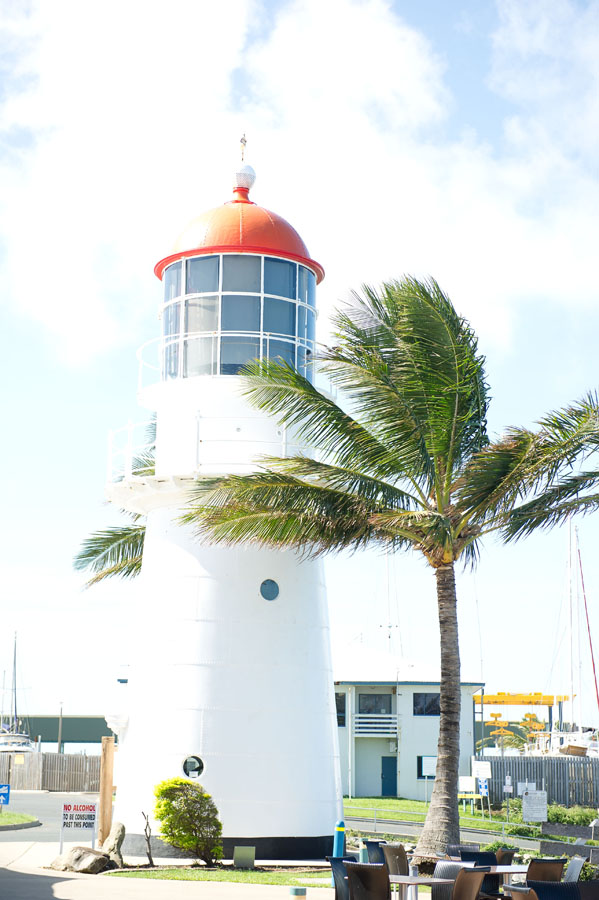
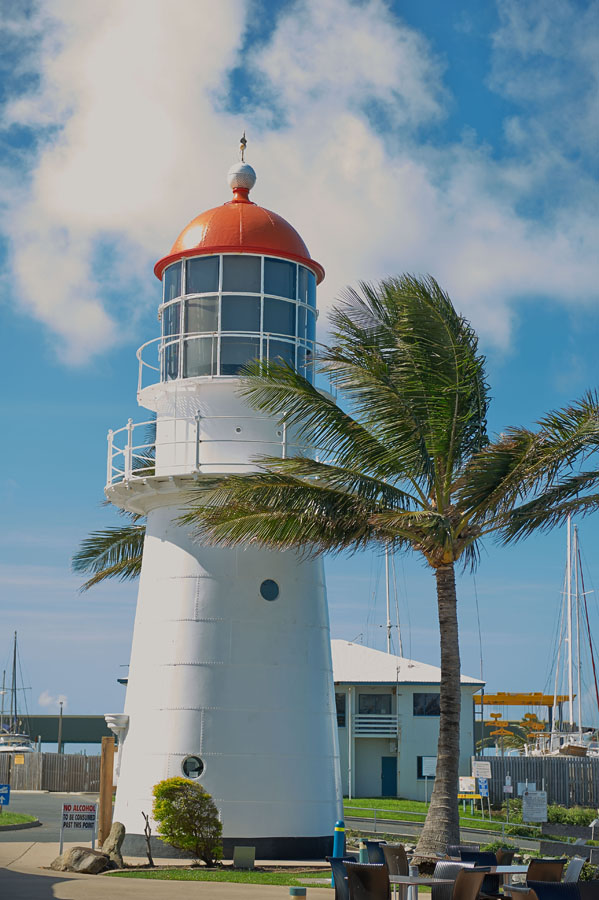
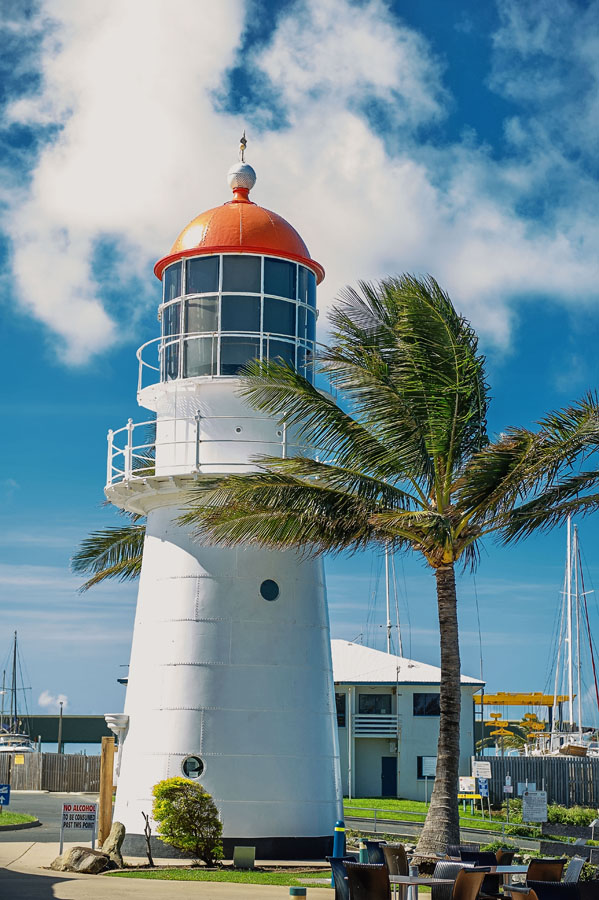
Testing image ‘Lighthouse’
Image shot over by +3.0 e/v. In ACR/Capture, settings same.
WB As Shot, Exposure down to -3.0 e/v, Shadows +60.
As shot:
As exported from ACR:
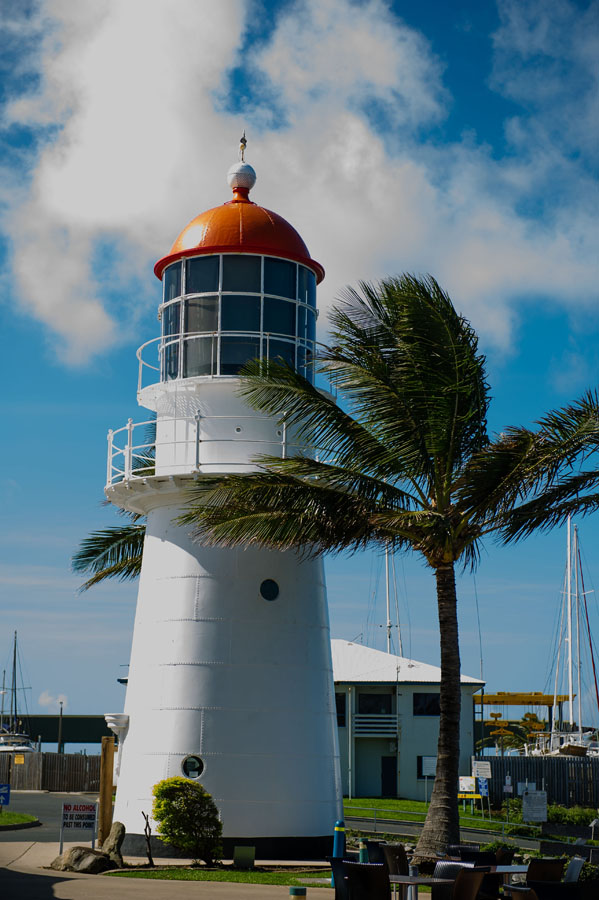
As exported from Capture One:
Final edited image:
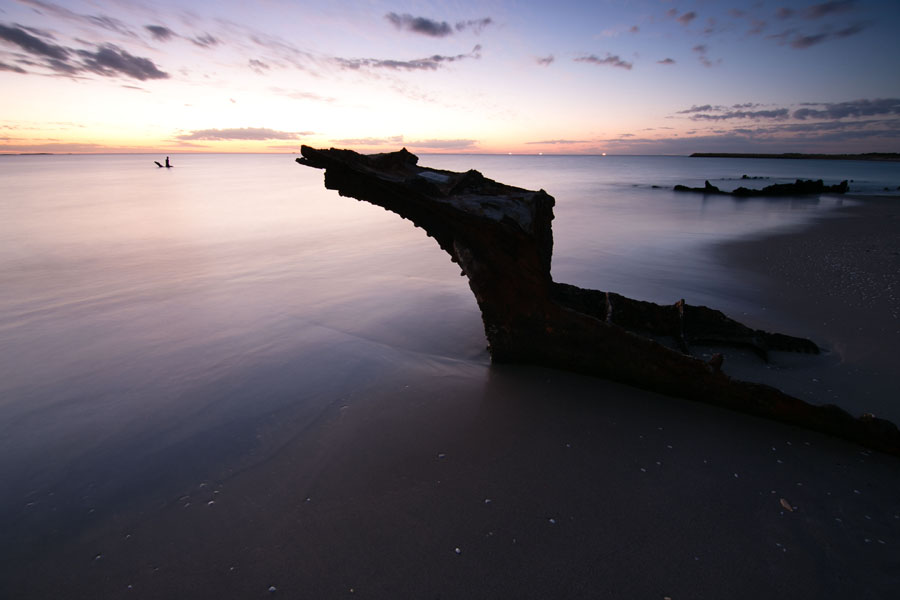
Testing image ‘Boat Wreck’
This image was kindly supplied to me by a good mate on the other side of Australia, Jon Lloyd, an avid Tangents/Forum member (jlphotocreative.com) it’s a fantastic image to work with in terms of difficulty in taking a quick shot, WB not correct to how he saw the scene when taking, shooting against the sun and then having a boat wreck with fabulous rust colours virtually in total darkness.
In other words, very bright Highlights, very dark Shadows, White Balance way off compared to the actual scene Jon says.
Here is the As Shot file:
So how did ACR and Capture One compare with this image?
ACR: This was in terms of getting some sort of ‘framework’ to then adjust the image one of the most difficult to work with, but if you did not see the Capture One version as exported, you would be forgiven for thinking that ACR did a great start point before a full edit.
Settings: While the basic WB was changed identically on each, the Shadows opened up the same on each and the Exposure brought back down to -1.70 e/v, there ended the similarity.
ACR/Capture One: WB: Temp 6500, Tint 0
Exposure: -1.70 e/v; Saturation +40
Shadows: +80
Clarity: 55
NO sharpening applied on either.
In ACR I had to really then play, increasing Darks, bringing down Highlights, increasing the Tonal Curve, increasing the Clarity, Vibrance, Saturation.
As exported out of ACR:

As exported out of Capture One:
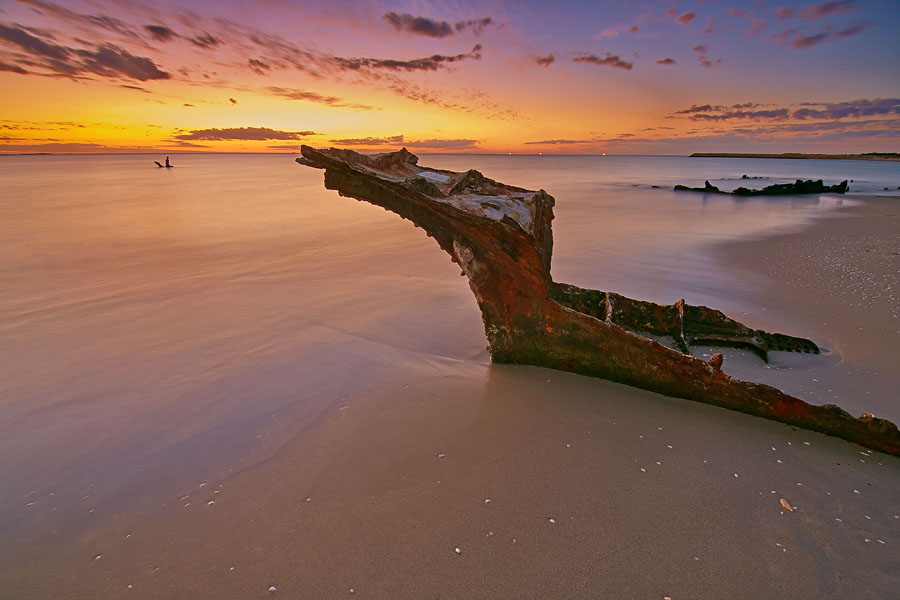
You can see there was a huge difference, in Capture One the Highlights were brought back much better, the shadows are better, the color is really much much better and the depth/clarity of the image is so much better compared to ACR.
Here is the final edited file I finished in Photoshop:
This of course is purely subjective to one’s taste and you could have hundreds of variations, but the essence of the comparison from the ‘starting point’ is chalk and cheese.
If you wanted to see a lot of the settings I used, I took snapshots of ACR/Capture One for the test images, along with the full res images you see in websize here, you can download the the high-resolution files.
Final thoughts
Simply put, it’s in a top shelf tier compared to ACR/LR.
If you are on a Mac, there is no need to purchase this program if you already have Aperture, as that is simply outstanding in terms of bringing back highlights, rendering images, etc. and it would be my personal choice anyway if I used a Mac.
Costs could be pretty prohibitive though for a lot of people, but if you are a serious professional, and you want a really top program, I personally recommend it 100% for PC based systems.
It is a steep learning curve, not intuitive if used to working with ACR/LR, but there is just too much to gain in having it from my own personal observations.
Also to clarify, I have no personal invested interests in this program whatsoever, apart from just wanting to use it.
And finally, this also just shows why you should shoot RAW. Neil’s post about shooting RAW vs JPG, certainly is a testament to that.
Of course, shooting like this deliberately would be an act of folly but it’s good to know what can be achieved in bringing back details, and in an incredibly good way, from a RAW file. Try Jpeg files, not a chance in a lifetime of trying.
In my experience one other huge quality difference between the two is working with images that have extremely saturated colors, such as neon and stage lighting. The Adobe converter tends to turn these types of images into a mushy blotchy clippy patchy over saturated mess whereas Capture One (like most other raw converters) does an infinitely better job at retaining detail.
The new processing engine in ACR/Lightroom also sometimes leads to some posterization in the blacks compared to out-of-camera JPEGs. Interestingly, even their newly released camera profiles for the Fuji X100 seem to have much better gradation in the blacks. Also, I find the out-of-the-box skin tone rendering under studio lighting everything but ideal.
I’m currently using Lightroom mostly for Workflow reasons and since the Capture1 trials have had some stability issues on my machine, but even in the DAM area LR has glaring omissions (try searching/filtering for the IPTC Extension Person Shown, setting up your own metadata field or batch copying data from one field to another without buying a plugin). Settings for virtual copies of images are not stored in the XMP but only in the catalog (ACR in Bridge and Photoshop could just ask you which virtual copy you want to open, but they don’t). And while I usually don’t do photo books, I tried the book module the other day, and it didn’t even let me change the page size to A4 for printing or PDF output, only book sizes offered by Blurb. I ended up using Hard Drive Published Collections and doing the book in InDesign with the Mini Bridge panel sorted to file creation date, which ended up being much more efficient than the book module anyway. Their web galleries still don’t have a responsive preset that works well on mobile devices without Flash. The iPad LR Mobile workflow thing should have been ready shortly after the release of the iPad, not half a year before the release of the iPad 6. Lightroom is part of a solution that has “Cloud” in the name, and yet there still isn’t a client proof/selection/ordering workflow (which is not that important to me personally, but for lots of other photographers). And LR mobile can’t even do local sync via WiFi or create virtual copies. You also need fast internet access to get files from your computer into the mobile application, which is ridiculous. And they still have no solution that would compare to Capture Pilot or the Hasselblad Phocus mobile application for photographers on commercial shoots with clients and creatives on set.
Don’t get me wrong, Lightroom has many great things to offer, but there are just a few things about it that are in dire need fixing and I have the feeling that Adobe just isn’t giving the product enough development resources. There just isn’t enough of a threat to their market dominance with the lack of significant updates to Aperture and other competing raw converters lacking the organizational features that LR and Aperture have.
Thanks Trev! Wonderful article and these samples are a fantastic testimony to the software. Nice work!!
I would certainly like to try the trial version. I use LR and was NEVER a fan.
Jen
Wow! I didn’t expect there to be such a big difference. I use ACR and its rendering is very familiar in these pictures: not too great. Capture One is worlds better. Even though I won’t probably be able to purchase Capture One just now, the wonderful thing about shooting RAW is of course that the superior rendering will be available to me even in the future. It’s nice to see that ACR isn’t the state of the art.
Is this just for MAC or is there a Windows version?
Charles,
It’s a ‘cross platform program’ meaning Windows or MAC versions available, just choose the version to suit your Operating System.
Tuomas,
Yep, sure is, did you also download the files (link in the article at the bottom of the ‘boat wreck’ samples) in full res to “really” see the differences when you save and open in Photoshop, or just even viewing.
In the ‘boats’ test files, the websized images between the Capture One Export and the final edit in Photoshop is pretty negligible in terms of details, but when viewing the full sized res files you can see it, also, the ACR export compared to the Capture One export is enormous in clarity, detail, rendering when you view the full res files.
The biggest difference though was in the ‘boat wreck’, and even viewing the low res websize files you can obviously see the exported differences.
Trev.
I wonder if moving from ACR to Capture One could solve the problems I’ve always had with Sony cameras and ACR. I could never quite get the colors right, shooting RAW with Sony NEX-5N or RX100: there’s always a greenish-brownish color cast. ACR works much better with Nikon RAW files, I’ve found.
Wow what a difference between the orignal and final picture. I’m gonna try the program and see myself how good it is. Thanks
I did write a reply to this post on my iPad – but ‘boom’ gone! Anyhoo… I have the trial version of Capture One Pro 7 and as an avid user of ACR in conjunction with PS CS6 I need to give this a spin. I can testify to the results it provides given that the sunset image is mine that Trev pulled back in this example!
I just need to spend the time actually doing a comparison before my 60 days is up and I make a decision!! It certainly seems as though it has some qualities which elevate it above ACR for shadow/highlight recovery.
Great write up Trev – you have really taken the time to pick this one apart. I have ‘the’ wedding to shoot in a couple of weeks and I can give it a whirl after that… of course the images will be perfect straight out of the camera and won’t need any editing… not!
Just a couple of notes that may be of interest:
1. I just bought the software and it seem to be half price at the moment. Should have been 229 euros, but was like 119 euros (Plus VAT that took it up to around 148 euros in total). Anyway, don’t know if it is a promotion on at the moment or how long it will last.
2. Do anyone know if there would be any difference in the rendering if you instead of NEF files use converted DNG files?
Cheers!
Regarding #2 above. If you import a DNG file it don’t seem to recognize the camera/lens used etc..so stick to NEF files (Nikon).
I own C7 Pro, Aperture 3 & LR5 (naturally ACR).
C7 Pro is probably one of the best RAW image converters since it’s inception with both Canon and Nikon files.
Aperture 3 would be a close second (very close)
LR 4 or 5 probably only popular due to having “Adobe” although good software, I find to have the lower score on over all image adjustment qualities.
For highlight and shadow adjustments plus sharpen and over exposure control, C7 Pro and Aperture have both produced better results.
I’ll agree if you are on a Mac, the C7Pro or Aperture 3 are your best choices. On Windows just based on image quality output, I would opt for C7 Pro over LR5.
All commercial work is done via C7Pro (sometimes Aperture) and all my weddings edited in Aperture 3.
Totally agree Sam, that was my initial findings when I wrote the article.
Having C7 Pro certainly runs rings around ACR/LR on PC for sure, just looking at that ship wreck with the highlight recovery on the sunset was simply superb compared to ACR (or LR, both same engines).