
Doug Fairbairn asked me about this image from a recent post on my wedding photography blog, where I showed some images from a Las Vegas destination wedding:
Great photos. I’m wondering about the lighting for the second photo – B&G and wedding party walking to camera with sun in background. How did you get so much light on their faces? Was it just reflected from the walkway or what? Too far away to use flash it would seem.
Doug .. thank you for the compliments!
About the look of that image and the way their faces are lit – this has less to do with the use of flash than it has with starting off with an image that is correctly exposed, and then tweaking it in post-production.
Two important things to note here:
– I shoot in manual exposure mode only. This gives me consistent exposure from frame to frame, and more accurate exposures. The strong back-lighting would’ve fooled any automatic metering mode.
– I shoot in RAW. This allows me all the flexibility in post-processing that I may need.
.
Let me take you through the steps that I took with this photo in post-processing:
For a comparison, here is the original image directly out of the camera:

As you’ll notice the white balance is incorrect. In this case I had the WB set to Auto, which in itself is unusual since I normally prefer the WB to be set to one of the presets like Daylight or Cloudy. Changing the WB to a pleasant white balance is easy in raw workflow, with no loss of info.
Also, because of the sun directly hitting the front element of the lens, there is flare and the contrast is reduced. This also needs to be fixed during post-processing.
Here is a screenshot of what my default ACR settings look like with that image pulled into ACR.
(Click on the image to get the larger image and see the actual slider settings.)
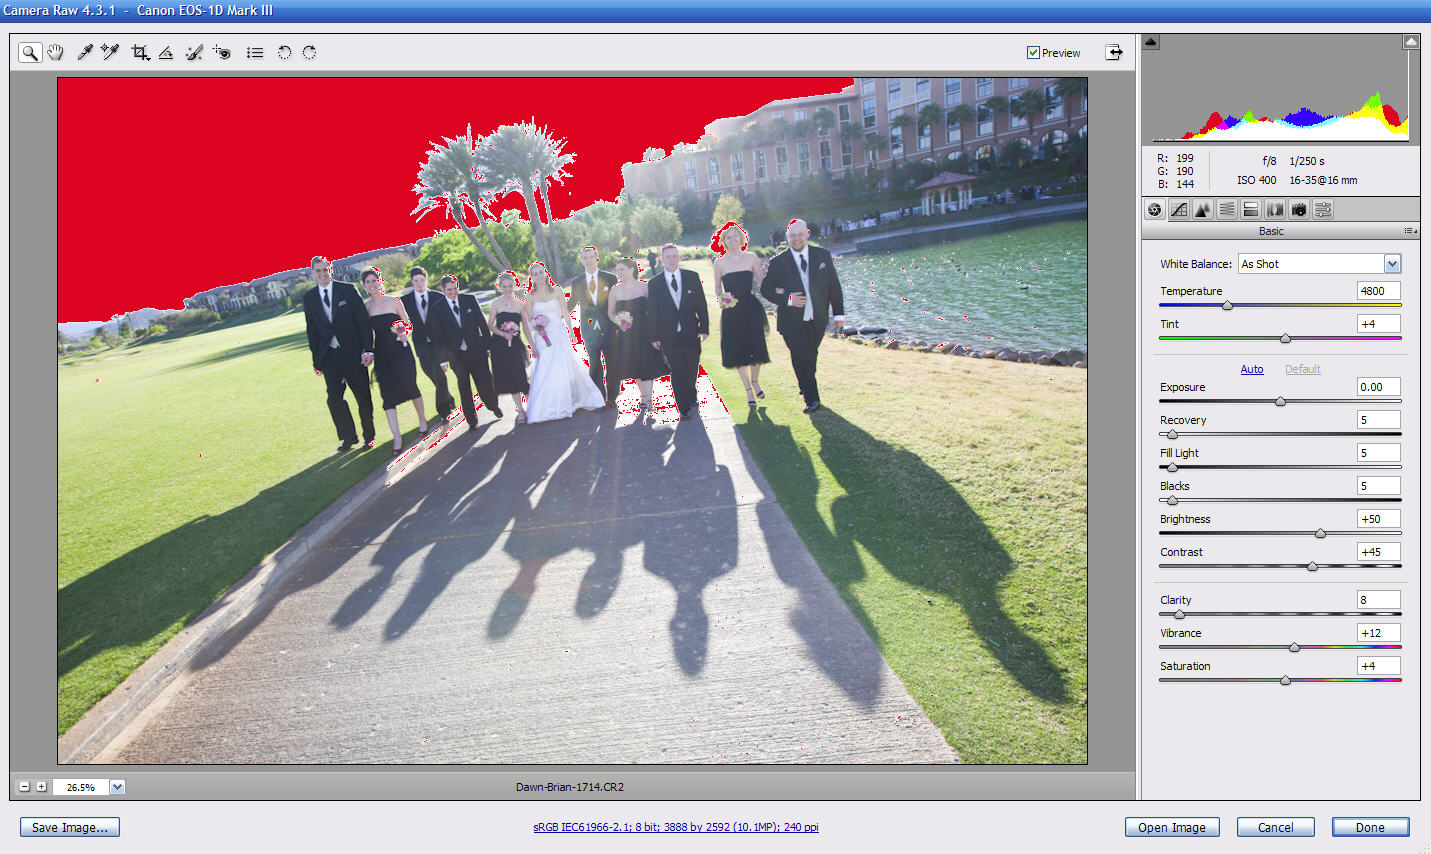
This image will look slightly different than the original because my default settings will change a few of the parameters. The red areas show where detail is lost. This can be controlled to a large extent with some of the sliders, such as Recovery. A change in white balance will also affect what colors are blown out, and hence affect the red areas showing lost highlights.
.
Adjusting the image in ACR:
I will firstly change my white balance and exposure to get to a basic image that looks good. And then I will finesse the other settings until I am happy with what the image looks like on my screen. (A calibrated monitor is essential.)
By now the image looks like this …

… but I would still like to have the image pop some more …
.. and for this I use a select few actions. I don’t often use actions, since I prefer my photographs to have a natural look to them, with little processing being visible. So most of my images that I show on my website or give to the labs for proofing are directly out of the raw converter. This is mainly because I want a fast and efficient workflow. Finessing a large number of images in Photoshop would be too time-consuming.
But this image I felt could do with a bit more snap to it. So I used one of the Totally Rad actions. As to which specific one … well, I’ll keep that a mystery. ;)
It might seem like a lot of work so far to edit the image. But, aside from the use of the action on this individual image, the rest of the post-processing workflow is fast since I usually edit images as groups. Because sequences of images will have the same WB and exposure, it is easy enough to select them all together in my raw converter program and adjust them simultaneously.
Back to the original question regarding how much flash was used – the EXIF data says that the flash was on in TTL mode and dialed down to -2.3 stops flash exposure compensation. The group was turned away from the sun, so the light on their faces would be fairly even. And I therefore just needed a touch of fill-flash.
So, as I mentioned at the start, the look of the image had less to do with how I used flash, but more to do with correct exposure, and then a touch-up in raw post-processing.
.
![]()
.
And for quick comparison purposes, here are the original and final images again, next to each other:
You can order the Totally Rad action sets, or other goodies offered, via this affiliate link:
Neil,
Thanks for the clear explanation on lighting the “group walking” photo. As soon as I saw the original, I could see the approach.
Getting the correct exposure on the faces is clearly the key.
Doug
*sigh**** If I could be so lucky that my Vegas wedding photographer is this talented & skilled. Sunrise in the Valley of Fire this week. We might go back at sunset so I get get my own shots. Any tips or advice?
I have you in my RSS feed and every time you have something new I learn so much. This time you gave me a lot of info on how to recover lost detail.
Thank you for sharing your vast experience.
Mariel.
I appreciate reading the way you edit your photos… No time-consuming :)
All together in bulk – if I may say so – for those pictures having very similar settings.
Pretty good idea. :)
The reason for this procedure is because you do have many consistent shots in terms of EV, composition and because they are done in similar environmental situations.
I mean: photos shot inside a church – one set / photos shot outside in sunset – another set / etc.
Th exceptins are those photos like the one above where you took you time.
This leads to the use of the same format all the time, landscape or portrait.
I gave a look to your pictures and I saw only pictures with one size.
Am I wrong ?
I appreciated mostly the tilted composition of the bride in here: https://neilvn.com/tangents/category/composition/
Hello Neil
My question is in these type of situation where the b&g or bridal party is walking toward you , do you switch to AI servo tracking in or do you stay in one shot?
Thanks
Mike
thanks for always sharing your knowledge!
I have the hardest time with metering. I just recently got a camera with spot metering thinking this would help me. I would love to master manual mode, but of course I’m trying to go off readings that aren’t always accurate. What type of metering did you use in this photo and what did you meter off of? I guess instead of (or in addition to) post production, I’d love to know how you captured the correct exposure to begin with :o)
thanks again for sharing!
jayne
I shoot in manual exposure mode, and in this example, it was key to getting the correct exposure. Of all the metering techniques available, I mostly use the histogram to figure out the correct exposure.
As for the metering pattern, I mostly just keep to evaluative / matrix metering. But it is also important to note that since I shoot in manual metering mode, the specific metering pattern does not really influence on my final metered settings. It may influence *how* meter, but not my actual correct exposure.
thanks for the links. i look forward to checking them out!