Tangents

photography tutorials, reviews & workshops

tangents photography blog
learn : discuss : share
subscribe today
  • Tangents
  • Tutorials
    • Flash Photography
    • Wedding Photography
    • Studio Photography
    • Posing People
    • Understanding Your Camera
    • Exposure metering
    • BFT
    • Best Photo Books
  • Workshops
    • Info: Workshops
    • In-person
      tutoring sessions
    • Online
      tutoring sessions
    • Video tutorials
    • Workshops in
      New Jersey (NJ)
    • Workshops in
      New York (NYC)
    • Studio Workshop
    • Workshop results
  • Books
    • On-Camera Flash (revised ed.)
    • Direction & Quality of Light
    • Off-Camera Flash Photography
    • Lighting & Design
    • On-Camera Flash (1st ed.)
  • Reviews
    • Nikon
    • Sony
    • Canon
    • Fuji
    • Profoto
    • lighting gear
  • Projects
    • Two Perspectives
    • B&W Infrared
    • Vintage lenses
    • Time-lapse photography
  • Info
    • About
    • Contact
    • My Photo Gear
    • Books by NvN
    • Newsletter
    • Join us on Facebook
    • Acclaim
    • Success Stories
    • Photoshop Actions
  • Forum

world in motion …

May 5, 2008 Neil vN 13 Comments

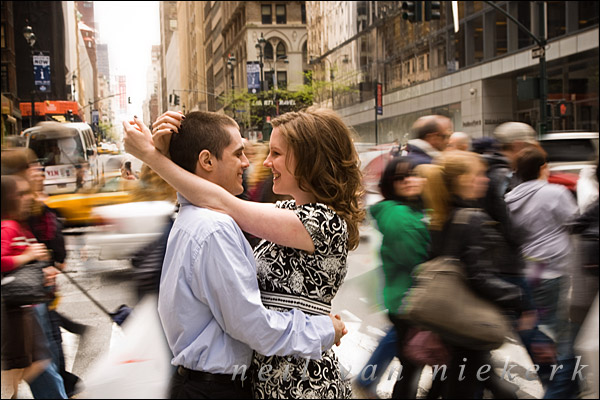
This image from the recent photo-session with Amy and Nick in Manhattan received a number of comments and questions about the technique.  The basic camera settings for several sequences of images here, were 1/20th (at f8) and 1/10th @ f11.  The image above was one of a sequence at 1/20th.  But there’s more to it …

Amy and Nick were enthusiastic enough to work with me in several times running out to the middle of this busy Manhattan road whenever the light changed and pedestrians crossed.  The idea was, as seen here, to have them sharp against a blur of people and traffic.  I set my camera to a slow shutter speed, and used a stabilized lens to compensate.  This was essential in getting the couple sharp in the image, and not have camera shake at such a slow shutter speed.  Since we had to work fast, using a tripod would’ve been far too cumbersome.  ( Besides, I never bring a tripod with me on a portrait shoot like this.)

The effect of the people and traffic blurring was unpredictable, and I therefore simply opted to have my camera blast 10 frames a second (at such a slow shutter speed).  This way I made sure I got enough images every time Amy and Nick stood still in the road.

(I should note that the images were initially edited for exposure, contrast, saturation, white balance, etc, as part of my normal raw workflow.)

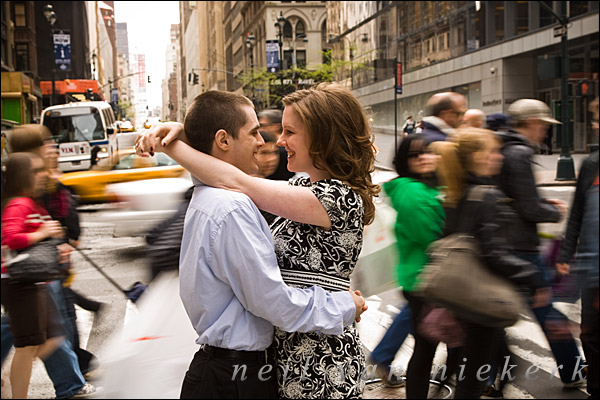
Here is an image where I liked how the people and traffic blurred around them, but I wasn’t  happy with the other person’s face being so dominant in the middle.  It was a distraction.

.
With this image, I liked Amy’s hands and there was also a pleasant blurred area between them …

… so I decided to combine the two images in Photoshop.

I started off by layering the two images, and then tried to get as good a positioning of them in the combined image by transforming the one image.  I checked this by changing the opacity of the one layer. It would be simpler blending the two images, if the position of my subjects (Amy and Nick) corresponded fairly closely between the two images.

.
And then I used a layer mask on the one layer and blended the two images.

.
For the final image I added a slight soft-focus effect on the background, and also increased the contrast ever so slightly.  I also brought down the saturation on the green jacket so that it is less distracting.   And there’s the resulting image – quite successfully showing the energy of New York, but still leading your eye to the couple.

Filed Under: digital imaging, Photoshop, technique, Uncategorized


Help support this website

If you find these articles of value, please help support this website by using these B&H and Amazon affiliate links to order your photo gear.

I also offer photography workshops and tutoring sessions, whether in person, or via online video tutoring sessions.

Stay informed via the monthly newsletter.

Please follow me on Instagram for more.

You can also join our thriving photo community in the Tangents group on Facebook, where we show our photos and discuss all things photography.

Thank you,

Neil vN

Books by Neil van Niekerk


13 Comments, Add Your Own

  1. 1Michael Chiara says

    May 5, 2008 at 8:31 am

    Sweet….Great job

    Reply
  2. 2Dennis says

    May 5, 2008 at 9:09 am

    Very well done. I continue to be awed by your work. Thanks for constantly sharing. God bless you.

    Reply
  3. 3Rene Skrodzki says

    May 5, 2008 at 9:39 am

    Excellent, I wanna try this so bad … I wonder if I could rally enough people to walk across a street here ….

    I might try this with someone in Toronto. Plenty of people there :)

    Reply
  4. 4j.ro says

    May 5, 2008 at 1:18 pm

    beautiful!

    Reply
  5. 5Linda Wang says

    May 5, 2008 at 1:31 pm

    Neil,

    You are a master at what you do, and a master at explaining it to others! Excellent work, and thanks for sharing with us!

    Linda

    Reply
  6. 6Antonio Correia says

    May 5, 2008 at 3:27 pm

    Very clever as usual.
    Very good work indeed.
    I do like to read what you share with us.
    Thank you :)

    Reply
  7. 7Han Cheng says

    May 6, 2008 at 9:15 pm

    Interesting technique. I have to try it some day!

    Reply
  8. 8Daubs says

    May 6, 2008 at 10:54 pm

    Amazing! You are sick and wrong…in the best possible way! Thank you so much for sharing.

    Reply
  9. 9Patrick says

    May 10, 2008 at 5:19 am

    Have to say, it’s an attractive image, like the way it was shot

    Reply
  10. 10Neil says

    May 15, 2008 at 10:17 pm

    Thank you everyone for the great comments. :)

    Neil vN

    Reply
  11. 11PIK CHA DIS says

    May 29, 2008 at 5:55 pm

    Photography made simple, good work, great explanations, continue sharing your knowledge.

    pikchadis(Jamaica)

    Reply
  12. 12Caryl says

    March 14, 2009 at 1:48 am

    It also helps to have an adorable couple… GREAT work and as always thanks for the ideas and the techniques

    Reply
  13. 13Stephanie Toolsie says

    March 24, 2009 at 11:25 pm

    Neil, another wonderful image and superb expanation, as always.

    Reply

Leave a Reply Cancel reply

Your email address will not be published. Required fields are marked *

categories

Articles & Tutorials

  • • About myself & this site
    • Books by Neil vN
    • Best photography books
    • Black foamie thing
    • Spinlight 360
    • Photographers’ success stories
    • email newsletter
  • • Flash Photography Techniques
    • Natural looking flash
    • Flash + Ambient light
    • Dragging the shutter
    • Bouncing your flash
    • On-camera flash outdoors
    • Exposure metering
    • Flash exposure compensation
    • Bounce flash examples
    • Which is the best flashgun?
    • Flash brackets
    • Off-camera flash photography
    • Flash photography basics
    • Using video lights
    • Flash photography tips
    • Photography books
  • • Photography workshops NJ / NYC
    • Models @ photography workshops
tutorials:
flash photography
Photography
Workshops

Recent Comments

  • Pat: Right up front, I’ll say I would NEVER buy a Sigma lens. That out of the way, and referring to these...
  • Stuard Santana: Poor Garret Shaw! he should know better, lol I got another one today with the same exact wording and...
  • Mohd Zamri Mohd Zan: In my country are even worst, most guest asking professional photographer to take their photo...
  • HenkW: Thanks for this review – one of the very few I could find on this most interesting topic. So, the...
  • Rachel Abi: Thank you so much for this guide!! There are some many options and you made this really clear :D

All rights reserved. Copyright © Neil van Niekerk 2023 · Customization by The Traveling Designer

Copyright © 2023 · NvN on Genesis Framework · WordPress · Log in