Exposure Metering Technique
Camera metering modes | Exposure compensation
more articles on exposure metering
![]()
Exposure metering using your camera’s built-in meter
The essence of achieving good and consistent exposure technique, is to decide what is the actual subject in the scene that you’re photographing .. and then expose for that. In the same way that you decide what the actual subject is that you want to focus your camera on, you also need to decide what the subject (or area of the subject) is that you want to expose correctly for.
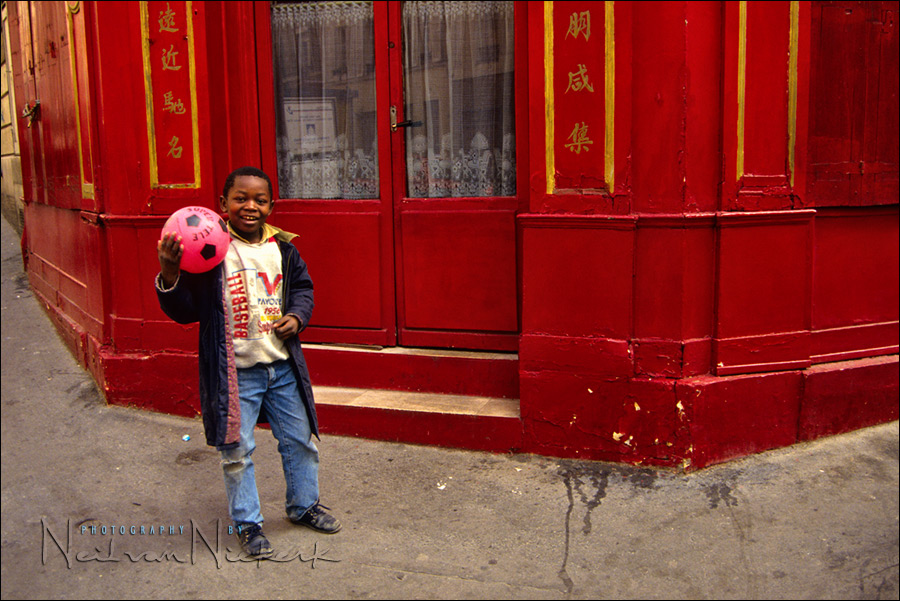
If you look at this first photograph, there are no large dark areas or shaded areas, and neither are there sections which are brightly lit compared to the rest. This image has tones and colours which are all kind of ‘average’.
There aren’t any large areas which are overly bright or overly dark. The few scattered dark sections are more or less balanced with the lighter sections. There shouldn’t be any camera or any photographer who’d have a problem getting the exposure right for a scene like this.
But what about scenes which aren’t so evenly lit?
Now here comes the crucial part .. take a look at this next photograph.
What is the subject matter here ?? The two men standing in the band of sunlight of course. Not the dark areas. The shadows merely form a natural border around the two men, and should not be allowed to affect my meter reading at all.
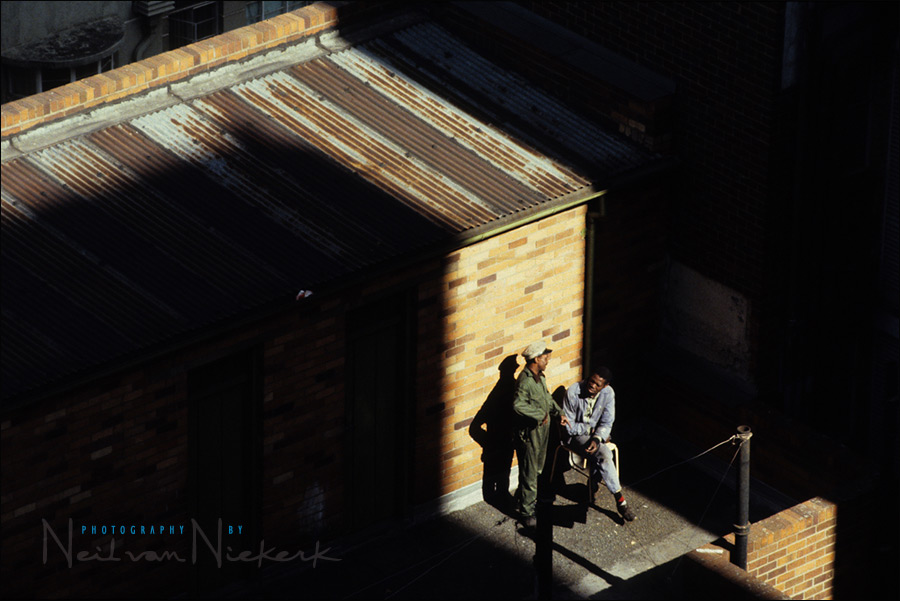
I need to expose correctly for my chosen subject – the two men – so that they appear neither too dark nor too light in this particular setting. By basing my exposure on the two men in the sunlight, the shadow areas will become dark shapes.
My actual method of exposing for the men, was to put my camera into manual metering mode and then I moved my camera to point to another subject which was completely sunlit, and I set my exposure reading accordingly. In this specific instance, I used normal centre-weighted metering, because it was the only metering option on that camera.
If the camera I used had a spot-meter option, I could have used that to take a selective meter reading off the sunlit area. I could’ve locked the meter reading either by either using manual mode or with the meter-lock in one of the auto modes. My preference is to always shoot in manual mode where I can, since this gives me the greatest chance of consistency between images.
In this case I specifically did not use purely automatic metering. The large areas in shadow would’ve fooled any camera’s meter. Center-weighted metering meters for nearly the entire scene. It has no way to distinguish what is my actual subject. With the shadow areas dominating in that photo, the camera meter would have given the entire scene an average exposure reading, which would have been too much for the actual subject – the 2 men – and they would have been grossly over-exposed. (Even matrix metering can only ‘guess’ at what is the subject and try and expose correctly based on an algorithm.)
Therefore I had to control my exposure – in this case by locking a relevant meter reading in manual mode. By doing this, I’m now able to shoot a series of photos, all correctly exposed, and all consistent.
Working with digital
These pages were originally written with the idea of exposing for slide film (transparency film).
Slide film has very little latitude for error, unlike negative film (colour or B&W). If you, as a digital photographer approach exposure metering with the same mind-set as a slide-film user, you’re much less likely to run into the same frustrations that negative-film users usually have when they first switch over to digital.
Even though there are further methods available to the digital photographer, such as combining different exposures as layers into a single image, and thereby side-stepping a lot of problems regarding exposure metering, the method explained here remains an essential base.
Digital photographers have an amazing advantage with the immediacy of the histogram and blinking highlights display. These are two essential tools that every serious photographer need to understand how to use.
Also, every serious photographer will ultimately have to become acquainted with the Zone System, or elements thereof. The method I describe here is a distillation of that. I definitely recommend that anyone interested in understanding exposure metering, delve further into the Zone System.
Further notes
Please note: for simplicity of explanation on this page, I didn’t take into account the tonality or reflectivity of the various areas, but just how the light falls in the scene and subject. (Taking the reflectivity of your subject matter and the scene into account, is just an extension of the same approach and thought process, but I didn’t want to make the explanation overly complex.)
There are specific reasons why I did not simply use auto-metering and dial in exposure compensation, but chose to use manual mode.
Something else to take cognizance of is that metering with variable-aperture zooms can be problematic if done at maximum aperture, and you zoom in and out.
I explain more on a following page on when to choose between center-weighted, evaluative (matrix) and spot-meter metering modes .
Averaging various spotmeter readings, is another alternative method mentioned sometimes – where you would spot-meter the dark areas and the high-light areas and then set your exposure as a happy medium. In my opinion, this might work some of the time, but most times, you will find that your actual subject will still be under or over-exposed – simply because the exposure value calculated this way is different from the settings needed to expose correctly for the actual subject.
Even if you want ensure correct exposure in tricky situations by bracketing your exposures, using a consistent method like this would ensure that you bracket with some specific idea in mind, and will most likely be very close to a correct exposure anyway.
By getting used to a specific way of measuring and evaluating exposures, you are eliminating random guesswork and building up towards a consistent and repeatable method of metering accurately and correctly.
 next: Camera metering modes
Help support this website
If you find these articles of value, please support this website by using these Amazon and B&H affiliate links to order your photo gear.
I also offer photography workshops and tutoring sessions. There are also video tutorials, which are online workshops on photography.
Join us on the Tangents Facebook group for further discussions.
Neil vN

Books by Neil van Niekerk

“If the camera I used had a spot-meter option, I could have used that to take a selective meter reading off the sunlit area. I could’ve locked the meter reading either by either using manual mode…”
and, lower down:
“Therefore I had to control my exposure – in this case by locking a relevant meter reading in manual mode.”
Please explain how and where to lock the meter reading in manual mode for spot metering. Nikon D200
Thanks a stack
Lydia, your exposure settings are by definition ‘locked’ when you use manual exposure mode, since YOU set the aperture, shutter speed and ISO. They aren’t going anywhere until YOU spin the dials
Lydia,
On most Nikon cameras, exposure is locked using the AE-L button. I’m not familiar with the D200, so I can’t say where exactly this might be located. Sometimes (usually?) it’s combined with the focus lock button (AF-L), and a menu selection can enable one, the other, or both to be locked when the button is pushed.
However, as Neil says, this is moot when in manual mode. FULL manual mode, that is. There are photographers who are using manual mode to lock shutter speed and aperture, and using AUTO-ISO to match sensor speed to the exposure, rather than the other way around, so even that assumption has to be somewhat tempered.
Warmest regards,
– Arved
Neil,
Great book and blog. My wife (photographer) and I (second shooter) and I agree to disagree on an issue. If you spot meter on a brides dress (change exposure compensation to adjust the 18% grey) and you have consistant lighting from abmient and strobes, same location, same compensation but different individuals around her, such as formals. Dark tuxes from groomsmen then light dresses from bridesmaids. Would you need to change the exposure settings for different individuals around the bride to make up for the tones that are not included in the spot metering, or would you expect to have a correct exposure every shot since we are only considering the brides dress from spot metering. Asthetics vs technical?
Thanks in advance,
Steve
Hi there Steve … no, you don’t change your settings.
Think about how someone with an incident light meter would’ve done it – measured the light falling onto your subject. This way the tonality of your subject doesn’t influence the meter reading. In fact, the tonality of your subject has no immediate bearing on how you use a handheld light meter.
If the handheld incident lightmeter is calibrated for your camera’s sensor / type of film … then it is accurate. You set those camera settings, and you’re done.
Anything else you need to do to bring detail back the tones into the zones you like, is then done in post. But your basic exposure settings remain unchanged for any specific light setup.
So who wins? : )
Hi Neil,
I also had a question similiar to Lydia’s , as I wasn’t quite clarified on it.
“Therefore I had to control my exposure – in this case by locking a relevant meter reading in manual mode.”
For instance, I have a D700 Nikon. How would I go about taking a “relevant meter reading in manual mode” ? Would I switch to AV mode spot metering, press shutter halfway down on my targeted area and see what it’s recommending?
Or do you simply mean to take a few exposures in manual shooting mode and preview the histograms based on being zoomed up in the area you want to properly expose for (similiar to your article on how to properly expose for a brides dress?)
any help would be greatly appreciated as I was not quite sure how to do this manual metering aside from the above.
Thanks a ton for all you do for us!
aj
You could do that, or simply just use your camera’s built-in meter.
No need to switch between exposure modes. Use the meter display (and interpret it), in the camera’s manual metered mode.
Hi Neil,
So here is how I understand it for me to get right exposure, Shoot in manual mode and meter the subject.
In ex. Im shooting a person(portrait), since her face is 1/3 of the frame, I should use center weighted aim the (o) as seen on the viewfinder to her face, adjust aperture and shutter speed till I hit the 0/middle mark on the exposure markings (+/-). recompose and fire away.
Is that correct? would the exposure still be the same If I take a step back after metering the subject then take the shot.
Tetzu .. largely, yes, that is how it would work.
But do keep in mind that skin tones also vary a lot in tonality, from very pale skin to dark skin. So you can’t just zero your camera’s meter reading on the skin tones … you have to figure out how this skin tone needs to be reproduced in terms of brightness.
When a subject’s tonality varies, is metering the mid tone the best way to get proper exposure.
Differentiating mid tones is another thing that I’m having a hard time to understand but with this site I now I’ll get there soon.
Thanks!
Tetzu,
There is a little trick you can employ to get midtones exposure correct and for that image above it would have been very quick to achieve.
I used to employ it in the days of film, without the luxury of a digital back histogram nor a lightmeter.
In the boy image above, point the camera at an area of the concrete footpath filling the frame, then zero out the camera’s meter, you will be so close to being perfect from the get-go.
Also, the same with a patch of green grass in sunlight or full shade gives a great starting point.
To prove that, right click on the top image above of the boy, and save it, open in Photoshop, then, making sure your histogram palette is open, and using the marquee or lasso tool select a small patch of that concrete then look at your histogram palette, it will be in the midtones, almost, if not perfect.
Marquee a small patch in same light as his left foot or same light just behind the boy, perfect. Then select a small patch where his shadow casts, it should read very slightly toward the shadows in the histogram, since there appears to be no harsh shadows behind him the light looked like an overcast day.
Same goes for that second image, metering on the concrete[?] area they are standing on, should give you an almost perfect exposure straight up.
Of course we are talking ambient light here, no flash, but still applies if you want your ambient to be almost spot on then fill flash. Also commonsense must prevail, no use metering on concrete/grass in shade if subject in sun, vice-versa.
Trev
Yes I did the photoshop exercise. got it, cant wait to apply the tips and methods here. Thanks.
I have a hard time understanding what “tonality” term means, can u help me please? Thank u very much
Your best bet is to read up on The Zone System.
It’s a way of dividing any scene into zones or regions of brightness … in other words, different tones.
So in that way the tonality of the scene you’re photographing, is a description of how the darker and brighter tones are distributed.
Hi Neil, I just wanted to ask if you have a subject in open shade with a bright sun lit background what would you use spot or evaluative metering. Would you spot off of a part of your background that you wanted in your scene or use evaluative and move focus point onto subject and read that exposure and shoot. This has been a little confusing for me here of late. Thanks. chris
Chris .. you would meter for your subject. (Unless in this instance you’d want a silhouette).
If you need to bring your subject’s exposure up to that of the bright background, then you’re moving into off-camera flash territory.
Ok, i wanted to know when someone’ referring to the word tonality = brightness , dark/white/grey…, no other sense… Thank u very much, you bet i will read it!
Hi Neil!
First of all thanx for sharing your knowledge,have really enjoyed watching your videos on YT.
You have mentioned that “…Digital photographers have an amazing advantage with the immediacy of the histogram and blinking highlights display. These are two essential tools that every serious photographer need to understand how to use…”
Could you please elaborate how do you use histogram and blinking highlights display?
Thanks,best regards! :)
Using the histogram to determine exposure
Neil, I’m struggling with once I know the ambient exposure, how to know
what to set my flash at to properly expose the shot, both for indoor
shots and outside. Is it possible to see a proper exposure with the histogram?
Kelly,
Neil posted a link directly above yours, and it’s exactly what you requested via histogram.
Hello Neil, many thanks for this article and also all the nice books I’ve bought from you :-)! I’ve a question: recently, Michael Reichmann published a pretty drastic How-To-Expose article – it’s pretty different than anything I’ve read in all those years about setting the exposure. Would you please tell me your opinion on this? Is it really optimal to take the exposure that much overexposes as the article states? I mean especially those paragraphs telling us to overexpose _both_ the white and black scenes that much. Thank you, Andrej
It makes sense if you want to use the leeway of the RAW file that way.
On the other hand, I shoot events, and the lighting is unpredictable. I don’t want to give away the RAW file’s headroom for over-exposure in that way … I might very well need it for accidental over-exposure.
I explain it here with an example:
https://neilvn.com/tangents/raw-vs-jpg-the-final-discussion/
If I had been shooting “to the right” in the histogram already at that point, I would’ve had NO leeway to correct the exposure.
So for event photographers, it still makes sense to expose properly wherever possible. Landscape photographers have the luxury of time and bracketing.
Thank you for taking your time to reply; it makes much more sense now! So I take away this lesson:
– technically the mentioned article is correct, taking the most out of the sensor, but
– the precondition for it to work is to be able to meter extreme precisely the highlights, as
– this method trades the available post-process playroom for less sensor noise
Thanks & Greetings from Swiss,
Andy
Andy,
I use that method nearly all the time, exposing to the right when I have ‘important’ shadow tones I want to be clearer/cleaner/brighter (over-exposure) because that way I get ‘cleaner’ shadows and when I bring it back in processing then re-open the shadows I have much healthier shadow range with a lot less noise, etc.
It sounds counter-intuitive but it works.
eg: Say I have a sunset of a wedding, but in the foreground I have great looking rocks on the beach, or other dark shadows of interest, I will expose for the shadows/rock more, letting the sky blow, but then very counter-intuitively I will also put my flash on and over-expose the subjects almost like the sky (when backs are to the sun).
So I now have better shadows, both sky/subjects are over-exposed, so I then bring back the exposure (normally it’s around a stop of ‘over’ I do) so both the sky and subjects are now exposed ‘correctly’ but then open the shadows which are now ‘clean’ and better instead of being ‘muddy/noisy’.
I most certainly can see the logic in that article which I had never seen before (thanks for link) as I have been following my own method for the past 3-4 years now on that.
You really do need to get comfortable with that methodology but it certainly gives cleaner results with a much healthier dynamic range since the camera’s range is really lousy compared to what you have seen at the time with your own eyes.
I should point out, that I am comfortable in bringing back shadows and this is only when I want the important shadows to be cleaner, and generally that’s when I am shooting sunset shots at a certain location I use where the rocks give fantastic details for that type of shooting.
Normal scenes in daylight like grass/fields/etc. I shoot normally.
Trev
Hi Trev,
thank you very much for your reply! Yes, I use the ETTR technique as well from the D30 times as I’ve first read about it: but it was always in the “scope of classical metering” – shooting the black cat on the black background, I would lower the exposure a bit (1-3 FS, it depends of course on the scene) on film, but leave it as is on digital, to get the ETTR effect. And adding 2-3 FS to white scene would be normal as the camera tries to make it gray anyway and lowers the exposure, so to get a film-correct exposure, I would add 1-2 FS as of the camera metering error and another 0.5-1 FS to get ETTR. BUT: adding light to the already overexposed metering, when the camera tries to make gray from black, is a bit new for me!
Based on ETTR in the classical scope, I would normally leave the overexposed black scene as is, say 1.5 FS overexposed, as the camera has done already ETTR – as a side-effect when it tries to see gray from black. But now you point-measure the white eye of the black-cat on the black background and add another 2-3 FS until you get a post-process highlight warning on the cat fur itself! So instead of getting the cat 18% (gray card) gray, you would get it almost white, as you try to get a bit post process highlight warnings on the black coat. This gives you not only ETTR overexposed, but eats up any available playroom for post processing in the right part of the histogram.
As Neil kindly replied, this drives the RAW post-process possibilities to its extreme to the right and can be dangerous in an uncontrolled fast-paced situation as it could easily loose the highlights. So technically is the method correct, but practically has it’s pitfalls: it trades the RAW manipulation headroom for less sensor noise.
Thank you and have a nice Sunday (the autumn here in Swiss is really beautiful for picture-making :o)! ),
Andy
Hi Niel,
I’ve read all your articles over the years and have distilled as much as I can from them. When you use flash, do you normally use matrix for the ambient rather than being more particular and using spot metering? I’ve read in your articles on ambient light disregarding flash use, how you use spot metering moreso for an accurate exposure reading (white dress and skin tones). But with flash, it’s more to do with the “difference” between ambient/flash exposures than anything else. So is matrix good enough for that as long as the ambient comes out less than perfect?
Pat, with flash I stay with Matrix / Evaluative metering on my camera.
I do that more for consistency in how I work, so that I get used to how my flash will respond in terms of TTL exposure.