Exposure Metering Technique
Camera metering modes | Exposure compensation
more articles on exposure metering
![]()
Using exposure compensation vs manual exposure
Using the exposure compensation dial on your camera is only useful when the area that you are metering off, is consistently darker or lighter than “average”. Then you could simply dial in the exposure compensation to have the subject appear appropriately darker or lighter. I also use exposure compensation to bracket exposures.
For any other practical situation, I find it frustrating to try and use exposure compensation with in-camera metering. Let me explain again with a previous photograph ..
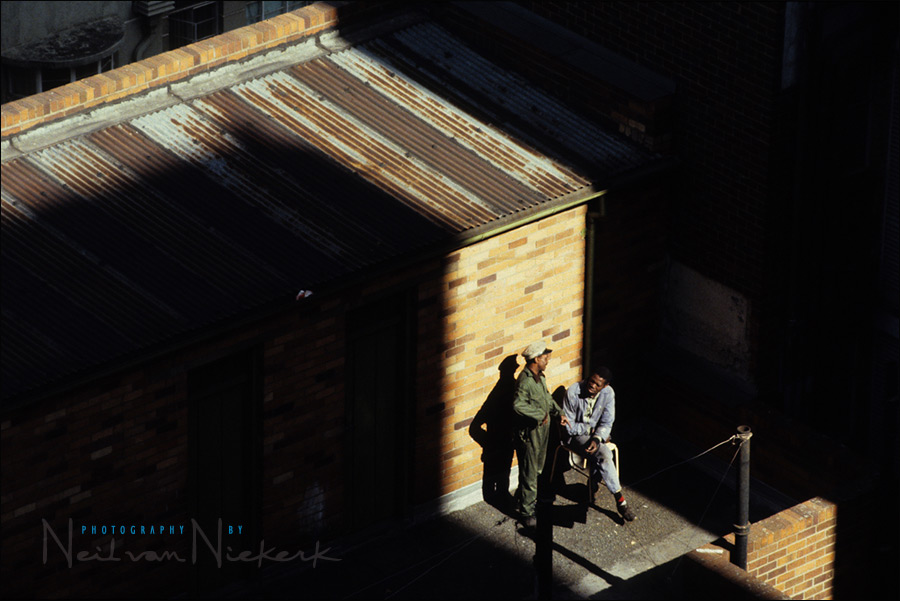
The men in this photo are my subjects, not the dark areas. So depending on the actual composition I chose or how much I zoomed in or out, I would have had to set different exposure compensation for EACH composition. This is because the amount of dark areas in the frame would vary dramatically each time for differing compositions – affecting my camera’s light meter differently each time – yet I would want to maintain the proper exposure of my real subject.
The crucial thing to realise here is that even though my camera’s meter reading will change as I zoom in and out, the exposure that I correctly calculated for my subject – the two men – won’t change. (Unless the lighting should change, eg. clouds passing overhead. But then I would need to take a meter reading again in the same way as described before.)
If had I decided to make the figures larger in the final frame, there would have been less dark patches, and the general meter reading in auto would have been different. And similarly, if I had used a shorter lens or zoomed out to get a wider view, there would have been more dark areas and the subject – the two men – would have been even more over-exposed in the photograph if I had simply used auto-exposure.
Also, how much exposure compensation would I have had to dial in for each shot? I would only be able to decide on that if I metered for the 2 men anyway, and then compared that reading to the overall reading I’m getting now when I have recomposed the image in the viewfinder. So if I had tried to use exposure compensation, I would have had to twiddle buttons or dials for so much time, that taking a photo in this instance would have taken me far too long. This is no problem if you are photographing a cactus in the desert which isn’t going to go anywhere for the next couple of decades, but for non-static subjects like people, using exposure compensation like this is just too slow. You could quite likely miss the actual opportunity while bracketing or setting exposure compensation.
On the rare occasions that I use an automatic exposure mode, I do use exposure compensation though, for when the whole scene is uniformly darker or lighter than average in tone. If the scene is uniformly darker than *average*, I will dial in -1 EV for example. This will bias the meter into giving one stop less exposure, and hence a darker image. And similarly for a scene that is lighter than average, I will dial in +1 EV for example. This will bias the meter into giving one stop more exposure, and hence a lighter image. The exact amount of compensation depends though on how dark / light the scene is and how dark / light I want to render it.
Also, familiarize yourself with Flash exposure compensation if you are using TTL flash. It is a related topic to general exposure compensation.
 next: More articles about Exposure Metering
Help support this website
If you find these articles of value, please support this website by using these Amazon and B&H affiliate links to order your photo gear.
I also offer photography workshops and tutoring sessions. There are also video tutorials, which are online workshops on photography.
Join us on the Tangents forum for further discussions, and stay informed of new articles via the monthly newsletter.
Neil vN

Books by Neil van Niekerk

I am a little bit confused.
The last paragraph mentions if using auto exposure, if the whole scene is dark, you will lower the EV by one to make it darker, and vice versa for a lighter image.
I would thought one would do the opposite…if the scene is too dark, I would increase the EV so as to brighten up the image and the opposite for too bright of an image.
Aaron, your camera’s meter will try to expose for everything as middle toned grey (zone #5 on this diagram).
So if your scene is darker than average / middle toned grey … then you need to decrease exposure, since your camera will have already pulled up the exposure.
Hi Neil,
Brilliant uncomplicated tutorials…I’ve learn’t so much, just hope i can remember it all, when i am under pressure! Thank you :-)
Neil
I’ve already communicated this to you but I have to say it again. Your site is second to none. Your insight is second to none. You so intelligently articulate what is required to take a picture – and do it well – you’re site is almost like a photographic bible. Keep this us. You are making one hell of a difference to so many of who would dream to emulate you!
Hi
Do you use manual all the time, an example would be at a garden party recently I used manual exposure over auto but I never seem to get it right first time. The problem is moving around and trying to take pictures fast.
People are not to impressed with me have to chimp the shot is there a better way to do this.
Alan
Great Site.
I think there’s a huge fundamental misunderstanding on what constitutes manual exposure. Manual exposure doesn’t mean using manual mode. Manual exposure means figuring out and applying your own exposure compensation…regardless of your shooting mode.
The intelligent exposure modes such as Matrix metering attempt to determine an exposure compensation for the scene. So even if you’re in the manual shooting mode, all you’re doing is following a meter reading that’s been biased by some Nikon photographer, depending on what type of scene the camera thinks you’re shooting. That’s not manual exposure. Manual exposure is when you examine the scene, meter a known reference, and apply an EC for that reference. Then you’ll have standard exposure, which you can then tweak to suit your pictorial vision of the scene. That’s taking control of exposure, and it’s skill that has to be learned.
To perform manual exposure you either intentionally over or underexpose in M mode, or apply EC in an auto mode. It’s the same thing…so much so that the same meter indicator is used for both M mode and for EC in auto modes.
Here’s an example. You’re shooting a bride and you want the best exposure for the white dress. You spot meter the dress and press Exposure Lock. Now you dial in +2.7 EC and you’re done…the dress will be well exposed without being clipped. If the light doesn’t change, you can use the same exposure lock for all following shots. (JPEG shooters better make that something like +2.)
Another good reference is the sunny side of grass. If you’re shooting a game on a field and it’s a sunny clear day, just point the camera at the grass and press exposure lock. Set EC to 0 and exposure is done.
What if the sky is full of rolling clouds and the sun is poking in and out? This is where EC and auto modes, and spot metering all come together. You pick your point of focus on your subject and you spot meter that area. Then you apply EC for correct exposure, either by knowing the amount required (because the metered area is a known reference such as light skin [+1]) or with a test shot or two. Now, you simply move your focus point onto that same area as you take your shots and change composition. On a Nikon, spot metering always follows the focus point, so you will focus and meter the same area, and will get the same exposure even though the light is constantly changing.
All this with auto modes, but it’s still manual exposure. As soon as you switch to Matrix you lose the reliable (but usually wrong) exposure of 18% gray. You can’t apply EC reliably because the camera is trying to do that for you.
Hi Neil,
I find your blog quite informative and it has become a reference for me.
I do, however, wanted to ask you a question in reference with what you have said here. Since I know you use Manual shooting mode mostly, how then you use exposure compensation in it? I shoot with Nikon (D600, D800 & D4) and when I am in the manual mode with aperture, shutter and iso all locked to specific values, turning the exposure compensation knob does not change the exposure at all.
I am thinking you discussed using EC in the context of auto and semi-auto modes, correct? If not, then I completely missed the point.
You’re entirely correct. With Nikon, when in manual exposure mode, the overall Exposure Compensation (EC), does nothing … except when you have TTL flash. Then the EC will also act as Flash Exposure Compensation. I do that quite often.
It does bias the meter, but as you mentioned, the settings remain the same.
In terms of available light metering, the EC wouldn’t affect the overall exposure.
Hi Neil,
I was doing a search on why the D700 seems to overexpose photos and found this article. I have been struggling with my D700 using the zone system. My photos are consistently too bright when using the zone system. I shoot in manual and was wondering if I dial in -0.7 on the exposure compensation and bias the meter (does that work?) will it work in manual. I know I could just adjust the meter reading with each shot but thought it would be so much easier to know that I could just use spot metering and adjust for the zone and be done. Would the camera use the EC as the new zero? I see in your response above that it doesn’t change the settings, but will the bias solve the problem?
Custom Function B6 is what you want to adjust then on your camera. This allows you to fine-tune your exposure metering, and not have your Exposure Compensation permanently set.
Hi Neil, I’ve a question about the EV compensation. For example, if I’m shooting a person with white dress, I know we have to do a +2 or +3 EV compensation over the spot metered value on the white dress. My question is, does this compensation amount remains same if I shoot the same white dress in sunny noon versus shadow area vs twilight? Because, when the ambient light is less, the white dress may not naturally look bright white; so do I still need to do a +3 or just +1 depending on the available light?
These two articles cover the topic:
– What should I meter off with the in-camera light meter?
– Exposure metering for the bride’s dress
You wouldn’t meter as high as +3 EV.
+1.7EV or +2EV is about right.
And you should meter the same way, whether in full sunlight or in more muted light.
Hi Niel,
How would I set my d750 for EC applied just by the command dial to just count the clicks.
I had it set for my d700 now I for got.
Thanks
Hi there Ali
Here is my suggestions for best custom settings for the Nikon D750.
Even though I don’t mention it there, I think you are looking for Custom Function B4 — Easy Exposure Compensation.
Thank you so much for all of your wonderful information. I will be photographing a family with one very dark skinned person, another light skinned. Do you have any articles on recommendations of who to meter off of to get correct exposure? I feel I may need EC with the dark skin but this may alter the overall exposure with the rest of the family. I will be shooting with fill flash in manual. Thanks
Hi there Sara
My first recommendation would be to NOT shoot in an automatic metering mode, but to use Manual Exposure Mode. This way your exposures are fixed, and you don’t have to be concerned about Exposure Compensation (EC).
I would suggest metering off a white part of your subject’s clothing, or a stand-in item you can meter off for the brightest relevant tone of your subject. Then the other tonal values will fall into place.
Also, do shoot in RAW. Not JPG. This gives you the most latitude in post-production, and you can more easily lift the shadow or darker areas.
Check out these two related articles which discussed this topic further:
– Exposure Metering Techniques
– Using the histogram to check exposure metering