Lightroom tutorial – Local adjustments
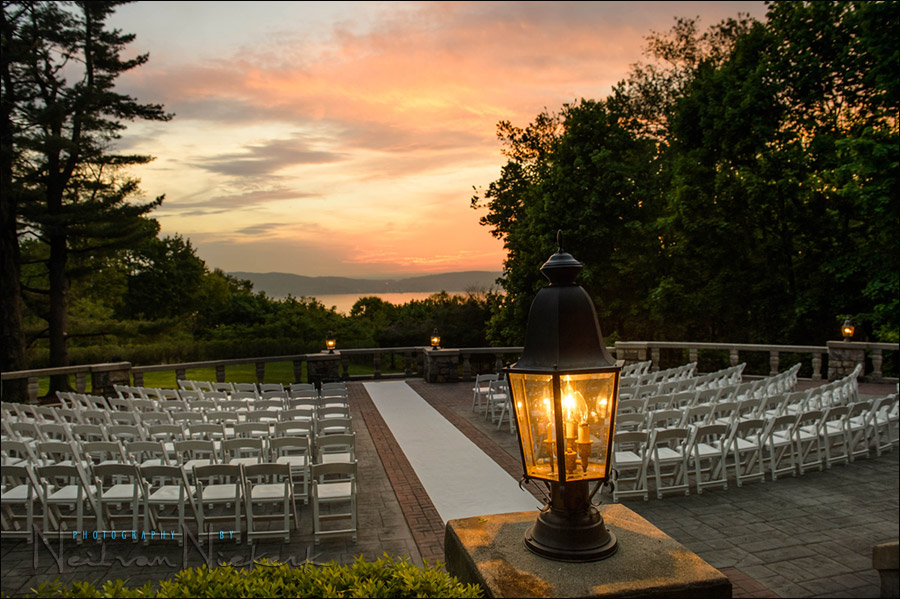
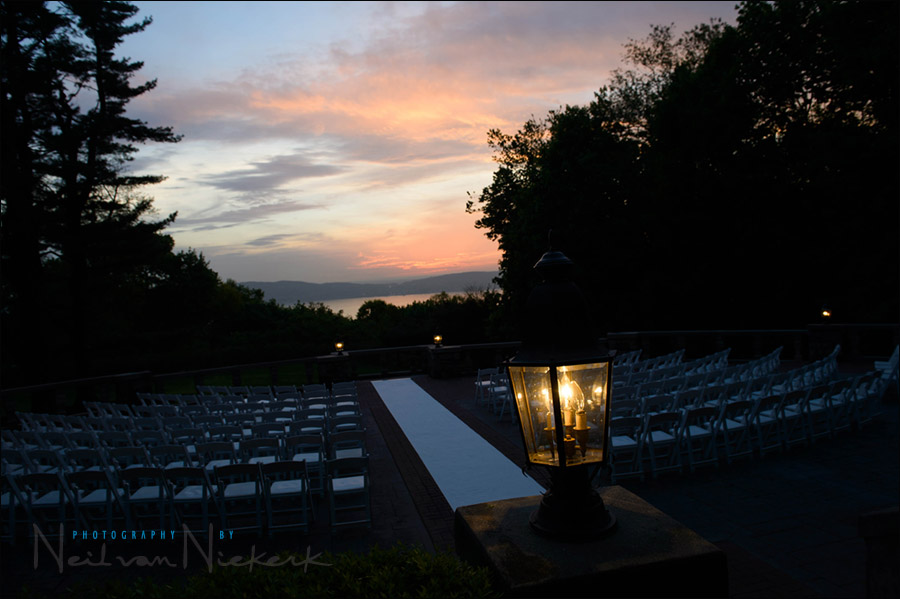
This photograph of the outdoor wedding venue gives a great sense of what it looked like there at the time. But the original image looked a lot more dull. There just isn’t a way to capture the deep shaded areas and the bright sky with a single capture, in camera .. without some post-processing work. Get it right in camera? … sure, but on occasion some post-processing helps.
Pulling it into Lightroom, these are the steps I’d take to finesse the image, specifically using the Local Adjustments brush.
- more articles on Digital imaging
What about the new in camera HDR function of the D4 & MKIII?
Im glad Im not the idiot you mention!
Or perhaps I am for not using LR…yet :)
Great demo. LR4 is fantastic and especially the local White balance brush.
Great tutorial, quick question Neil. From what I see you have a default import with your adjustments..IS your starting point camera profile…the original ADOBE camera profile or is it switched to standard?
thx
Thanks for the demo Neil. This was actually the first time I have see the LR4 control panel..
Nicely done! I use Lightroom so often and it is nice to learn about features that I never knew about before, for example the histogram’s connection to image as you passed the pointer over the image is very cool. This was an excellent demonstration and you showed how easy it is to make these types of corrections with this tool.
Very very useful tips for lightroom and for taking photos with high contrast scenes:) Thanks very much..
Neil,
Have you moved completely to Lightroom for you wedding workflow?
One thing I like about Lightroom is the ability to generate camera profiles. I use the XRite Color Checker passport and plug-in for Lightroom to generate profiles for the cameras. I started doing this after moving from Canon to Nikon and found the Adobe profiles for the D3/D700 caused lots of problems trying to get nice looking skin tones. Made it very useful as I use 2 cameras and it helps keep the images consistant looking.
Using the camera profile as a base I’ve generated presets that replicate the Portrait, Landscape and Standard Nikon Picture styles.
Hi Neil,
I believe you were previously happy with PS and Bridge. I’m intrigued as to when and why you made your move to Lightroom?
I haven’t yet decided on what to upgrade to from my old version of CS3. Could be Capture NX2, Lightroom 4, or PS CS6.
Thanks for any insights you can offer.
Cheers
Jonathan.
hello Neil..
how does the LR4 compares with LR3? The size of it is now considerably very large (10x larger than LR3)..Apart from that, you can do these things that you did in the video in LR3 as well right?
i’ve also heard that LR4 is having performance issues, even on mac i5 and i7..
do you have any performance issue after using LR4?
i’m still deciding whether or not to upgrade to LR4..
Cheers
Adi
Hi Adi,
I cannot answer for Neil, but yes, I noticed a slowing down but only after you open it and then when you go to develop on the first image, even if you have the same library previously and have completed that image, it takes a while to render.
But, once it does the first render, it appears to work as before for me, but I am pretty lucky to have a fast new machine, so I could imagine it would be a bit slower on other machines.
Yes, you could do the local brush on LR3 also.
Trev
Hi Trev
I appreciate your feedback. Thank you so much. I’m using iMac i5..and i’ve read alot of performance issues in the net..
but the good news is that LR4.1 Beta is coming out..Hopefully they will address those issues.
Cheers
Adi
Nice tut Neil, thanks. Howzit from another SA, Auckland, New Zealand :)
Cool tut thanks Neil!
I’m new to LR and digital photography in general. Your fine tutorial provided additional insight into the use of LR. Thank you Neil!
Thanks for this tutorial Neil. I see the value of the local adjustment brush and plan on using it in my processing!
Excellent tutorial, I love lightroom, the more tutorials I watch the more I love it, im using ps less and less. Thank you Neil
I feel like such a nerd for not having stumbled upon a dodge & burn tool in lightroom! Did not realize where it was. I was just opening up any files that needed it in photosjop afterwards. This will help the workflow a bit. Thank you :) on a sidenote, I thank you for your blog. My high school in rural northwest Ohio had no photography to offer ( only one potter’s wheel in the entire art room for 600+ middle school tbrough 12th grade to use – the arts were not invested in obviously) and commuted to earn my bachelors at a college that was still fully film photography only in 2005 when I graduated. After graduation, I worked parttime (as much as I could) for the local newspaper shooting with digital, mainly sports. Tangents has really helped fill in the gaps for my work. Especially utilizing off camera flash. I have gained the knowledge and, perhaps MORE importantly, the Confidence to grow and expand my work. Thank you! :)
Does anyone know what the ‘plug in’ is called that sends images from Lightroom to an Ipad? For example, I saw a vid where in a photoshoot the parents could view the images on the Ipad, as they were being taken by the camera. The photographer had his camera tethered to his mac.