
RAW workflow – the first step – changing your default settings
As a bit of a forward nudge to those who are entirely new to a RAW workflow, or who hesitantly moved to shooting in RAW – here’s the next step forward – changing the defaults for your RAW file.
Before we even get there, shooting in RAW is very much part of the serious photographer’s environment. Shooting just in JPG is rarely an option. As I have mentioned, there are few occasions where shooting in JPG might be an advantage. So with that in mind … RAW it is. And has to be.
Now, some notes for the newcomers to shooting in RAW.
There are a few things you have to keep in mind:
1.) Your images will look different than the JPGs from the camera
Your camera processes the data it captures. You set your White Balance, and perhaps a few other Picture settings which determines how you like the Contrast and Saturation to appear. This processing is done in-camera, to give you a JPG. Even if you shoot only in RAW, the camera’s preview is what the embedded JPG of that RAW file looks like. So the preview shows a processed image of some kind.
As an aside – you don’t have to shoot (RAW + JPG) to get the JPG image. There are software options which will allow you to extract that embedded JPG. (It might be of lower resolution though. This depends on the camera make & model.)
Most RAW convertor programs have no way to access the picture info that your camera wrote to the RAW file, such as Contrast and Saturation and other picture style settings. The only RAW programs that allow for this, are:
Canon’s Digital Photo Professional (DPP) software.
Nikon’s Capture NX / NX2 software.
Canon DPP is software that comes for free with your Canon DSLR, and is actually a great program to start off with. It will follow your camera’s settings, and give you the same picture settings as your camera did. Since the Canon skin tones are superb, and is sometimes difficult to get right with other RAW program, DPP really is a nice way to ease into a RAW workflow. The controls are limited compared to Lightroom or Photoshop’s Bridge / ACR, but the software is easy to grasp and use.
Nikon Capture NX2 software has to be purchased. Great image quality, and it mimics your camera settings for any specific image (just like Canon’s counterpart), but I found it a fairly slow program to use for a workflow dealing with a large number of images at a time. These software programs are continually tweaked and improved, so it will definitely be a good decision to at least check out the free trial version.
So those two proprietary software programs will be able to give you JPGs that will look exactly like your camera would produce – but with all the flexibility in post-processing that the RAW file allows.
All other programs that you might use to process your RAW files, will give you results which look different than the in-camera JPG would. (In theory it is possible to calibrate your RAW file’s profile to give you exactly that.)
2.) You will have to adjust the RAW converter’s default settings
Since your non-proprietary RAW editing software will only be able to decipher the White Balance you had used, you will have to change the default settings.
There is a variety of programs available to view and edit RAW files. The two most prominent software suites which offer a complete workflow, is Lightroom by Adobe, and Aperture by Apple. Both of those software programs offer a robust and complete workflow for RAW. If you want to dive head-first into a complete RAW workflow solution, either of those would be superb.
The program I still use to edit RAW files, is Photoshop’s Bridge and ACR. ACR is the abbreviation for Adobe Camera RAW, and is the part of Photoshop with which RAW files are handled.
Comparing the image shown at the top, with one generated from the original default settings:
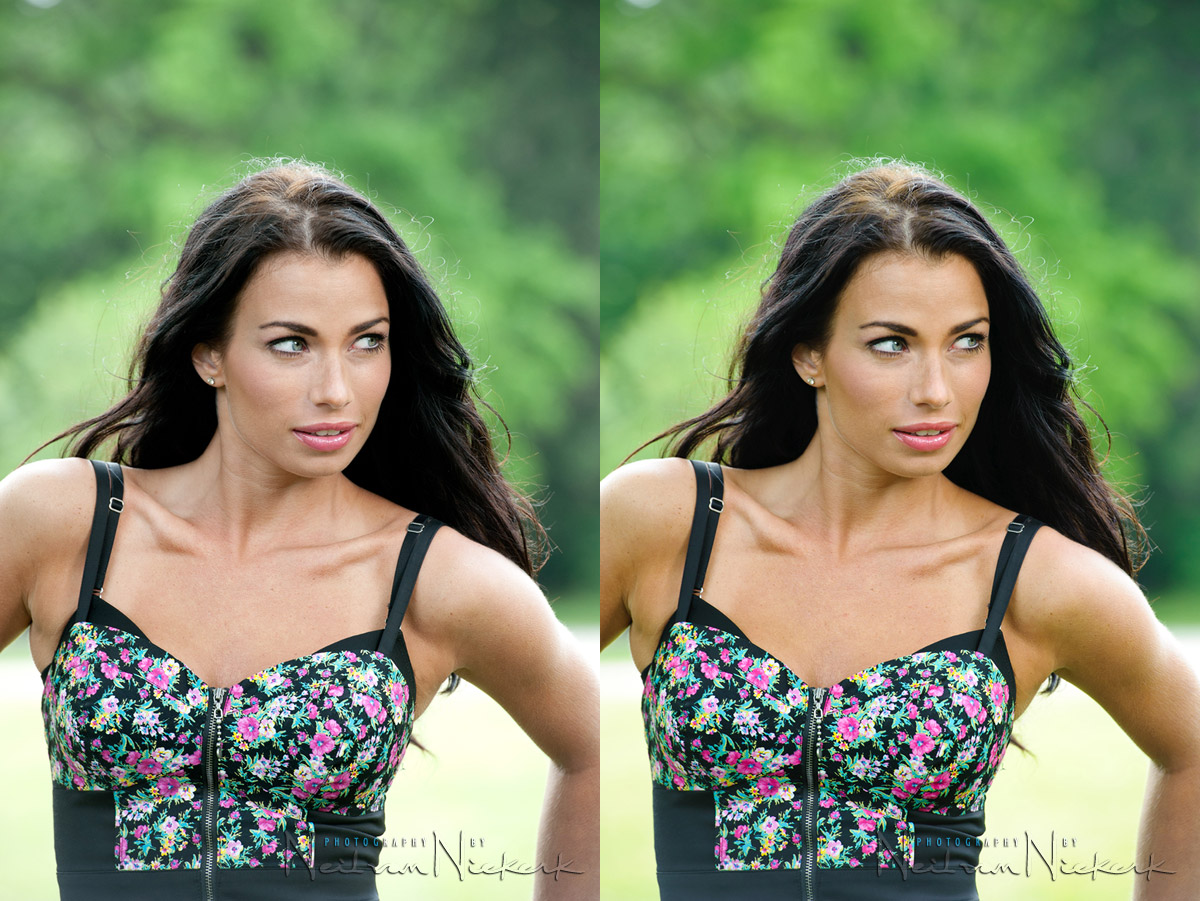
The left-hand image is with Photoshop Bridge / ACR at the default settings. The right-hand image is with my choice of default settings. It has more contrast and a bit more pop to the colors. Our model, Nikki had a nice tan to her, and wasn’t as pale as the left-hand image.
For both of those images, I did pull up the exposure since I unintentionally under-exposed this image by firing the flash too fast. I also changed the WB for both the images. But the other settings remained at the default for the left-hand image.
The left-hand image looks good, but is a little flat, and lacks some contrast.
Here is what my settings look like in Bridge / ACR in comparison:
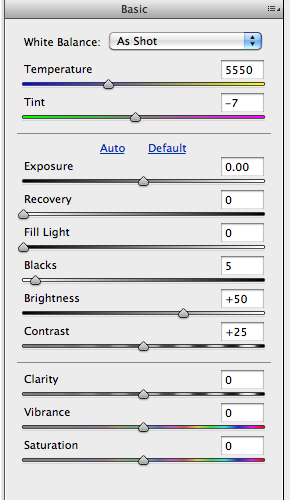
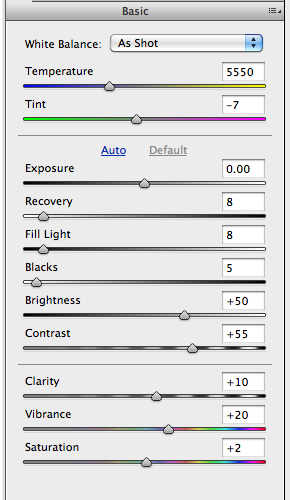
You’ll notice the settings on the left-hand screengrab are mostly zero’d out. For my own default settings, I increased the contrast and bumped up the other settings as well. This gives me a punchier default image when I load my RAW files the first time, or view the images in Bridge the first time.
These are the settings I’ve arrived with in using my Nikon D3 bodies and wouldn’t necessarily transfer to other cameras like that. I didn’t go through a process of calibration via a color checker chart. These are simply changes to the default settings that gives me color and contrast and saturation that I like as a starting point to editing the RAW files. By a process of trial-and-error, I gradually adjusted my RAW files’ default in Bridge / ACR to these to give me images which immediately have more punch.
Similarly, if you are just starting out with editing RAW files for the first time, you might find the images look lackluster, and even a touch under-exposed. You would then either through a process more scientific than mine, or by looking at your calibrated monitor, come to settings which look good.
I use Adobe Standard as the profile, since Camera Portrait profile often gave a green-purple color banding in darker areas. Not nice.
Because I don’t shoot something as rigorously demanding of accurate color as commercial photography, there is a certain latitude here in my approach to this. I just want the images to look good, while relying on the benefits of the RAW capture.
Summary
With this brief introduction to a RAW workflow, I wanted to help newcomers that may be concerned with or frustrated by their RAW files not immediately popping with color. The idea here then is that it would be necessary to “take charge” and create defaults to your RAW files that give you basic images that look closer to the way you’d like them to be.
Of course, the beauty of working with a RAW file then is that it is impossible to make a mistake. You can always go back if you change your mind, or as discover more about digital photography and digital workflow.
You seem to have that gift of making knowledge… a friend.
Comfortable, affable, accessible.
Further Neil, choosing NX2 (can’t speak for DPP), is that you’re able to create custom photo profiles and load those into camera adding yet more flexibility. Nikon produced a series of their own Landscape and Portrait being two, but as said, you can create your own via the Picture Control utility.
Nirvana for me would be a Nikon piece of software akin to LR or Aperture and as fast to work as them as NX2 and ViewNX2 is painfully slow especially if your computer is doing something else.
I recently tried LR v3 and am very impressed at its noise reduction section.
Bibble 5.2 for me, blazing fast, excellent plug-ins and it runs natively (!) on Linux.
Sorry, but I’m a true believer of open-source operating systems.
Roel
I’m just wondering, is it a MUST to shoot in RAW?
I know most wedding photographers do so. But I also know at least 1 top photographer who doesn’t. To him, shooting in RAW is just an excuse for you to make mistakes or be sloppy in your skills. He gets everything right in the first place. From color balance to exposure. All in JPEGs! I have full respect for this photographer because he has won many international wedding photography awards. His pictures are absolutely stunning.
RAW for me is my digital negative and cannot be mistakenly overwritten. White balance can also be a lazy after thought and storage is relatively cheap considering the price per GB these days. I just believe my photos deserve to be taken in the highest quality possible so the extra bit depth can also be important especially for quality printing.
That said, i would honestly only shoot RAW for a high profile clients, cherished travel photos, fashion shoots or anything where dynamic range and colour is of the upmost importance. If i did ever shoot for events, weddings, parties and so-forth it is doubtful i would shoot RAW. When you factor in the shear number of photos required and high speed or burst rate is of the upmost importance, JPG is the way to go.
Both formats have a place for me, but RAW editing for me is so enjoyable with todays current tools.
I use a Macbook Pro, Lightroom, Portraiture and Photoshop CS5, namely because they all work in symbiotic harmony together. Add other tools like Flickr and WordPress and your website really requires the bear minimum of maintenance, great if you run photographic blogs.
Neil
The setting you have used in the right screengrab, am i correct in thinking you have these set, so every image you open comes straight in at those settings? So straight away you have better colours before you use other tools, to achieve the look you want. Thanks.
Another important aspect for people deciding which format to use…
Generally you will see extra (fine) details in your captures, when producing a TIF or JPG from a RAW file, compared to a camera produced JPG.
Furthermore…
As I found out the hard way, it is worth archiving your RAW files. Each advancing generation of RAW processing software seems to reveal more fine details and remove image noise more efficiently.
So at a future time, it should be possible to return to previously taken RAW files and extract even more information, producing a (possibly) more detailed image than currently possible.
Obviously, there are certain limitations and considerations, quality of optics used, f/ stop (depth of field and diffraction) and so on.
David
Hi Neil,
What type of tool do you use to set/correct your white balance ?
Regards,
Tam
Greetings Neil
I had this posted in another section titles “digital imaging and workflow”, and decided to copy and paste into this tangent.
Finally, a meaty tangent on RAW
Being a long time fan of your work, I took your advice and progressed into shooting RAW.
All can I say to those who are not sure, is yes, yes, yes and yes. I now see the advantages of shooting in RAW.
The manipulation of white balance, exposure etc etc.
Even deliberately shooting slightly over or under exposure (in a test scenario), I can save the image.
I would like to say that as a new comer to RAW, that the following book is a must, as it explains the workings and relationships of the required programme such as Photoshop, Bridge, Camera RAW and DNG.
Real World Camera RAW with Adobe Photoshop CS5 by Jeff SCHEWE and Bruce FRASER.
Cheers
Angelo (Australia)
The hardest part for me is to find that right taste!!!
We always try to make the photos look while we process them, but sometimes some tweaks are just wrong and don’t work when others look at them. I always wanted to take a class where I could see great photographers like you doing corrections like so I could learn. Maybe the next seminar?
Bart,
I was in the same position as you.
As Neil mentions in many tangents, buy a spyder and calibrate your monitor.
Fine tune your camera settings.
However, the book I mention above is a must.
Find and buy it, cos it will explain a he’ll of a lot.
It’s easy to follow and goes through practical examples.
It will also guide you through all the software required for RAW.
Neil can only post so much info at a time, the rest is trial and error.
Hope this helps
Cheers
Angelo (Australia)
I couldn’t agree more. RAW beats the crap out of JPEG. With RAW you can recover so much detail.
Hi Neil, can you share what would look like the default settings for canon 1dmk4? Just curious to compare with mine. Thanks. Roman.
Neil, with regards to my earlier post here, yes, I’ve read your link on RAW vs JPG.
Before I move on, I have to say it’s not that I disagree anything you wrote, but I’m just questioning/sharing what I have learned from a top wedding photographer in the industry who does not believe in shooting RAW.
If I should disagree with anything, it’s the part where you stated:
“You have no excuse to shoot in JPG (only) format, unless perhaps …”
You should add in another point: “Unless perhaps you have a workflow that suits JPG and can still produce excellent results”
To clarify things, I shoot totally in RAW, unless it’s for some assignment where lighting is very controlled or something less important.
It’s not easy to shoot in JPG for important assignments. I would say it’s possible, but the key is only if your WORKFLOW suits you. It’s all about workflow.
The photographer I mentioned above is internationally recognized and has won numerous WPPI awards. So the accolades he has won are enough testament that he knows what he is doing. I’m just waiting for someone to mention his name here!
To him, shooting in RAW is a waste of time. He likes to get everything right first. Most photographers don’t feel comfortable shooting in JPG because it’s like asking one to walk in the streets naked. You feel unsafe. So to that, I have to take my hat off him. He is by far the only professional photographer I know who shoots in JPG and can produce stunning images that blow anyone away.
It’s not that his images have not gone through editing. They certainly have. It doesn’t mean that you can edit your images only if you shoot in RAW. On the contrary, even if you shoot in JPG, you can still edit your images without much image degradation, provided you get most things right before pressing the button. That’s what he does well. And mind you, he doesn’t just shoot posed studio/portrait shots. He is a wedding photographer on the move also.
I hope this clarifies….
As usual Neil
Thanks for the detailed answer to my question.
Do you apply any Photoshop curves or Levels to the output file.
Or do you only use Photoshop for retouching or adding FX filters?
Lou
Hi Neil,
I’ve got a question.
With the camera profile, you have changed it to canon portrait as a base. I always doubt myself to judge what looks best when pp’ing due to the many variations and the infinite level of fine tuning available. When looking at a set of shots to pp I doubt myself with ‘your ruining it, just leave it alone’ running through my head the whole time. I’m finding the pp process very similar to the jump from the Auto modes to Manual mode on camera. I’m comfortable in Manual now (with your help I might add).
When compared to the sooc your base is certainly a huge improvement with colour and punch. I tend to go be very conservative and mostly end up under doing it to some degree, only realising it when comparing to shots of others (for example when posting on flickr etc).
My question is; how did you go about building the confidence in your PP? Finding that sweet spot and the middle ground between under and over cooking it? I always, always think that someone else would have pp’ed my shots better than I did and how much better off they would have been for it.
As always a great post and for me a thought provoking one.
Best Regards
Chris
Hello Neil,
six great as always!
A question: what software elaborated RAW images, and ‘better use of Camera Raw, Lightroom, or Photoshop?
Edy Trigona Genova Italy
Another question:
Sometimes I find my images a little ‘flat colors and a little’ cold.
I wanted to know if the method you have chosen you to change the contrast with Camera RAW is good for any image, or to warm up a bit ‘colors you can suggest other methods delll’immagine
Thanks as always
You are the best
I am a photographer, but also do a lot of DSLR video work. As such, I meet a lot of shooters who wear it as some sort of badge of honour that they shoot JPEGs as opposed to RAW because they’re just that damn good. Further conversations throughout the day I’ve found out a couple of things about what the REAL (reading between the lines) reasons they don’t shoot RAW despite their claims. Here are the main objections:
1. They just don’t know how – while they might be good photographers their computer skills are novice level
2. They just can’t be bothered – for those that might know how to work a computer the they don’t have the inclination.
3. They might have the inclination – but their computer hardware and/or software don’t cut the proverbial mustard to handle the massive file sizes of some of the newer DSLR’s
4. They really are just that vain and arrogant!
Personally I use RAW for just about everything – even for walking around. For day to day use i use RAW as it forces me to stay organized – keep stuff i really want and get rid of the rest. Professionally i use RAW as I can’t with 100% reliability control the environment around me. What if the sun comes out behind a cloud or goes behind one – while something that can’t be replicated happens? Or a guest fires their camera and i get two flashes going off at once? I do a LOT of Indian weddings and sometimes bouncing flash inadvertently catches say a bright pink sari that i didn’t really notice or even if i did notice it would be too late to do anything about as the moment had passed? The only viable solution would be the latitude of a RAW file.
I know this is rambling on a bit… I’ll leave everyone with this thought: I met a photographer who was actually a guest at a wedding. He noticed that i was “chimping” – looking at the LCD screen after every shot. He “graciously” pointed out that it makes me look amateurish and also had pretty much the same thing to say about me shooting RAW. I explained my rational behind everything and even photoshop compositing and cropping, image processing for BW etc., and as for the “chimping” I asked if he knew of a better way to ensure people’s eyes were open – and if it was better to take a RAW photo capturing a unrepeatable moment that can be fixed later… or fiddling with settings to get that perfect JPEG while life unfolds in front of you!
Hi Neil,
I attended your presentation last evening at the Pocono Phot Club. It is the best on camera flash session I;ve been to.
I immediaely rushed home and dug out my old promaster flash ( my Pentax AF360 does not swivel) and put it on my K7 to try it. Just shooting in the livingroom at still subjects I was impressed with the results.
Thanks
Bob
Wish I had something more intriguing to say, but just wanted to take the time to thank you for sharing your knowledge. Your website has helped and inspired my photography tremendously.
I always have trouble shooting RAW. Unlike here my RAW images are always overexposed looking, weird in color and over contrasty! I have even zeroed out my meter no blinking highlights and shot in “neurtral” setting and it still looked really off. I have heard that Nikon zhooters need to have an exposure comp of -2/3 or something to acheive correct exposure in RAW. But this may just be a myth. Any thoughts on how I can have my RAW look normal?
Meridith,
If you are using Lightroom, if the camera calibration module says “Adobe Standard” for its profile, then the image you see will be “off” compared to the in-camera image. It will look overexposed and have high contrast. If you set the profile to “Camera Standard,” it will look closer to the in-camera image.
Because the RAW is devoid of any processing, you have to give the RAW converter some starting defaults for processing the RAW, like Neil said.
Hello Neil,
I have been shooting jpeg and am just now in process of learning to shoot & process in raw. Right now I prefer to stay with bridge/acr workflow…but have much to still learn, and later down the road may or may not move into lightroom.
But I’m very interested to know with your individual portraits typically, what do you have your sharpness (if any), and noise sliders set to usually (in Detail)? And do you add sharpness “last?”
I’am just trying to get this down, as I’ve shot portraits in jpeg always & the raw look kind of soft sometimes & lack luster…even after processing. But I dont want to over do it either! I’am determined though…I know & have heard how much more latitude I have with shooting raw versus jpeg!
Thank you, your reply is most appreciated!
Thanks so much Neil for your quick reply, as I know how busy you are! And hoping not to be a bother again, with a couple more quick questions..
When you sharpen final resized image, is it done in photoshop, and what settings (normally) do you sharpen your final images?
THANK YOU in advance for your time!
Mmm, after 20 years of shooting on film I have finally stepped into the digital world and latched my 70-200mm f/2.8 and 24-105mm f/4 onto a digital body – the 30D. Needless to say I now feel that the photographic world is my oyster! RAW is definitely the way to go; there can be no argument here. The detail, and ability to easily and simply tweak images in RAW format, is simply a revelation. On ya Neil!
What do you use to calibrate your monitor?
Lou
To calibrate my monitor, I use the Datacolor Spyder Colorimeter (B&H / Amazon)
Dear Neil, i have use spyder 3 express for calibrate my lcd. I have some question for you :
1) Have i must sett my working space in photoshop with profile monitor RGB – Spyder3Express (a new profile shown after calibrate lcd with spyder 3) or my working space still with srgb IEC….2.1?
2) Have i must sett on Canon DPP color management for color matching setting with my monitor profile(spyder 3 express)
3) Adobe RGB or SRGB for camera setting?
Thx Neil
Hi Neil,
I’ve been poring through your blog for the last six months and attended your flash workshop in Dublin a few months ago. It really had a very positive effect on my wedding shots since, and I would highly recommend it to anyone wanting to attend a workshop with you – really well organised, great models and make up artist, very professionally done.
Ive been using DPP which gives good results from my Canon 5d mk1, just wondering if you would mind sharing your DPP presets when shooting with canon cameras?
Thanks!
Hi Neil!
Do you use Adobe RGB or SRGB for camera setting?
Best regards!
^Istok, If you are shooting in RAW, there is no predefined color space for these files. Adobe products, Aperture, etc… all define a larger working color space (like Prophoto RGB) while you are editing the RAW files and ignore the camera setting for color space. When you choose to export a file from your RAW converter, then you can assign the jpg/tiff/whatever a color space at that time. (Generally, sRGB would be best for web usage, email, etc…)
Check your RAW software, but all programs I know of ignore the camera settings for color space and therefore it’s not really that important of a camera setting to worry about when shooting with RAW.
Hope this helps!
Great article! What would you recommend using to extract the jpeg from the raw file? I shoot raw 100%, Canon dslr. Sometimes I love the shot SOOC and I don’t want to process the raw. I have the software that came with the camera as well as LR3 and CS5. Thanks!
Photo Mechanic will do that for you. Check that linked article how Photo Mechanic can speed up your workflow.
Hands down I would have to say that I have made things a whole lot easier for myself when I am shooting in RAW if I follow these steps.
Pre-Shooting Phase:
1. Using the “One-Shot Digital Calibration Target” I set the proper exposure for the scene (environment) that I am shooting in.
https://www.amazon.com/gp/product/B000JOQ10K/ref=oh_details_o03_s00_i00?ie=UTF8&psc=1
I verify that the White portion of the target displays properly on my histogram
2. Once my exposure is set, I use the final image that was taken successfully and set it as my custom WB in my EOS 1D X.
3. I now take a quick photo of my “ColorChecker Passport” device and save it for Post-Processing.
https://www.amazon.com/gp/product/B007V9N5R8/ref=oh_details_o06_s00_i00?ie=UTF8&psc=1
4. I begin shooting
NOTE: If my scene or environment changes, I redo steps 1-3 again. If I am in a pinch for time I simply leave my white balance in Auto WB – this is easy to fix in LR4 with the Color Checker Passport plugin and functionality software built in.
Post Processing Phase
1. Load photos into LR4 using the DNG format
2. Create my custom camera profile using the DNG photo that contains the image of the ColorChecker Passport that I held up and shot.
3. I use this one profile now and apply it to all of my photos ensuring the color is completely accurate.
4. I finish making any other edits to the photos that I want.
That is it! It is easy-peasy using these two tools.
The cool thing to make note of, even if I do not have my exposure set correctly, as long as I take a photo of the Color Checker Passport in the environmental conditions that the photos were taken in, everything will be taken care of in LR4 by the Passport’s software automation functionality.
I have found that the color rendition that the Color Checker Passport applies to your photos is even more accurate and “vibrant” that that of any of the Adobe preset profiles that are available in LR4 by default.
Hi Neil, in comment #42 you said that you don’t use this presets anymore, right?. So, you only use “Adobe Standard” and ajust to taste? Or you still have some kind of default settings?. I ask you because I think my default RAW looks a bit “cold” or “flat”.
P.S: I shoot with a D90 and process RAW with Lightroom 4
Thanks!
I will play with sliders to find a pleasant preset. My main problem is not knowing exactly what to change (and how) to improve my default RAW. I mean, I know it doesn’t look like I want, but I don’t know where to start.
I think I need to read more and do some tests.
Thanks for your constant dedication and help!
Hi Neil I started out using your settings in RAW as my starting point with my camera profile in RAW set to Camera Portrait based from a screen shot displayed here. But when I started including more ambient light with a higher ISO to make the image look more natural, I noticed it didn’t look so great. Too flat or washed out. Hardly any contrast until I tried Camera Standard and suddenly everything fell into to place. Same thing with my outdoor images as well. They are improved a 100% or more. Sometimes I still finesse the setting depending on the image. Interesting discovery to learn.
Hi Neil,
Good comparison! Very detailed. It answered almost all my questions. But I have one more :)
I have shot 1000+ raw files. I do not have / do not intend to retouch all of them (just around 50 that the customer will pick). So I just want to create jpeg from them and send to the client. But the problem is (as you described) when I open them in lightroom and export them, the exported images are not as the images as I saw on the camera, and most important they are not satisfactory (because they differ a lot from that I have seen on the rear display of my camera)! I shot with nikon d3200. So I tried nikon NX2 and exported the images with a good quality. But this is a pain. I use lightroom for retouching the raw files (because I find lightroom much better in my opinion) but for those files that I do not intend to process, lightroom is not good because it is not reproducing my camera images, and the camera image is the right image for me, for those images that are not manually processed. So this is a pain for me, so now I shot raw+jpeg.
The question is: For those images that you do not retouch in lightroom (or whatever software you are using) how do you export them ? Is ok for you to get image that is different from what you have seen in your camera and give it to the client ?
I use Photo Mechanic to extract the embedded JPG in any RAW file where I might need the straight-out-of-camera JPG.
This way I don’t have to shoot RAW+JPG, but just RAW … but still have the sooc JPG when I need it.
Photo Mechanic is also a really good tool to speed up your workflow with the speed with which you can cull and select the images.
Thanks!