Tangents

photography tutorials, reviews & workshops

tangents photography blog
learn : discuss : share
  • Tangents
  • Tutorials
    • Flash Photography
    • Wedding Photography
    • Studio Photography
    • Posing People
    • Understanding Your Camera
    • Exposure metering
    • BFT
    • Best Photo Books
  • Reviews
    • Sony
    • Nikon
    • Canon
    • Fuji
    • Profoto
    • lighting gear
  • Workshops
    • Info: Workshops
    • In-person
      tutoring sessions
    • Online
      tutoring sessions
    • Workshops in
      New Jersey (NJ)
    • Workshops in
      New York (NYC)
    • Photo walks in NYC
    • Studio Workshop
    • Video tutorials
    • Workshop results
  • Books
    • On-Camera Flash (revised ed.)
    • Direction & Quality of Light
    • Off-Camera Flash Photography
    • Lighting & Design
    • On-Camera Flash (1st ed.)
  • Projects
    • Two Perspectives
    • B&W Infrared
    • Vintage lenses
    • Time-lapse photography
  • Info
    • About
    • Contact
    • My Photo Gear
    • Books by NvN
    • Join us on Facebook
    • Acclaim
    • Success Stories

available light portrait (model – Anelisa)

July 22, 2010 Neil vN 34 Comments

photographing people – available light portrait

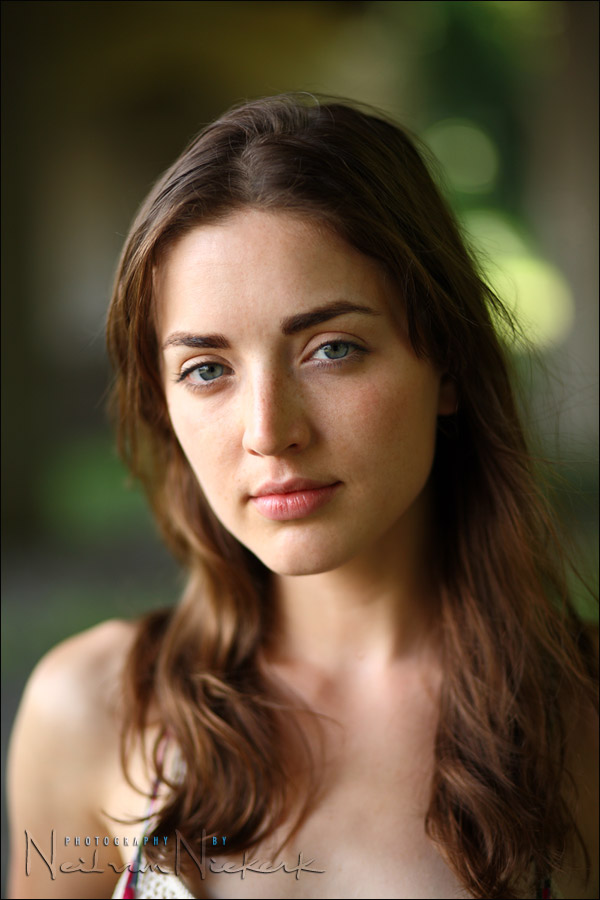
While unloading lighting gear from the van to shoot a last few images for a certain section for my next book, I turned around and noticed the way the light fell on Anelisa.  Beautiful portrait light.  The (cropped) pull-back shot will show why ..

We were parked under a bridge.  The light now comes in from the side, but high up. This means the light isn’t top heavy, and you won’t get heavy shadows under the eyes.  So with slight positioning of our model, Anelisa, we have soft light that comes in from a perfect angle – from the side and above at around a 30 to 45 degree angle.

This is the kind of thing we can actively look for when photographing someone.  A few steps inside a doorway.  Or a few steps under a carport.  Or even a few steps between trees in a forest or park.  Just enough to hide the light coming from above on a cloudy day, or from the sun.

The photo was taken with the classic Canon 5D, and the Canon 85mm f1.8 (B&H)
Camera settings: 1/400 @ f2 @ 200 ISO; no flash, just available light.

photographic composition – looking at the background

In framing the portrait above, I moved a little until I liked the way Anelisa was framed against the out of focus high-lights in the background.  This relates directly to a previous post on how we frame our subject when shooting – we purposely look for at the background, and how we position our subject and ourselves in relation to the background.  In that sense again, the photo at the top, while it is an impromptu  portrait, it isn’t accidental in its composition.  The composition was done with purpose.

And to give you an even better idea of how ugly our surroundings were, click on the pull-back shot to see the entire area.  But in framing tight with a short telephoto lens; and using shallow depth of field; we’re able to eliminate everything that doesn’t add to the final image. That’s the essence of composition – the photographer includes what adds to the final image, and eliminates everything that doesn’t add something.

choice of lenses for available light portraits

A final comment about the lens – the Canon 85mm f1.8 (B&H) – it’s an exceptional lens for the image quality vs price.  Many aspiring photographers who are using the slow f5.6 zooms, might think that photographs where the use of shallow depth of field is out of their reach, should strongly consider an 85mm f1.8 lens.  It is quite affordable, and will give you access to this kind of simple portraits, where attention is placed entirely on the subject.  For the Nikon shooters, the Nikon 85mm f1.8 (B&H) is the equivalent.  Of course, the ‘big guns’ here are
the legendary Canon 85mm f1.2 (B&H), and the stellar Nikon 85mm f1.4D AF (B&H).


Filed Under: Anelisa Durham, composition, gear, general photography, portraits, technique, Uncategorized


Help support this website

If you find these articles of value, please help support this website by using these B&H and Amazon affiliate links to order your photo gear.

I also offer photography workshops and tutoring sessions, whether in person, or via online video tutoring sessions.

Please follow me on Instagram for more.

You can also join our thriving photo community in the Tangents group on Facebook, where we show our photos and discuss all things photography.

Thank you,

Neil vN

Books by Neil van Niekerk


34 Comments, Add Your Own

  1. 1Jemny says

    July 22, 2010 at 5:56 am

    very nice civil portrait! Could you please tell what aperture is used? My gues is at F3.2 but would like to be sure… thanks a lot.

    Reply
  2. 2Neil vN says

    July 22, 2010 at 6:00 am

    Hi there Jemny … I used the lens at f2 as mentioned there in the text. : )

    Neil vN

    Reply
  3. 3Eefje says

    July 22, 2010 at 6:08 am

    Hey Neil,

    thanks for shairing ‘the essence of composition’. I already learned a lot from your blog!

    I recently purchased the Canon 85mm f1.8 and it’s a very nice lens to work with.

    Greetz from Belgium
    Eefje

    Reply
  4. 4Sean S says

    July 22, 2010 at 6:33 am

    Neil,

    You always make the simplest subject intriguing.

    For those reading comments, the buttery shallowness from these lenses adds such a painterly quality to the shot… both within the face and beyond into the background. We always hear about shaping with light… but this is shaping and sculpting with aperture.

    Reply
  5. 5Rashid Khan says

    July 22, 2010 at 8:00 am

    Hi Neil

    About your lens choice…
    I use the 50mm 1.8 but I use a 1.6 crop sensor body.
    Would the 80mm that results from that situation have the similar effect to the 85mm on a full frame?

    Reply
  6. 6Neil vN says

    July 22, 2010 at 8:10 am

    Rashid … a 50mm lens on a cropped sensor would give you a similar image if you framed it the same.

    The bokeh on the 50mm lenses are different though, and usually harsher.

    Neil vN

    Reply
  7. 7Stephen says

    July 22, 2010 at 8:15 am

    Nice shot and composition. Yeah, the pull-back shot is a mess.

    Is this a switch back to Canon?

    Reply
  8. 8Steve says

    July 22, 2010 at 9:12 am

    Niel,

    Is there a specific reason why you shot with the 5D and not the typical D3? I would say “maybe it was just what was in his bag,” but that too implies a specific choice. I’m sure you don’t play camera gear bingo before heading out on a shoot.

    I’ve been considering picking up the 85 f/1.8, but have seen a lot of mediocre shots with it (probably all from mediocre photographers). That top shot may have just sold me (when the budget allows).

    Steve

    Reply
  9. 9Neil vN says

    July 22, 2010 at 9:31 am

    Stephen and Steve … the reason why I used the 5D here, is that I needed to shoot some more images for my new book on off camera flash. And I needed to illustrate something about the Canon histogram.

    I do still have a small Canon system, incl two speedlights and two CP-E4 battery packs and two ST-E2 wireless transmitters. I need those for the workshops.

    Also, since I want the material on this site to largely be system-agnostic, and confidently reply to questions from both Canon users and Nikon users, I keep some Canon gear around.

    Neil vN

    Reply
  10. 10Greg B says

    July 22, 2010 at 9:45 am

    Good post Neil. You are very good at teaching me to see what I am looking at.
    BTW – I don’t have many lenses, but I do have that 85mm lens and it is wonderful. I call it my “magic” lens.

    Reply
  11. 11Gregory says

    July 22, 2010 at 12:14 pm

    Neil,
    The shot above looks like from a photoshhot, but i guess it was a casual shot for you and it was this good. You are too good. Do you ever use a 50mm,1.2 Nikkor. Is it any good for portraits. I have a 50mm, 1.2AF lens. Where can i put it to use.

    Reply
  12. 12Neil vN says

    July 22, 2010 at 12:33 pm

    I have both of the recent versions of the Nikon 50mm f1.4 … the AF-D and the AF-S. But I don’t really like them as much, largely because of the bokeh, and also because I REALLY like zooms.

    Where would you use the 50mm f1.4 / f1.2 ? Where you need then. ; )

    Neil vN

    Reply
  13. 13Chip says

    July 22, 2010 at 12:48 pm

    Neil, I’ve thought about picking up the 85mm 1.8 (Nikon), but I recently took the plunge on the new 70-200 2.8 VRII, which I know you love. Do you think this same portrait would’ve worked as well with that lens?

    Reply
  14. 14Neil vN says

    July 22, 2010 at 1:16 pm

    Chip, my preferred lens would definitely be the 70-200mm f2.8 … it’s a workhorse lens. The new Nikon 70-200mm f2.8 AF-S VR II is such an exceptional lens that I would definitely not use the 85mm f1.8 over it, and only if I really needed the f1.4 look, would I use the 85mm f1.4

    So in terms of the gear, you don’t have to search further – you have an exceptional lens there.

    Neil vN

    Reply
  15. 15Joe D says

    July 22, 2010 at 1:32 pm

    The big big gun is the 135L. Fabulous lens! I have the 85mm 1.8 too, also a fabulous lens as long as you don’t hit the high contrast purple/green fringing which is quite severe.

    Reply
  16. 16Jun says

    July 22, 2010 at 2:20 pm

    Thanks for the tip in looking for out of focus hilight for background. that’s a very useful tip for this type of shots.

    Looking at the pull back, this is almost a window light situation uh?

    Reply
  17. 17Neil vN says

    July 22, 2010 at 2:34 pm

    Jun .. it’s very similar to window light, indeed.

    Neil vN

    Reply
  18. 18Kris says

    July 22, 2010 at 2:47 pm

    Very inspiring article and photo.
    So even on a cloudy day, no direct sun light on the model, you would still move him/her under the bridge?..

    Reply
  19. 19Neil vN says

    July 22, 2010 at 3:03 pm

    Kris, I wouldn’t just rely on the light being soft on a cloudy day. It is usually top-heavy and you get shadows under the eyes.

    Check this recent post about a photo session on a rainy day. There is one comparative photo where the couple is out in the open, and you can see that while the light may be soft, it isn’t flattering. The direction is wrong.

    With that in mind, I would most certainly direct a model or couple on a cloudy day, and control where we shoot if I had to rely on the available light.

    Similarly, check this recent post where I only used the available light during a photo session.

    It is ALWAYS done with the quality of light in mind. And that very specifically includes the direction of light.

    Neil vN

    Reply
  20. 20Tom K. says

    July 22, 2010 at 3:22 pm

    There is something very special about that portrait. Simple. Beautiful. Elegant. Real.

    Reply
  21. 21Augie De Blieck Jr. says

    July 22, 2010 at 4:22 pm

    I’m liking the sharpness of primes the more I see them, no matter the length of them. So sharp!

    But I’m happier to hear that there’s another book in production. Yay! Can you say what the topic of it is?

    Reply
  22. 22Neil vN says

    July 22, 2010 at 4:33 pm

    Augie, the book will be on the topic of off-camera flash. It is slated to be a Spring 2011 release.

    Neil vN

    Reply
  23. 23Sheri Johnson says

    July 22, 2010 at 5:29 pm

    As always, I appreciate the information you share and demonstrate on your blog, the behind the scenes info about the location. It is always so helpful. I know the book will be great.

    Reply
  24. 24Geoff Captain says

    July 22, 2010 at 6:15 pm

    Neil used the 5D to show how ‘even a Canon can look good in the hands of a pro’. kidding!! ;)

    In regards to Chip’s question: I just got finished doing some fine focus adjustments with my 85f/1.4 and my 70-200f/2.8vrII, I was having some issues with my D300s back-focusing. And after pixel peeping for the process, I’ve concluded that although the 85f/1.4 does have that creamy bokeh and that ‘3d look’ wide open, that new 70-200vrII is really, insanely sharp. That with it’s VR and fast focus, I’m actually going to relegate the 85 to the back of the bag except for special circumstances.

    Reply
  25. 25Martin says

    July 22, 2010 at 6:19 pm

    Hi Neil,

    Just wanted to say thanks for all your wonderful posts – the quality you post, both in terms of the photos themselves and the information you provide are nothing short of exceptional. Love reading your stuff, one of the first things I look for each day in my RSS feeds.

    Reply
  26. 26nick aro says

    July 22, 2010 at 9:56 pm

    Hey Neil,

    I can’t wait for your new book! A question about the image you posted above: I noticed that the girl’s face is in focus but her body goes softly out of focus. What sort of pose did you have her do to create that effect. Are you having her lean in forward at her abdomen? Or did you just have her stand however she wanted?

    -Nick

    Reply
  27. 27Neil vN says

    July 22, 2010 at 10:29 pm

    Nick, the model, Anelisa, is an experienced model, so she doesn’t just “stand however she wanted.” She is quite intuitive in adapting and changing her body movements and facial expressions. But she also takes direction very well. So it’s a mixture of me guiding her, and me just letting her do what she needs to do in terms of posing.

    In this shot, it’s just a very basic pose where her body is angled. Nothing more. But I did direct her to angle her body and her face, in such a way that the light falls perfectly on her face. No leaning forward though. Her shoulder is angled away from the camera.

    Neil vN

    Reply
  28. 28Briand says

    July 23, 2010 at 3:23 am

    you make this looks easy

    genius how you compose the bg

    Reply
  29. 29Michael says

    July 23, 2010 at 4:56 am

    Hi Neil,
    I just want to thank you for sharing your knowledge ! I’m a french follower of your work and you have taught me so many think ! I’ve just bought your book which is an excellent reading !
    thanks for all !

    Reply
  30. 30Neil vN says

    July 23, 2010 at 11:18 am

    Michael .. thanks! Good to hear. :)

    Neil vN

    Reply
  31. 31Gene says

    July 23, 2010 at 2:13 pm

    Neil:

    This may be a stupid question, but how did you meter the available light? Would you spot meter the highlights on the skin and let the remaining tones fall where they may? What is the best technique without an incident meter.

    Reply
  32. 32Neil vN says

    July 23, 2010 at 9:20 pm

    Gene … my starting point was a meter reading as is. As framed there. With evaluative metering / matrix metering, the camera does a pretty good job when the tonal values are evenly distributed across the frame. Then it was just a 1/3rd stop nudge upwards in exposure to get the skin tones where they needed to be. A quick check on the back of the LCD got me there.

    Neil vN

    Reply
  33. 33Brian Carey says

    July 24, 2010 at 8:39 am

    Lovely work and thanks for the insights!

    Reply
  34. 34Daniel says

    August 1, 2010 at 2:11 am

    Just found your site, and what a wonderful and informative site it is. Keep up the great work.

    Reply

Leave a Reply Cancel reply

Your email address will not be published. Required fields are marked *

categories

Articles & Tutorials

  • • About myself & this site
    • Books by Neil vN
    • Best photography books
    • Black foamie thing
    • Photographers’ success stories
  • • Flash Photography Techniques
    • Natural looking flash
    • Flash + Ambient light
    • Dragging the shutter
    • Bouncing your flash
    • On-camera flash outdoors
    • Exposure metering
    • Flash exposure compensation
    • Bounce flash examples
    • Which is the best flashgun?
    • Flash brackets
    • Off-camera flash photography
    • Flash photography basics
    • Using video lights
    • Flash photography tips
  • • Photography workshops NJ / NYC
    • Models @ photography workshops
tutorials:
flash photography
Photography
Workshops

All rights reserved. Copyright © Neil van Niekerk 2025 · Customization by The Traveling Designer

Copyright © 2025 · NvN on Genesis Framework · WordPress · Log in