Effective on-location portraits, with off-camera flash
When I photograph someone on location, I rely on a simple, yet effective method that will ensure that at the very least, I will get portraits that work. Let’s have a look at this method, step-by-step:
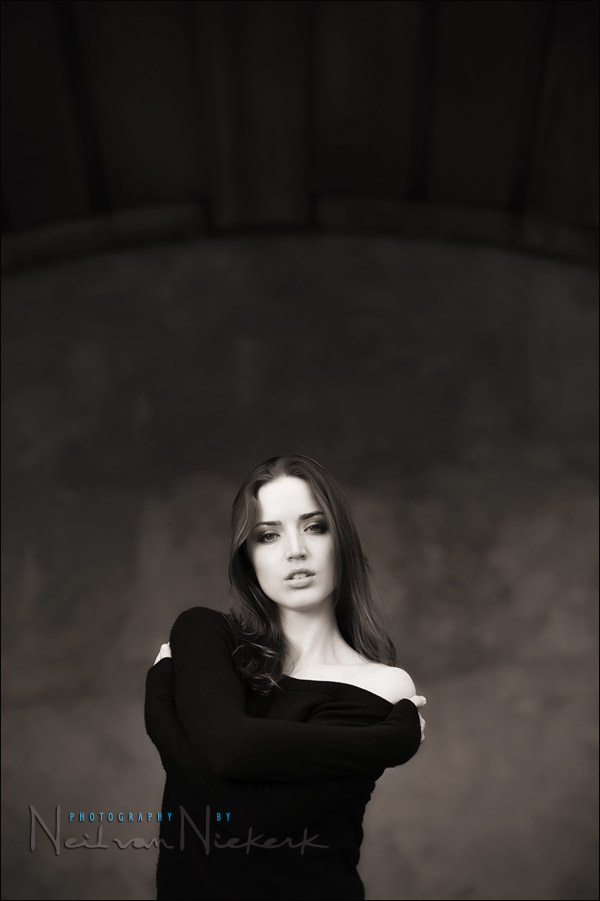
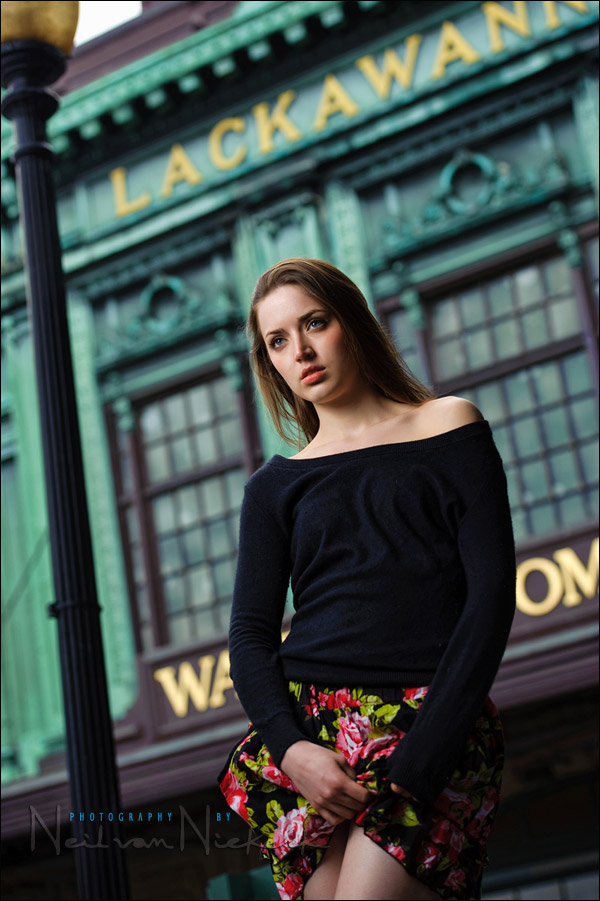
1/1000 @ f3.2 @ 200 ISO
Nikon D3
Nikon 70-200mm f2.8 AF-S VR II (Amazon) @ 155mm
ambient light only
1. find a good background
The background can be uncluttered and plain and work as a simple backdrop .. or it can be a pattern or an interestingly detailed background .. but it has to somehow complement your subject.
Just as important, is to look at the edges of the frame. Carefully look at what you are including … and also what you are excluding. Try to avoid things that will distract attention from your subject. If there is a busy background, see if you can compose your photograph such that the background accentuates your subject. Or that your background is perhaps a patterned background with repetitive forms.
Throw the background out of focus .. at least to some extent.
2. consider your light
The final image here is the only photo where only available light was used. But in all four photographs, I looked for a background such that I could position my model, Anelisa, in even light. No hard cross-shadows from sunlight. No odd dappled light pattern.
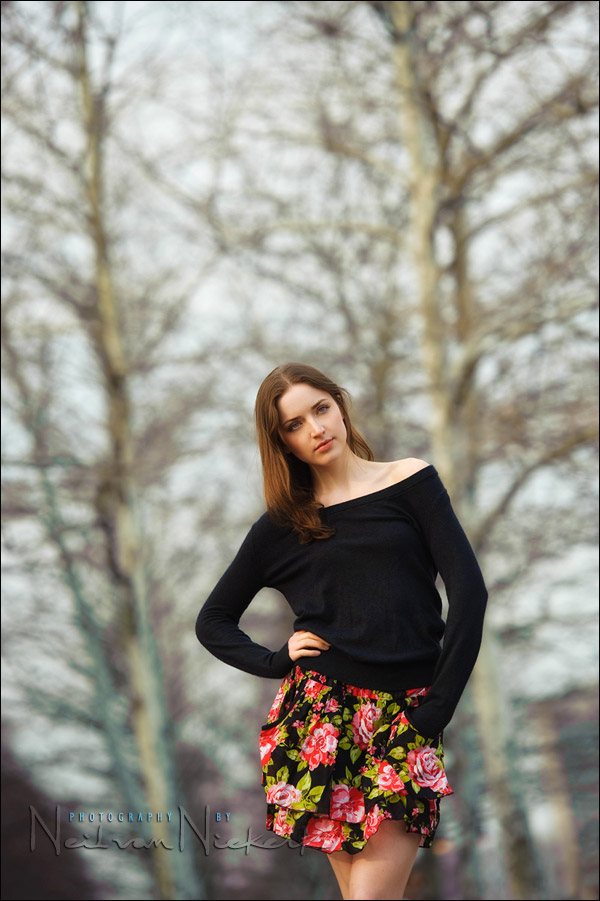
In the first three photographs, I looked for a spot where I could position Anelisa against a brighter background. I would then find my exposure for the background … which implies that she was under-exposed. Then I used manual flash in a softbox to expose correctly for her. The ambient light on her is then under by around a stop or two stops in these examples.
In using the flash & softbox, I could then control the direction and quality of light on her. And of course, balance her exposure with that of the background … as I wanted to. In other words, I had a fair amount of control over how bright the background and subject were in relation to each other. For example, in the second (B&W) image, I could’ve chosen to have my background slightly brighter. Or darker. Similarly for the first image. I wanted my background *that* bright … and then pulled the exposure for her up to that level. (Via flash in a softbox.)
If I had decided to use available light only for all the photographs I took during the session, I would have to very carefully consider the quality of light falling on her .. and then how I position her. But in using flash (with a softbox), I have a lot more leeway in what I can do.
3. composition
The photos shown here all have a central composition. It was a very specific decision in these cases. I really don’t want to fall into the straight-jacket of mechanically composing my photographs with the Rule of Thirds (or the Golden Mean) in mind. Don’t even use that ugly ‘R’ word around me.
I want to instinctively react to what I see, and adjust my composition accordingly. This does mean that I make mistakes that I can clearly recognize afterward in the editing process. I do tilt images for compositional effect, but sometimes the tilt creeps in because I’m not careful enough while shooting. It it something that I have to guard against, and try to self-correct during the shoot.
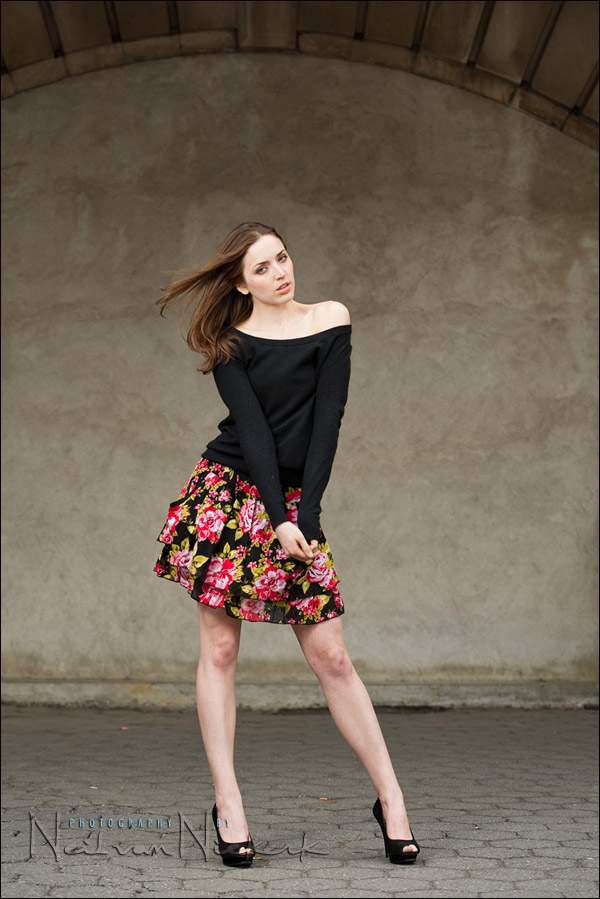
Not only were these images specifically shot with a central composition, the 2nd and 3rd images were posed such that she is quite straight-on to the camera. If it works, it works.
4. position yourself
This relates to how the previous three considerations – background, lighting and composition – are balanced in terms of your own position. If you change position, you change the way your subject is related to the background. You change the composition. And quite often, if you change your position, you change the light you will see on your subject.
Think of the two extremes as an example: If you are in line with the light falling on your subject, you will have flat / even light. If you stand behind your subject, you have a silhouette.
In short, consider how your own position changes the balance in your composition, lighting and background.
1/250 @ f4.5 @ 200 ISO
Nikon D3
Nikon 70-200mm f2.8 AF-S VR II (Amazon) @ 150mm
off-camera-flash in manual mode, with softbox
1/250 @ f4 @ 200 ISO
Nikon D3
Nikon 70-200mm f2.8 AF-S VR II (Amazon) @ 160mm
off-camera flash in manual mode, diffused by a softbox
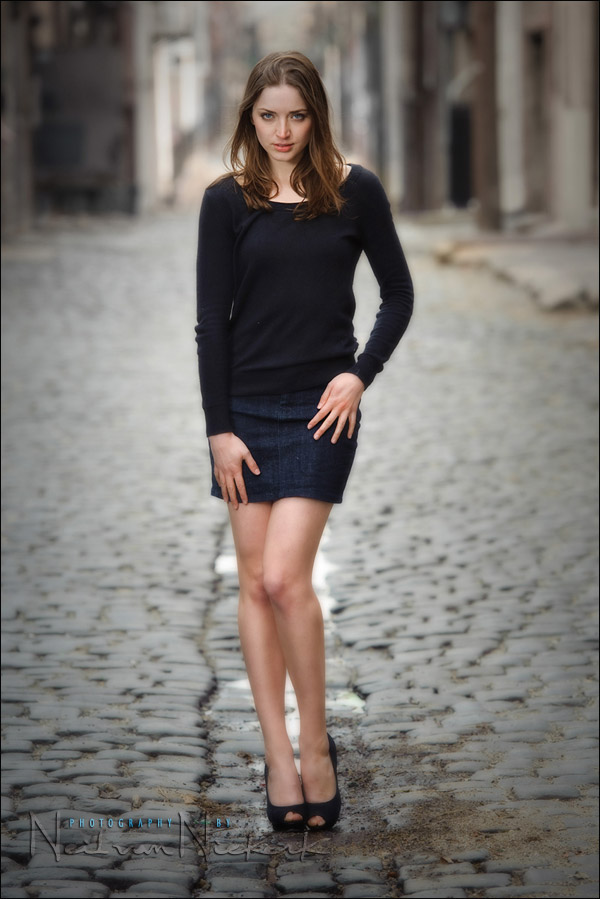
1/250 @ f4 @ 200 ISO
Nikon D3
Nikon 70-200mm f2.8 AF-S VR II (Amazon) @ 82mm
off-camera flash in manual mode, diffused by a softbox
1/250 @ f4.5 @ 200 ISO
Nikon D3
Nikon 70-200mm f2.8 AF-S VR II (Amazon) @ 150mm
off-camera flash in manual mode, diffused by a softbox
related articles
– more articles about off camera flash
– tips on posing people / working with a model
– making your images pop – through choice of lens
For just a second there, I thought the reason why she was hiking her skirt in the first image was to show how she had the NvN logo tattooed on her leg….
Neil,
Been following your site for a while and love all the info you give us, thank you very much. I don’t really know too much about post processing techniques and use very limited amount of photoshop on my photos (basically due to lack of knowledge). But was wondering why use things as the Nik Color Efex Pro 3 (Glamour Glow / B&W Conversion) instead of what photoshop has to offer. Do these programs do what photoshop already does just a lot more simplified?
Thanks again for the wealth of info you share!
Ed V
Ed, these plug-ins and filters and actions are a faster way of getting to certain Photoshop effects, than if you had tried it on your own.
I’m sure you could create something like Imagenomic’s Portraiture if you had enough time to fiddle around in Photoshop, and knew Photoshop well enough .. but in the end, the $$ for the software is cheaper than the time spent creating it from scratch.
I mix ‘n match these effects and then use them at reduced opacity, for a milder and more controlled effect.
They aren’t a necessity, and when I recently met up with Chuck Arlund, he showed me the Photoshop tricks he uses … and I was surprised how simple they were. No plug-ins and filters. Just a few simple Photoshop tweaks.
So the argument can be made that these kind of additions to Photoshop can be a crutch.
Which is the battery for your Qflash (x2t2). Nice portraits.
Regina … if the Q-flash is held up on a monopod, I use the Quantum SC. But I had lent my two SC batteries to a friend, so we used a 2×2 battery this time.
hello Neil; i just wanted to ask you if i do really need to buy
an expensive lens like the 70-200 2.8 to take this kind of pics
because i see that at the end we always end up by using photoshop
so where is just the quality of the lens please excuseme if
i am not clear with my question but inglish is not my lenguis
and i am trying. but thank you so mouch for all your help
that you give us for free.
i am trying to buy my new gear of lenses thats why i am asking before i buy.
thanks!!! Jorge
Jorge .. it really depends on the type of photography you do.
These images were all shot around f4 … and the f2.8 aperture wasn’t necessary.
The amazing stabilization of the Nikon 70-200mm f2.8 VR II, also wasn’t required here.
But for a certain style of photography, and for specific scenarios, it becomes essential. If you need that wide aperture, and you need the stabilization, and you need edge-to-edge sharpness, and faster auto-focus … then the choice is made for you. Of course, there is also the need to be able to able to balance the budget.
Hi Neil, another series of great shots. I love the way your models look in your photos, can u pls suggest us how do u get models to be so comfortable? They are probably professional models, but i find the “people” skills are hardest to master.
Esp during weddings, i sometimes run out of poses and what to ask them to do…lol…and thats also my inexperience.
like always, it was pleasure to visit ur site.
Our model here, Anelisa, is indeed a professional model.
The model makes a big difference in how easy a shoot is. For that reason I prefer working with professional models or experienced models. (Which is why I always pay a model when I do a casting call on Model Mayhem .. I want to be able to select from experienced models who respond.)
Here are my 3 best tips on posing people.
Hi Neil, I notice that you always use imagenomic portraiture. Have you ever tried the topaz clean? Looks like it does the same thing as the imagenomic product. Is there any reason why you choose the imagenomic portrature instead?
Imagenomic Portraiture is, in my opinion, an essential plug-in if you do a lot of .. well, portraiture. But I use it quite sparingly. I don’t like the barbie doll look.
And I haven’t seen any other plug-in that works so well as Imaginomic Portaiture.
Hi Neil,
Another useful post. thx.
Some places I have seen, expecially wedding images,very good tone smoothness.
The said smooth tone images are having foreground,subject and background items and they are in daylight. They are having a velvet look and more to a 3d effects.
Neil, Can you name a plugin purticularly for tone smoothness? Can you please explain a little to that tone smoothness?
Neil,
I can’t get over how effective your instructions are when you delve into a complex topic. You start off with a general overview that clearly defines the issues and goals. Then into the specific details and reasons for your approach, each effectively linked and melding into the next. I believe from a grammar teacher’s perspective, you would get top grades!
-Jory, Omaha, NE. (Afghanistan for until Sunday, then it’s leave!)
Jory .. thank you! Wonderful compliment.
Hi Neil,
Im a huge fan and infact I have a copy of your book “On camera flash” and it’s very helpful in my quest to understand and master lighting more.On one of your images above (last image),I see that the you have 1/1000 @ f3.2 @ 200 ISO
as your setting,question is… were you using CLS to get that HI shutter?I know that Pocket wizard cant go hi up past 1/250 on Nikons (yet), and are all the shots taken with a softbox? – Thank you!
rOiko .. that photo was shot with available light only.
I have now fixed the incorrect text accompanying the image.
Hi Neil,
In the first three images you used Q-flash in manual mode. Why you did not use Q-flash in TTL mode?
Thanks again,
Alfredo.
Alfredo .. the set-ups were static in position, therefore it was simpler to shoot with manual flash, and get more consistency in exposure.
Hi Neil! Thanks a lot for sharing your wonderful knowledge in the photography world! You mention that you prefer to pay for the model, how much, if you don’t mind, do you pay or affer her by the hour? Thanks again! Elio.
Models usually have their rates, and I keep to that. It varies from $20 – $50 an hour. It is of course more if you want to photograph implied nude or nude. But the actual fee is something you’d have to request from or negotiate with the model.
Thanks! Neil!
Wonderful set and instructions Neil :) I love the series :) Specially the tonal placements :)
I’d like to ask about the fill-in flash. I follow your method, and use Nikon TTL-BL on the SB900. D90 is set to manual matrix mode, or sometimes Av (shutter is 1/125 to 1/200). But for whatever reason the TTL doesn’t “just work” as it should. Sometimes it’s too bright, sometimes too dark (the subject). Sometimes it feels like FEV doesn’t help – I’m only 5 steps away, surely it’s not out of power?
Your previous post suggested that Nikon CLS ‘knows’ where the subject is vs bg, and should work even for off-center subjects. But I can’t get it to work here.
Val .. the most likely explanation of your fill-flash is blowing out (and you have dialed down the FEC), is that you’re too close for the flash to effectively quench its output. Check your distance scale on the back of your flash, and just make sure you’re within range, and not too close.
Another problem might be that you’re inadvertently going into High-Speed Sync mode and thereby losing a lot of your speedlight’s power.
Also, if you shoot too fast, and you’re not using a battery pack, then your flash might not have recharged enough. Even when the flash shows it is charged (eg, the red LED comes on), then it is quite likely not at full charge yet, but at 80% or so. And if you fire immediately, you might not have enough juice in your flash.
As you can see, there are several reasons which could contribute. Best to try a methodical process of elimination … but always keeping in mind that TTL is an automated metering mode, and as such there will be inconsistencies in the exposure.
I hope this helps.
That is an exquisite example of perfectly balanced flash and ambient. They look totally natural. Well done.
Hi Neil!
Another great post! :) I have a few questions regarding the Quantum flash.
In the past, I’ve shot all “off-camera-flash” images using manual flash power, and manual exposure. I would love to start using ETTL as I’m guessing it would be much faster/easier in a crunch situation (like a wedding, etc.)
But…the price for a Quantum system that functions with wireless ETTL is quite high.
Have you ever used the “auto” mode on your Qflash? Does it work well?
Just curious…why did you shoot with manual flash in these pictures?
Thanks for any advice!
Rob
I did actually use the Auto mode on the T2 Q-flashes, when I used them on a bracket on my camera. (Oh the backpain and wrist pain from chimping that top-heavy setup!) This was because the Q-TTL mode on the T2D wasn’t reliable at all.
There’s no reason why you couldn’t use the Auto mode on the Q-flashes.
Hi Neil,
Your photos and your flash technique have really inpired me. I’m new to digital photography and have not used flash very often. However, after meeting you and seeing your work at Photo Expo in New York, I have been interested in learning more about using your technique for portraits.
Is Portrait Professional the same or similar to Imagenomic? I love taking portraits and try to use natural light as much as possible, but I realize, after seeing your work, that a flash can provide that subtle difference between a nice shot, and a great shot.
Thanks for help and for taking the time to share your knowledge. I certainly appreciate.
Michael
Michael, I don’t have any experience with Portrait Professional, so can’t do any comparison between that and Imagenomic Portraiture. But from the description on their website, it would appear it does something very similar … at a more affordable price. More than that, I can’t help you with. : )
Hi Neil,
I have always been a fan of yours and I really appreciate all the techniques that you have shared.
I am just curious with the use of flash…I am assuming that the ambient light is dark enough so that you can shoot it at f4. If you were to shoot the model at f2.8 could that still have been possible? or would you have to use ND filters to compensate or hypersync?
Also, could you share your “favourite Photoshop action” that you sometimes use?
Thank you in advance,
Cham
In these shots, I could’ve dropped my ISO .. but in brighter light, I would’ve had to use an ND filter. (I recently bought one but haven’t properly used it yet on a shoot) … or you could go to HSS mode, and use radiopoppers to get non-line-of-sight control over your wirelessly controlled TTL flashes.
As for the favorite Photoshop action that I used here … some things will have to remain a mystery. :)
Hi Neil
I´ve learnt a lot from you via your site! Thanks.
A question: Could you have replicated the same effect in these photos with a reflector using natural light only? I understand that flash is necessary indoors or at night but during the day outside wouldn´t it be as easy to reflect the daylight?
I look forward to your comments.
Mark E.
Mark … a reflector doesn’t always give enough light, and you have to consider where you position your subject with greater consideration than when you use off-camera flash.
This is simply because you have to position yourself and your subject and the background .. in such a way that you still have enough light falling on your reflector, that you can direct towards your subject.
For ease of use, I still much more prefer off-camera flash.
Neil,
Regarding the model’s fee for casting/test that you pay, does that included their makeup and hair. As always, “Awesome Work”. Gregory
Gregory .. thanks!
Re the hair and make-up, that’s up to you and the model to figure out and negotiate, and whether you have a very specific idea in mind with the shoot.
Neil, i have some question for you :
1) when you do test shot without flash to find your background exposure what metering you use matrix or spot and what position your metering, you make zero or you make more over exposure for your background?
2) Do you use light meter to find exposure what you want for your model?
Thanks Neil
Hi there Joe ..
Usually it doesn’t matter what metering mode you use, as long as your method is good, and consistent.
Remember, you can’t just zero your camera’s metering needle and assume you have correct exposure. You HAVE to take into account the tonality of your subject / scene.
As for a lightmeter … for this shoot I wanted to bring it, but forgot it at home unfortunately. (For manual flash it helps to have a flash meter, unless you’re able to use the histogram with a degree of accuracy.)
So with this shoot, I checked my exposure via my camera’s preview. Not necessarily super accurate, but it gets us there in the end too.
Hi Neil!
Your articles are great and informative. Thanks! I do have a couple of questions though. In your pictures where you are using your off camera flash: I would assume that with the high shutter speed you used, you should achieve a dark background– but you still got the background in. How did you get this? My thoughts to answer this are: 1)you exposed for the background like you said, 2)your apeture wasn’t that small to diminish the light source, so did it have to do with using a zoom lens instead of prime?, 3) your backgrounds were not that close to the subject where the flash would take over and make the background go dark. Am I right in any of these?
Also, in exposing your image, are you using spot metering? So do you say to yourself the correct exposure of the background just to keep it in mind and then you set the flash exposure to act more of a fill light? I’m sorry! This question I am having a hard time putting to words.
Thanks,
Anna R. Hodges
Hi there Anna ..
The shutter speed I chose, 1/250 isn’t really a high shutter speed. I would regard it as my average. The shutter speed I default to most times. There’s a specific reason for it – it is my maximum flash sync speed.
>> 1) you exposed for the background like you said,
In scenarios where my subject is under-exposed to some extent compared to the background, the most logical starting point is to expose for the background, whether correct, under (saturating the background), or over (letting it blow out). This is for the ambient light then. Therefore your subject is still under-exposed … until you add flash to expose correctly for your subject.
>> 2) your aperture wasn’t that small to diminish the light source,
This doesn’t really come directly into play. My aperture choice is juggled along with my decision to use a specific ISO / shutter speed / aperture combination. Or alternately, I choose my aperture based on my need for a specific depth-of-field. eg, shallow, medium, loadsa-depth-of-field.
>> so did it have to do with using a zoom lens instead of prime?,
It had absolutely nothing to do with primes / zooms.
>> 3) your backgrounds were not that close to the subject where the flash would take over and make the background go dark.
That is a large part of it. In this case, it isn’t a specific conscious decision, but that is what is happening … the flash doesn’t expose the background in these examples.
>> Also, in exposing your image, are you using spot metering?
I could’ve used spot-metering, but stayed with Matrix / Evaluative metering instead.
Using spot-metering does help if you expose correctly for a specific tonal value. But you can’t use the spot-meter and randomly point it at the subject. It needs a lot more thought.
In reply to this question:
>> So do you say to yourself the correct exposure of the background just to keep it in mind and then you set the flash exposure to act more of a fill light?
Here are two articles that cover it thoroughly:
– balancing flash with ambient – where do you even start?
– balancing flash with ambient exposure
Neil, fantastic article again.
One question, regarding Jorge’s question. You write: …”These images were all shot around f4 … and the f2.8 aperture wasn’t necessary. But for a certain style of photography, and for specific scenarios, it becomes essential. If you need that wide aperture”…
I’m just doing research on this matter, because I’d like to buy a 70-200mm lens too. I’ve got a question: is it correct to say that when you shoot a model, whom is changing her pose, moving a little to make the photos a bit dynamic, etc, that it’s better to use a tele-range (100mm or more) with an aperture of f/4, so you have: a) a blurry background and b) a sharp face. Because, until now, I always did this with at 50-70mm with wide open aperture (f/1.8-f2.8) so I could get the background blurry, but.. it was difficult for me to keep the model’s face sharp at this very limited dof.
So very wide open apertures (f/1.4-f2.8) are fine for still portraits, where the model doesn’t move or moves very little, is that right?
Many thanks Neil, you are teaching me a lot!
Neil, I bought a 70-200mm lens this weekend and first tests show a higher success rate at keep the model sharp (using f/4) while still having a blurry background (shooting at 150-200mm). I also have the feeling that controlling the light from the off-camera speedlight is much easier then with f/1.4-f/2.8). And last but not least, I finally tried TTL instead of doing everything manual and the results were good and I managed to have more shots in the end. I love this. :)
Great shots. I love reading your posts. I was surprised youre not a big fan of the “R” word on portraits. I was very fond of it because it makes the image look more interesting, but i guess central composition can be great too. Thanks for the tip
Gorgeous!! …as always!
Hi Neil,
I just love the way you explain and the quality of content. I am very impressed and would try your techniques.
I have a manual flash YN-560, Do you think pictures like these can be achieved with that one or TTL flashes are better ?
Hi Neil,
Inspiring pictures and article – thanks for sharing.
I was wondering – ow far do you position yourself from the model and how far away is the off camera flash? i.e., do you decide what zoom you want to use and just adjust your distance till the subject fits the frame or do you start at a certain place and play witht he zoom until it just feels right?
-Ayaz
Hi Neil,
I love reading your tutorials. I have an outdoor shoot in a ocuple of days with a very photogenic girl so I’m looking at brushing up on OCF on location, plus just natural light and reflector. Trouble is I’ll be working alone without an assistant and probably won’t have handy surfaces for bouncing on camera flash (trees/open spaces).
How do you work if you don’t have an assistant to hold the OCF/ softbox? I can take light stands but I’m a bit worried it’ll be windy! I have looked but can’t find anything specific in you blog about working alone, but if I’ve missed it please point me in the right direction.
Thanks!
Carmen
Carmen, in that case, I would make sure I photograph where I don’t need more than just the tiniest bit of on-camera fill flash.
– Lighting for on location photo sessions – pick your battles
– On-camera TTL fill-flash
Many thanks Neil.
I’ve decided to keep it simple as it’s my first proper shoot in this vein with an aspiring model and I don’t want to muck things up by over-complicating. I may use On-camera flash or perhaps hold it in my hand with CLS. We’re thinking dark and moody so flash and under exposing the sky (which will probably be inclement) may well be a feature.
Hi,
Great article. I Just wonder, when you meet up with a model, do you pick specific location, or you base on luck trying to find some good spot ?