Making your images pop through lens choice – Compressed perspective
The immediate reaction when considering how you could make your photographs *pop* might be to juice it up in Photoshop. But the process should start much earlier – in camera. With a few easy techniques, we can consistently create images that jump off the page or screen. With some of the engagement photo sessions that I’ve shown, I get comments about the 3D look to some of the photographs. The look is achieved through a simple technique – compressed perspective with a longer focal length.
1. Technique
A. choice of lens
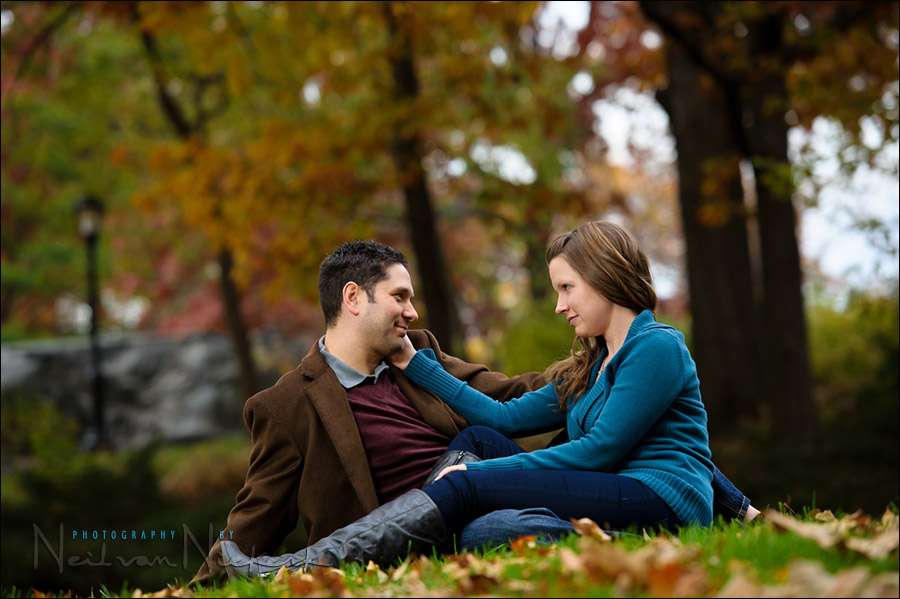
The way that the couple, Lindsay & Chris, is isolated / separated from the background, is mainly due to my choice of lens – the 70-200mm f/2.8 – a fast telephoto zoom. Whether it is the Nikon 70-200mm f2.8 AF-S VR II (affiliate), or the Canon EF 70-200mm f/2.8L IS II (affiliate), this optic is essential for on-location portraits.
With workshops, I’ve seen attendees make a common mistake in choosing a focal length. They stand at a certain (comfortable) distance from the subject / model, and then zoom to fill the viewfinder with the composition they want. The problem here is that most often they are standing too close to the subject, and are zooming to a too-wide focal length.
The best approach is to zoom to your maximum focal length, and then step backwards until you find your composition … and then only zoom wider if necessary. Doing it this way, forces you to use the longest focal length that makes sense for a specific composition. It might seem like a trivial adjustment to your technique, but it could very well change the way your photo look by forcing a longer focal length.
The longer lens also helps in eliminating distracting elements in the background because of the tighter field of view. With the image at the top, I also lay down on the grass to hide people in the background, exactly as described in this linked article. Eliminate and simplify!
B. choice of lens aperture
A wide-ish aperture with a longer focal length, will give you shallower depth of field. This shallow DoF will blur the background. With this in mind, I most often work in the f/2.8 to f/4 range when I use a 70-200mm lens. And to reiterate something – shallow DoF is not the same as good bokeh. (And there certainly isn’t such a thing as “giving more bokeh”.)
C. distance to the background
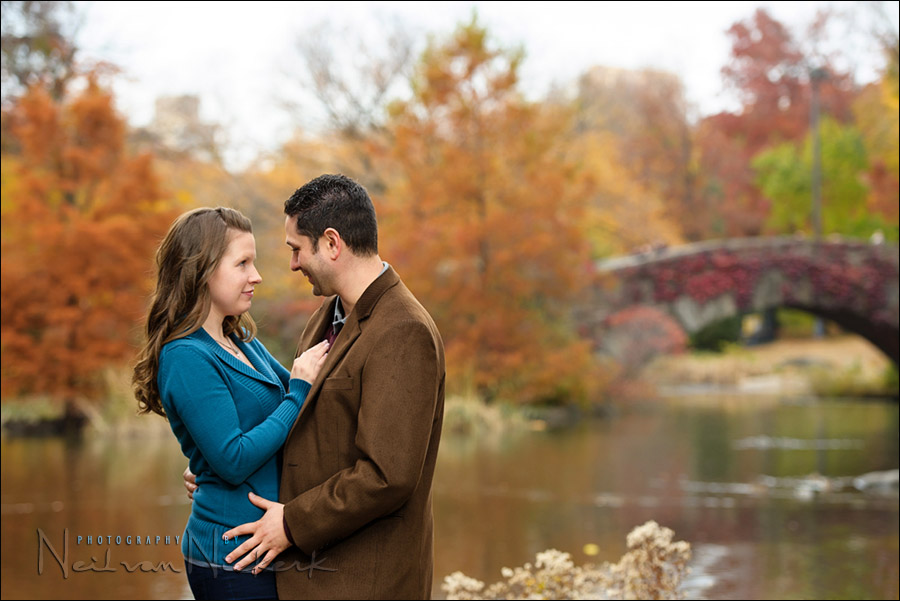
Coupled with the choice of wide aperture and a longer focal length, it helps to position yourself and your subject so that your background is distant. This is why the 2nd image has such a painterly feel to the background – it is distant enough and the lens aperture is wide enough to blur it.
2. Lighting
The lighting here is also important to lend a certain crispness to the image and help separate the couple from the more muted background. The sky was overcast, so the light was soft … but it was top-heavy, giving shadowed eyes.
The lighting here was straight-forward off-camera flash with the Lastolite 24×24 Ezybox softbox (affiliate). The off-camera flash was in TTL mode, with FEC around -2 or -3 EV.
3. Post-processing of the image
Finally, I have to mention that I did in fact use a basic Photoshop technique to give the images a bit more contrast and saturation. I did this by creating a Soft Light layer at 30% as described in this linked article.
But long before I even felt the image could need a bit more punch, the essential techniques were there to ensure that the images I got in-camera didn’t need Photoshop work to make the pop.
camera settings for these image
1/250 @ f/4 @ 640 ISO
Nikon 70-200mm f2.8 AF-S VR II .. at 150mm
1/250 @ f/4 @ 400 ISO
Nikon 70-200mm f2.8 AF-S VR II .. at 150mm
Photo gear (or equivalents) used during this photo session
- Nikon D3S
- Nikon 70-200mm f2.8 AF-S VR II / Canon EF 70-200mm f/2.8L IS II
- Nikon SB-910 Speedlight controlled by PocketWizard FlexTT5 & AC3 Controller
or alternately, the Canon 600EX-RT Speedlite controlled by Canon ST-E3 Transmitter - Lastolite EZYBOX 24×24″ softbox
- Manfrotto 1004BAC – tall light-stand
Hi Neil,
1. Will the LED Light or reflector work in this situation too?
2. Why did you choose to change the ISO instead of shutter speed?
Thank you,
Ups
I find a reflector is harder to deal with than controlling the TTL flash level from my camera. Less shouting to my assistant at that distance. And an LED light isn’t powerful enough for this bright light.
I changed the ISO instead of the shutter speed (which I kept to 1/250), because maximum flash sync speed is a sweet spot. Something magical happens there when you try to balance flash with ambient light. Read that linked article until it makes sense.
I’ve got the 70-200 v1 lens and it’s great!
Thank you Neil. Great tutorial. Thanks for links too. How do you get the colors so true and beautiful? I think you shoot on auto white balance right? If so what if any post-processing software or technique do you use to make any color corrections needed? Or are your great colors more a result of getting the light and exposure right in the first place?
Jennifer … quite a few things will affect this.
– the choice of raw converter
– how you set up your RAW defaults
– good exposure
– lighting & light
– your chosen WB (as set in the RAW editor) … I use the default WB settings on the camera, such as Cloudy and Daylight to get me close to help me asses exposure and what the image looks like on my camera’s preview.
– a calibrated monitor
To calibrate my monitor, I use the Datacolor Spyder Colorimeter (B&H / Amazon)
Hello Neil! Thank you for your post! Like always something cool to learn from you.
You’re truly inspiring photographer and teacher :)
The longest focal length I have is a 100mm 2.8. Would it be sufficient to achieve this look?
Laura .. what camera? Whether it is a full-frame camera or a crop sensor will affect the final look to an extent.
Apart from better photos, using a larger distance to your subject is less intimidating to the subjects and yourself (helps to overcome your shyness).
Neil,
It’s a Canon 5D Mark II and the lens is the 100 2.8L macro.
Laura .. then I have good news for you. You’re going shopping!
Thank you so much Neil (for comment #7) and for the great link. How great it will be to get color consistency! Especially with skin color.
Great tutorial. What really jumped out at me is when you discussed the common mistake of standing too close to the subject and then zooming. I am definitely going to keep that is mind.
Also, I have a 24mm – 105mm F4 on a 7D. Do you think I can achieve a similar effect. Thanks and look forward to attending one of your workshops.
You’d get a similar effect with the Canon 24-105mm f4 IS lens on the crop-sensor Canon 7D if you use it at the longest focal length. Just note that the 24-105mm f4 lens has harsh bokeh, so the out of focus areas might not be as pleasant as with other longer lenses.
Hi Neil!! Great tips and photos as usual! How do you fix a person’s glare on their skin in a photo?
Dirk
To fix glare on a person’s skin, I use a wonderful plug-in called Shine Off, as mentioned in the article on retouching for portraits.
You talked about maintaining a proper distance from the subject. Just wondering how far away were you from the couple? Thanks. And thanks for sharing your knowledge. I love your site as well as your on-camera flash book (hoping to get the off-camera flash book for Christmas.)
Amy, the general suggestion would be that using a focal length over 100mm (on a full-frame camera) for a tight portrait is better. With two people and a looser framing, I’d say anything over 50mm would avoid distortion of facial features.
The longer focal lengths then also help to isolate your subject.
So if you’re using a 50mm lens and standing close to your subject for a tight framing, you’d do better off with a longer focal length if you want flattering portraits.
The focal length and your framing will determine your actual distance.
Hey Neil,
Awesome examples regarding effective use of focal length and aperture. As typical, your presentation style and descriptive ways work great.
Regards, Mike
Tack sharp, great color, over cast pops color. Under expose 1/2 to 1 stop. Any Topaz color pop here?
Great thinking out of the box. I will put this one to practice.
Love that it is F4 at 150. Don’t think that F2.8 would blur background much more.
I prefer F4 to retain some detail over F2.8. the Flash soft box uses all the flash light pointed at the subject verse a shoot through umbrella spreading the light all around
thanks
Nope, no Topaz Adjust, just the Soft Light adjustment layer at reduced opacity, as mentioned under heading C.
Neil, I can absolutely concur with everything you said about the 70-200/2.8 lenses from either manufacturer. Whenever I swap out to this lens on the job……..magic happens :) I love using it, and clients fall in love with the images from it.
On a side note, I recently upgraded my PW’s to the newer Flex’s after watching your video on using them. I have shot two weddings with them since, and I’m very impressed. Thanks a million.
Peter
Would an 85 1.4 suffice?
The field of view would be different to 150mm or 200mm, but the focus plane would be thin depending on distance between yourself and the subject.
Ps love the website, your doing a great job inspiring others with your knowledge and insight. If you ever do a workshop in the England I would be happy to sign up.
With the tighter focal length that the 70-200mm offers me over a fixed 85mm lens, I find the longer zoom to be more versatile, especially in how I can select a complementary background.
Hi Neil, I can’t thank you enough for your work and this website. My images are now quite different due to my expanded knowledge in using flash so many, many thanks.
In regards to long lens, I have a wedding (my first!) to do in Tasmania next month and I have been wondering if I should use my 100-400mm L IS Canon as my second lens due to my desire to use longer focal length for the couple at the beach? Or is this too much? My only other lenses are 50mm “macro” f/2.5 or the every so slow 70-300mm IS. It will be used on a canon 30D and my primary camera/lens combination is 40D/24-105mm L f/4.
I barely have used the 100-400mm and when I did, it was to shoot bats at a botanical garden. Handheld. I would like to shoot after ceremony for 15 min with the couple at the beach, me at quite a distance so I can just tell them to walk and I can get natural shots of them instead of posed ones.
Could you please help me decide if I should use that telephoto over the 50mm pseudo macro lens?
Many thanks for your help.
Cheers!
I just remembered something – the 100-400mm is only f/5.6 maximum. Is that going to be a big factor with (1) shoot just before golden hours and (2) my desire for that tight, shallow depth of field?
I just don’t know the answer to this as I haven’t had the experience trying that lens as portrait, even if environmental.
Cheers again :)
how about 80 200 f2.8 nikon, with D90 can i achieve that look with it?
Neil,
how you deal with separating subject from the background when you don`t have additional lighting and you shoot in overcast sky ?
With that challenge, your only real option is very shallow depth of field.
As a side comment: with with most photo sessions, I pick my battles. If something isn’t going to work, I move on. If it is a scenario I have to shoot, then I accept it as it is, and work within the constraints.
Hi Neil. Will the Nikkor 55-200mm at f/4 also separate my images from the background?
The Nikkor 55-200mm is actually an f/4 to f/5.6 lens. So at the 200mm length, you’re dealing with f/5.6
So you can still effectively throw your background out of focus, but you’re going to need the distance between your subject and background.
To create the maximum 3D pop effect, you need older prime (not zoom) lenses with as few elements (“glasses”) as possible, ideally less than 8 elements. Automations (such as vibration control etc) increase the number of elements, making the pictures more “flat”, and faces without noses. Google “lens 3d pop”, you’ll find articles describing how modern lenses produce very flat (although sharp) pictures. Unfortunately we forgot that photography is a form of art, not a hunt for megapixels and sharpness.
You can find 5-6 element older lenses (Nikon, Canon) that produce full colors and 3D natural depth rendition – you can’t find this in modern lenses (except the modern Voigtlander and the previous Planar and Distagon Zeiss – not the newer ones).