Composition, posing, light & lighting – when it all comes together
I just love this photograph of Anastasia Z, and want to share some of the through-process in how it came together.
To test the Canon 6D camera (affiliate) and the Canon 24-70mm f/4.0L IS lens (affiliate), I met up with Anastasia Z in New York. I scouted this area, while we were waiting for Anastasia who was running a touch late. Just as well I did the scouting earlier on, because it was freezing outside.
I saw the way this building over the Highline in Manhattan was creating this jagged shape with strong lines. I also knew the staggered vertical lines would work well, silhouetted against the winter sky. When we met up with Anastasia, we discussed an approximate plan of where we’d shoot .. including somewhere inside eventually. But I wanted to try this one specific idea first – right here.
So, knowing more or less what I wanted, we walked towards this spot. On our way there, I did try out an idea, but it didn’t quite hang together, and I dropped it to get to this place where I knew the idea would work.
So here’s how this photograph came together with just three test images …
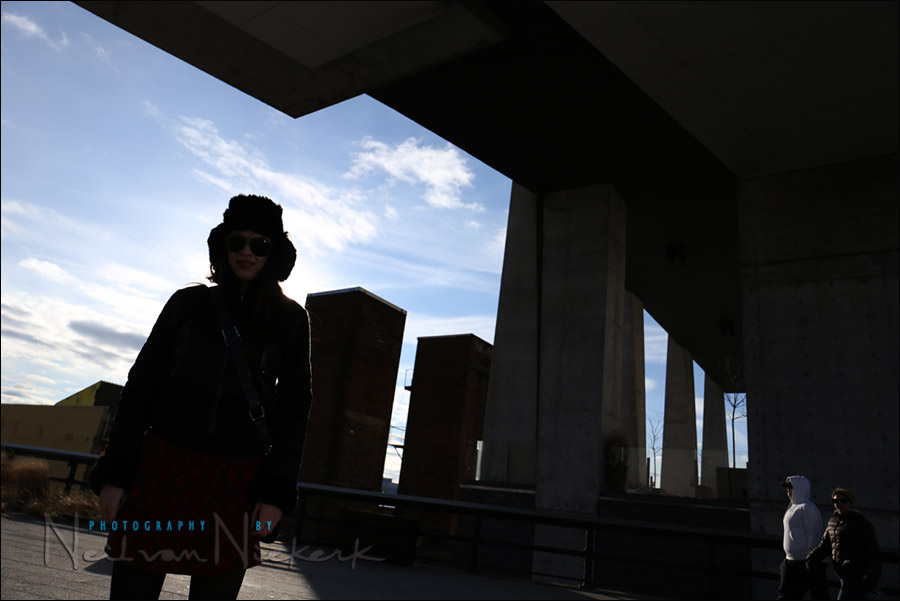
- camera settings: 1/180 @ f/11 @ 100 ISO
I had tried shooting with bare flash at high shutter speed earlier on at a spot along the way, but the HSS flash just ate up too much of the flash’s juice for the aperture / shutter speed / ISO combination we needed. At 1/4000 @ f/4 the flash had to be really close to her to have the effect I needed … so close that the speedlight would’ve appeared in the frame. So I knew I would have to work at the maximum flash sync speed of the Canon 6D camera (affiliate), which is 1/180
Now it might sound like a dramatic difference from the 1/200 max flash sync speed of the Canon 5D mark III (affiliate), but in reality it is an incremental difference.
Back to the photo in this sequence – when we arrived here, I positioned Anastasia to show her on the back of the camera more or less what I had envisioned. It is usually easier if your subject is involved in what you’re trying to do and have a clear idea of what you’re aiming for.
So there’s the composition. With Anastasia placed in that corner of the camera’s frame, it was just a matter of adding flash to light her up. Full power manual flash to match the bright light in the background.
A specific power setting on your flash, at a certain distance, would imply a specific aperture / ISO combination. Or, the other way to look at it … since I had the aperture / ISO because of how I wanted the background to appear, I had to have my flash at a certain distance (because I was at a specific power setting already – full power.)
More about the line of thought here: getting the most power out of your flash / speedlite / speedlight
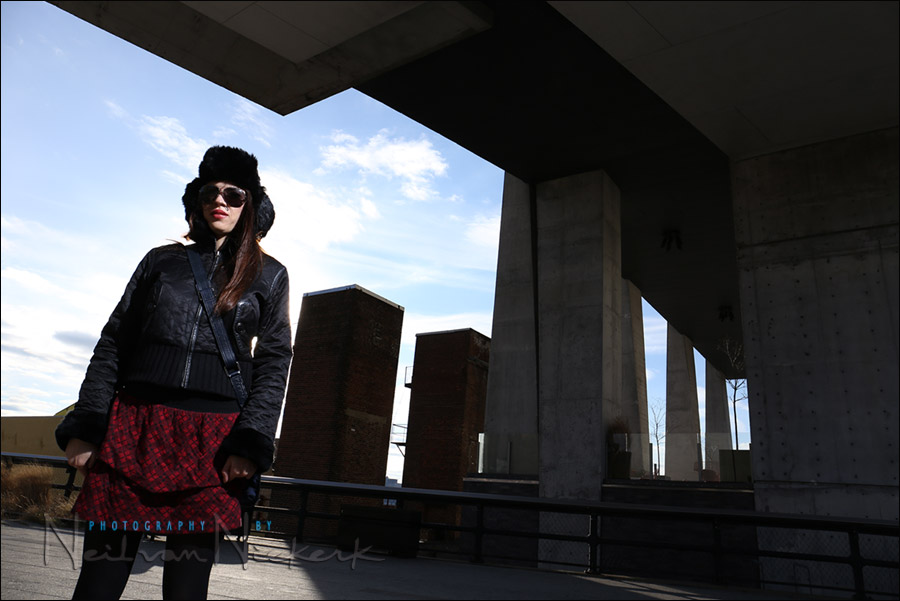
- Here is second image: 1/180 @ f/11 @ 100 ISO
The background in this previous photo was a stop too bright for my liking, so I changed to f/16 and had my assistant bring the flash that much closer … to get correct flash exposure on her.
It takes longer to describe this, than to actually do it. It becomes an easy and fast thing to do once you have the routine down.
The thought-process is the same as described in this article: controlling bright daylight w/ direct off-camera flash (model: Molly K)
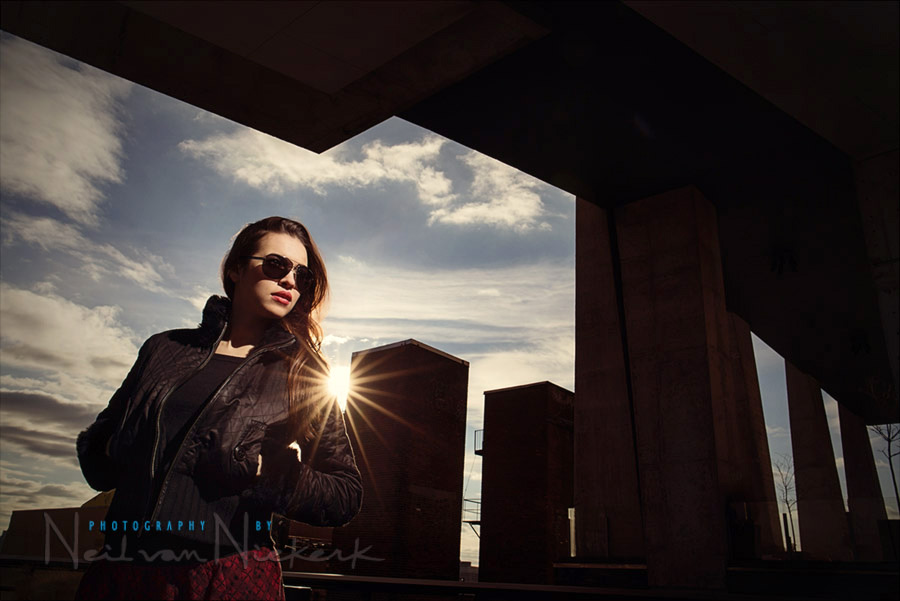
Then I had to direct Anastasia’s pose so that the light fell on her in a pleasant way … and then I changed my own position so that the sun wasn’t directly behind her anymore, but intentionally flaring. Dramatic!
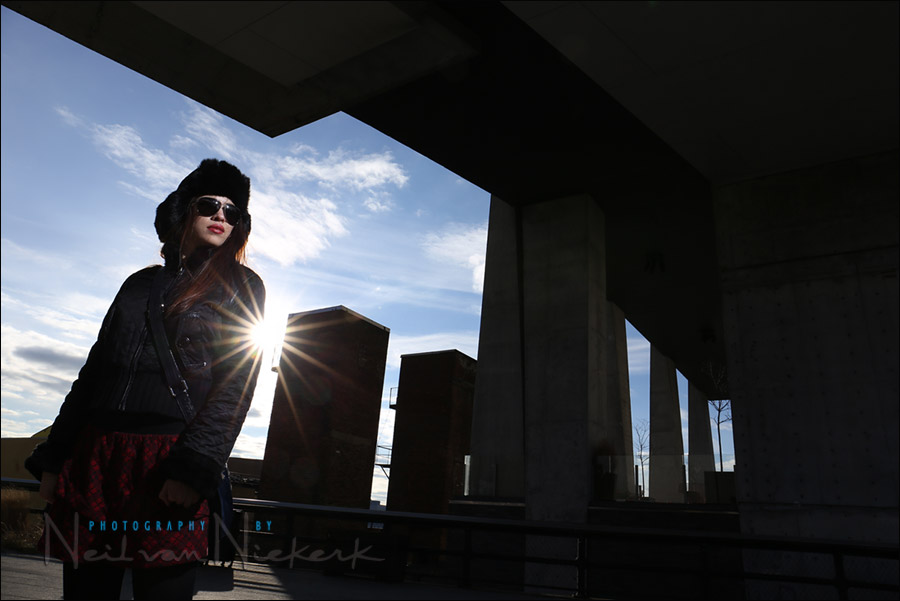
So there we have it in 3 shots. Then I had Anastasia take her hat and bag off, drop into the pose … and get ready for a sequence of images. We had to work fast in the cold, so this methodical way of doing it helped in nailing the final image nearly immediately.
And here is the final image, edited with a combination of Photoshop filters – Nik HDR, Portraiture, Shine-Off. Each of them brought something to the final image.
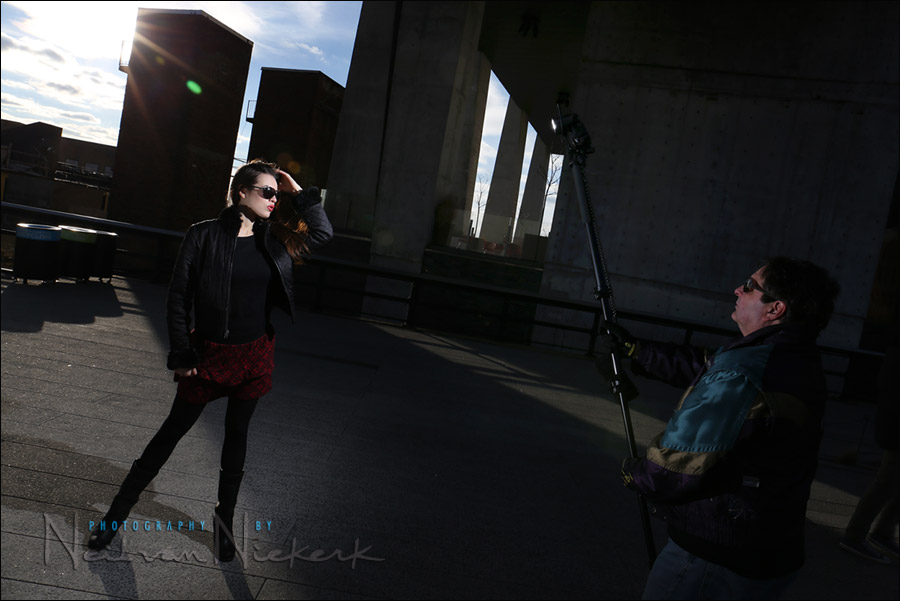
- camera settings: 1/180 @ f/16 @ 100 ISO .. full power manual flash.
Here is the pull-back shot to show where the flash was positioned – held up by Peter Salo who was helping me out on this day, enthusiasm undiminished by the cold.
With the photos that I wanted, we needed to get someplace warmer … so we hung out for a while in a restaurant, and then we went to Times Square to work on another idea I had, which would be a quick video clip that just might just work … Anastasia Z, with a sense of playfulness and allure.
In this way, final images (and also the video clip), are most often an iterative process. Changing a few things along the way to get to something that looks great.
Photo gear used during this shoot
Canon 6D
Canon 24-70mm f/4L IS
Canon 600EX-RT Speedlite / Canon ST-E3 Speedlite Transmitter
Hi Neil
Great shots and explanation as always! Just wondering if you have any real feedback on the 6D yet… I’m looking to add to my gear later this year and the 6D is on my list of gear being considered.
Regards
Roy
Neil, I just read your article on the shoot with Anastasia Z, and noticed you used Nik HDR for some of the editing effect. which part did you use that program on, if I might ask? And how did you avoid the noise problem I seem to have with using HDR programs?
Merrit .. I used Nik HDR to bring up the shadow detail.
In the original edit, you couldn’t see her eyes in her shades. Nik HDR brought that up. But I have it on a layer and pull down the opacity a lot. It’s just a hint of the lost detail.
“The background in this previous photo was a stop too bright for my liking, so I changed to f/16 and had my assistant bring the flash that much closer … to get correct flash exposure on her…”
Neil, a majority of what i have learnt about flash is thru ur tangents,now correct me if i am wrong but isn’t it that to underexpose your background(read ambient) you need to go down on the shutter speed but since here you were on flash sync of 1/180 you could not have gone higher which brings us to the point where in u said u closed the aperture down, does it affect the ambient the same way as the shutter speed does
To under-expose, I’d have to go up in your shutter speed.
And yes, a stop in aperture affects exposure the same way changing your shutter speed by a stop would.
Hi, Neil! Terrific, again!
When you use bare undiffused flash like this, how do you zoom it? Do you prefer to let it in 14mm, 24mm, 105mm, or something else?
Regards!
Hi Neil, well from what i understand now is that you were basically stuck in 3 out of 5 parameters… you were at minimum ISO, Max Shutter sync speed, Flash at full power.. so if one is stuck like this and you still want to further under expose the ambient, then you close the aperture which will affect both the ambient and the flash but the flash can be compensated by moving closer to the subject… Right?
Pankaj .. tadaaaa! You have it. There’s a consistent, repeatable method here.
Hello Neil,
I have interesting way for bringing shadows up. It isn’t my concept and you may know it, I found it somewhere on the Internet. It’s kind of “HDR” image from one photo. Open the RAW file as a Smart Object by holding the shift button when you’re in ACR, which changes the Open Image button to Open Object. Now if you right-click on the RAW smart object layer and choose New Smart Object via Copy, you have a copy of the original RAW smart object with its own independent Camera RAW adjustments. This means that you now have multiple instances of the same RAW file with its own dedicated Camera RAW settings. Now you can add a mask to the layer and cover lights or shadows or anything you want. Double click on the layer – you can correct it in ACR and come back to Photoshop. The source image RAW is untouched in this way. You can do one layer for lights, second for shadows or two independent white balance layers or any other combinations. It opens new horizons in editing for me and maybe for someone too.
Regards, Tad.
Tad .. thank you! I’ll try this method. Sounds like it’s very flexible.
Thanks for the excellent post Neil!
Also, my copy of “Direction & Quality of Light” just arrived from Amazon. Looking forward to reading (and re-reading) all the great advice within. I recognize a couple of the images in the book from your blog posts.
Keep up the great work!
Great work Neil. Informative and helpful post as always :))
Neil,
I ran accross you via an Amazon recommendation of your latest book. I happened to review the first few pages and saw something about a “Tangent Blog” which I had never heard of so I googled it and found your site. I was really taken aback about your photography, you are EXTREMELY talented and the images are spectacular. I especially like the Anastasia shoot where you explain your procedure so clearly. It is so nice and refreshing to see an artist helping those less functional in the craft to improve. I will be reviewing your site in more detail and signing up for your e-mail letter. Much appreciate what I have seen thus far and will be reviewing your books for possible purchase. Do you do any landscape work or do any landscape seminars or workshops? I did my first workshop last year in the Grand Tetons and I would like to do another one in some of the National parks etc, specifically out West. Also are you located in the States or in the UK or Holland? All the best.
Ken .. here’s a little bit about me … and here’s a map to the website.
I don’t do much landscape photography – I live in New Jersey.
Hi Neil: thanks for another extremely informative article. Had to try this, so I went outside and set up a willing subject, an old, black boot with white lettering on it. At minimum ISO, max shutter sync speed and aperture to be determined, I took test shots and settled on f/11 for my chosen ambient exposure. I then turned the flash on (an SB-800) which gave a reading of 15 feet at full manual power. I took a shot with those parameters, and it looked good, with the white lettering easily legible, which was not the case without flash. Next, I wanted the subject to fill the frame even more and moved to about 6 feet from it. I used the minus button on the flash until the distance reading gave me close to 6 feet. Doing so dropped the flash power as expected to 1/4 and gave an equally good result. Richard
It has to work! That’s the beauty of doing it systematically, starting from a few easy reference points.
dramatic!
you’re the man!
thanks for the education from you!
Neil, was just thinking… does this mean there will be a Nikkor AF-S 24-70 f/4 soon??
I doubt it. It’s kind of a redundant focal length / aperture combination, although Canon obviously didn’t think so.
Neil,
If one wanted to use E-TTL II in this situation (with the 600EX-RT), would three 600EX-RT’s grouped together (set on HSS) had enough light output for this particular scene?
If used close enough, then yes.