using direct fill-flash from your on-camera speedlight
Here’s a question that comes up often in emails I receive: Do I use a diffuser of some kind outdoors or do I just use direct flash, with the flash in the straight ahead position.
The simple answer is that yes, outdoors I most often shoot with my speedlight straight-on with no diffuser or light modifier, especially if I only use my speedlight for fill-flash.
But then again, the answer is not quite that simple – so let’s take this back a few steps:
Shooting with your on-camera flash in a straight-ahead position while indoors is possibly the worst way to use flash. We are far better off creating softer directional light by bouncing off a wall or other surfaces.
In this example from a wedding I photographed recently, the flash is both diffuse and directional. And it should be noted that even though the flash used here was an on-camera speedlight, there is no light coming directly from the camera’s viewpoint.

.
This would be ideal the ideal way to use flash outdoors as well, and where I am able to, I do use off-camera lighting that is diffuse.
For example:
Here I used a Quantum T5D-R in wireless TTL mode and with the Q-flash in a Westcott Apollo softbox, creating a very pleasant fill-flash. The Q-flash (with Quantum 2×2 battery) and the softbox was held up high by my assistant.
.

In this example, I bounced my on-camera speedlight into a reflector that my assistant was holding up – and this once again, gave me soft but directional light.
So where I can, I do try to use soft directional flash outdoors, but quite often there are compromises of some kind to deal with. There might not be a handy surface to bounce flash off, or perhaps the available light may be too bright to allow me to bounce light effectively off outside surfaces. Or I might be without an assistant.
When I am working outside and I only have my on-camera speedlight to help me with less-than-ideal available light … and I have these above-mentioned limitations … then I accept the compromise of direct on-camera flash.
Since I can’t bounce flash off the clouds – although I have seen photographers apparently try that, strangely enough – I accept that straight-on flash is all that I have at my disposal at the time. BUT, when working with subjects outside, I will try and position them such that the ambient light is fairly even (or pleasant looking) light on them … and then I use fill-flash to lift the shadow areas.
So in that case, I am using just a touch of fill-flash, and the flash is barely noticeable. Therefore the fact that it is direct flash barely detracts from the overall image.
I very rarely use a diffuser of any kind when I shoot outside with direct flash (as fill-flash). The reason is that we only get softer light by creating a (much) larger light source. And plonking on a Stofen on the front of the flash does NOT create a larger light source. Similarly, pretty much every light modifier that is attached to the speedlight and used directly, will not create a much larger light source than direct flash. It is therefore just a simpler way to use the flash direct – straight-on and without a diffuser – and dial my flash compensation way down to around -2EV or -3EV.
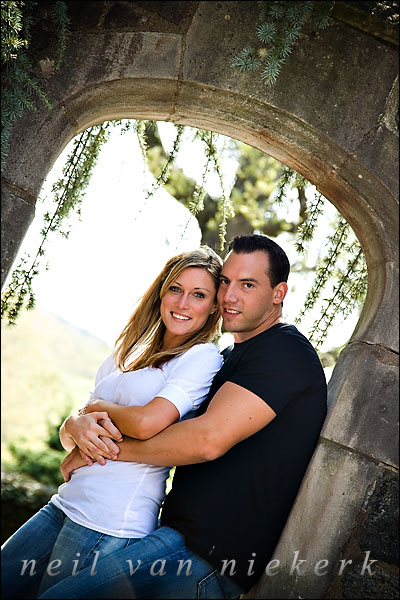
more examples from engagement photo sessions
My settings:
1/250th @ f5 @ 500 ISO – manual exposure mode.
On-camera TTL flash, dialed down to -2EV.
As you can see, I carefully placed my subjects in open shade and I used un-diffused direct on-camera flash to lift any shadow areas just a touch. It does not look like direct flash, because the flash was dialed way down … and the flash exposure rides on top of correct exposure for the available light. ie .. the flash just sweetens the scene a bit.
.
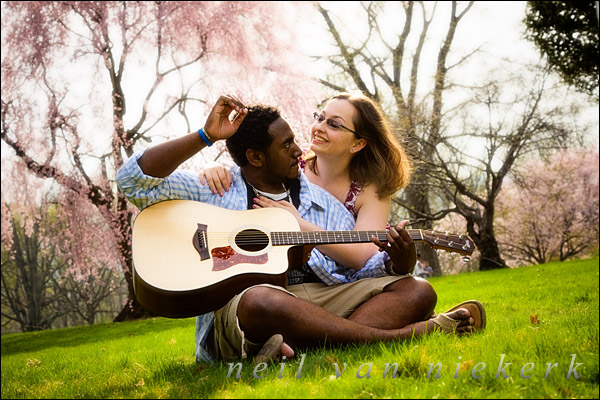
My settings:
1/320th @ f4 @ 500 ISO – manual exposure mode.
On-camera TTL flash, dialed down to -3EV.
Once again, I made sure I had even light on my couple by having them turn away from the sunlight, ie I placed my subjects in open shade. And similarly to the previous example, I used undiffused direct on-camera flash to lift any shadow areas just a touch.
.
Why -3EV here and -2EV in the previous example? Purely whim. No real reason aside from that.
You see, since the flash is just a soft ‘touch’ of fill-flash, the exact value isn’t of that great an importance. The fill-flash just rides on top of correct ambient exposure. And THAT is key here – that my available light exposure is correct. In both these examples (and in every other example on this website), I shot in manual exposure mode. It really is the only way to achieve consistency in exposure, and achieve consistently correct exposure. Trust me on this one.
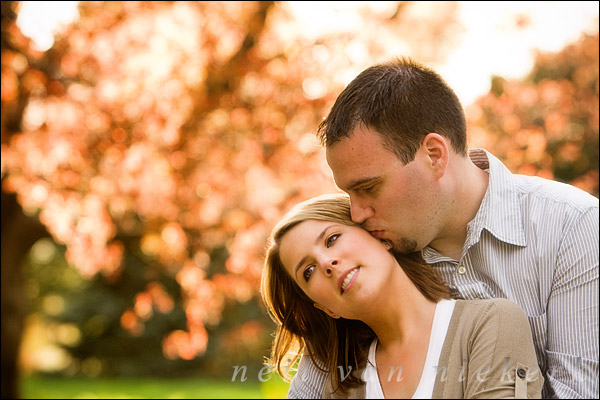
Here’s one more example to show that using direct flash like this as fill-flash, and that getting these results aren’t merely flukes:

My settings:
1/250th @ f4 @ 800 ISO – manual exposure mode.
On-camera TTL flash, dialed down to -3EV.
.
Now, what about those times when flash isn’t merely delicate fill light ?

My settings:
1/250th @ f7.1 @ 200 ISO – manual exposure mode.
On-camera TTL flash, dialed up a touch to +0.3EV.
As I mentioned earlier – using the speedlight for a touch of fill-flash means that the direct flash is barely noticeable. However, if I have to use flash as a main source of light, then the flash is noticeable – but not necessarily objectionable. And I’m of the opinion that using a flash modifier on a speedlight would barely have made a difference … except cut down on my speedlight’s power. And few flash modifiers offer a substantially larger light source over that of the speedlight’s flash head – and therefore to my mind, using a flash modifier outdoors isn’t often of much use.
In the image above you can see that flash was used, in that there is a distinct flash shadow – but this was a slight compromise on this photo shoot, since I knew I would be moving around a lot. And therefore when I had to lift the shadow areas to that of the brighter sunlit areas of the scene, I knew I would have to use more than just a hint of fill-flash.
So yes, I do use direct on-camera flash when shooting outdoors. But even then I take care in how I use flash, and specifically how I use flash in relation to my available light.
I took Neil’s flash workshop last year, and he covered this topic and much much more. I highly recommend his workshop for everyone shooting weddings. It dramatically improved my photography, and continues to do so. Neil is the master of light! And an all-around nice guy.
Linda
This is a really useful round-up, thank you. I’ve developed such an aversion to direct flash that I’ve ignored the fill-in possibilities. Shall definitely give it a try now.
Great post, thanks. But why shoot at ISO 500 and 800?
Extremely informative, as always.
I’m just wondering why your ISO is set so high (500 and 800) in the first three direct-flash examples.
Thanks,
Matej
Hi. Wonderful article.
Just wondering about the high ISO’s used outdoors, 500 and 800 ISO….
also do you have a formula for how much fill flash you use? more flash in the sun than in the shade etc, overcast days…just wondering if you can approximate what FEC you dial down for different scenarios.
Thanks! This was helpful.
Neil,
I greatly appreciate all the effort that’s gone into this blog .. I must have read the whole thing and will probably do so again in the run up to my best friend’s wedding in the summer. Thank you.
When you use the term “open shade” – do you mean the subject is say standing in a field and is shaded by a nearby wall but is open in all other directions?
That is how I would read it but above in the lovely shot of the couple with the orange light diffusing through the trees you say you “asked them to turn away from the Sun – i.e. they are in open shade”. Do you mean what I said above or do you literally mean that they were lit by direct Sun but with their backs to it? The lighting seems way too soft for them to be lit by direct Sun so am I right in thinking they were also stood in shade .. just that we can’t see the shaded area as it’s (usefully) out of frame?
Thanks,
Declan
Wow thanks for your prompt reply! Hope you weren’t thinking I was poking holes! It was an overcast day then – that would explain the lighting. Did you warm it up then?
Aye they’re stunning shots .. nuff said! :)
Thank you Neil!
Can’t believe you posted this up today, since I had the same problem on Saturday. I had the flash on my camera but had no idea what to do with it since I’ve always heard direct flash is bad. I’ll def give your pointers a try the next time I shoot.
Thanks so much for the information you provide here Neil. I greatly appreciate it. Looking forward to hopefully take a workshop with you one of these days. Any chance you’ll have one locally (NJ) before October?
-Thai
Excellent page this week, I learned so much from this and other ones here.
I also wanted to thank you for responding to my email last week.
Your use of on camera flash rocks for sure, this is the direction I want to go in and I will be practicing for sure.
Since most of what I used to shoot was available light, (car racing) learning flash has certainly improved my photographs.
Hey Neil,
Thank you for the great information.
i just wanted to ask you something, isn’t using a smaller Aperature like F/4 or F/7.1 is the way not have all the surrounding over exposed from the flash.
i tried fill flash before but i had the problem is that i expose the couple correclty then i take the shot, the couple are great and the fill flash did eliminate the shadows, but the ambient and surrounding is over exposed, so isn’t this the reason fro smaller Aperature.
for what i know is that the Aperature size is the main factor in controlling flash light entering the camera, secondary is the ISO.
So from the setting of your pictures i would say you lowered the exposure of the surrounding by giong to SS 1/250th???
thanks again
I have started using High Speed sync and really love it. I’m concerned about the drain on the flash batteries with this setting, specifically when shooting a lot of images.
You mentioned you try to stay out of High Speed Sync whenever possible. Is it because of battery drain? If not, then why ?
Great article. Wonderful images and poses.
Hi Neil:
About the 24-105mm f4 IS lens and Canon 70-200mm f2.8 IS lens…Can’t you dial the 70-200mm to f4? For example, suppose you wanted to shoot at 80mm. Both lenses support that zoom length, so both lenses can be set at f4. I presume your choice to use the 24-105mm goes beyond the aperture setting.
Hey Neil,
I have followed your thoughts and teaching. It truly has made a difference. I noticed some photographers are using Video lights instead of flash, outdoors. What are your thoughts on using a video light instead of a on-camera flash. Of course an assistant would have to be used.
Thanks,
Pecci
Neil,
1st of all thanks for the information you provide, I’ve learned so much since I started reading your blog.
I shoot Nikon and I was wondering if you set your Flash to TTL-BL for the above shots and if so would you also dial down the EV.
Hye Neil…nice tutorial there..juz curious though..when u set ur shutter speed at 1/250th..you used the max sync speed rite of ur flash..so,like my camera max sync speed is 1/200th..can i set my shutter speed to 1/250th or should i decrease my shutter speed so that the cam n the flash can sync accordingly at 1/200th..
Neil,
Your guides are pretty much my textbook references for those specific tricky situations. However, I’ve read all of your flash tutorials but I still beg to wonder: when IS it best to use your flash bounced at 45 degrees? I seem to find a lot of places on here that say it’s not the proper way to use the bounce flash, but what kinds of situations would it be the way to go, generally?
Thanks,
Phil
Hi Neil,
Thank you very much for this article. I had the impression that you would loathe to use direct flash, based on previous articles, so this was very informative. I find your blog very helpful, so thank you for that.
Someone above mentioned videolights. I would be grateful if you would post a write up on your experience with it, as your experiments progress.
Thanks again,
Jakob
Neil, I have tried this bare flash vs diffuser outside and when the FEC is dialed down, you’re right you dont see much of the “flash look” cuz its just fill in….and its definitely easier to not have to use a diffuser.
Question, you had given a couple of approximate guidelines for how much you should dial down in various scenarios, and mentioned that in the case of backlight, you shouldnt dial down so much and keep it approx -1 to +1…but wouldnt that “flash look” appear then, being that you are not dialing down and not using a diffuser?
Thanks
Aaron
Hi Neil,
I just love your use of flash in all situations and i guess that it takes a lot of practice to “master the light” this website is a real insperation to me as a new’ish’ wedding photographer….
Just a few questions if you dont mind..
1st question,
As all of the images above were exposed manually, did you expose for the backgrounds or the subjects faces in the bright background images or take a mean average then dial your FEC back accordinally ??
2nd question,
If you set a manual exposure for a bright background and it shows -1 stop to retain a bit of detail would you then dial the FEC back -2 or -3 stops or let the flash TTL work it out ??
Thanks for the site
Martyn…
Hi Neil
This whole conversation is regarding dialing down FEC OUTDOORS.
What about when shooting indoors? Do you leave it at FEC 0, or do you dial down sometimes too?
Indoors I mostly leave my FEC around the zero mark, but it depends on the reflectivity of my subject, and other things such as strong back-lighting. That affects the way the camera exposes for TTL flash.
There’s more here about flash exposure compensation.
I shoot Nikon and have just begun experimenting with flash. I have a single speedlight, the SB600. Your BLOG is so instructional and insightful. Thank you for taking the time to teach us all about flash photography. I need to go out and practice taking pics, but believe me I’ve read your blog at least twice and probably will need to read it many more in order for things to sink in…
You mention in one of your previous replies that had you shot these images with the NIKON equipment you would have just set the speedlight to TTL BL–do you find that TTL BL works as well as the TTL on Canon dialing up and down the FEC? I’m wondering!! Just seems to simple that with Nikon you can go outdoors and take great flash shots exposing for your subject (of course, in even light–or open shade), setting the flashgun to TTL BL and shooting with flash straight on….is this basically what you would do?? should the metering be matrix, or center weighted? One thing that I’ve picked up which has been eye opening is the fact that as a rule of thumb, to shoot outdoors shutter speed should be at or near camera’s flash synch speed, and that you want to shoot in a pretty wide aperture, therefore ISO is the setting that needs to be played with in order to get good exposures. I tend to shoot in Manual mode all the time, so I appreciate that you are an advocate of manual shooting.
Hi Neil!
First of all thank you for great page that you share with others.
I would like to ask something…Logic of Nikon and Canon FEC is different as far as I know. Nikon have a different logic. If the flash shows when you take a picture for example -1EV then you have to move (correct) with buttons flash exposure to -1EV to get zero EV in the end. Am I right?
So how can I know how much of EV should I put when taking pictures outside – using fill flash? Because max sync is 1/250 that means that is a must to use EV correction outside because you have to use direct flash to a subject and if you do not correct EV you get flash effect on your subject. Am I right? I’m talking when a subject standing on a sun.
Kind regards,
Andrej
Here you “dragging the shutter”:
https://neilvn.com/tangents/flash-photography-techniques/dragging-the-shutter/
and here you explained that “dragging the shutter” is not the best way to do it – that we should user aperture dragging:
https://neilvn.com/tangents/dragging-the-shutter-revisited/
I am a little confused or I missed something here…
Kind regards,
Andrej
One more question.
You wrote that you can control ambient exposure with ISO and aperture to get correct exposure on subject and background. But how important is to set right shutter speed? Is there a difference if I set it to 1/60 or 1/250 when I am inside since flash can work in TTL with ma shutter speed?
So how do I know which ISO and aperture must I set to get right ambient exposure when I set 1/60 or 1/250 for example in a room with lights …
Kind regards
:) It is me again. Sorry for so many post but I’m reading all this stuff and I have numbers of question in my head. I have to give them on board. ;)
So when you say words dragging shutter speed does that means that you put shutter speed in fixed value (using a S mode on camera)? Or do you use A mode and only change aperture and iso to get good ambient exposure + subject?
Hi, Neil never stop learning here – a quick question about Better Bounce cards (Peter Gregg) , I started to use them lately and last night used them on an outdoor family shoot when there was nothing to bounce from , no assistant and my light was fading fast. We had set the time for later in the afternoon but the day turned out overcast which meant there was even less light. I shot manual mode at low shutter speed 1/30- f5.6 800ISO. I dialled down the flash and adjusted it via viewfinder depending on the distance from subject/s. Is it still better to use nothing with straight on flash? IS there a better way to use the bounce card
The shots are ok just – a little noisy and a litte flat from a lighting point of view
If I had set up the flash to shoot off camera wirelessly to fill how would that affect my settings?would that have been a better solution?
Hi Neil,
I’ll add my comments to all those who complement you on this page! Great stuff.
Quick question tho- how do you balance the colour temperature of the flash to the ambient; do you use gels/filters or just so little flash that it doesn’t really make much odds?
Best regards,
Dom
Hi Neil,
Big Thanks for superb work – you’re making a lot of people happier and happier with their photos day after day .Thank you much.
I’ve just got one question about exposure:
How did you get 1/320th @ f4 @ 500 iso or 1/250th @ f4 @ 800 iso – outside with a day light? [I assume when you measure exposure – flash is of, subject is on place, you take the metering and then you turn flash on and TTL does it’s magic, right?]
My problem is – even when I’m in the shade (with moderate bright background – a couple under a tree for example) – I get 1/250 @f 8 – f11, so to get background out of focus I’m lowering iso to 100 [nikon D300], and I have to raise shutter speed to level the exposure. I’m entering FP flash mode which I don’t like because of poor range and efficiency .
So what’s the trick with fill flash photos and shallow DOF? Do I use TTL or TTL-BL since background is brighter?
Does ND filter help it?
Best Regards,
Mariusz
Hi Neil,
thanks for your time and reply.I’ve read some more about FP mode of my flash and I think I’m getting there. I just have to figure out max. flash-to-subject distance in this mode.
The problem I had was middle of the day, and shallow DOF with just a touch of fill flash, but still with correctly lit (but out of focus) background. Sometimes I even would like to underexpose background a little.
I usually use Nikon’s CLS so I can put my flashes closer, but with shoot-trough umbrellas I sometimes wish I had a little more light.
As for ND filter I already figured out that it gives you less ambient, but requires more flash at the same time, so high-speed sync flash really is a better choice.
Thank you for everything.Thanks for your website – the knowledge you’re passing is priceless.
With Respect,
Mariusz
Hi Neil,
One of your photo above used 1/320, which is above the sync speed. But I don’t see any dark band on the photo. How is this possible?
Thanks,
Leo Dj
Again, wonderful information. Re Canon, I’m confused if using FEL is necessary while employing your method, with the camera in manual while flash is set to ETTL, in order to place subjects off center. I get the impression that the camera needs the main subject to be centered for correct evaluation using ETTL flash mode. Can you elaborate of direct me to site of clarification?
Thank you for your time.
Hey Neil:
Love your site, very informative. Any idea where I can purchase the black foam that you use for your flash?
Thanks!!
In the sixth and seventh picture under this post, I love the effect of a blurred background. How did you get the background to blur in an effort to focus on the couple? What setting did you use? I have a Nikon D40 DSLR. I love this feature you used, but I’m new to photoshop and photography. I’d like to emulate the effect.
Thanks!
Thanks, Neil. It’s a lovely effect. Do you have any recommendations for doing this with a basic 18-135mm lens?
Hey Neil,
I’m rockin’ a D40 like Mel (along with the 18-55mm kit lens, a 55-200mm VR, sigma 30mm prime, and a sigma 18-50mm f/2.8, vivitar DF-383 flash… such is my meager budget, unfortunately) and I must say I’ve been hooked on the blog since I ran across it. Very inspirational, and I’ve come to the conclusion that when I can manage to make the step up from my wee little D40, it’ll be a big step up to something along the lines of a D300 instead of the D90 I’d previously drooled over.
Thanks for the inspiration! Any suggestions you can give those of us with completely inferior equipment would be awesome. (I’m only able to shoot up to ISO 400 reliably without noise.)
Keep up the good work!
Hi Mel,
the most important recommandation I could give you, is get a good book about photographic basics or search the internet. Those kind of things are really essential to achieve ‘good’ pictures. There is nothing special I could recommend you, because I’m not native English speaking and have no cloue what special book in English would fit to your needs…
To answer your recent question: You will get a shallow depth of field the more you get to wide focal lengths, a wide aperture (i.e. f4 and blow) and it is crucial to check your distances between the subject and the background.
That means, use a focal length from 50mm and above, use a wide blend aperture and stay as close to the subject as possible (fill the frame with a face etc.) and be shure your background is a least a couple of feet behind your subject.
Typical portrait focal lengths are between 60 to 140mm and 135mm is the classic. Keep in mind that you’re using and APS-C camera which will do some cropping to your focal length compared to full frame cameras. Take the number on your lens by 1.5 and you will get something around 40-85mm for classical portrait focal length. You can choose above 85mm (APS-C) as well and it will work fine, plus the depth of field will be more shallow by getting to the far end.
I hope this helps as probably this will be far better explained in some good literature.
That would be great! I just picked up the 85mm 1.8 a couple of days ago.
I realize this is getting away from lighting but since we’re talking bodies and lenses I’ll share my experience as I’ve owned the D40, D70, D90 and D300. This might open a can of worms but here goes:
D40 requires lenses with an internal motor — the 50mm 1.8, 85mm 1.8 and numerous 3rd party lenses will not auto focus on the D40. I loved the photos coming out of the D40 but I wanted access to some of these other lenses. I sold the D40 and bought a second hand D70 on Ebay for $300.
The D90 takes virtually identical pictures as the D300. They share the same sensor and are equal at high ISO’s (ie. 1600) but the D90 costs $700 less. There’s probably very little reason (if any) to choose the D300 over the D90 unless you are considering to go pro. That is, a consumer probably won’t need the ruggedness of the D300 body and/or access to a few of the controls that are buried in the D90 menu. If money is an issue, which it is for most, I would suggest that a consumer buy the D90 and put the extra $ that would have gone into a D300 body into fast 2.8 zoom lenses or 1.4/1.8 primes instead.
Ernst
With regards to the blurry background, the budget 55-200mm VR even at F5.6 produces blurry backgrounds, especially when zoomed in. A nice little lens for about $200 in brighter conditions.
Hi Neil,
Again… so excited, like a child in a candy store over all this wonderful knowledge you are sharing with us. As you can see from all my questions, I’m all over your site reading and absorbing.
After reading this blog, I’m left with a question….
In previous readings, I learn that you meter for the background to capture the exposure you desire, then the TTL flash will fill-in the subject and everything falls into place. Right?
And, on this lession, you mention “to expose for the brighter background, and use then use flash (or some kind of supplemental lighting), to bring your subject’s exposure up” which is in-line with other tutorials I’ve been learning here.
But, then you seem to contradict in a reply to Martyn that you “expose for my subjects. If the backgrounds blow out, so be it.”
Based on these two contradictory statements, I’m assuming to blow-out the background or not is more of a preference with the individual setting & subject matter, right? Or, which is the best method for optimal exposure for the whole scene? I’m lead to believe to expose for the brighter background and then use flash to bring up the subject is better?
On a side note, I was wondering if you considered posting a tutorial that could be entitled “Starting Points”….that goes into depth about your basic, starting settings for different lighting scenarios.
Of course, we all know that nothing is the magic setting, but throughout the board I have seen you mention what you would “start with” and go from there… such as indoors with ambient light, outdoors in full sun, outdoors in shade, what flash exposure compensation you start with, etc. etc.
All of your posts are invaluable, and I think a lot of your students would find a lesson like this really beneficial.
Thank you for all you do! Thank you for giving so much of your time to explain with patience and true desire to teach others.
-Amanda
I just recently found your site and think it is great. I have learned a lot so far. Your images are simply beautiful. I just purchased the Canon 430EXII and am experimenting with fill flash for outdoor shots. One thing that I noticed is pinlights in my subject’s eyes. Is this because the FEC is not dialed down far enough or something else? What is your advice to avoid pinlights? Also is cathlights something you try to obtain when your subject is looking directly at you?
Neil,
Thanks for the clarification. Other forums have made pinpoint lights in the eyes seems as though it is a bad thing to have in your shot. But obviously, you get wonderful results using this method. I have much to practice with my speedlite. I will continue to follow your site and try the techniques you describe as I really want to achieve great results with my speedlite.
Thanks again!
Hi Neil, I’ve just shot my first event – a 50th birthday party using your method with, ‘The Black Foamy Thing’, I was so impressed with the results.
The skin tones have remained warm with no nasty flash hotspots that I used to get using a Stofen diffuser or bounce flash with out shielding the subject.
I decided to try out your techniques in a low pressure environment first, with the idea that I’d like to advance and use the ‘The Black Foamy Thing’, at my next wedding, which happens this coming Monday.
It’s a very small affair with only 8 guests so again, it’s not going to be a big hectic shoot so there won’t be quite as much pressure.
I’m so glad I came across your website, your teaching is excellent and I’ve learned a great deal from you.
I just wanted to thank you for sharing so much of your knowledge.
Neil,
4th photo from the top (sitting couple)
Light was bounced from your left or right side ?
You will have to figure this out yourself by looking at the photo. If you can’t tell, then the position doesn’t really matter.