dealing with reflective surfaces when using flash
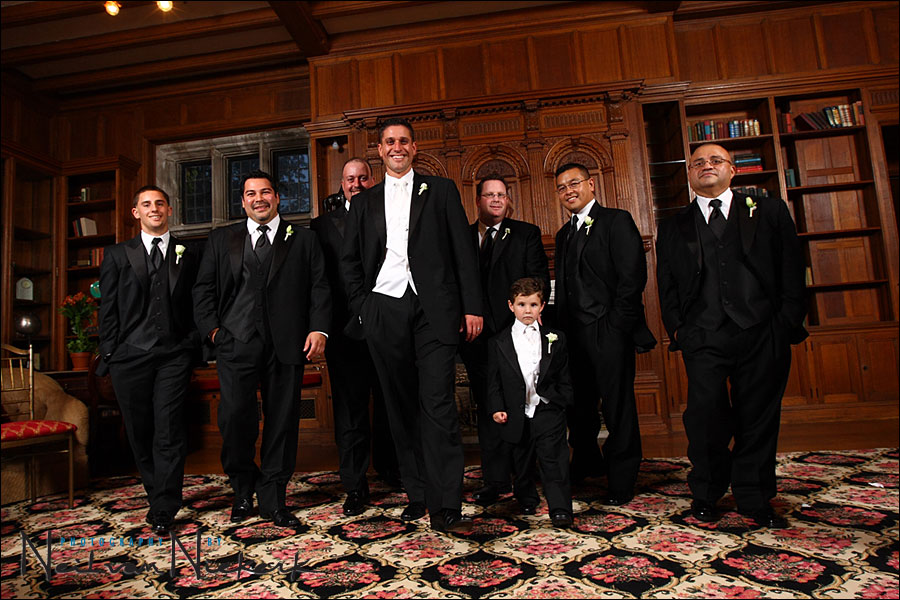
Rooms with wooden paneling are notoriously difficult to shoot in when using flash. This is because of the tendency for the light source (flash) to create large hot spots on the wooden surfaces. I’ve had someone ask me specifically about these images from a recent wedding, and how I avoided those specular reflections in the wooden paneling.
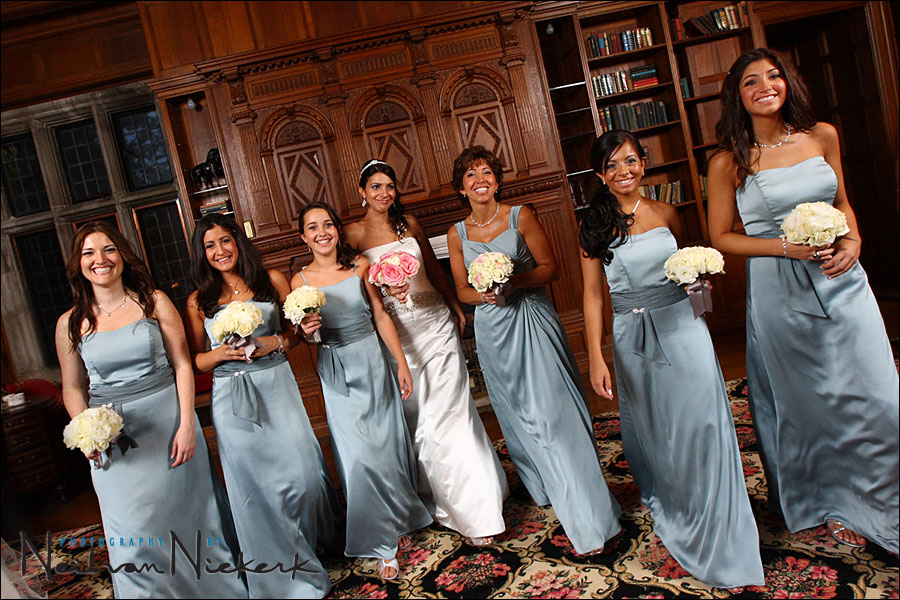
The best way to avoid them is to make sure you don’t “see” your light-source / flash-tube in the wood paneling. Imagine the flat surface to be a mirror – and then from your angle of view make sure you wouldn’t be able to “see” your flash in that surface. This goes back to the tenet that angle of incidence = angle of reflectance. So just make sure you don’t see the reflection of the flash in that surface.
The best approach then is to hoist the light source (flash heads) as high as possible, while using a longer lens so you don’t “look up” into any possible hot-spot.
With such a big group though, it was tough not to see that reflection. I usually have two Q-flashes (T2 models) on tall Red-wing light stands that I fire with Pocket-Wizards. I sometimes use white shoot-through umbrellas or umbrellas with a black backing. In this case I tried the white shoot-through umbrellas but I was getting hot-spots in the paneling. The best solution I could come up with was to bounce the two Q-flashes (on either side of me), directly into the ceiling and thereby have my light source as high as I could, and as diffuse as I could.
A simple solution but it worked.
Here are photos and details of the equipment used …
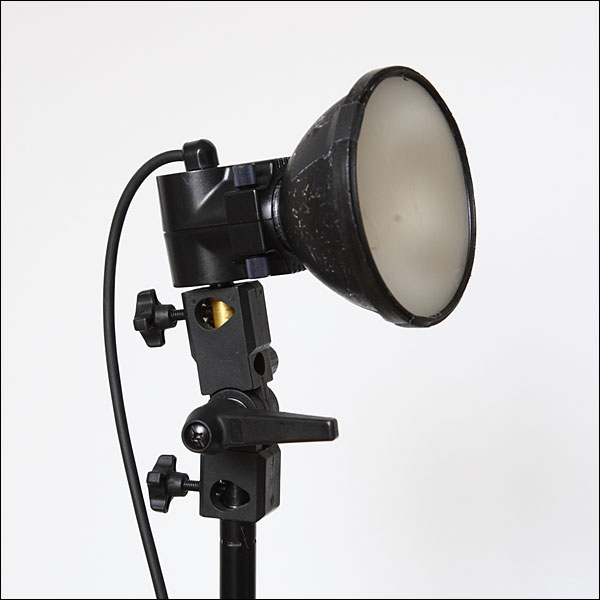
Here I used Quantum flashes for my off-camera lighting, based around the T2 Q-flash – a solid workhorse of a flashgun.

To make it easier for me to adjust my flash settings manually, I use the QF36T Quantum Extension Cable (B&H), so that the flash-head can be way up high, but the controls are eye-level. This makes it easier to adjust my flash power up or down without needing to hoist the Q-flash itself up and down.
In that image you can see the Quantum 2×2 battery on the left, and the body of the Q-flash. The Pocket-Wizard is held in place with a nifty device – the Flash Caddy – that I ordered from Flash Zebra.
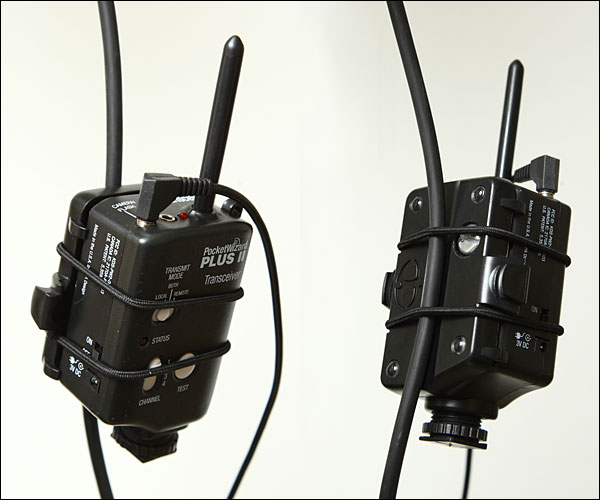
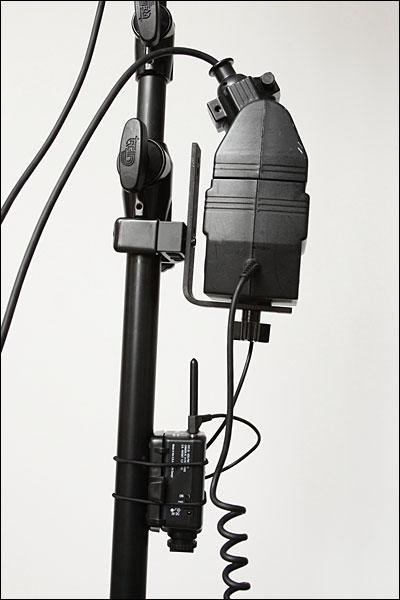
I mostly just let it dangle from the Extension Cable, but you can just as easily clamp it to the light-stand itself. For simplicity of illustration, I removed the Quantum 2×2 battery from the next image so that the clamps holding the Q-flash in place can be more clearly seen.
.
The flash-head looks like simplicity itself now, in comparison to the clutter of cables and clamps downstairs.
Check out this page for more details on the various bits and pieces I used here.
Hi Neil,
I’m new to photography just learning to use the flash with my 450d, your site is like rope let down from heaven.
more power.
jim
I was about to ask what to do if people stand behind a wall that has large mirrors mounted, but you answered that question.
I ran into this problem at a baby shower party at a Chinese restaurant, where one wall had a rectangular mirror installed that covered the entire wall. The mother-to-be and her table of gifts were situated right in front of the mirrored wall. Unfortunately, this event occurred was before taking your workshop, so I was bouncing off the ceiling or to the side, rather than trying to fire the speedlight remotely. Unfortunately, this meant that I would be able to see my own flash in a lot of shots. I had to do a lot of WB and exposure correction in post-processing.
I don’t have any Quantum equipment but I do have two Nikon speedlights, so maybe wireless TTL will get me some better lighting control, although it won’t look anywhere as good as using your Quantum equipment.
Hi Neil enlightening as always, I was just wondering what lense you used and the camera set for these shots, thanks
Neil hi.
Had the same experience re wooden panel and really, I had a hard time. I only used on-cam flash Canon Speedlite 580EXII. Thanks for the tip.
Thanks Neil.
You know, eversince I learned about your site, from a Wedding Photography book, I learned a lot from it. In fact, I’m more comfortable in using flash than ambient light. It gave me the courage to try so many things that are not the norm.
Though being just a newbie, admittedly, oftentimes I could not understand technical terms you discussed.
Have any plans of going to the Philippines for a workshop? Give me a holler. Will surely attend.
Regards,
Turo
Hello
I’m a beginner in photography, and I would like to ask you about other aspect of wooden (or painted with dark colors) rooms: I’ve seen in the first photo that the the ceiling of that room is also wooden, and when I bounce the flash from such surfaces it eats a lot of flash power and gives some color cast. A color cast can be undone in post processing, but how you manage with flash power?
Regards,
Darek
Along with wood paneling, these same techniques may apply to leather couches too…..they can be difficult.
Neil – thanks for your ever-educational site and your commitment to sharing your knowledge.
I’m wondering about the bracket that holds your Qflash to the stand when you use the ext cable. Is this available at B&H?
Neville
Neville, the bracket you see there comes with the QF36T Remote Flash Head & Extension Cable. Even though the B&H link doesn’t mention it, it comes as part of the set-up, as shown in this photo. (courtesy of Quantum Instruments)
Thanks for your quick reply Neil. I’ve just purchased my first T5D-R and am excited to begin using it. I’ll be retiring some old Metz heads. Not having to hoist the stand up and down to make changes will make my life a lot easier!! Glad the bracket comes with the extension cord.
Neville.