Tangents

photography tutorials, reviews & workshops

tangents photography blog
learn : discuss : share
  • Tangents
  • Tutorials
    • Flash Photography
    • Wedding Photography
    • Studio Photography
    • Posing People
    • Understanding Your Camera
    • Exposure metering
    • BFT
    • Best Photo Books
  • Reviews
    • Sony
    • Nikon
    • Canon
    • Fuji
    • Profoto
    • lighting gear
  • Workshops
    • Info: Workshops
    • In-person
      tutoring sessions
    • Online
      tutoring sessions
    • Workshops in
      New Jersey (NJ)
    • Workshops in
      New York (NYC)
    • Photo walks in NYC
    • Studio Workshop
    • Video tutorials
    • Workshop results
  • Books
    • On-Camera Flash (revised ed.)
    • Direction & Quality of Light
    • Off-Camera Flash Photography
    • Lighting & Design
    • On-Camera Flash (1st ed.)
  • Projects
    • Two Perspectives
    • B&W Infrared
    • Vintage lenses
    • Time-lapse photography
  • Info
    • About
    • Contact
    • My Photo Gear
    • Books by NvN
    • Join us on Facebook
    • Acclaim
    • Success Stories

high ISO is no substitute for good light

May 15, 2009 Neil vN 15 Comments

The light on Valerie here is from the evening sky, some city lights, and some of the parking lot’s lights.  All of this added up to give me enough light to use for a lovely impromptu available-light portrait of her, right there in the middle of the parking lot.

My settings were: 1/160th @ f1.4 @ 1250 ISO
My equipment: Nikon D3 and Nikon 85mm f1.4

The light was soft, but wasn’t necessarily the best for a portrait where she is simply looking at the camera.  Because of the surrounding buildings, the light was fairly top-heavy.  So I asked Valerie to lift her gaze slightly – and in this way more light fell onto her face and kept her eyes from being shrouded in shadow.   I controlled how the available light appeared in this image, by directing Valerie and positioning her.

This brings me to a point which bugs me when I see it mentioned on the forums – the idea that using a high-ISO capable camera will necessarily free you from using flash.  This simply isn’t true.  Being able to shoot in low light doesn’t necessarily mean the lighting on your subject is good.  Very often you can improve on the existing light, whether with some flash or video light or a reflector.

Here’s an example from the same photo session out on the streets of Nashville, where Valerie and I were roaming around in the early evening, seeing what interesting portraits we could come up with.

Using the same camera and lens, I liked how the defocused background lights (traffic lights, cars and buildings), appeared behind her. The background looks great, and I have a beautiful model .. but the lighting on her is very uneven and unflattering.

I decided to improve on this by bouncing flash off that side of the building you can see in the top image. It is quite far away – maybe 5 car lengths or so – a fairly extreme example of on-camera bounce flash.

But what gave me the ability to do so, was the fast aperture lens, and the high ISO.

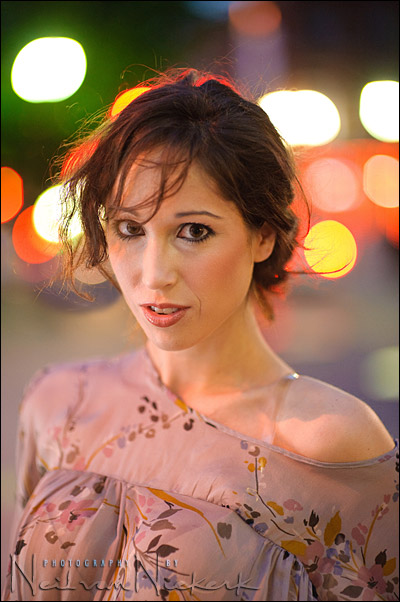
The additional light from the bounced flash, opened up her features.  The lighting isn’t perfect, but to my eye it is a huge improvement on the original image where I simply relied on the available light as presented to me.  I do like the way though that the light on her now varies and creates a soft random pattern on her skin.

The point I am trying to make (or perhaps labor here), is that simply having a camera that gives you the freedom to shoot in low light, (and having fast lenses), doesn’t immediately imply that you can forget about looking at the quality of light that you have.

You still need to figure out if the light is ideal or interesting or complements your subject … and then supplement your lighting if you see fit.  In other words, having the ability to shoot at a high ISO is no substitute for continuing to look at the direction and quality of light.

Filed Under: flash photography, lighting, models, technique, Uncategorized


Help support this website

If you find these articles of value, please help support this website by using these B&H and Amazon affiliate links to order your photo gear.

I also offer photography workshops and tutoring sessions, whether in person, or via online video tutoring sessions.

Please follow me on Instagram for more.

You can also join our thriving photo community in the Tangents group on Facebook, where we show our photos and discuss all things photography.

Thank you,

Neil vN

Books by Neil van Niekerk


15 Comments, Add Your Own

  1. 1Rory Mole says

    May 15, 2009 at 4:55 am

    Hi there Neil,

    Thanks again for confirming the need to enhance available ambient light.

    Could I maybe suggest something?

    Would using a refelector to bounce off be a better deal than the building to the left of the camera. You would have had to have an assistant standing about 10 feet on your left to bounce from. This could probably be a good solution to the situation, but it would require an assistant which is not always convenient.

    I notice a benefit of having a fast lense with the ability to use a large aperture and that is a nice blurred background which enables the model to stand out nicely.

    If we don’t have a lense that gives an aperture of 1.4 or even 1.8 could we get by with maybe f3.5 or even 4. This would mean that the flash exposure compensation would have to be dialed in a bit higher than it would for f1.4-.8 and a slower shutter speed to get a similar effect and of course a higher ISO then.

    Are my ideas correct here?

    Thanks again for a great article again…

    Reply
  2. 2Neil says

    May 15, 2009 at 6:16 am

    Hi Rory,

    A reflector to bounce the flash of would be much more flexible than looking for suitable surfaces to bounce flash off. But an assistant isn’t always available or convenient .. and sometimes it’s just more fun looking for interesting opportunity and challenges.

    Re your comment about dialing in more FEC when you use a lens with a smaller max aperture … in theory this shouldn’t be necessary since with TTL flash metering, your camera takes the change in aperture automatically into account. But there might be some non-linearity in practice when using extremely wide apertures or high ISOs.

    Neil vN

    Reply
  3. 3Gracious says

    May 15, 2009 at 6:40 am

    Hello Neil,

    what about the WB setting here? and is it wise to use a gel in this situation?

    Thanks for sharing your experience and knowledge with us…..
    Many regards from Germany,
    Gracious.

    Reply
  4. 4Neil says

    May 15, 2009 at 7:53 am

    Gracious, I didn’t gel for this image, although I did have 1/2 CTS and full CTS gels with me. Since I was bouncing off part of a brick wall, that will add a warm color cast to the light .. and it appeared to be sufficient.

    Neil vN

    Reply
  5. 5Val says

    May 15, 2009 at 8:15 am

    Hi Neil,

    I see that you take many of your models with f1.4-1.8 and nail the focus. My fastest is f3.5, but when I take portraits, about half my shots would be out of focus using AF! Especially with groups of 2-3ppl even tho I thought I was lined up one person would still be out. I never notice this in my LCD since I don’t 100% each pic to check.

    Where do you focus on their face? Do you have any tips how to ensure correct focus?

    Reply
  6. 6Daniel says

    May 15, 2009 at 8:25 am

    I was wondering about Val’s question as well. I usually only trust my center focus point.. How do you do it Neil?

    Reply
  7. 7Neil says

    May 15, 2009 at 10:58 am

    Val and Daniel ..

    I always focus on the “front eye” of my subject. That way I can use a surprisingly narrow depth-of-field and still have the image look crisply in focus. With a simple portrait, your gaze is nearly always captured by the eyes of your subject.

    I mostly use the center-point and focus and recompose … except when I am using a wide-angle lens, or using the lens in close proximity to my subject. I then use the focusing points away from the center … but I’m not entirely happy with how sharp my images appear always when using the focusing points towards the edges .. whether with the Canon 1D mk3 or the Nikon D3.

    When I use a wide-angle lens, then the arc through which I swing the camera to have my subject off-center .. that will increase the likelihood of miss-focusing. This is due to the basic geometry of a triangle … and also due to some lenses being flat-field, and others not. Errors creep in.

    I don’t think focusing technique is ever a topic where you can propose a cut-and-dried method. Or perhaps I just haven’t honed my skills there well enough to give specific advice. : )

    Neil vN

    Reply
  8. 8Ricardo Carvalho says

    May 15, 2009 at 3:55 pm

    ola! me chamo Ricardo, sou residente do Brazil. cheguei aqui indicado pelo um grande fotografo: Daniel Gomes do brazil.
    chegando aqui, adiquiri conhecimentos fantastico. agora não deixo seu blog por nada.

    gostaria de agradecer por compartilhar tecnicas fantasticas
    obrigado
    um abraço!!!

    Reply
  9. 9Mohanpreet Singh says

    May 15, 2009 at 4:18 pm

    Hi Neil
    May be above two queries also call for another topic – focus points on the camera and how to use those. I am myself struggling with that.
    Looking forward.
    Thanks for keeping the useful info coming, not to be found in any camera manuals :-).
    -MP

    Reply
  10. 10Neil says

    May 15, 2009 at 4:22 pm

    Mohanpreet .. I do keep a list of possible topics for the blog, and focusing technique might be a subject that will come up some time in the future. : )

    Neil vN

    Reply
  11. 11olympus_fotograph says

    May 15, 2009 at 4:25 pm

    hello Val,
    The one and only point which must be sharp are the eyes.(or at least one eye).
    also when you shoot animals, the eyes *must* be sharp.
    i think manual focus was used, after a bit time you will get it trained when you use it.
    autofokus is not just only a small point, it mostly an area(of course also small) were the camera decide “this is sharp…”
    look at this:
    it was for a manual focus training for my upcoming birth of my second child.
    the lens was a Leica summilux 25mm/1.4 asph used on a E-500.
    yes you are right….with the E-500 it is very difficult to man. focus, also with the lens at 1.4.
    the summilux is not easy to turn with man. focus, means getting out sharp pics.
    https://farm4.static.flickr.com/3325/3513220292_c335e6da5a_o.jpg

    grts
    peter

    Reply
  12. 12Antonio Correia says

    May 16, 2009 at 1:19 pm

    I think the issue is indeed manual focus.
    When the light is very dim sometimes only the central point is operating.
    The others find no contrast and refuse to focus.
    Thank you for showing your work and ideas Neil :)

    Reply
  13. 13Jason Smith says

    May 17, 2009 at 4:27 am

    Thanks Neil. I see a lot of wedding photographers who say that they dont use flash. I have photographed a lot of weddings and spent a lot of time wondering how this would be possible.

    Sure I have a D700 and can shoot at ISO 3200 – but if there isnt any decent light on your subject it doesnt matter how high your ISO can go.

    Reply
  14. 14Heather Walker says

    July 6, 2009 at 9:05 pm

    Question… something I can never get right is high ISO. I use even 400 – 800 and I get noise/grainy look with my Nikon. I am not sure if there is some setting you are using to eliminate the noise from this… but I thought it should be better than what I am getting.
    Are you showing SOC with that top image in this post, where there is no visible noise, or did you possibly use a program to fix it.

    Thank you!
    Heather

    Reply
  15. 15Neil says

    July 7, 2009 at 12:16 am

    Hi there Heather …

    You don’t say which camera you are using, for that would make a difference. The D3 and D700 are in a league of their own here.

    So I would comfortably shoot at 1250 ISO for portraits like these where I rely on the environment.

    Regardless of the camera you use though, the most important thing is to never under-expose. The moment you under-expose your noise will become more apparent.

    I have Noise Ninja and Neat Image, but I very rarely use them. So the images I post here are at the default noise-reduction setting, whether I use DPP or ACR. No further noise reduction used (or needed.)

    Neil vN

    Reply

Leave a Reply Cancel reply

Your email address will not be published. Required fields are marked *

categories

Articles & Tutorials

  • • About myself & this site
    • Books by Neil vN
    • Best photography books
    • Black foamie thing
    • Photographers’ success stories
  • • Flash Photography Techniques
    • Natural looking flash
    • Flash + Ambient light
    • Dragging the shutter
    • Bouncing your flash
    • On-camera flash outdoors
    • Exposure metering
    • Flash exposure compensation
    • Bounce flash examples
    • Which is the best flashgun?
    • Flash brackets
    • Off-camera flash photography
    • Flash photography basics
    • Using video lights
    • Flash photography tips
  • • Photography workshops NJ / NYC
    • Models @ photography workshops
tutorials:
flash photography
Photography
Workshops

All rights reserved. Copyright © Neil van Niekerk 2025 · Customization by The Traveling Designer

Copyright © 2025 · NvN on Genesis Framework · WordPress · Log in