recap: Photography workshop – Atlanta (2009)
The near-penultimate workshop for this year was held in Atlanta, covering the range of topics relating to flash photography and lighting. As always, it was good to meet and work with a group of people – and then throughout the day, watch and experience everyone’s progress in getting more familiar with the subject. Thank you to everyone who attended!
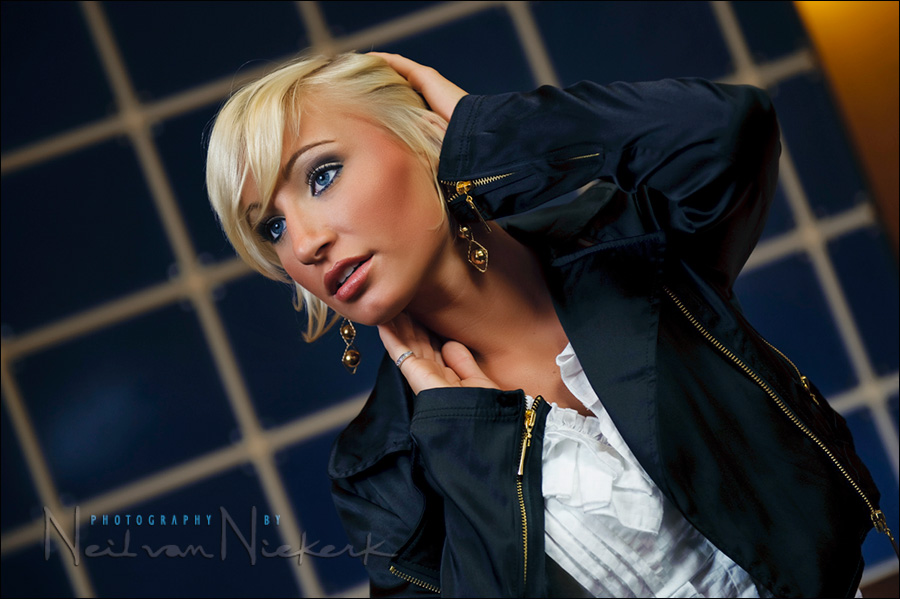
The image above of our model, was taken in the hotel lobby. The wall behind her had an interesting pattern, and I wanted to use that. Even though the lobby had a fair amount of broad window light streaming in, I felt we’d have a more controlled scenario by using manual flash in a softbox. Instead of completely over-riding the available light with flash, we metered for our ambient light, and took a few test shots to get to a base exposure. (Around 1/60th @ f4 @ 400 ISO)
Then, to use flash in addition to the available light .. and have it such that the flash now gives us more controlled light, we under-exposed the available light by about a stop. I ended up using 1/60th @ f3.5 @ 200 ISO. By using a flash-meter and adjusting the output of the speedlight attached to the softbox, I arrived at a power setting where I got f3.5 @ 200 ISO for that particular distance we had the softbox set up from the model.
And there we have it … enough available light still registering on the background (with some spill from the flash), but with the softbox delivering a cleaner more dramatic look to the light falling on the model’s face.
Photography workshops
- More info about upcoming photography workshops.
- Recap of previous photography workshops.
The “Best Workshop” I’ve attended! Thank you for sharing your information on using flash in all situations. The workshop format was awesome. You kept it moving all day, there was never a lag when you weren’t teaching and we weren’t shooting the lovely Jessica.
I look forward to attending your workshop next year!
Best regards,
Danny Wilson
O.K. something just dawned on me. When you say underexpose then add flash, you mean with aperture or ISO right? I think I often times I speed up my shutter to underexpose for flash. I would assume, since Tv does not matter to a flash, that wouldn’t be helpful, right? I say this because you opened up your Av and Slowed down your Tv, which would then increase your exposure, but you decreased your ISO. Am I on the right track? Did you even follow what I just said? See, this is why my family won’t be my models anymore, because I’m too dammed slow!
Dan .. It sounds like you’re on the verge there of an aha! moment.
There is actually 2/3rd stops difference between the available light as we metered for it, and our eventual settings.
You could change any of those three settings (aperture, ISO and shutter speed) to under-expose the ambient light. Or a combination of those, if you wanted to under-expose for the ambient light even more.
Usually though, you’d raise the shutter speed if you were working below max sync speed. In a scenario like this where we are using manual flash, we want to stay at, or below, max sync speed. Going over max sync speed into High-Speed Sync territory complicates things a little for what needs a simple explanation at this point.
So, as I said, the usual logical first step would usually be to raise the shutter speed if you wanted to under-expose for the available light, and your shutter speed was below max sync speed.
But really, when working in less-than-bright available light, where you don’t need to run the speedlight / flashgun at close to full-power to match the bright available light … then you can play with any of those three settings – shutter speed, aperture, ISO to bring down your ambient light.
Then you simply meter for your flash’s output (as manual flash), for whatever aperture & ISO combination you chose. Shutter speed has no effect on flash exposure while remaining outside of HSS territory.
So with this example, I did have additional shutter speed to play with to further reduce the available light if I had chosen to do so.
But in scenario where you are working in bright available light, your first step would be to go to max sync speed … at your base ISO (usually 100 ISO or 200 ISO, depending on your camera), and then find your required aperture for the ambient light. Then from that step, you’d figure out your flash exposure. If you needed to under-expose your ambient light then so that your flash exposure dominates … then you’d go to a smaller aperture. That’s just the logical ways to do it in bright light. (As an example, check out this recent post where I photographed a model in bright sunlight, and had to use small apertures like f16)
But with this example here of the model at the workshop, we were working in more subdued light .. and then our options are open.
I hope this helps make more sense of things.
Neil vN
I want to post this photo here, taken by Daniel Sawrie at the workshop, as a great example of how awesome bounce flash can look if used with some thought.
Neil vN
What an awesome workshop! I have no doubt that the skills you taught me will make me a better photographer. Thanks for coming to Atlanta.
Hey Neil, it’s me again. After thinking about my “Ah ha” moment, I started to realize you probably stayed with f4 because you wanted your background to stay awesome but not dominate or distract; which you nailed. You couldn’t drop your Tv for fear of shake so your only option was ISO to underexpose. Which leads me back to….. well, the beginning. Crap! You know Neil, I really hope it’s just a matter of practice and not my lack of ability. I know what looks good and that is what drew me to your site to begin with. I love the way the background tones in the squares match the models skin tone highlights and the wall on the right matches her shadows, even her eyes match the windows. Balance, everything is in balance. Last thing I want to say is, I hope you realize how valuable you are to other people. You give freely your wisdom and knowledge and I believe you would do it even if there was no money to be made. Morals, values and the love of mankind is what really matters anymore and it just seems sometimes like we are losing are way. Individuals like you, give us hope in the future of mankind. Thank you for your time, I know how valuable your time must be but it’s never more valuable than your sense of self.
Thanks again, and
I LOVE YOU MAN! (LOL)
Dan
Dan .. thank you for the lovely compliments!
Re your take on the settings:
You have it there. It’s a matter of juggling the settings like that. Sometimes one setting would be a specific choice, but another time it would be something else making another setting the one we’d want to be specific about. Your thought-process there is spot-on then.
best
Neil vN
Wow! You guys are amazing. After looking at the images from the workshop, I defintely need to cull out less worthy pieces in my headshot port to feature some of these. Which is uncommon… usually workshops are a study in technique and rarely are images portfolio quality. Although most of the language went totally over my head, I too learned from the workshop on positioning for different lighting scenarios.
Thank you again and may you all be blessed with “Good Hair” days:)
Jessica
The workshop in Atlanta was fantastic!! If you are serious about learning better lighting techniques then this workshop is a must. The combination of lecture and practical application was pefect for really reinforcing the different lighting scenarios and applications. I would attend this workshop again and again. That is how valuable the information was. Neil was a pleasure to work with and made sure that everybody was involved and understood the material. DO NOT miss this workshop. It is awesome!! thanks Neil
And another image from the workshop – this one by Sandy O’Neal
Excellent workshop! Definitely worth the drive to Atlanta. Neil, the light bulb is still coming on for so many of the concepts you taught. I must say the most valuable was understanding directional light. It’s making a huge difference in my work. I’m trying everything you taught, and getting great results. Thank you so much. Kim