
Photoshop tips – making your images pop – soft-light layer
As much as I am a firm believer in getting it as close as possible in camera, by using proper exposure and proper camera settings, and good light .. most often an image can be enhanced in Photoshop with a few simple techniques.
There is an entire industry built around software and plug-ins and add-ons and action sets for Photoshop to enhance and manipulate images in Photoshop. However, I’d first like to go over some of the simpler ones that you can use in Photoshop without additional software.
These Photoshop techniques are well-known to the more experienced digital photographer, but I thought this might make a great on-going series on simple Photoshop techniques. As always, I’d love to hear everyone’s input, especially since my own Photoshop skills can’t quite be regarded as skillz yet. ; )
The first technique that I’d like to cover, is quite simple:
– you add an adjustment layer (such as Levels) to your image;
– change the blending mode to Soft Light, and then
– adjust the opacity to taste.
– erase the layer mask of any areas you want to bring back (or close) to the original.
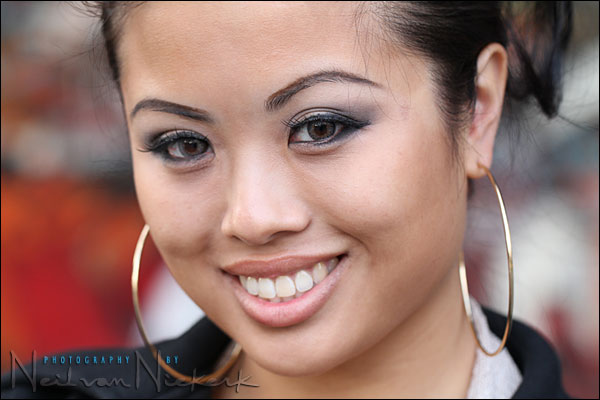
Here it is in a bit more detail. Starting with this image ..
You add an adjustment layer. Levels is a good choice, although in this instance it doesn’t really matter.

(Of course it does help if your original image is well-exposed and has good color balance.)
Now change the blending mode to Soft Light ..

At a 100% opacity, the Soft Light blending mode is likely to be too strong an effect. It will appear to over-accentuates the contrast and saturation. Now simply adjust the opacity to taste. Usually somewhere around 20 – 40% is good. But it really depends on the image and individual taste.
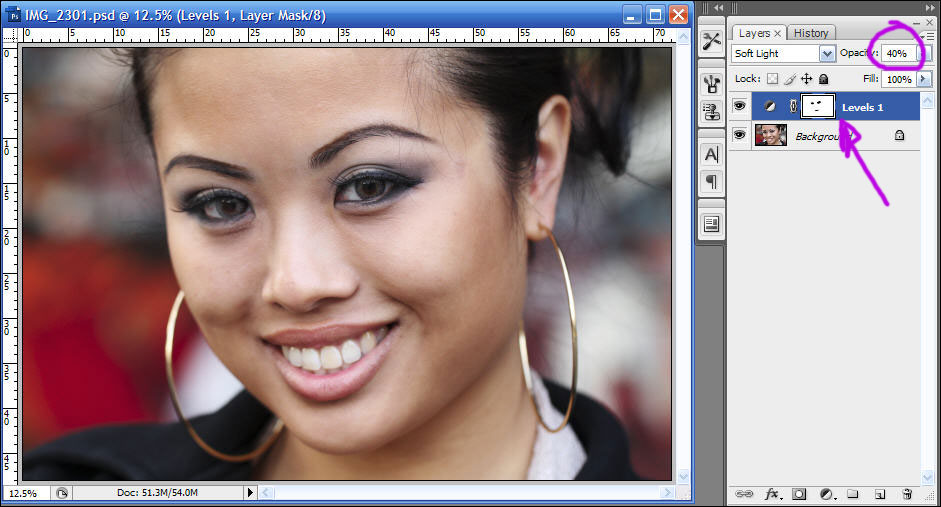
Here I erased part of the layer mask to bring back some of the original image – specifically her eyes. This will make her eyes appear brighter again.
And that is it. A very simple technique to give your photos some pop to them.
Here’s the original again ..
.. and the final image, with the Soft Light layer set to 40% opacity.
Hi Neil,
thank you very much for sharing. This is easy nice one technique :) Love it. I’m using basically to all my images at the very beginning the reverse unsharp mask. The setting is Amount 20, Radius 60, Treshold 0. This gives also nice pop effect to every image. When you apply this on a duplicate backround layer you can also play with the opacity. And as a bonus this works well also with B/W images as well. Just convert to B/W, my favorite technique is with gradient map adjusting layer, and then ones or twice if needed I apply the reverse unsharp mask routine. Quick and dirty :)
…on-going series on simple Photoshop techniques…
Thanks Neil. I’m looking forward to seeing and learning more of these techniques!
Thanks Neil its simple and usefull :).
Neil, thanks. Just tried it on a few photos, and saw not only an improvement, but some insight in how fellow photographers are getting some pop in their images that mine were lacking.
Hi! Neil,
Thanks for sharing this.
I actually discovered this technique a few months ago (accidentally). Needless to say, most of my photos get this treatment. What a difference it makes!
I am a big fan of “simple but effective” techniques when it comes to photoshop. This one fits the bill just right. Hope to see/learn more of these from you.
Regards,
Vikram
I don’t really see the difference, what am I looking for? It looks more saturated in the final image inthe back, that’s all I see.
I do a similar thing by making a luminosity selection in CS4 using opt+cmd+2 on the Mac (alt+ctrl+2 on the PC) or in CS3 or opt+cmd+shift+~ (alt+ctrl+shift+~ on the PC). Copy the selection to a new layer and change the blend mode to soft light. Instant bit of pop.
I avoid Photoshop like the plague. Anyone have a recipe to do something like this in Capture NX?
simple yet effective! Thank you Neil for sharing!
Thanks Neil – this seems too simple to be true! The effect looks a lot like adding Clarity in Lightroom plus bumping the blacks, I think.
Nice tip but is there a easy way to achieve this via Capture NX ?
Thanks!
C
Thanks again Neil for the great simple tutorial.
I can do all sorts of fancy tricks in photoshop but this simple technique is spectacular and easy. I even made an action for it with a couple variations.
This should add a lot to those images that need a little more umph that get the regular color and exposure adjustments I deliver.
Do you do this on most of your images?
Hi Neil,
Thanks for a great yet simple tip. I have just come back to phtography after 10 years away and BOY! have things moved on! It is great to learn simple tweaks that working photographers use on a regular basis.
Keep em coming!
Thanks,
Geoff
For those avoiding Photoshop, Adobe Lightroom (or Apple Aperture) should offer similar capabilities at half the cost of the Photoshop. You’ll have to use the Adjustment Brush of Lightroom to get a similar effect.
Hi Neil, excellent blog. Can’t get enough. Would you (or anyone) be willing to show/describe how to do this in Lightroom? As lightroom doesn’t have layers, is this type of thing still possible? Thanks!
Kevin,
Unfortunately, as Neil said, Lightroom doesn’t use layers nor does it have a soft light blending mode. I can only get something similar (not equivalent) to this through using the Lightroom Adjustment Brush to “dodge and burn” select areas of the image. For example, you can use the Adjustment Brush to sharpen and brighten the eyes of the model in the images above. But, then you have to worry about the contrast of the face around the eyes since you only made a local adjustment for the eyes, not the entire image. There is probably a set of steps in Lightroom that can get you an image that is close to the one that Neil produce in Photoshop. However, from my working with Lightroom a bit (I’m no expert), I think this effect will be a bit more difficult to achieve in Lightroom.
Can you explain the procedure used for the eraser tool.
I’m a GIMP user. Similar effect achieved by duplicating the layer, blurring the top layer (play around with how much), and changing the top layer mode to Overlay. Adjust opacity as you like just like Neil did.
Just tried this on a bride with her flowers. Nice color pop.
thanks for the tip
Should review my blending mode training
Hi, just stumbled on this- not being rude but I see zero difference in this method vs adjusting contrast in Lightroom except that you can exclude parts via erasing with this method. I am an experienced ps/lightroom user.