
|
The first time I became aware of the pin-up artwork of Alberto Vargas was with the release of the album, Candy-O, by the Cars in ’79. It was often mentioned how Vargas was brought out of semi-retirement to create this image. With that, my interest in pin-up artwork by the legends, Vargas and by Gil Elvgren, was fired up. |
 |
This will also explain why I’ve been a fan of the photography of Robert Alvarado ever since I first saw his work. He clearly pays homage to those two artists.
pin-up style photo session – trash-glam
Jessica and I have discussed doing some pin-up photo sessions for a while now. This is from the first photo session today, going for a trashy glam look. Combined with her self-proclaimed let’s-get-Jessica-a-D700 fund, we’re even playing around with the idea of doing a calendar of pin-up photographs of her.
Here is the pull-back shot of the set-up:
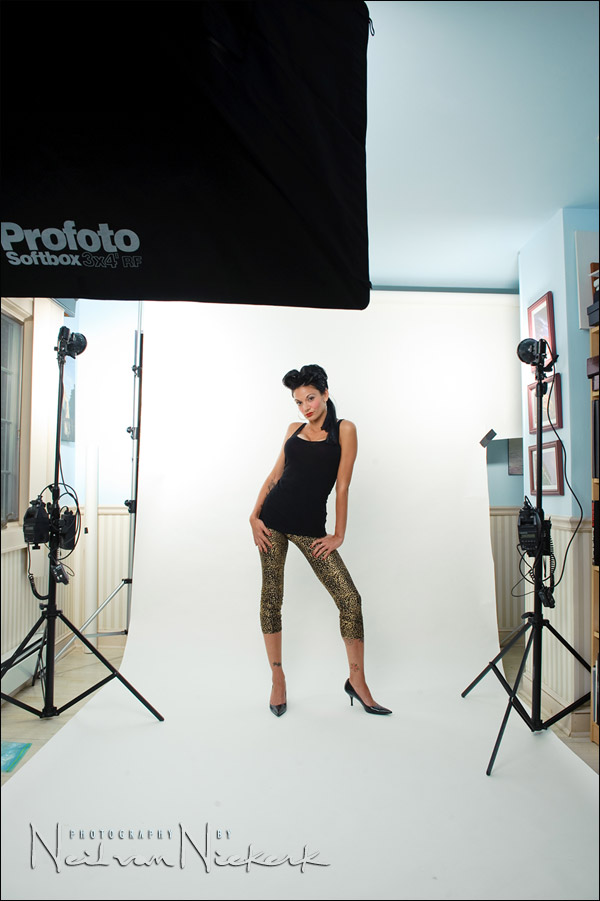
Two Quantum flashes lit up the background. The main light was with a 3×4 softbox nearly over-head of me. Working within a small area set up with a back-drop, I wanted the light as even as possible. I wanted to flood the place with light. That’s all there is to it, really.
Equipment used during this photo session:
Nikon D3; Nikon 24-70mm f2.8 AF-S (B&H);
Profoto AcuteB 600R power pack (B&H); Profoto 3×4 softbox (B&H)
Red-Wing light-stands; Pocket-Wizard Plus II Tranceiver (B&H)
.. and a bunch of Quantum gear.
Hey Neil,
about how much room do you recommend you have for a set up like this? I want to create a home studio but I only have about 10 feet of space between me and the back of the white-seamless (in the room I’d be using). Would that be too small?
Thanks for any help
Naf
Neil,
It looks like Jessica is pretty close to the background lights and background. How do you avoid the flare that can occur when you shoot into a white background? I know that some lens handle that better than others. Is that how you avoid flare or is there something else that you do?
Thanks!
Looks pretty tight here Neil where you’ve had to cut the seamless to fit it in the room :)
I have a variety of colors of the seamless paper backdrops. I use the Savage 53″ seamless paper hen I do head-shots with a quick setup in my living room. Not a glamorous or elegant setup, but the photographs look good! Since most of my non-wedding work is on location, or I rent studio space when I need, the lack of an own studio hasn’t been much of a hampering.
For this photo session, I knew I’d want wider than the 4.5 ft wide seamless (the 53″ one), and rolled out the Savage140″ wide seamless paper … but as you can see there, it was too wide for my living room. Oh well, out came a pair of scissors.
Hi Neil,
How did you keep the light from wrapping around too much with such a small/tight seamless setup? I’m always getting a really bad bleed back off of the backdrop. Loved your book btw!
– Davis
I haven’t personally experienced flare when shooting on seamless unless the lights weren’t flagged to avoid spill back into the lens or they weren’t controlled by a snoot or grid.
Also curious about the size of the seamless as it looks like its been cut on one side, definitely bigger than 5 feet but looks like its not the 8-10 foot one which is impossible to transport lol.
Hi Neil,
The background is white, but Jessica is wearing a black shirt. The camera will try to make both gray. What do I meter off of? Based on your past instruction, using TTL, I would meter ambient light and let the TTL flash bring up the subject’s exposure.
In your setup, it looks like a manual flash setup, so are you using your Sekonic light meter to get proper exposure?
Stephen,
when I do the white background pictures, I don’t meter at all for ambient.
I don’t meter at all.
I make sure the flash on my subject is correct and make sure the flash on the background is around 2 stops over.
As long as the lights used for the background don’t spill, this should always work.
judging from the set up pic, Neil didn’t use any ambient either.
I could be completely wrong though.
Hi Joost,
Thanks for your reply. I probably wouldn’t meter the background either, since in this type of setup, the subject is the the most important element. I just needed someone else like you to confirm my thinking.
Neil,
Thanks. I have to stop looking at everything in TTL flash context. Different setups for different situations.
Manual flash for controlled setups and studio photography, where distance to flash is fixed and the lighting environment is stable. TTL flash for situations where distance to flash and the lighting environment are variable, where it is easier for TTL to handle the flash.
Hi Neil
Like others, I struggle with massive flare and loss of contrast when shooting white knockouts in my small studio. I use the same lens, the 28-70 f2.8. I found that I have had to reduce the output of my background lights (Bowens Esprit 500s) by bouncing them into two white stands first before they light the back wall. These stands, two tall, man-high rectangular boards painted white and hinged in the middle to help them stand on their own, also serve to stop light from falling onto the model.
Yet even with all these precautions, I often have flare around the ankles and legs of the model. It seems it is critical to have the right ratio from background to foreground light – another photographer here mentioned 2 stops. I would love to do that, but 1.5 x is probably all I can allow myself without running into flare problems and contrast loss.
Any advice?
Typically about 8 feet. My place is really small.
And that’s if I’m shooting head and shoulders. If I do full length shots, I have to plaster myself against the opposite wall and shoot at just under 50mm, which makes me nervous. I don’t like distortion.
But having a look at the pullback shot of your studio, it does not seem any bigger than mine. Hence my question.
What’s the distance between your model and the backdrop then? It looks fairly tight from the picture above.
Hi all.
Some talk about a two stop overexposure of the background: now, that is seriously overkill.
I have extensive experience on white seamless, and if the space allows for a good distance between the background lights and the white seamless,(usually two suffice,) then a one stop overexposure is plenty. More than that is useless unless a) flare effect is desired b)the seamless can’t be lit evenly, and portions are way overexposed while other portions are just white enough c) a rim light effect from the background reflexion is desired.
What I do is flag the unused portions of the seamless that are not in the picture in order to limit flare, mostly for verticals. A compendium shade can be of great help as it can be made to conform to the frame proportion. The paper lying on the floor will seldom be pure white in the set-up described: it is mostly lit by the key light , and is much weaker at the floor level A plexiglass is typically put on the paper, the model stands on it, and due to strong reflexion, may appear as pure white. The line that still shows has to be retouched so everything is smooth and even colored.
Never forget that lighting the front portion on the floor with additional lights will create a “floor light” as well as exposing the model’s legs and shoes selectively. A white seamless can be considered a light source, at least a reflector in any set-up. It’s a question of balance. It helps a lot to use a lens that shows very little vignetting, so as to avoid lightening the corners on white and other seamless.
Thanks to Neil for the interesting articles.
Neil I have a space in my home 10 feet wide by 24 feet long. Is that enough for a small portraits studio. I am working with 2 580 EXII speedlights with 2 32″ umbrellas, and a 24″X 24″ softbox on a 100w strobe.
Hi Neil;
Although we live in a some what small Townhouse, the main room with stairs to the left is 20 x20 (a LR & DR). I hit the background with two 150 W cheapos and keep the people 4 ft in front of the background. With a 10ft background I basically have 5 ft spill away from the side walls.
Then I use a 5ft brody box as key and small fill if needed. I do meter.
Also as per your articles, for head shots use two 2×2 softboxes with my 580 exII and a IR ST2 type on the Canon 5D. I just love the automatic light ratios and no need to meter with this setup as it uses ETTL ratios.
I have a 3rd light to help fill the middle
I would think that if the model is in front of the backlights, that she would be about 4 ft from the background.