exposure metering – shifting your exposure settings by counting the clicks
When shooting in consistent light, and I have a specific exposure setting that is correct – then changing settings to a an equivalent exposure is as easy as counting the clicks. These clicks on your digital camera – whether aperture, or shutter speed or ISO – change the exposure by 1/3rd of a stop. You can then simply count these up and down to get to an equivalent exposure with a different combination of settings.
Most (if not all) digital cameras change settings by 1/3rd stop. Older lenses changed by 1/2 stop settings, but all (most?) modern cameras with electronic controls between the camera and lens, will change the aperture settings by 1/3 stop values. Older cameras changed shutter speeds by full stop settings. But with D-SLRs and as far as I know, any modern camera that has electronic controls, have 1/3rd stop settings.
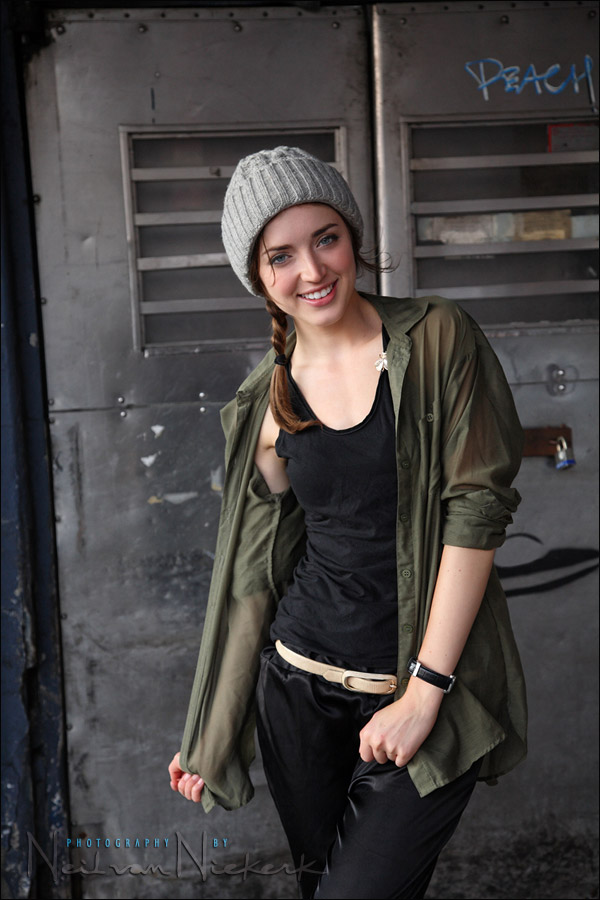
Back to the photographs here: The second image was shot first, and the settings were 1/200 @ f5.6 @ 400 ISO … a good combination. The aperture gives a crisp image on the zoom, and 400 ISO isn’t a high ISO, and 1/200 is certainly hand-holdable on a stabilized lens. I liked the background, but thought it was too apparent in the frame due to the f5.6 aperture. I needed shallower depth of field than the f4 zoom I was using, would allow me.
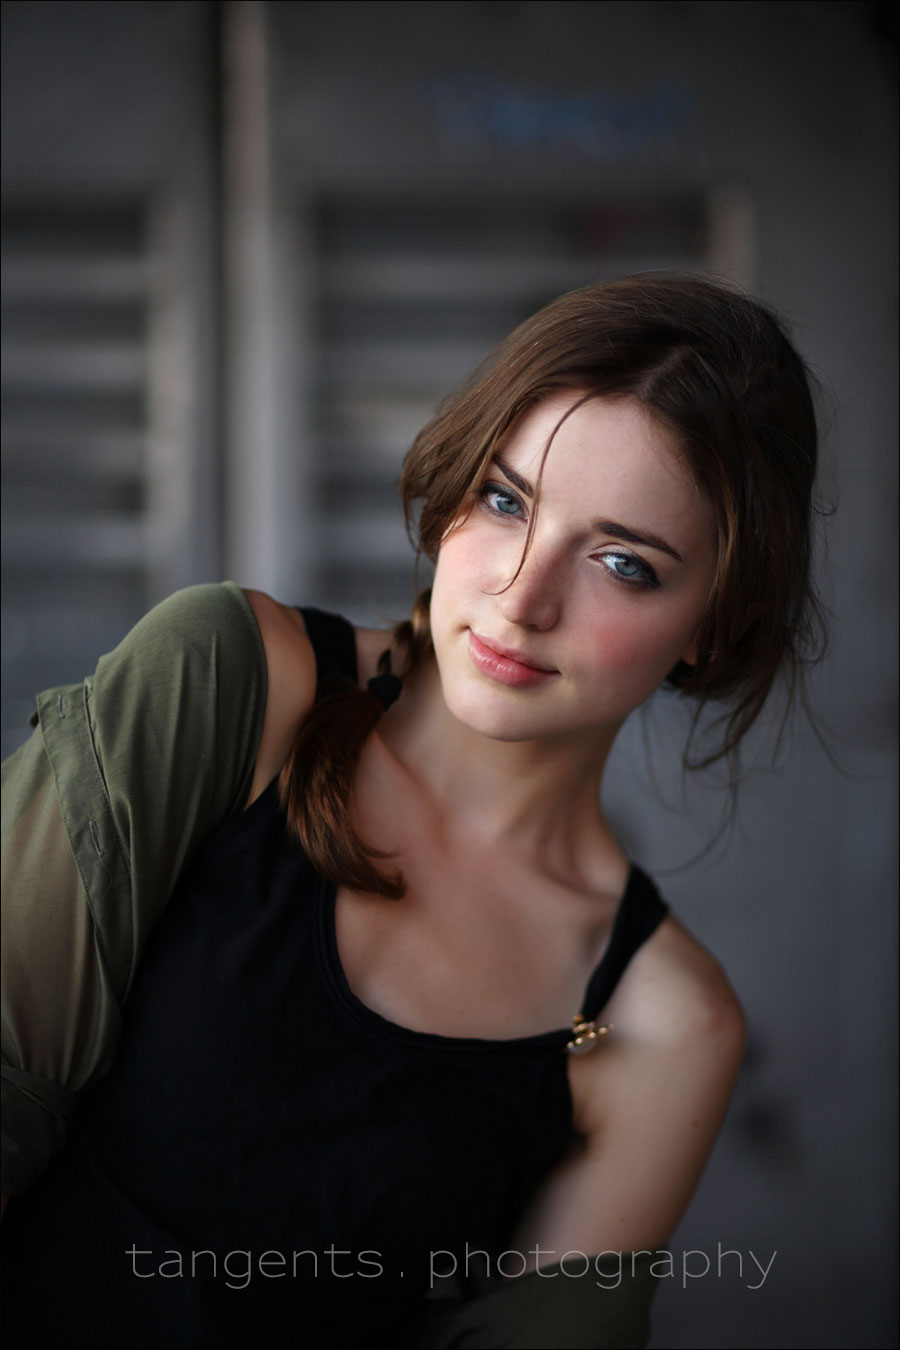
I then changed to an 85mm f1.8 lens to get to a wide aperture to throw the background completely out of focus for a tighter portrait of Anelisa. The resulting image, shown at the top, was shot at 1/400 @ f2.0 @ 100 ISO with the 85mm lens.
Getting to 1/400 @ f2.0 @ 100 ISO, from the previous 1/200 @ f5.6 @ 400 ISO … was then just a simple matter of counting the clicks. A certain number of clicks on the aperture, shutter speed and ISO, had to balance out. This would give me the same exposure, without me having to meter again for my subject. The number of clicks have to balance out. A few clicks up on the shutter speed; a few clicks wider on the aperture, and a few clicks down on the ISO … and there we are.
Still keeping with the basics: going wider on the aperture means more light is allowed in. To counter this, we have to raise the shutter speed .. or drop the ISO setting. Or a combination of raising the shutter speed and dropping the ISO. Counting the clicks is easier to do than calculating the exact same exposure by counting by the third stop values for shutter speed, ISO and aperture.
If your camera offers the choice between 1/2 stop indents and 1/3rd stop indents, then I strongly suggest staying with 1/3rd stop values. It allows a finer control of exposure.
Equipment used:
The image at the top was taken with the Canon EF 85mm f1.8 USM, and the second image was taken with the Canon EF 24-105mm f4 IS USM zoom. The camera was the classic 5D. Only available light.
I do believe that the lack of the aperture scale on modern lenses are the cause that newer photographers aren’t familiar with the sequence of numbers, and hence what they mean.

The values for full apertures settings: _ f22 _ f16 _ f11 _ f8 _ f5.6 _ f4 _ f2.8 _ f2
That is something that every serious photographer needs to know. I would even say it is an absolute. You *have* to memorize those values, and understand that they are one full exposure stop difference in brightness. Also, that each value indicated a doubling (or halving) of the amount of light that will hit the film / sensor. (If any of this isn’t doesn’t make sense, then it is time to do some further homework.)
And while I think it is necessary to know the full stop values, it also makes sense to know the in between third-stop numbers. It helps in counting exposure values up and down, and getting to equivalent exposure settings quickly.
Now if only Nikon and Canon would implement something like Pentax’s ingenious Hyper-Manual mode where the shutter speed and aperture settings are changed in tandem.
Hi Neil, awesome article.. and as usual she is just beautiful.. absolutely gorgeous.. :)
Hi Neil,
Because the top image appears darker overall, I am wonderigng about your metering mode – Was this scene spot metered on the model? Any vignetting applied in post or is that a natural result from the lens?
It’s amazing how ‘PEACH’ graffiti on the wall melts away into nothingness using the fast lens even though it looks relatively close to her.
If it helps anybody, starting at f1.4, a full stop is approximately an exponential power of square root of 2, shown as SQRT(2) below. The ^ is an exponential.
f1.4 = (SQRT(2))^1
f2 = (SQRT(2))^2
f2.8 = (SQRT(2))^3
f4 = (SQRT(2))^4
f5.6 = (SQRT(2))^5
and so forth.
Yes Neil,
Hypermanual mode would be awesome. Who do we have to bribe.
Additionally, per your photo above of the lens.
Why did the manufacturers think it was a good idea to get rid of these markings for depth of field/hyperfocal distance, etc.
It is disappointing that so many do not understand what these markings mean AND disappointing that we now have to memorize this or carry a depth of field chart.
Great article as usual and a great way to simplify things, a real time saver.
My students are constantly complaining to me about having to learn equivalent exposures. Because they came up in the digital age of photography they have a hard time seeing the relevance. In the film days we were using it all the time, especially in the darkroom. Knowing your apertures is vital. So many people use the excuse that they are not good at math, and then they are stuck relying on the camera. Well the camera is only a machine. You have to know your basics. You cannot build a good house on an unsound foundation. People should take the time and learn the craft of photography.
Hi Neil!
First things first. As always wonderful photos! I´ve been following your superb work since last year, and everytime is always an inspiring and pleasing feeling!
Since then, I have the tendency to always use the Speedlite in almost every situation…to, let´s say pop-up, the images…and specifically in these photos above could you use them too? Do you think that is absolute unnecessary? Am I over using the speedlite? I see that is perfectly exposed, but like I said…am I using in a wrong way?
Thanks for your absolute wonderful work and your kindness of sharing all of it with us, it absolutelly has no price! Thanks!
OMG, I am really in love with this lady! And for you Neil, another piece of great teaching. Thank you!
The maximum difference between 1/3 stop adjustments and 1/2 stop adjustments is 1/6 stop…it’s hard for me to accept that cutting things that fine is a big deal…
Neil … somewhere I remember seeing a comparison chart of the ISO, Shutter Speed and Aperture. True to your point that most folks don’t know the relationship between each.
In order to understand this relationship, it would be nice to have a “crib” sheet as a reference and training tool.
Do you have a link to such a chart ?
I’m a bit confused. Is it true that two different lenses leave the same amount of light in at the same aperture setting? What if a lens has more internal “loss” due to more glass?
Neil, thanks for the competent answer. I once again see the engineer in me braking through. ;-)