technique – using lens flare for effect
While lens designers try to minimize lens flare, and we use lens hoods, we can often use lens flare for special effect. Shielding the front element of the lens from direct sun and other strong light sources helps giving a more contrasty image. But letting the lens flare take over in a controlled way, can really give impact. That golden, sun-drenched summery feel to a photograph enhances the mood.
During this recent photo session in Central Park, New York, with a couple, Alli and Scott, the lens flare was quite intentional. But as is usual, there’s a certain progression towards the final images …
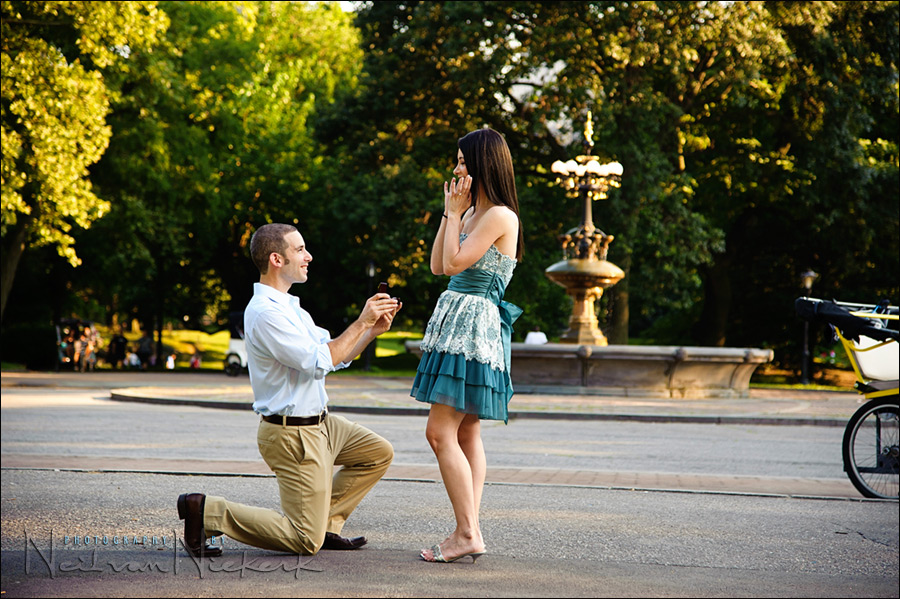
As mentioned in that blog post, for their engagement photo session, Scott wanted to go back to exactly the same spot in Central Park where he had proposed to Alli, and do this fun re-enactment. Cute!
For the initial test shots, I shot up towards the path where the horse-and-carriages would approach. But this meant that the background was constantly cluttered with people and bicycles and of course, the horse carriages. On top of that, the trees were shaded, and gave a too dark background. No separation.
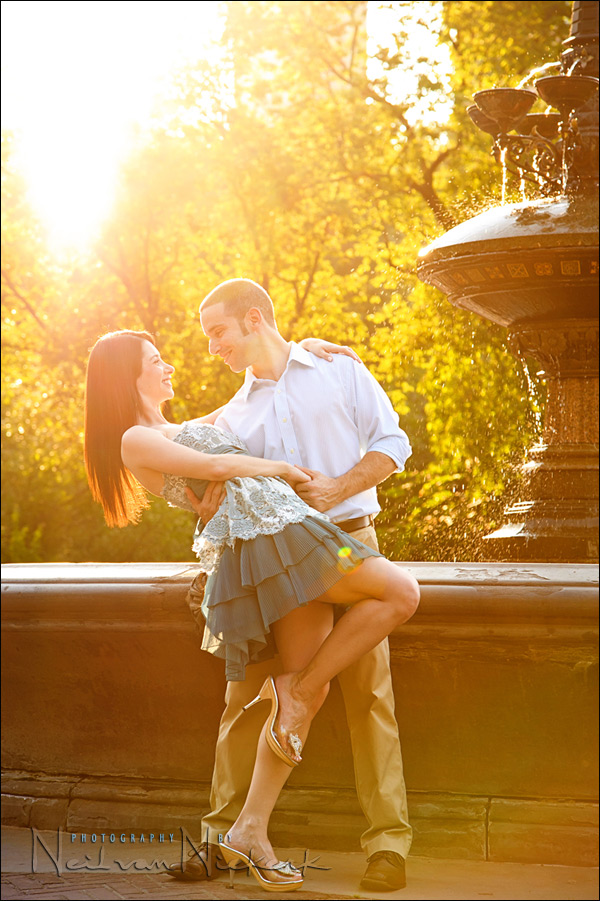
So I decided that we should move to another spot, 90 degrees off to the side from where we were, but still facing the fountain. Now I was shooting directly towards the light. The sun-dappled leaves would create a much brighter background.
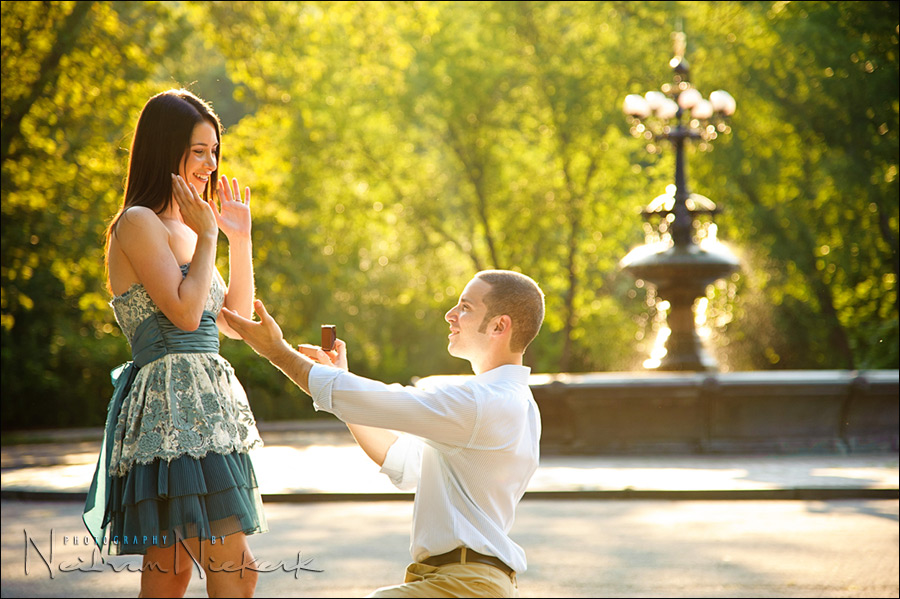
Now we have an interesting image. It just pops, and the background is simple. No clutter.
There is also an important change here, which might not be immediately obvious – I had Alli and Scott change position, with Alli now on the left-hand side of the image. The reason? The way she parts her hair. If you look at the initial test shot, her hair partially obscures her face. Turning her to the other side, leaves her face more open to the camera. This is something I immediately look for when posing a couple where the girl has long hair.
About the lens that was used, it is the new Nikon 24-120mm f/4 VR (B&H). Since this engagement session was the first time I used it, I’ll post some more images in an upcoming review of the lens.
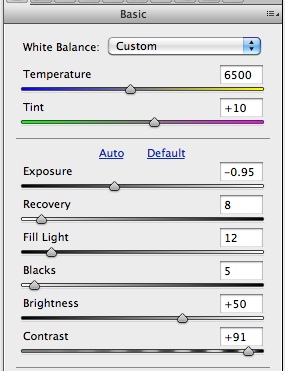
Lens flare reduces contrast, and we need to work with the image a bit to give it some punch again. Looking at the top image again, here is the comparison between the final image as posted here, and the JPG out of the raw conversion.

 |
I used the Oh Snap! action in the Totally Rad action sets, to punch up the image some more, and also pulled the levels down a little bit. |
|
But even before pulling the JPG into Photoshop for that little bit of sweetening, the brute adjustments were done on the RAW file to get to the image on the right. Flare tends to wash out the image considerably, so as usual, I pulled the exposure down a lot, and also pulled the contrast way up. I often adjust the Black Point as well, but not in this case. From here I would generate a JPG, which is then retouched a bit in Photoshop if I feel like it. |
 |
And here we have it – an image which evokes just the right mood – fun, sexy and summery …
Related articles
|
You can order the Totally Rad action sets, |
Wonderful, as usual from Neil.
Excellent food for thought. All these years I have tried to avoid flare at all costs. I can see by this photo as well as others work that he can be quite a useful artistic choice. I am taking aome photos this Saturday and will see if I can incorporate flare into some photos.
Thanks Neil.
I usually do everything in RAW and then export to JPEG. I never really considered doing any sweetening on the JPEG.
As for your lens review, I definitely would be interested in your opinion comparing the 24-120mm f4 to the 24-70mm f2.8. I have wondered if I can replace the 24-70mm f2.8 with the 24-120mm f4.
Does converting the RAW to JPEG and then sweetening mean saving the JPEG twice and potentially losing some info? Is the loss so minimal as to not spend too much time worrying about it?
Great post Neil. The portraits are awesome!
How many hours was this before sunset? Was this just straight natural light?
Just one question. I always assumed a small aperture would generate more flare or does it just create ‘starry’ flares and large apertures like F/4 create larger blurry flares? I love the flare in your shots!
Thank you for posting! I was reading the post the other day about this shoot and was wondering if it was actually lens flare creating that look.
I read your blog everyday, thank you for posting!!!
Cool effect, creative. I wonder how the look would have changed had you shaded your lens? Suppose you wanted backlighting but not the lens flare and not the diffuse, fuzzy, low contrast look that goes along with it? Would shading lens achieve that but cutting down on light hitting lens?
Thanks Neil.
Thanks as always Neil for your great work.
I would love your opinion on the Nikon 24-120 f4 image quality and specifically how it handles for wedding/portrait work. I know you use to say one of your favorite lenses for weddings was the Canon 24-105 so I am eager to hear your thoughts. As I get older and enjoy simplifying things not for laziness sake but to focus more on composition and the moment then fiddling with gear – I would like to reduce the reliance on the 24-70 and 70-200. I am now considering the 24-120 as a nimble main with a couple good primes tossed in (35/85) when I want to shoot wide open. Any thoughts on your experience would be greatly appreciated. I love lens flare by the way. We need to embrace the special character of our glass as an asset. Really love your blog and work. Thanks
Lens flare can appear as a general haze across the picture that lightens it reducing contrast. It can also appear as streaks across the picture or shapes, usually circles, in the picture.
I find similiar tutorial about understanding and how to avoid lens flare when take a shoot… just for share
http://photograpyreview.blogspot.com/2011/10/understanding-lens-flare.html