Timelapse photography project – Commercial properties
Always busy, the most recent project that I was busy with, was for a client who had asked for a way to show their various commercial properties in a dynamic way. I had to help them show their warehouses and buildings in a non-static interesting way. I suggested time-lapse photography, and they accepted my proposal.
With time-lapse I could create a video clip that is dynamic in a way that isn’t possible with stills or even video. Above is a shortened version of the final project.
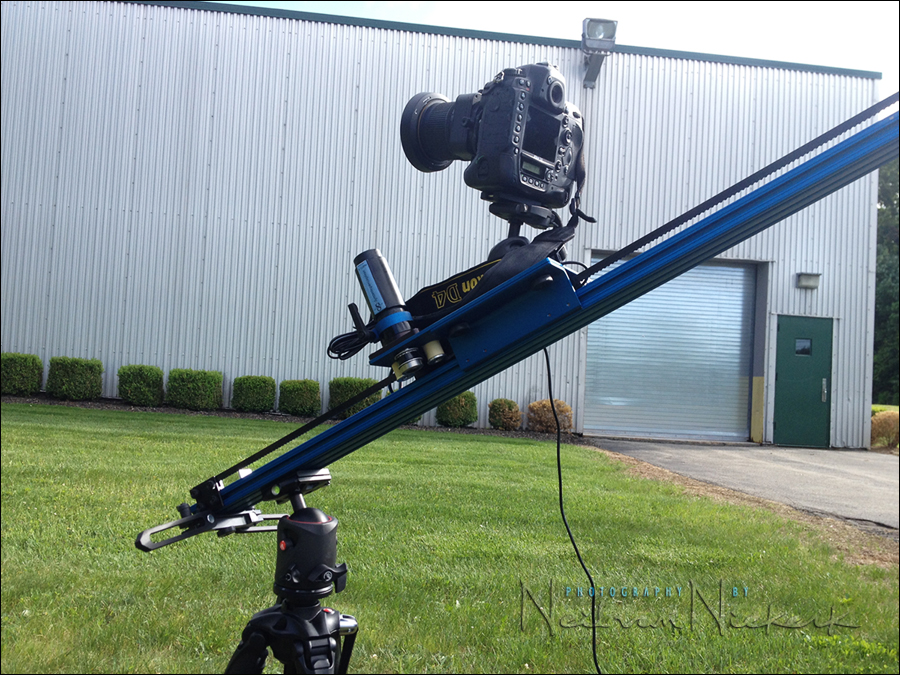
I have created other time-lapse clips with my Nikon D4, which was made easier with the built-in time-lapse mode of the camera. What I envisioned, was that as the day progressed, the shadows would move, and clouds would move. With theDynamic Perception Stage Zero dolly, the camera would move as well, and it would be possible to get a final video clip that had an unusual cinematic quality to it that wouldn’t be possibly any other way.
All of this sounds easy stated like this, but there were a few challenges:
About the video clip
There are a total of 12 sections shown here, each about 4 seconds long. I did tests, and 3 seconds were too short – your eye didn’t quite have time to rest and grasp what you’re seeing. When I did tests, 6 seconds felt a touch too long for this subject. (With time-lapse clips in New York, I felt that 10 second clips were about optimal, because of how busy the street scenes were.) So I decided on 4 second sections. In retrospect, 5 seconds might have been better because of the final video which had cross-fades which took up a tiny bit of time. It’s funny how such short timing durations make a difference.
The opening shot is actually reversed. The sun was going down, and the shadows of the trees rose up against the side of the building. I needed an opening clip, and I thought it would make a great reveal, if played in reverse.
The final clip was an obvious choice for me to use at the end, since it went naturally towards nearly all black. So it was easy to fade out.
There are two sections which for me worked beautifully, with the sun popping in in the left-hand top corner. It held the two clips together, even though the motion changed from L-R to R-L.
Clouds helped when the warehouse looked exceptionally bland. But only if they moved over in the background, and didn’t create long periods of darkened landscape. I lost days of shooting time because of cloud cover and rain. I needed sunshine for these clips, because I needed the movement of the shadows across the building facades.
Most of these clips took between 30 mins to 2 hours for the camera to move. This meant that I preferred to shoot earlier in the day, and in the late afternoon. The shadows moved too slow when the sun was overhead, compared to when the sun was much lower in the sky.
I used fairly slow shutter speeds for most of these – around 1/8th to 1/15th of a second. I wanted any movement in the frame to be as smooth as possible. Even then, some of the trees have leaves which jittered a bit too much for my preference. I did use polarizers and ND filters to get around this.
Which brings us to choice of gear:
Photo gear (or equivalents) used during this shoot
Lenses:
For lenses, I mostly used two lenses. (I’m listing the Canon equivalents along with the actual Nikon lenses I used.)
I started with my trusty Nikon 14-24mm f/2.8G AF-S (Amazon), but it was limiting in that I couldn’t get slow enough shutter speeds, and this lens with its monstrously large front element doesn’t allow polarizers or ND filters. So I bought the Nikon 16-35mm f/4G AF-S VR (Amazon) because it takes a 77mm filter.
The 16-35mm range was quite useful, however, I shot most of the clips with a 24mm tilt-shift lens:
Tilt-shift lenses are invaluable with architectural photography. You’re able to correct for leaning verticals when you shoot upwards. I ended up only partially correcting for this, because the movement of the dolly changed the perspective somewhat. So I settled for a visual “this looks okay”, and would use that setting on the lens.
A side-effect of correcting verticals was that the building is now larger in the frame. Without the tilt-shift lens correcting (even if only partially) for the leaning verticals, the top part of the building would be smaller in the frame. And I wanted to show the building’s facade – so it helped that the building now appeared visually larger in the frame. Somehow I had never thought of tilt-shift lenses in that way, that they’d make the building appear larger.
Tripods:
With this project, I knew I would be shooting over a period of a few weeks, and it would involve lots of driving around. It meant that I wouldn’t be able to have an assistant with me, and I would have to figure out a way of doing time-lapse on a dolly as a one-man show. I quickly realized that I would have to upgrade my tripods if I were going to do this project solo.
Funny thing about gear – as we progress from being mildly curious to obsessed amateur photographers, and perhaps eventually tip over into doing this professionally – we are often stuck with gear we bought as amateurs. Gear that works nicely, but might just be a touch short of being ideal for professional use.
This happened with me and tripods and tripod heads. One or two days into this project, I knew I needed to seriously upgrade what I have. I had three tripods of varying size. I had two larger ones which I had used for the Time-lapse dolly. But I realized what I needed most of all, were two identical tripods that would be supremely easy to set up. Keep in mind that I would have to single-handedly a 6-ft long motorized dolly. I would have to be able to set this all up without looking embarrassingly clumsy.
These are the tripod legs and heads that I settled on – an interesting combination of not-too-heavy, but quite sturdy:
The RC4 quick release is a larger plate, and works beautifully with the motorized dolly. A smaller quick release plate like the Manfrotto Q2 plate was just too small and narrow.
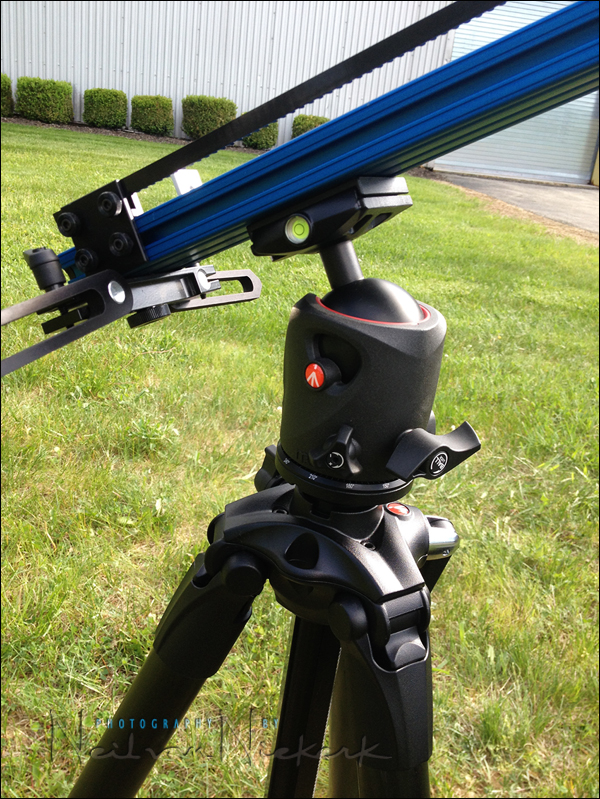
The 057 Magnesium Ball Head was also perfect in that I could use one hand to tighten the ball-head with a flip of a lever, and secure that end of the dolly (clipped into the quick release plate), while leaving the ball-head itself only semi-tensioned. Enough tension to help secure the dolly, but not so tight that it was inflexible to me moving the other end of the dolly still.
Setting up these tripods like this, as a single person, is more difficult to describe in words than actually doing it. These tripods actually made me look less-than-clumsy. I like that. One thing I hate more than struggling with gear, is the appearance that I am struggling. No viral Youtube clip yet of “Guy Struggling with Tripods.” Not this time.
Other extras:
Since a single 5-second clip could take 2 hours to shoot, nevermind setting up and doing short test runs, meant that there were oodles of time that I had to keep busy. So I took my MacBook Air with me, and a WiFi hotspot, so that I could keep working while the camera slowly crawled along the motorized dolly.
To bring the shutter speed down to have more flowing time-lapse sequences, Neutral Density filters and Polarizing Filters are also essential.
Related links
- Camera settings for Time-lapse photography
- More articles on Time-Lapse Photography
- Time-lapse photography tips: Shooting sequences
- Everything you want to know about Time-Lapse Photography, an E-book by Ryan Chilinski
Timelapse photography – a complete introduction
There are several websites that are loaded with information – and then there is this thorough primer on the topic, written by Ryan Chilinski: Everything you want to know about Time-Lapse Photography. (Amazon)
Neil, nice work and great info.
A few questions and a few suggestions: What is your frame rate? What software are you using?
It just seems a bit jumpy and video-like, if you know what I mean. Are you at 24p? Try using frame blending and perhaps even a motion smoother like warp stabilize, mercalli, or twixtor. These on a weak setting will add that touch of ‘cinematic’ smoothness to the movement.
Just a thought, I am a huge fan of your work!
-Joel
I kept it to 30 fps on purpose. I don’t think 24 fps itself would add anything “cinematic” over 30 fps.
I used the built-in time-lapse function of the Nikon D4 which creates the video clip in-camera. No need for all the post-processing of the individual images to create a video file. Then I compiled the individual clips in iMovie. Dead simple.
Some of the jumpiness comes from the way that the cloud shadows would cause a darker frame. Also, cars and people coming in and out of frame does that. Inevitable when you photograph commercial properties.
I did bring the shutter speed quite slow to help minimize that kind of video “stuttering” where motion looks jerky.
Thank you for the recommendations about the software – I will delve into those and see what improvements can be made.
I have debated to do some time laps landscape work but still need the equipment. This looks like it was a fun project but also a ton of work… but well done and better than static shots.
WOW!
Just brilliant…
Hi Neil,
Just a maybe superficial observation. Time lapse makes trees seem rather scary/creepy. The rest of the frame looks great.
-Rich
Yup, there’s a jittery quality to that movement that even slow shutter speeds didn’t quite solve.
Ha, what a fitting time to see this. I just jumped into doing some timelapse things. The Canons don’t have their own internal software for timelapse, so I had to get a third party solution. There are a huge amount of them out there, too. It was tough figuring one out.
Just curious, because I am not that familiar with Nikon, but do you set your exposure at the beginning and you get what you have? Does it have the capability or change the ISO/SS/aperture or do you do that in your initial setup?
You can change exposure (via shutter speed / aperture / ISO) while shooting, but it can look jumpy.
If you’re shooting with Canon, then look into getting the “Bulb Ramper” (also known as Bramper) for your setup. With the Bramper you can adjust the exposure via the Bulb setting, as the existing light becomes brighter or darker. (If interested, I am selling mine, since it only works with Canon.)
Thanks, but I’ve just ordered a triggertrap & a timelapse+. They both do bulb ramping, although, one does it more eloquently than the other.
Hi Neil
Great job. How did you deal with dust on the lens? I just did a time-lapse last month in Pretoria, my first ever. See https://vimeo.com/101226953. Shooting at the sky, with the dusty wind on the Highveld in South Africa was a real pain. There’s not an awful lot that I could do, as the breeze was sometime blowing directly across the lens. So even when I was editing in LR5 afterwards, dust never stayed static on the lens. Painstaking removal was all I could do and in some cases was not successful.
I think the problem you’re referring to is sensor dust – not dust on the lens?
Sensor dust will always be a problem.
First step obviously would be to make sure your sensor is clean, and then to not change lenses as much.
If you shoot individual images to compile the final time-lapse clip, you could do local corrections to clone out dust on groups of images. Also, you can use video editing software like After Effects to get rid of dust in the video during post-production.